- Marketers Guide
- Integration
- Third-party Platform Integration
Amplitude
Airbridge supports integration with Amplitude. With the integration, event data is sent to Amplitude, allowing you to leverage the data from Airbridge for more in-depth product analysis with Amplitude.
Note
Once the integration is complete, the attribution data collected by Airbridge is sent to Amplitude’s US server. If you want the data to be sent the EU server, contact your CSM.
Attention
To implement the integration with Amplitude, choose one integration method between V1 and V2 methods. When using both methods, event duplication may occur.
Airbridge supports 2 different methods for integrating with Amplitude. Select one of the V1 or V2 integration methods. Refer to the table below for details of the V1 and V2 methods.
V1 | V2 | |
|---|---|---|
API | Attribution API | HTTP V2 API |
Pre-setup | Add code snippets into the Amplitude SDK to collect Ad ID (GAID for Android, IDFA for iOS, IDFV) | Add code snippets into the Airbridge SDK to get Amplitude Device ID |
Events that can be sent | All events (Target Events and In-app Events) - Standard Events - Custom Events collected more than once | |
Event properties that can be sent | 12 event properties that are preset | Event properties you select from the 124 properties |
User matching method | Ad ID is used. In case of failure, the Ad ID is discarded after 72 hours. | Identifiers are used in given priority. In case of failure, the user is logged as a new user. |
The V1 method works through the attribution API provided by Amplitude. Airbridge starts sending the Target Event data collected after the integration implementation is complete with Amplitude. The event properties sent to Amplitude are logged as user properties in Amplitude.
Event properties other than the ones of Target Events cannot be sent to Amplitude using the V1 integration method. Implement the V2 integration method to send in-app events and their event properties to Amplitude.
The following steps must be completed to implement the integration through the V1 method.
Refer to the articles from Amplitude's developer guide below and add the required code snippets to the Amplitude SDK.
If the code snippets are not added to the Amplitude SDK before configuring the integration settings in the Airbridge dashboard, the integration won’t be complete.
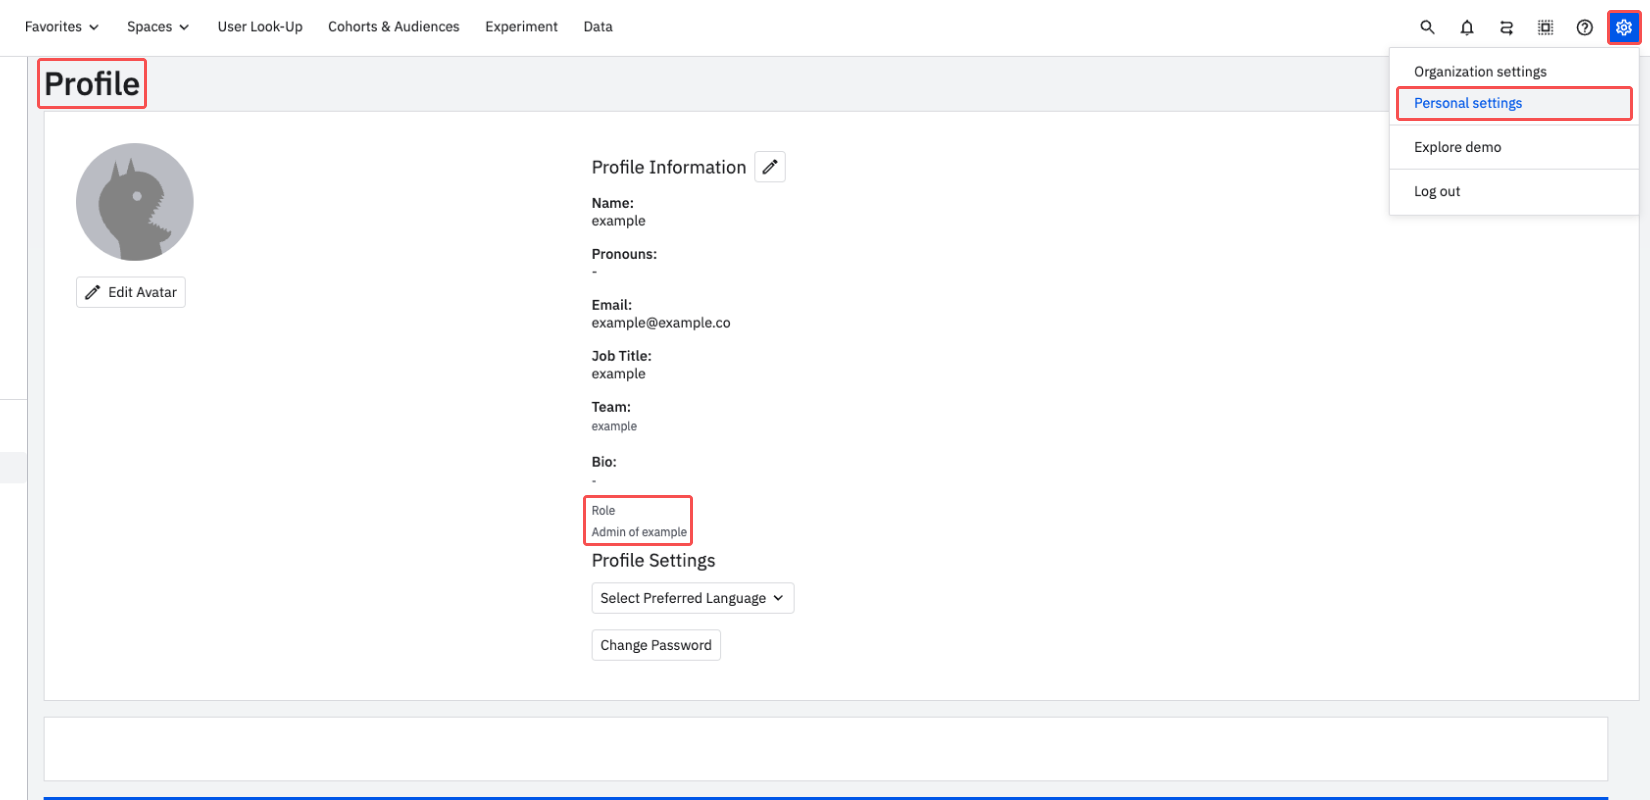
Check the Amplitude account's user role in the [Settings]>[Personal settings]>[Profile] menu in the Amplitude dashboard. You must have the Admin or Manager role to access the API Key in the Amplitude dashboard.
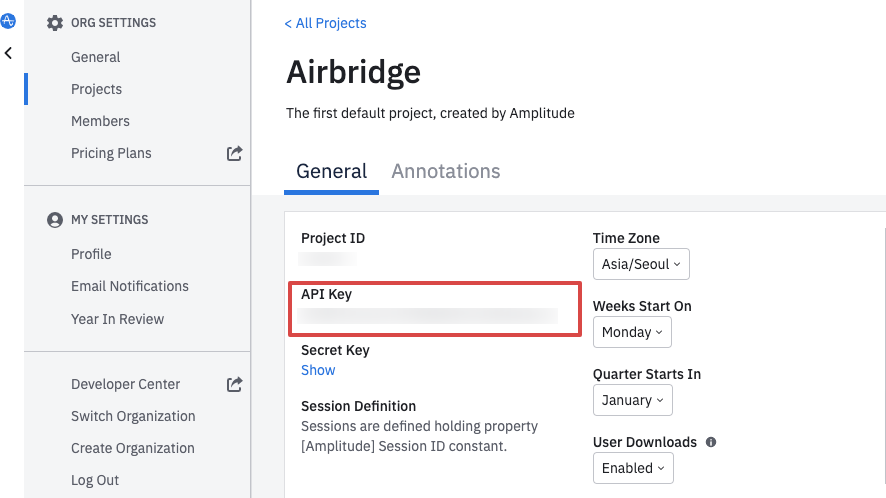
Navigate to [Settings]>[Organization settings]>[Projects] and select the project to import the Airbridge data. In the [General] tab, click Show to view the API Key.
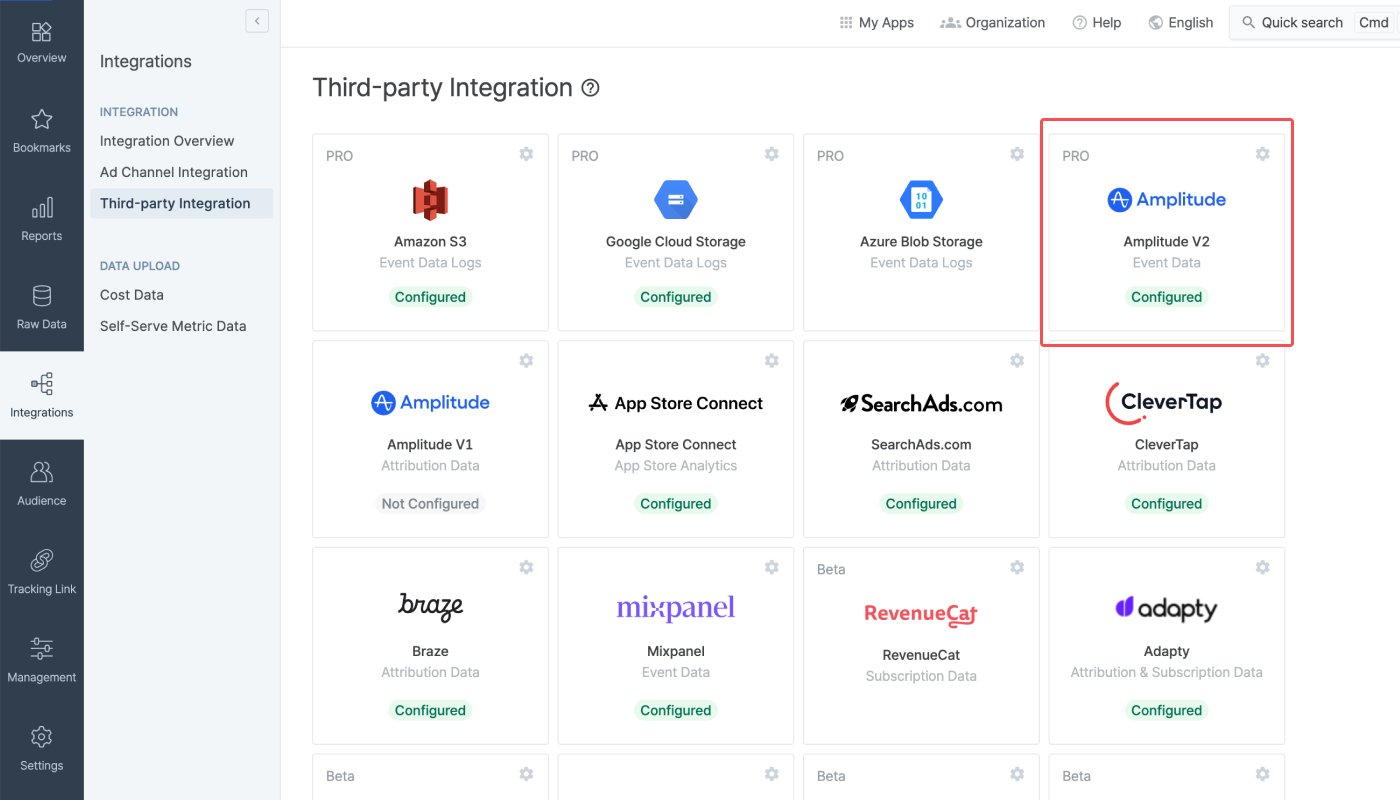
1. Navigate to [Integrations]>[Third-party Integration] and select Amplitude V1.
2. Enter the API Key copied from the Amplitude dashboard.
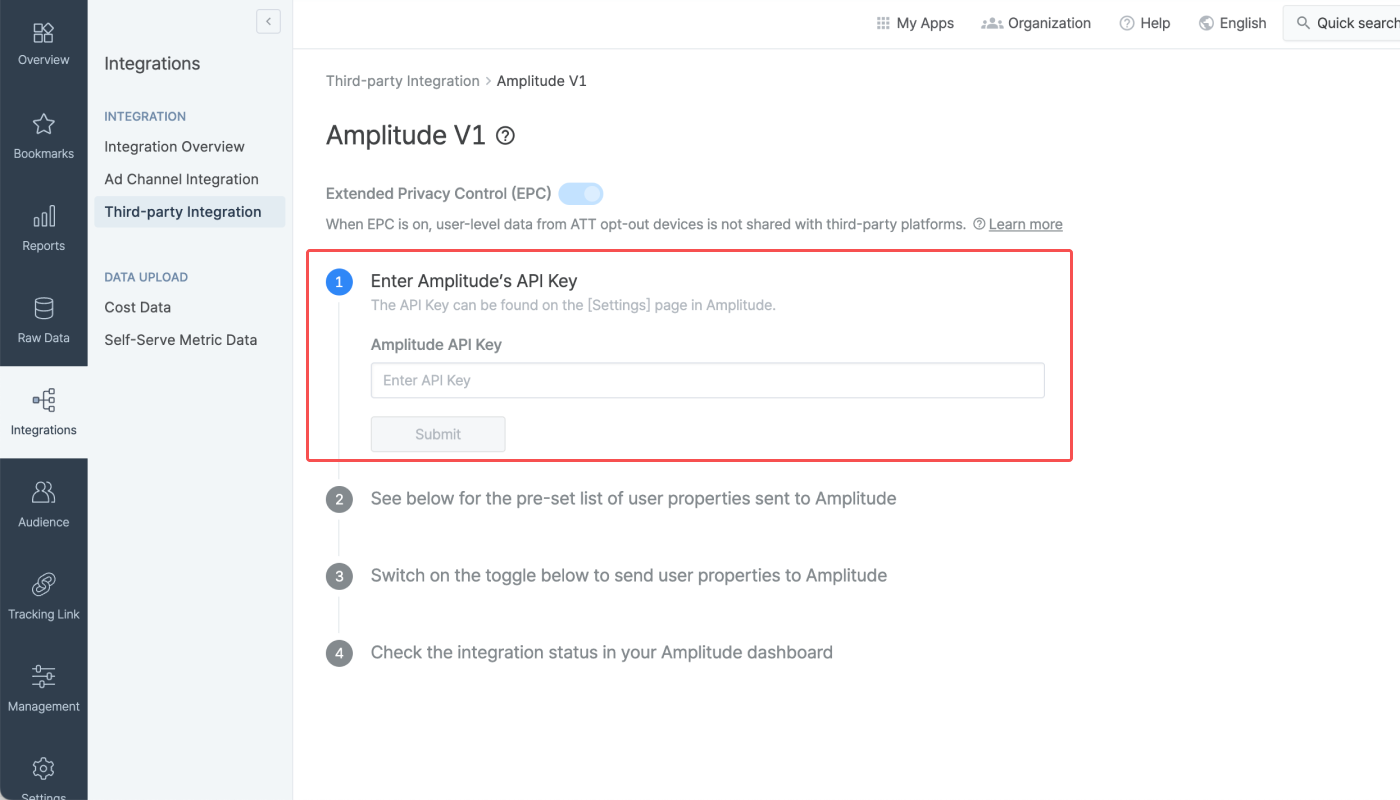
3. Switch on the Send User Properties toggle. The properties of the Target Events will be sent to Amplitude, and the user property names will be prefixed with [Airbridge] in Amplitude.
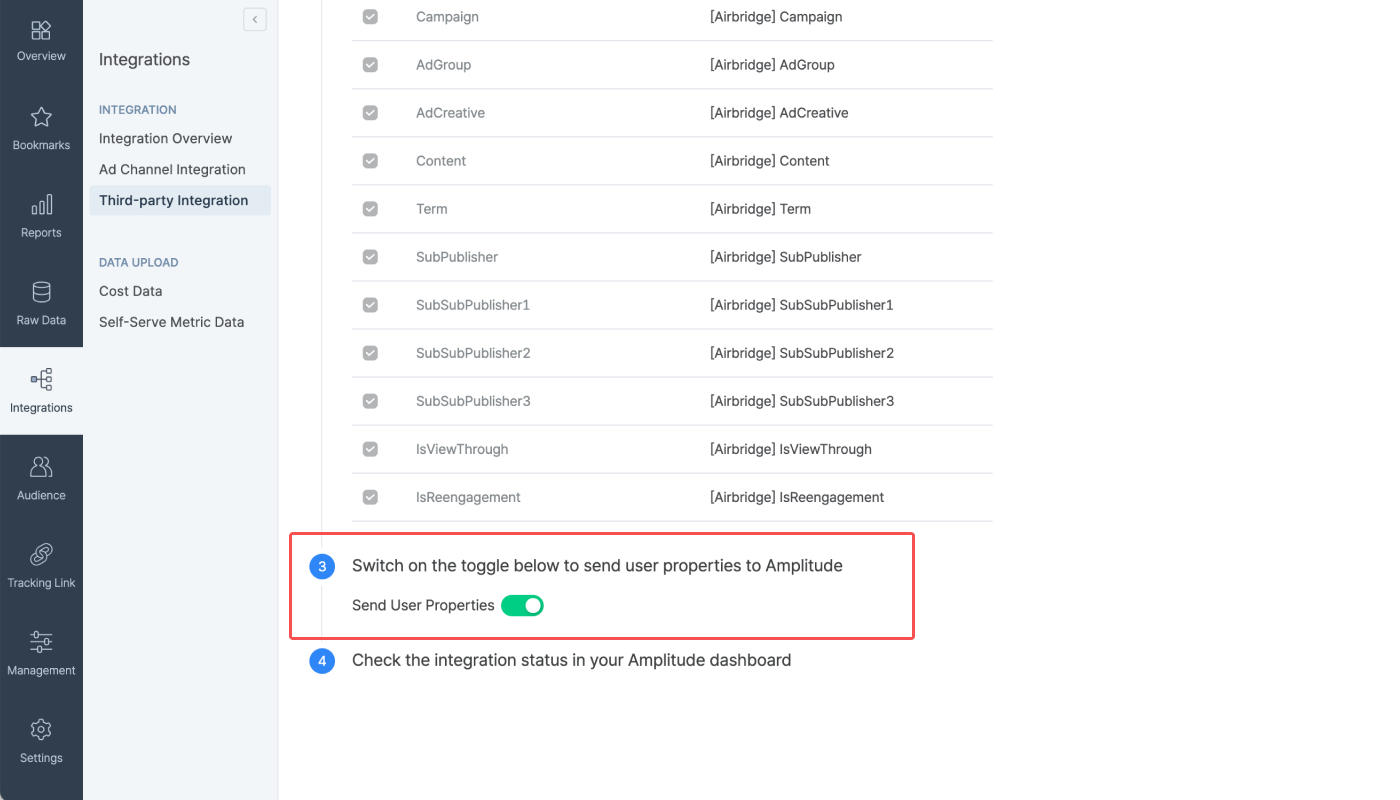
The V2 method works through the attribution HTTP V2 API provided by Amplitude. Airbridge starts sending the Target Event and in-app event data collected after the integration implementation is complete with Amplitude. The event properties sent to Amplitude are logged as user properties in Amplitude.
The V2 method allows sending more event data to Amplitude than the V1 method. Before implementing the integration through the V2 method, check whether the event data you want to send from Airbridge to Amplitude is already being collected through the Amplitude SDK. Note that event duplication may occur if the event data sent from Airbridge to Amplitude is also collected through the Amplitude API.
The following steps must be completed to implement the integration through the V2 method.
Before enabling the integration with Mixpanel in the Airbridge dashboard, the SDK setup must be completed. Refer to the developer guide below.
If the SDK setup is not completed, Airbridge cannot be successfully connected to Amplitude even if the integration is enabled in the Airbridge dashboard.
Check the Amplitude account's user role in the [Settings]>[Personal settings]>[Profile] menu in the Amplitude dashboard. You must have the Admin or Manager role to access the API Key in the Amplitude dashboard.

Navigate to [Settings]>[Organization settings]>[Projects] and select the project to import the Airbridge data. In the [General] tab, click Show to view the API Key.

Attention
Make sure the required code snippets are added to the Airbridge SDK before providing the API Key to the Airbridge dashboard. Otherwise, the integration's implementation will not be complete.
Refer to the following article from the developer guide and share it with your developer.
1. Navigate to [Integration]>[Third-party Integration] and select Amplitude V2.

2. Click Add Connection.
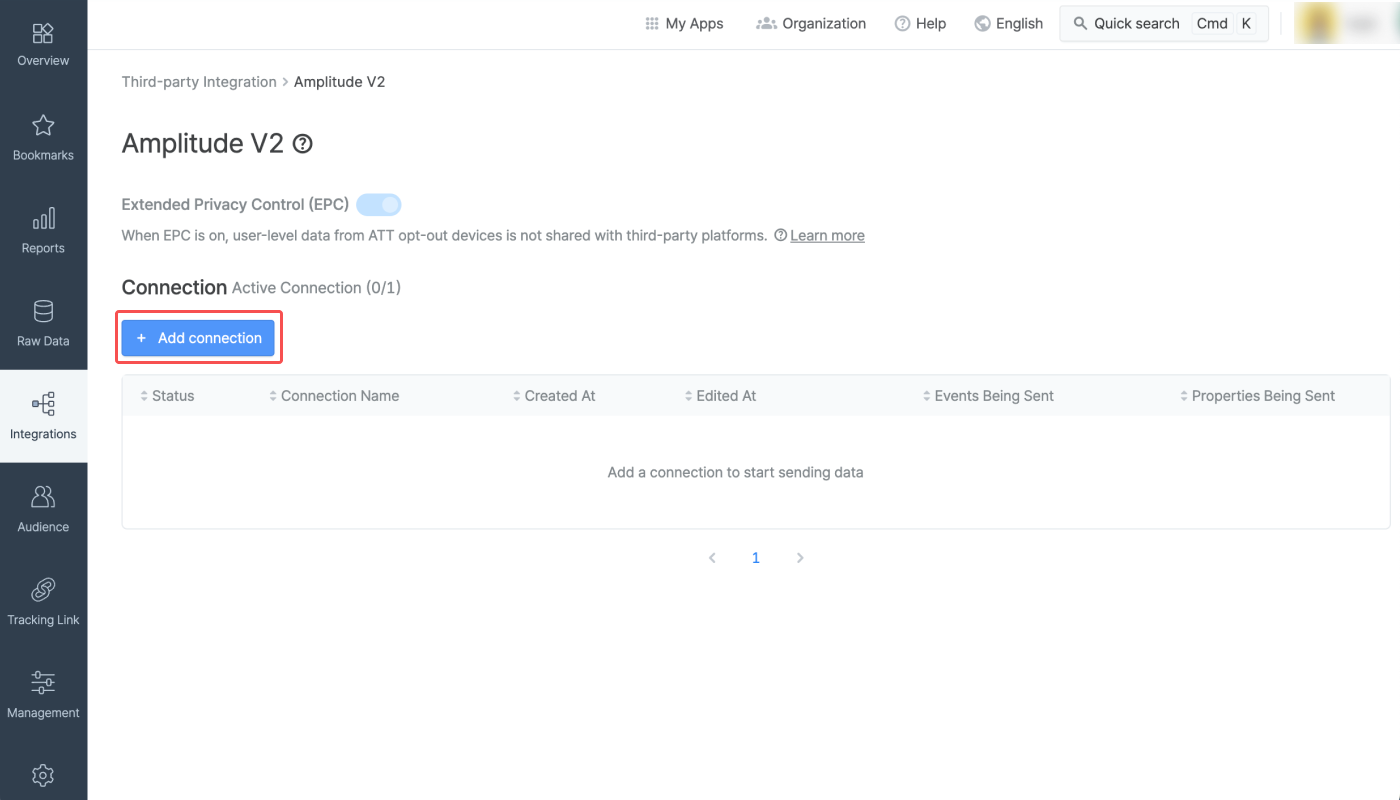
Connections
You can add multiple connections to send events to Amplitude. However, only a single connection can be enabled at a time. For example, if you want to switch to a new connection, you need to disable the current connection and enable the new connection to send data to Amplitude.
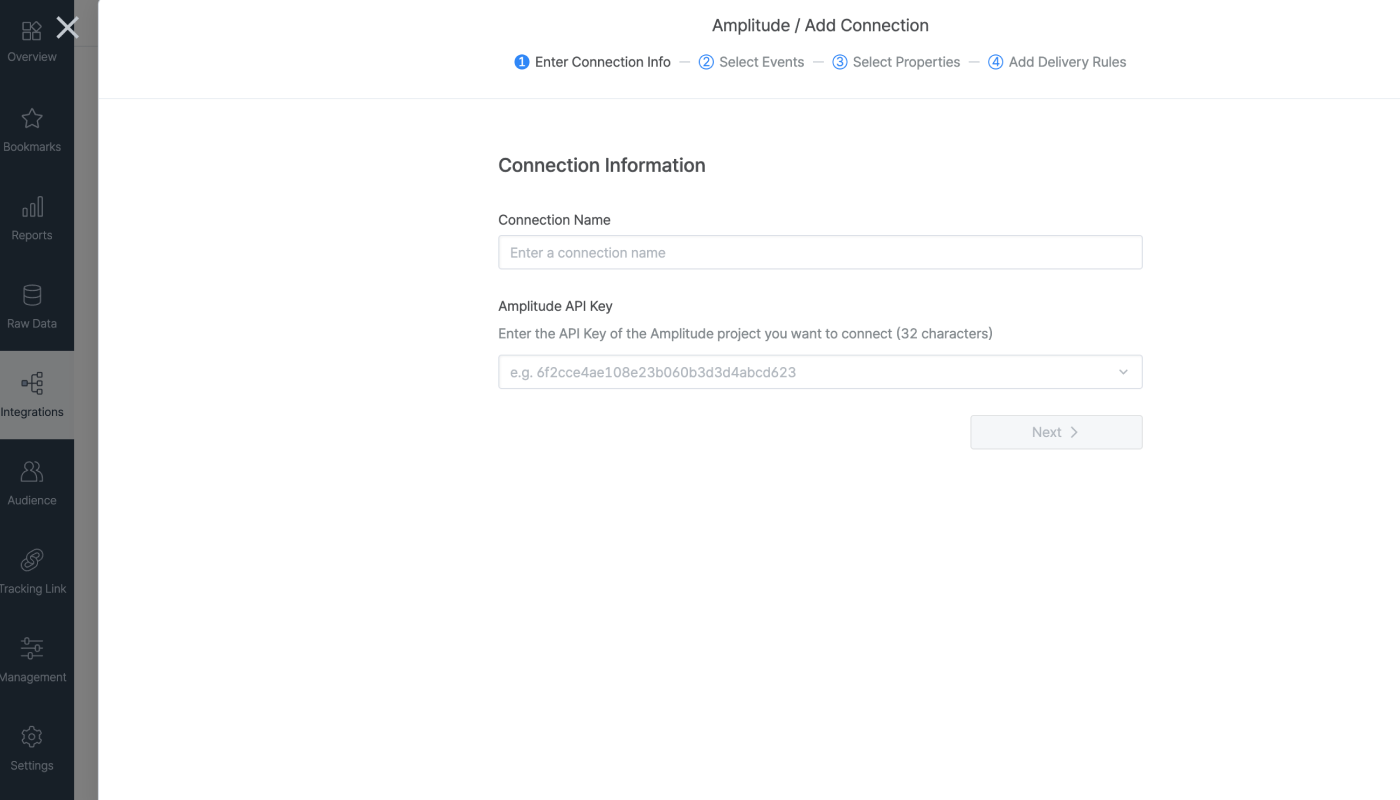
3. Enter the API Key copied from the Amplitude dashboard. If you have registered API keys with Airbridge before, you can also select from the list of already registered API keys.
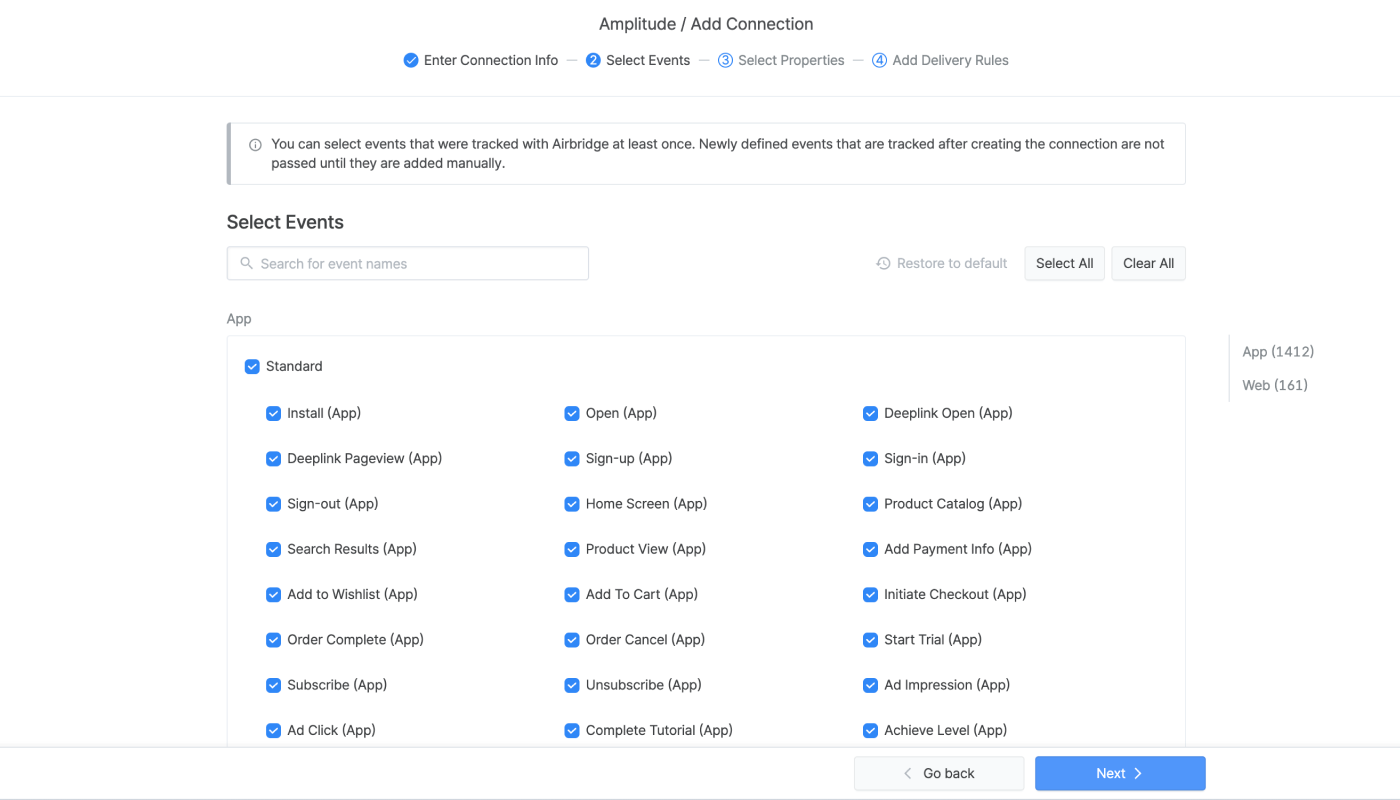
4. Select the events you want to send to Amplitude. All events are selected by default. Click Select All or Clear All to select or clear all events. Standard Events are available for selection by default, whereas Custom Events are available only when Airbridge has collected the event at least once.
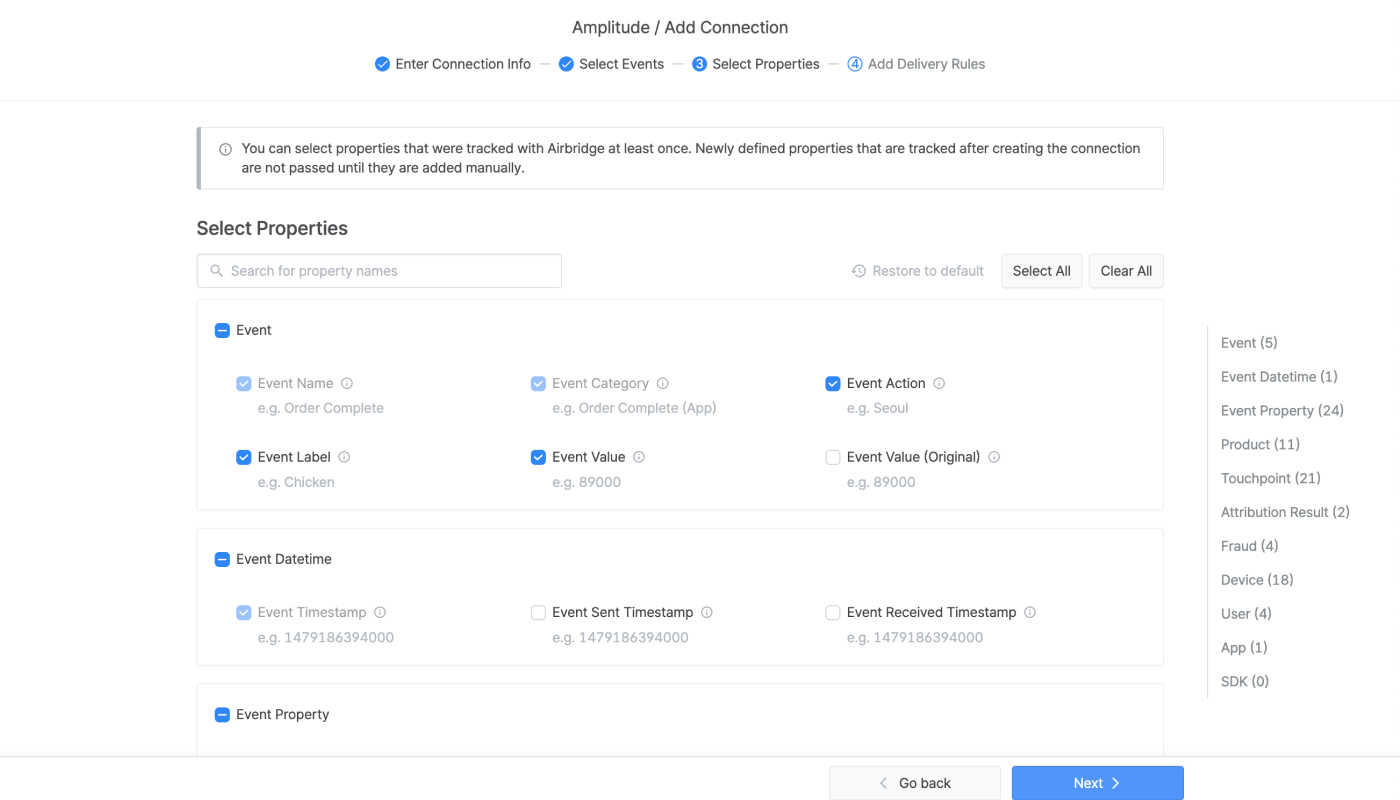
5. Select the event properties you want to send to Amplitude. Click Select All or Clear All to select or clear all events. The following event properties are sent to Amplitude by default and cannot be deselected.
Event Category, Event Timestamp, Device ID, Platform, User ID
Refer to the information below for event properties that can also be used as user properties in Amplitude when imported.
By default, the event properties sent from Airbridge are imported as event properties in Amplitude. There are some event properties, however, that are imported as event properties and also as user properties. In Amplitude, you can use the user properties for data analysis on the user level. The user composition chart, for example, can only be configured using user properties.
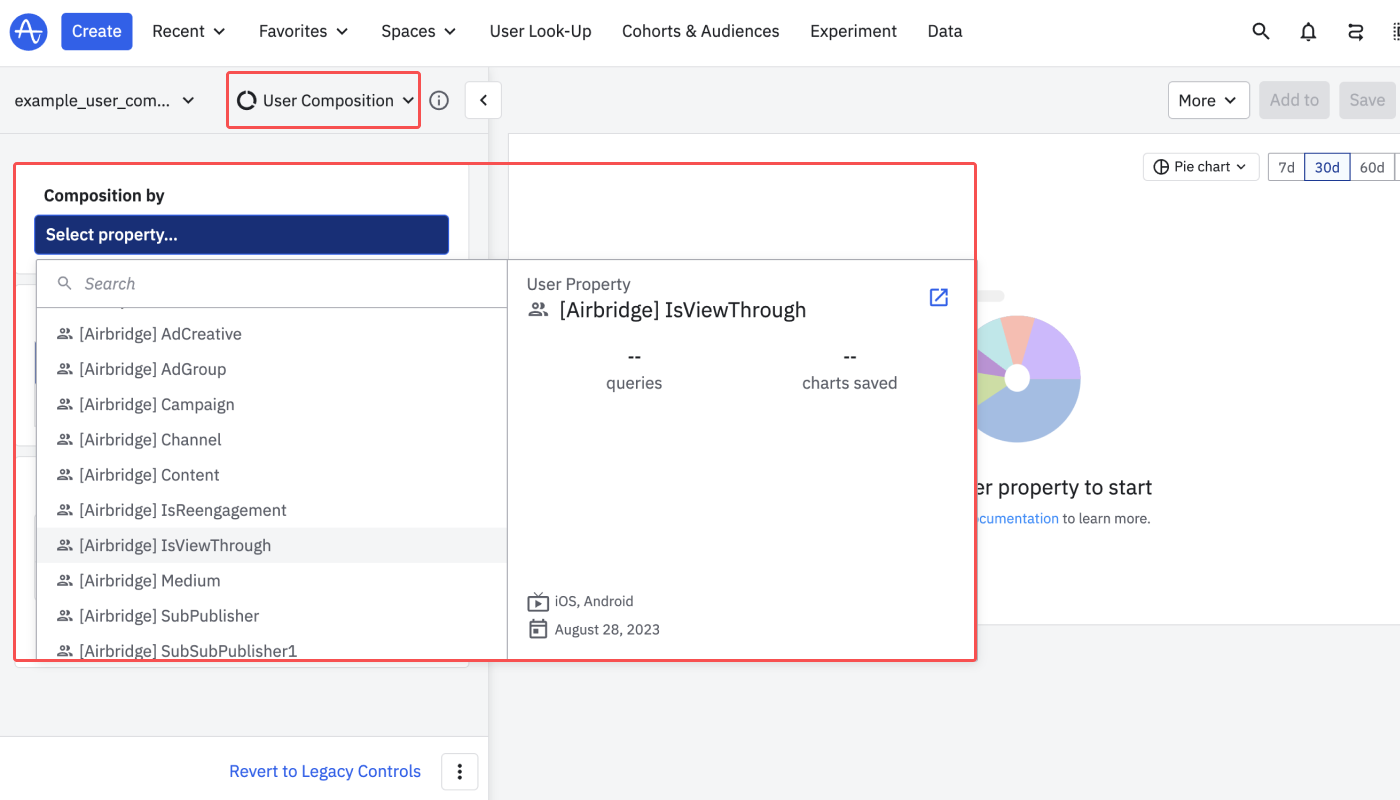
The following Airbridge event properties are imported to Amplitude as event properties and user properties.
Note
When no data is collected,
-is sent to Amplitude as the touchpoint-related properties. For the connections that fall into the following conditions, however, null values are sent as the touchpoint-related properties.
Connections created before 2024-02-29
Connections not activated or not edited after 2024-02-29
Touchpoint-related properties
The table below lists the user-related properties. When no data is collected for these properties, - is sent to Amplitude.
Property |
Description |
|---|---|
Channel | Channel that generated touchpoints and conversions |
Campaign | Campaign that generated touchpoints and conversions |
Ad Group | Ad Group that generated touchpoints and conversions |
Ad Creative | Ad Creative that generated touchpoints and conversions |
Content | Content that generated touchpoints and conversions |
Term | Term that generated touchpoints and conversions, and also refers to ad search keyword |
Sub Publisher | Sub publisher that generated touchpoints and conversions |
Sub Publisher 1 | Level 1 publisher below Sub Publisher that generated touchpoints and conversions |
Sub Publisher 2 | Level 2 publisher below Sub Publisher that generated touchpoints and conversions |
Sub Publisher 3 | Level 3 publisher below Sub Publisher that generated touchpoints and conversions |
Campaign ID | Unique ID for a campaign parameter value that was generated from SAN(Self-attribution Network) |
Ad Group ID | Unique ID for Ad Group parameter value that was generated from SAN(Self-attribution Network) |
Ad Creative ID | Unique ID for Ad Creative parameter value that was generated from SAN(Self-attribution Network) |
Channels that did not attribute to the conversion
The
Channelevent property data is logged as “Unattributed” when the channel didn’t attribute to the conversion, which is an event occurrence, and in this case, “Unattributed” is sent to Amplitude as theChannelevent property.
-is sent as theChannelevent property when no data has been collected.
The table below lists the user-related properties. When no data is collected for these properties, a null value is sent to Amplitude.
Property |
Description |
|---|---|
User ID | User ID of the user who generated a touchpoint and conversion |
Hashed User ID | Hashed User ID of the user who generated a touchpoint and conversion |
User Email | User Email of the user who generated a touchpoint and conversion |
Hashed User Email | Hashed User Email of the user who generated a touchpoint and conversion |
User Phone | Contact of the user who generated a touchpoint and conversion |
Hashed User Phone | Hashed contact of the user who generated a touchpoint and conversion |
Custom User Properties | Custom property |
6. Set the delivery rules for sending event names and install attribution data to Amplitude.
Choose the name format for the events and properties that Airbridge sends.
No [Airbridge] prefix: Event names and property names appear exactly as they appear in Airbridge. This is the default setting.
Add [Airbridge] prefix to event names and property names: Event names and property names appear with [Airbridge] prefix added at the beginning.
You can decide whether to send the attribution data of Install to Amplitude every time the attribution data of the most recent event is sent to Amplitude as user property. Note that the attribution data is the touchpoint property data of Target Events.
Airbridge only sends the attribution data of the most recent Target Event to Amplitude as user property. As a result, the attribution data of the most recent Target Event is available as a user property in Amplitude, allowing you to determine which campaign the user most recently engaged with before opening your app.
Refer to the table below that illustrates the data delivery for a user who performed 5 Target Events.
1st Target Event | 2nd Target Event | 3rd Target Event | 4th Target Event | 5th Target Event | |
Event performed by the user | Install | Deeplink Open | Deeplink Pageview | Reinstall | Deeplink Open |
Attribution data sent to Amplitude as User Property | Install | Deeplink Open | Deeplink Pageview | Reinstall | Deeplink Open |
Every time Airbridge sends the attribution data of the most recent Target Event to Amplitude as a user property, it also sends the attribution data of the Install event. As a result, the attribution data of the most recent Target Event and the Install event is available as separate user properties in Amplitude. This allows you to determine which campaign the user most recently engaged with before recently opening your app and which campaign the user engaged with before installing the app. The attribution data of Installs is displayed in Amplitude as user properties with install_ as a prefix.
Note that when a Reinstall occurs, the attribution data of the Reinstall will be sent instead of the attribution data of the first Install. Refer to the table below that illustrates the data delivery for a user who performed 5 Target Events.
1st Target Event | 2nd Target Event | 3rd Target Event | 4th Target Event | 5th Target Event | |
Event performed by the user | Install | Deeplink Open | Deeplink Pageview | Reinstall | Deeplink Open |
Attribution data sent as user property | Install | Deeplink Open | Deeplink Pageview | Reinstall | Deeplink Open |
Attribution data sent as user property with | Install | Install | Install | Reinstall | Reinstall |
7. Configuring the Additional Delivery Rules is optional. You can create a connection without adding any delivery rules.
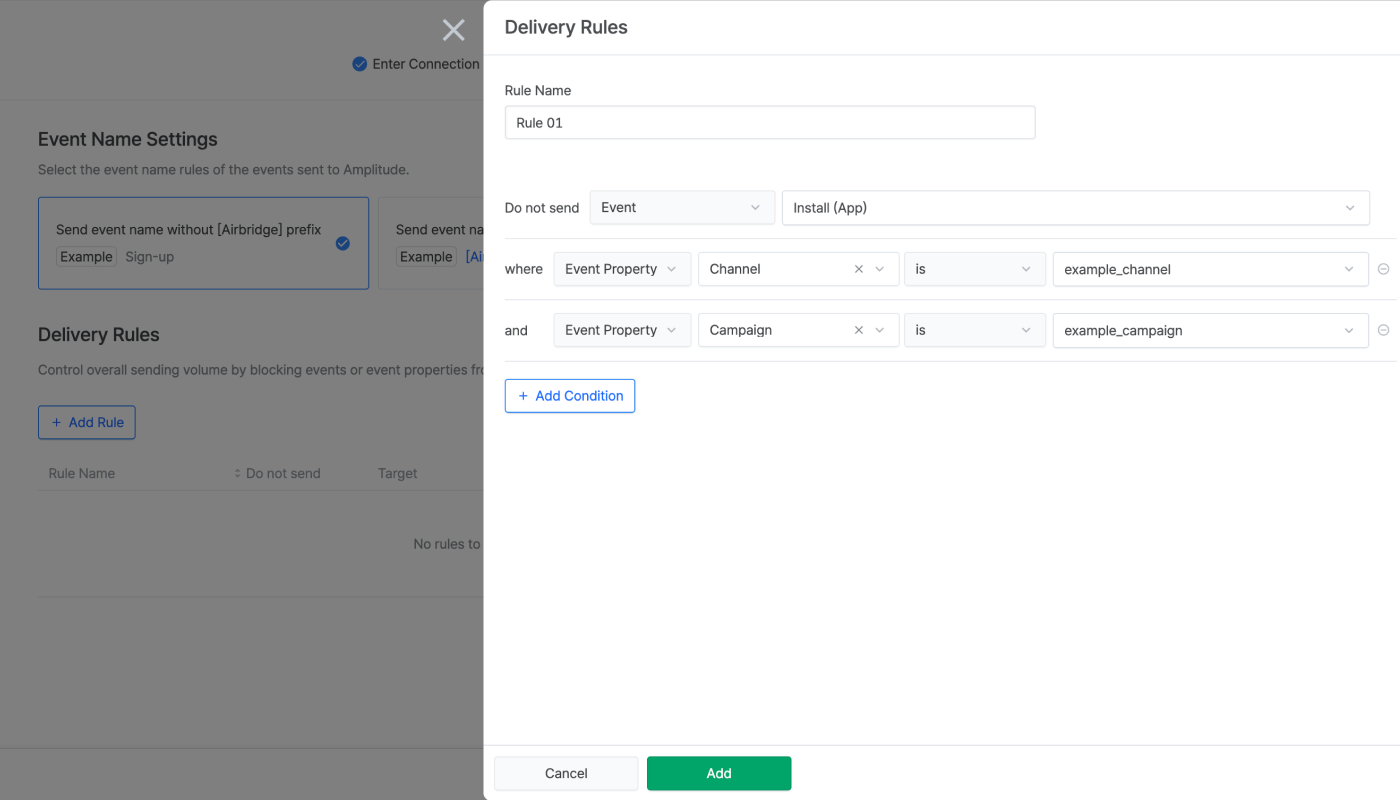
If there are events and properties you don't want to send, click Add Rule, enter a unique rule name, and configure the rule conditions.
You can add multiple conditions to a delivery rule. For example, if the delivery rule has been configured like in the image below, the Install (App) events are not sent to Amplitude if the Channel property is example_channel, and the Campaign property is not example_campaign.
However, you need to add a new rule to configure different conditions for a single event or property.
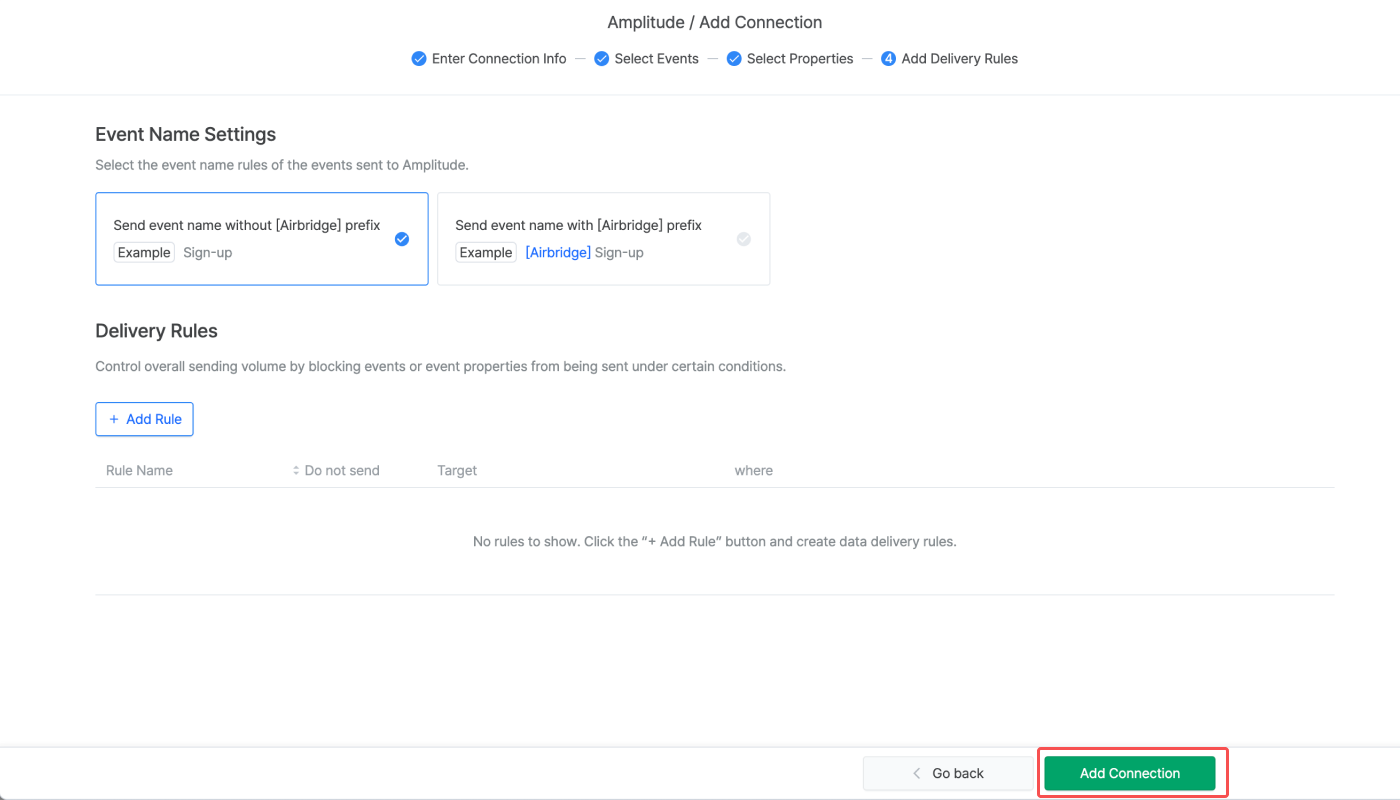
8. Click Add Connection when you are done. Note that the events that are used for configuring the delivery rules cannot be unchecked from the events selector in the [Select Events] step. You must first delete the relevant delivery rule if you don’t want to send certain events.
9. The default status for a new connection is Inactive with the status toggle being switched off. Switch on the status toggle to activate the connection.
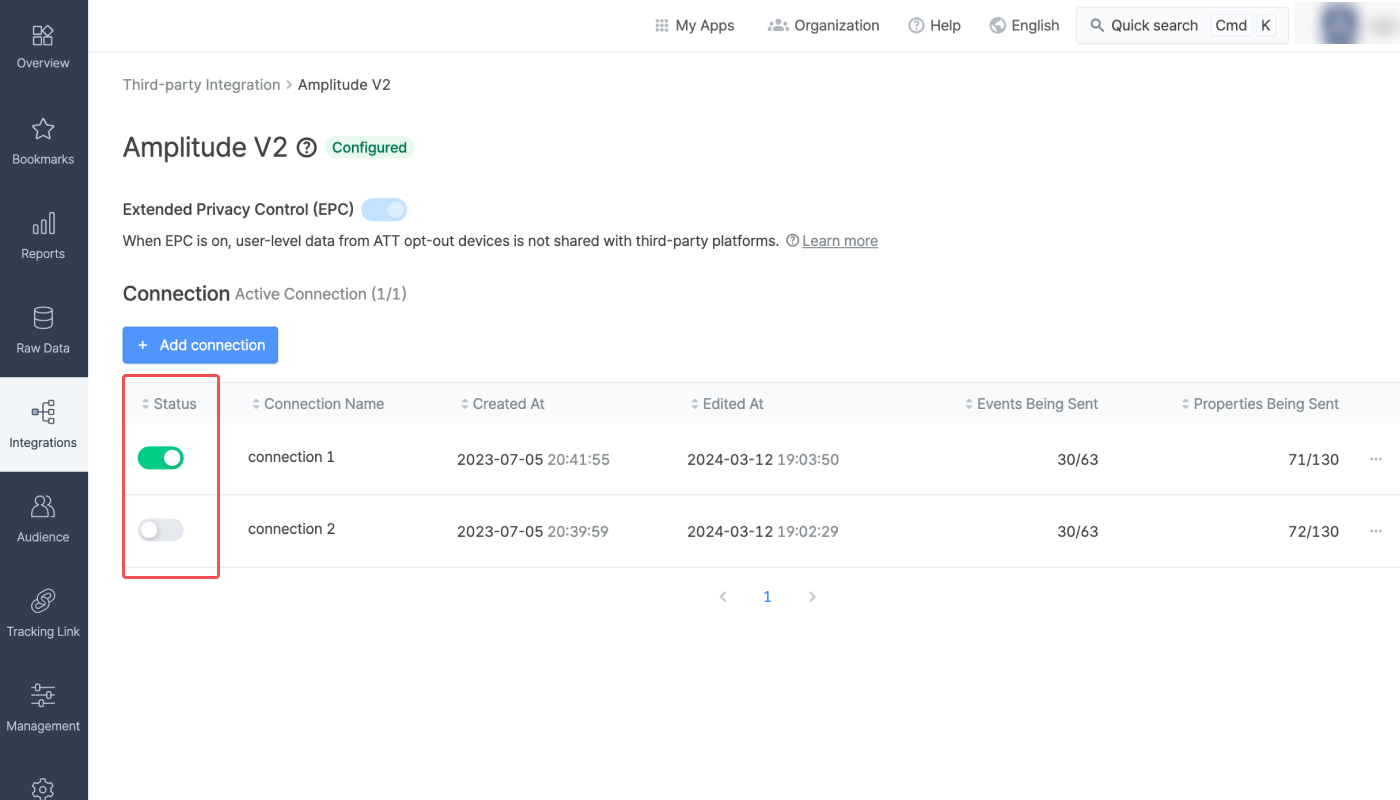
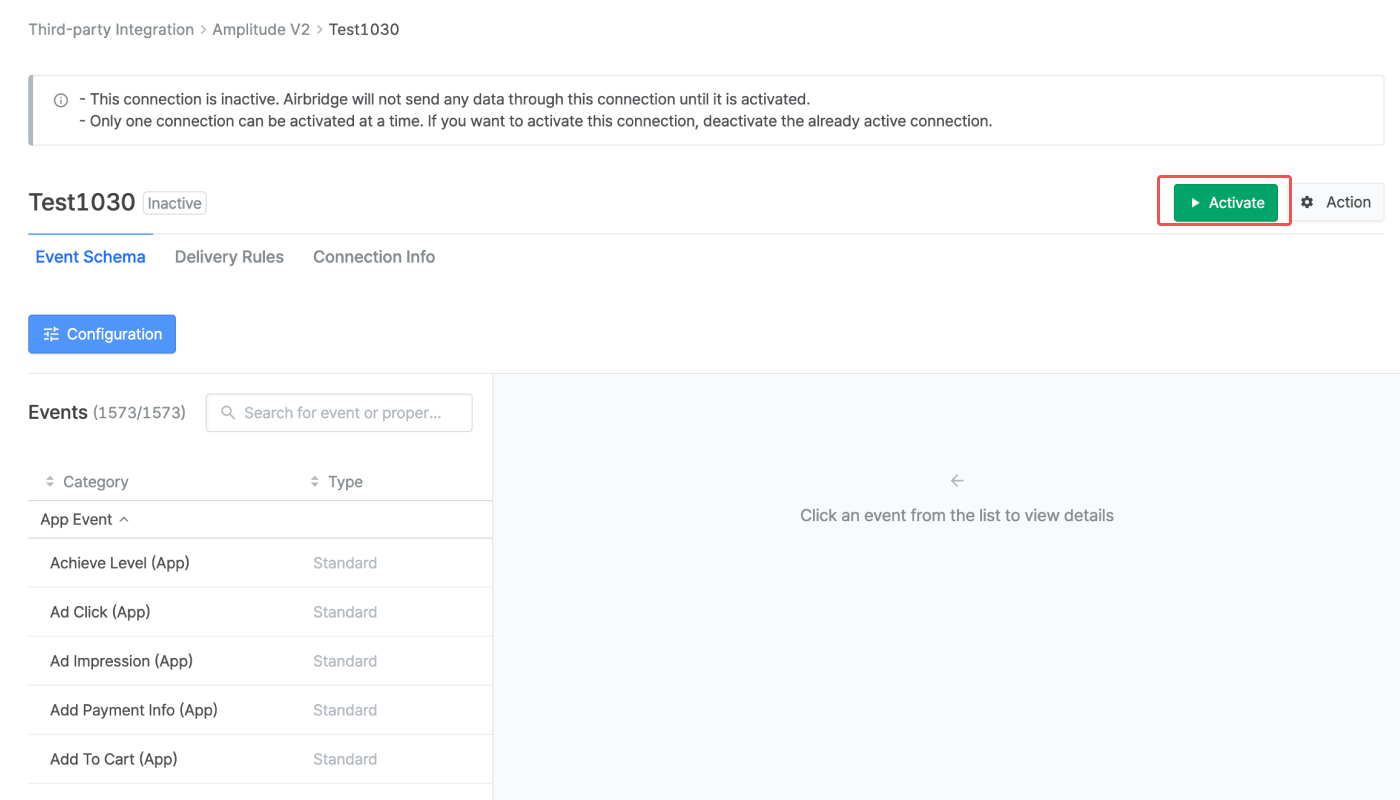
You can also activate an inactive connection by clicking on it and clicking Activate. When activated, the configured events and properties are sent to Amplitude.
Click the connection to edit its connection settings, regardless of whether it is active or not. You can edit the event schema, delivery rules, and connection info. Be cautious when editing the connection settings of an active connection, as unintended events and event properties may be sent to Amplitude.
Click Activate to activate a connection. Airbridge starts sending data upon activating a connection. When clicking Deactivate, data is no longer sent.
The third-party integration status is displayed under the third-party solution name on the [Integrations]>[Third-party Integration] page. Refer to the table below for the integration status types.
Status | Description |
|---|---|
(No message) | No connection has been configured or cannot verify the integration status |
Not Configured | At least 1 connection has been configured but data is not being sent |
Configured | Data is being sent to Amplitude |
Event Schema
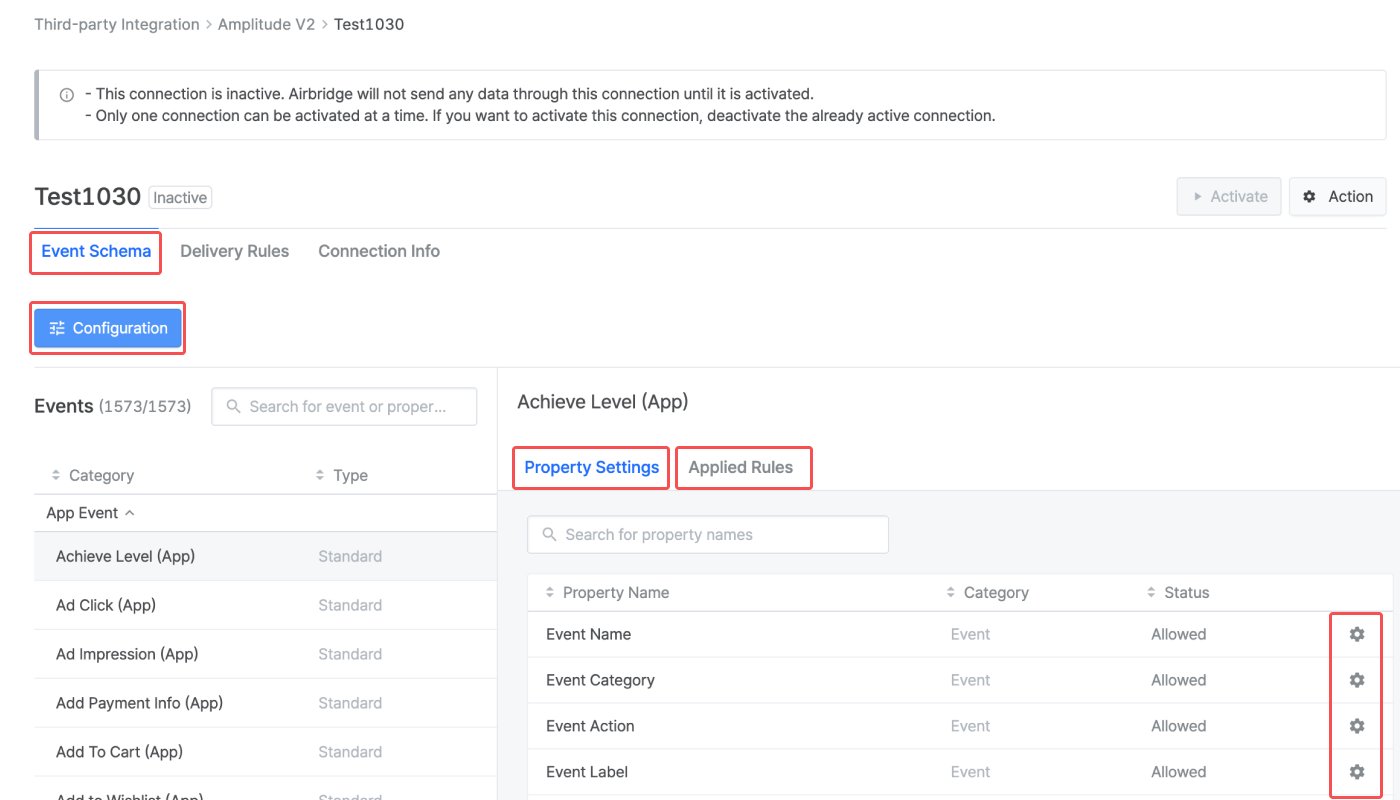
Click Configuration on the [Event Schema] tab page to edit the event and event property selection.
Click an event from the Events list and click the [gear] icon from the [Property Settings] tab. In the [Applied Rules] tab, the delivery rules can be configured at the event level.
Delivery Rules
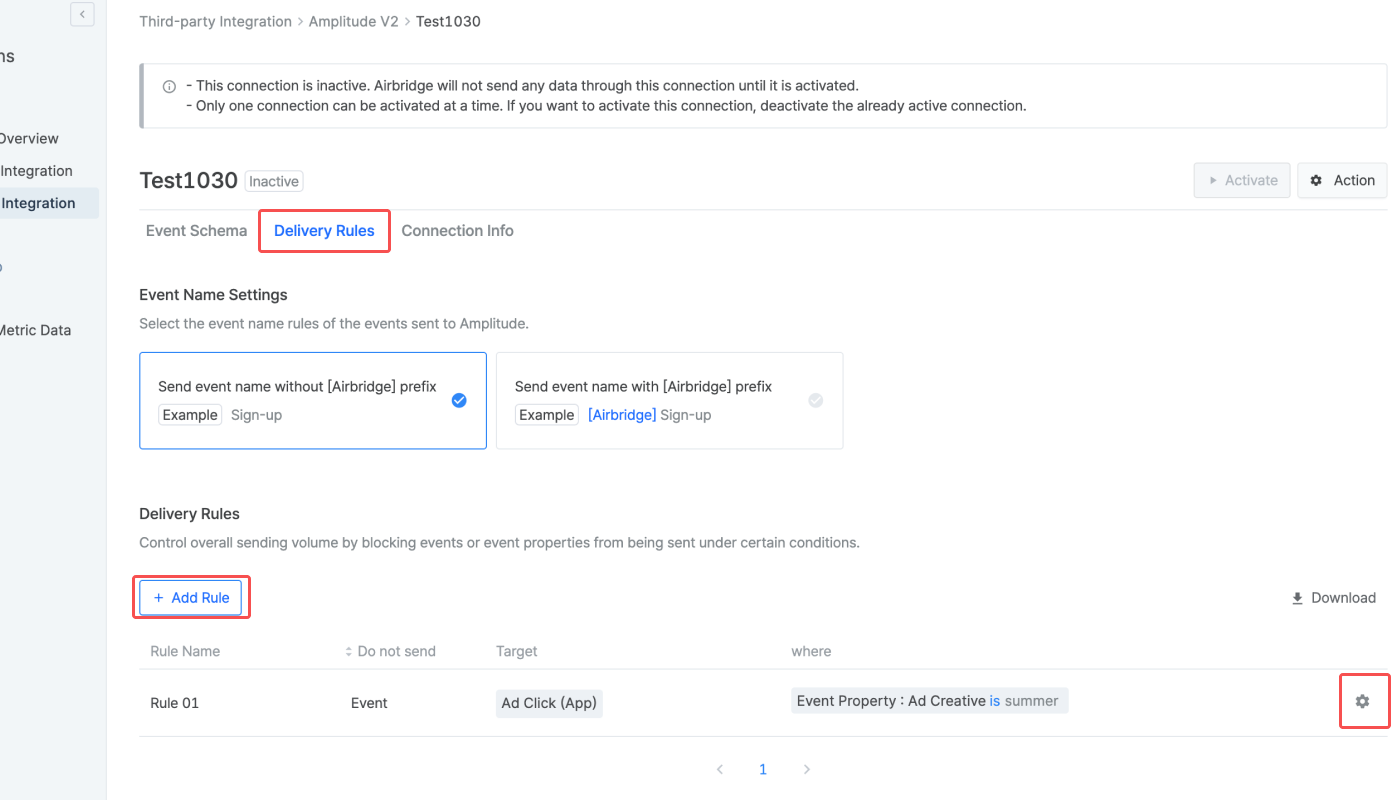
In the [Delivery Rules] tab, view all delivery rules applied to the connection. Click Add Rule to add new delivery rules. Click the [gear] icon to edit the rules. Click Download to export the delivery rules as a CSV file or Google Spreadsheet file.
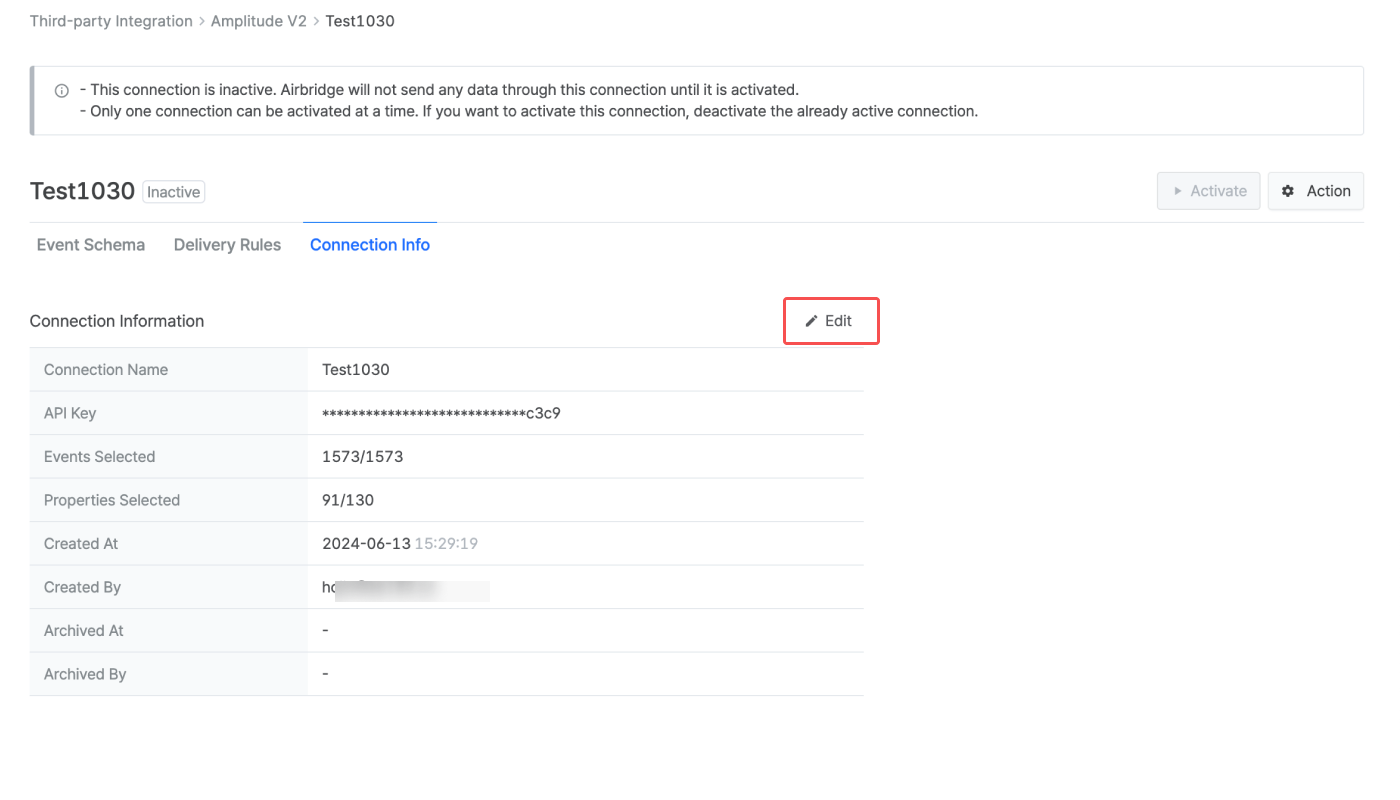
In the [Connection Info] tab, you can see the connection details. Click Edit to edit the connection name and the credentials used for the integration. The credentials are not fully disclosed.
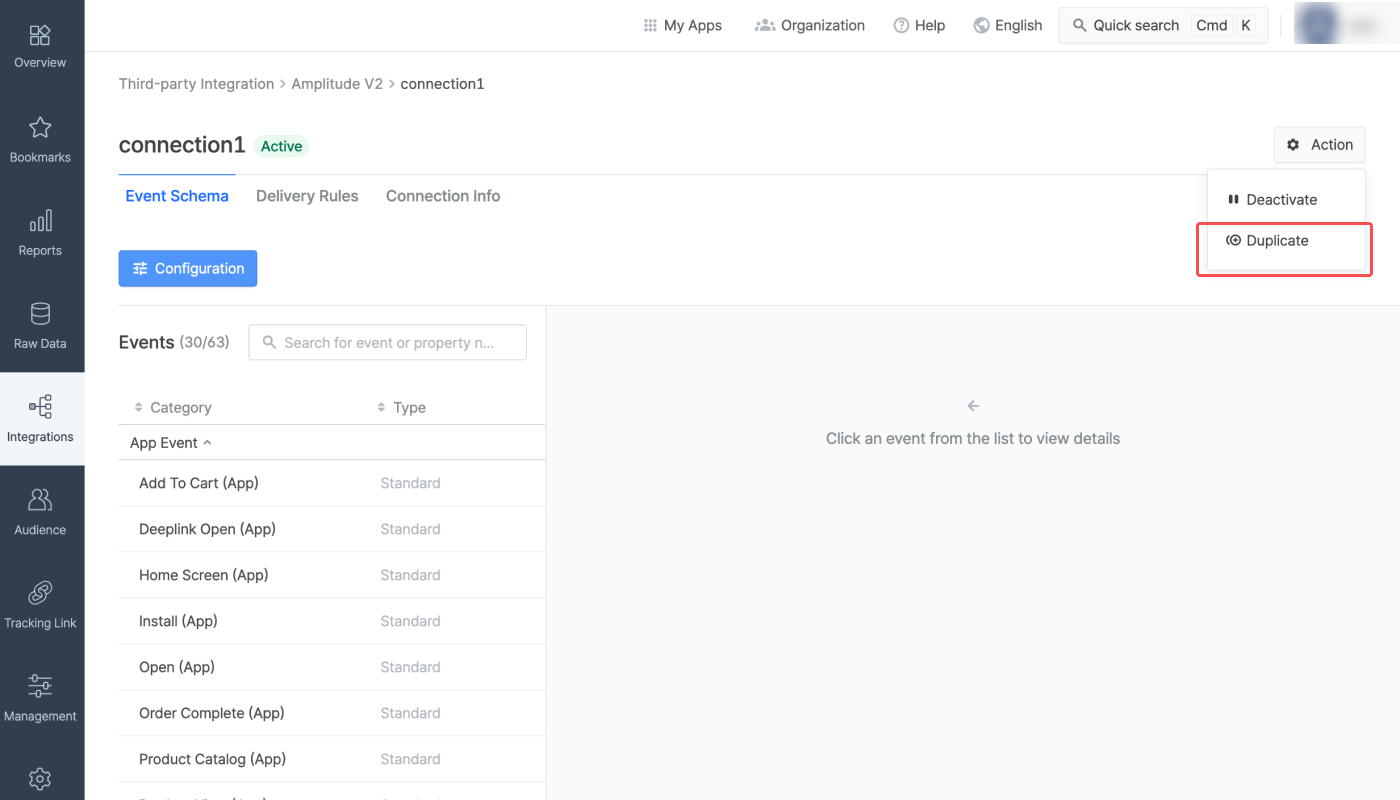
Click Action and select Duplicate to duplicate connection settings to create a new connection with a new connection name.
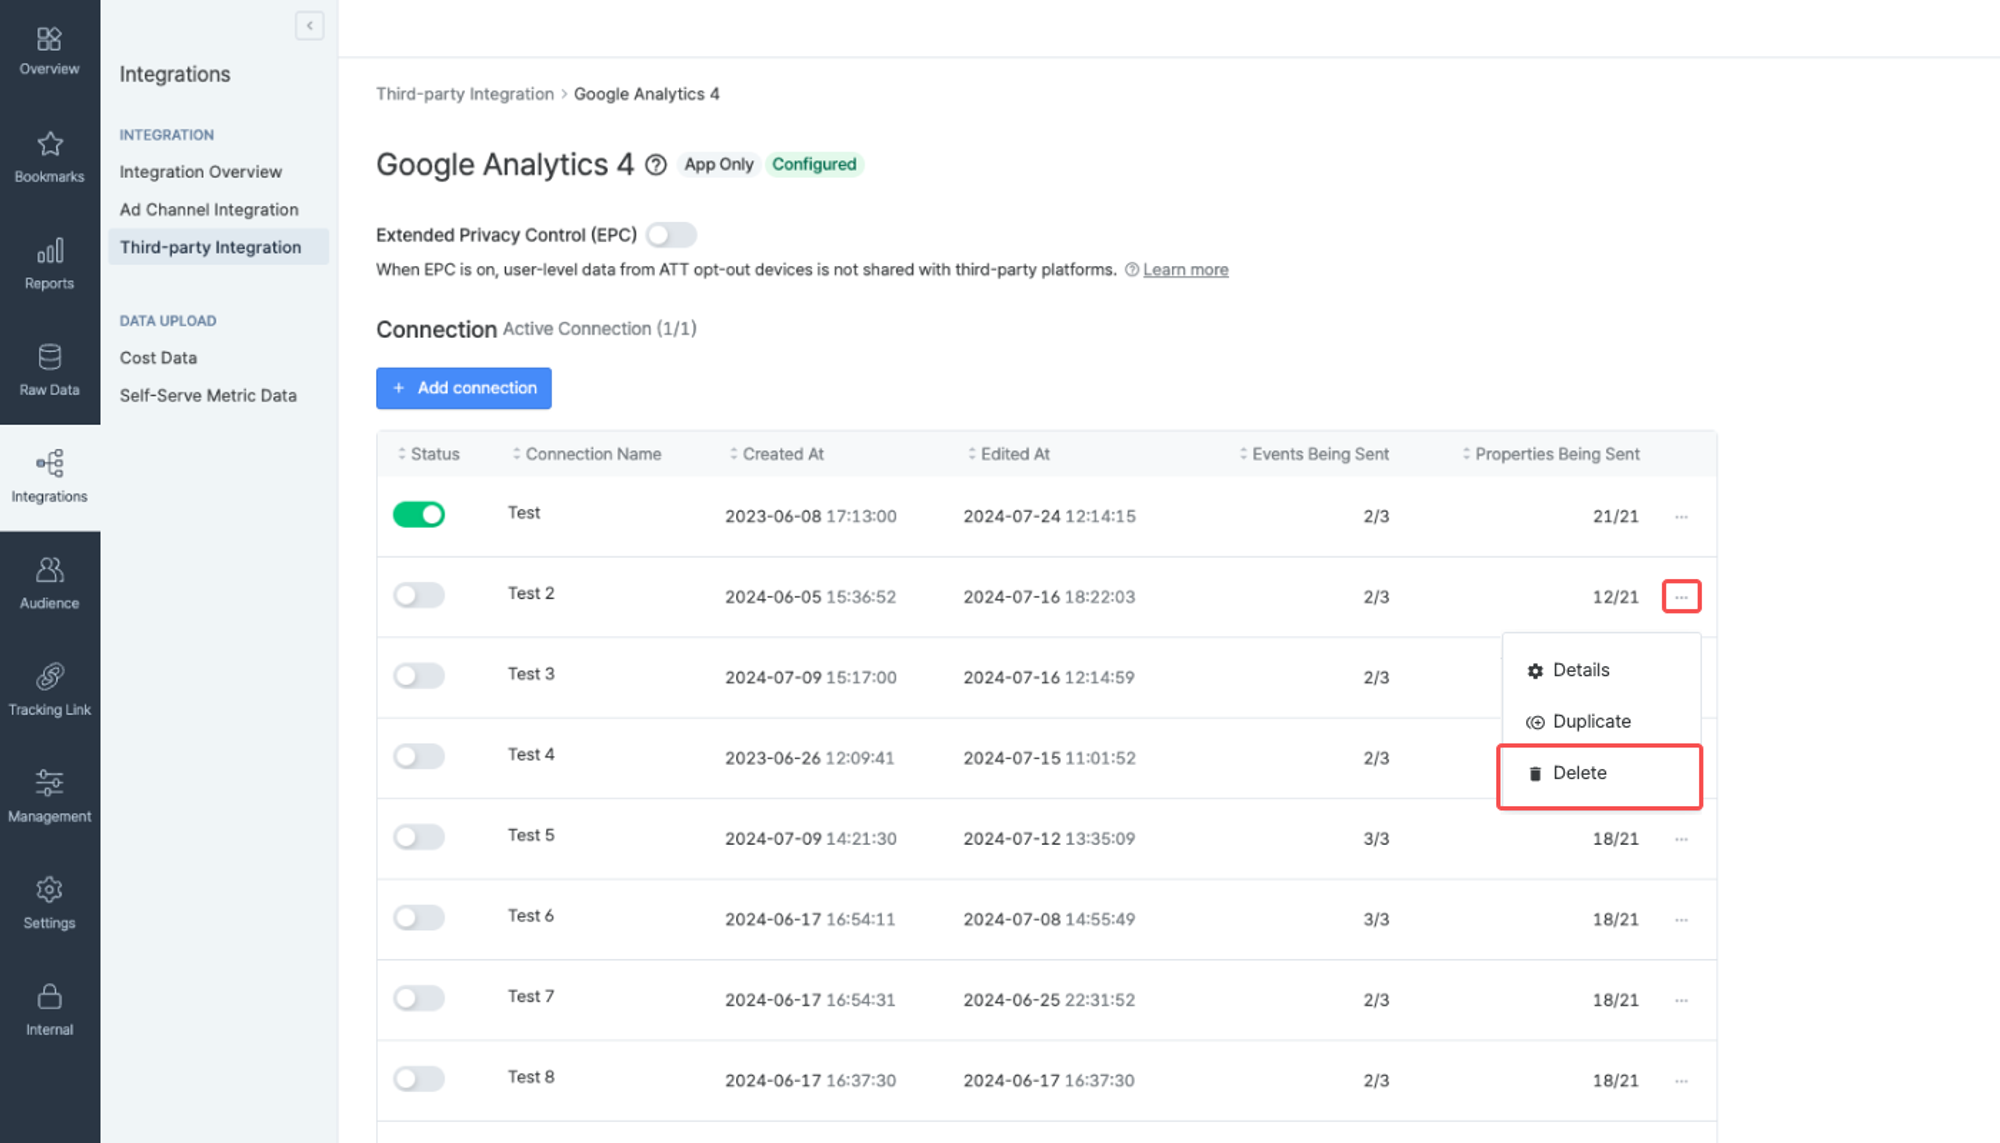
Click the [...] icon and select Delete to delete a connection. Active connections cannot be deleted. Deactivate the connection first to delete it.
Once the integration is successfully implemented, Airbridge data is made available in Amplitude.
The user properties sent from Airbridge using the V1 integration method have their names prefixed with [Airbridge]. The events sent from Airbridge using the V2 integration method will have their names prefixed with [Airbridge] only when configured to do so.
Refer to the information below to learn how to use Airbridge data in Amplitude.
In [User Look-Up], the Airbridge events and properties can be viewed at the user level.
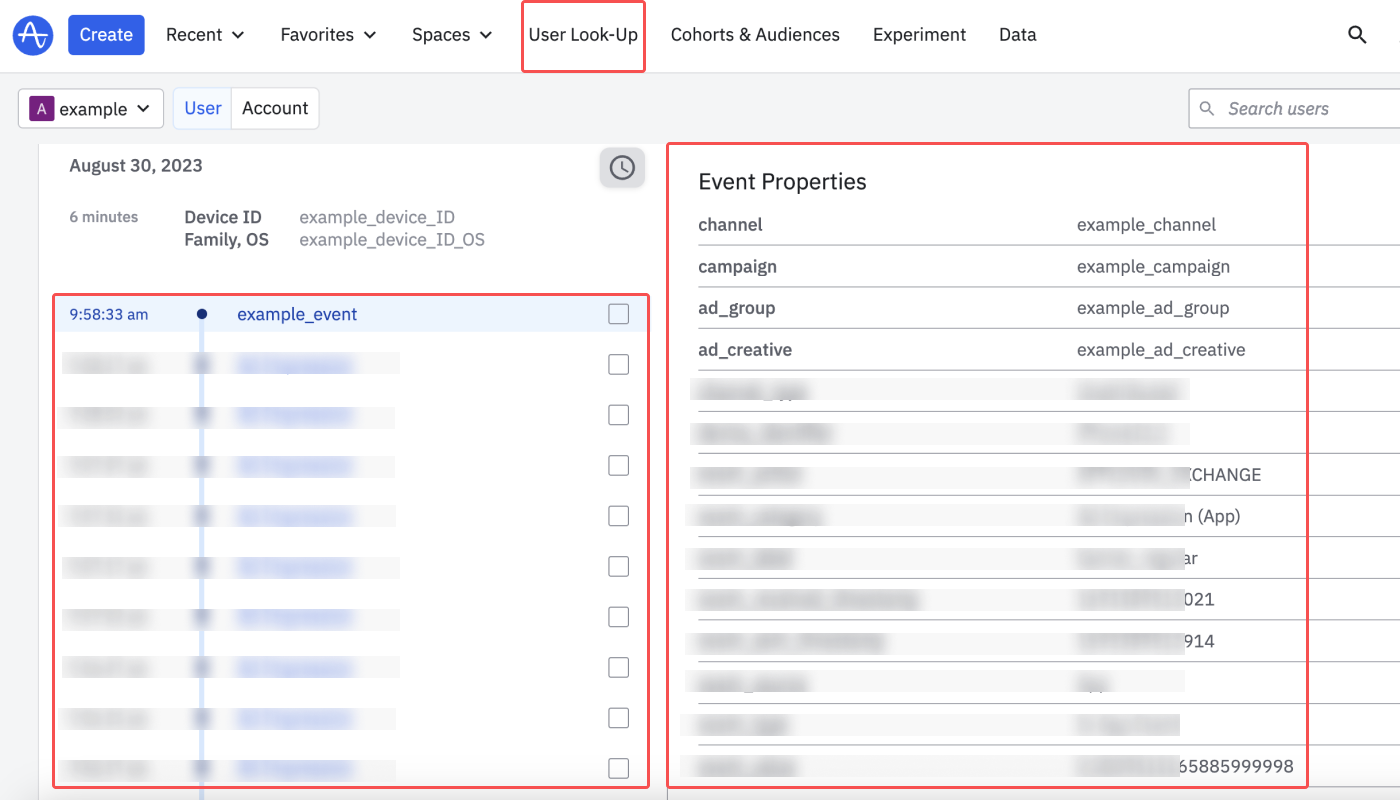
Make use of the Airbridge event data when creating charts in Amplitude. Refer to the information below to learn how to use the Airbridge event data when creating an Event Segmentation Chart in Amplitude.
Select events
Click Add Event or Metric and select an event from Airbridge events. Unless the Airbridge events have been assigned to a specific category, the Airbridge events are under the category, Uncategorized or Unexpected.
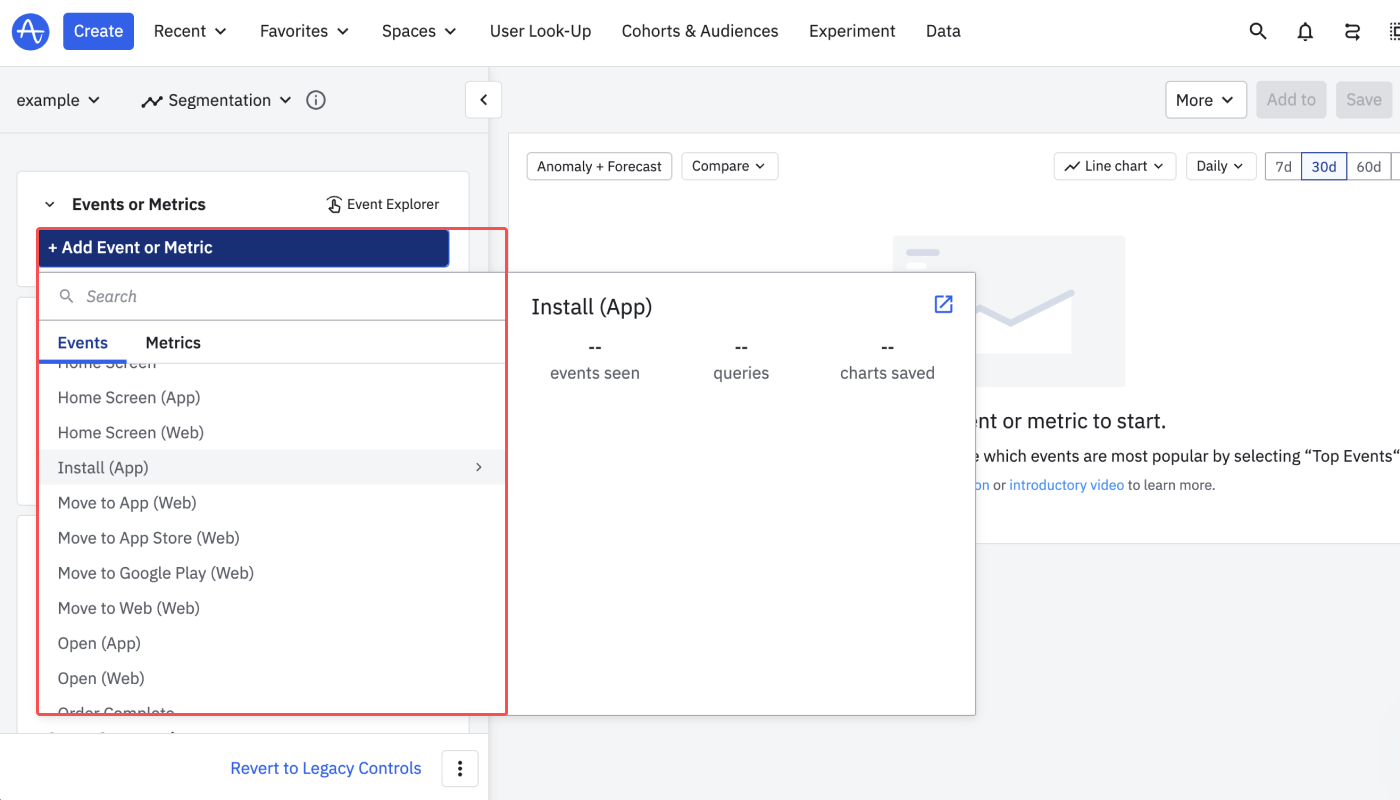
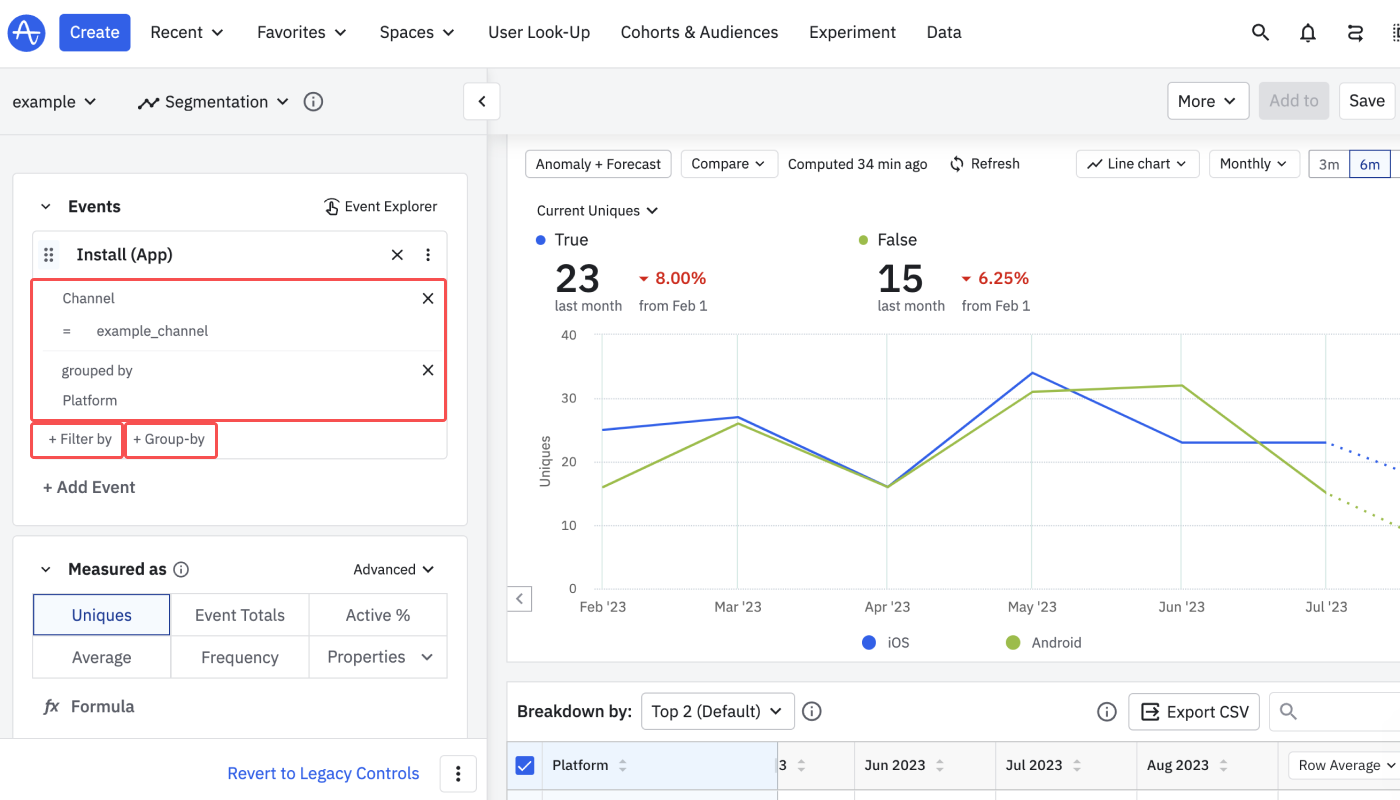
The event property of the selected event can be set as a filter or a GroupBy. Click Filter by to view the metric data of a specific event. Click Group-by to view the data into specific groups.
For example, if the chart has been configured like in the image below, you can visualize the Install (App) event data with the channel property being example_channel by different platforms.
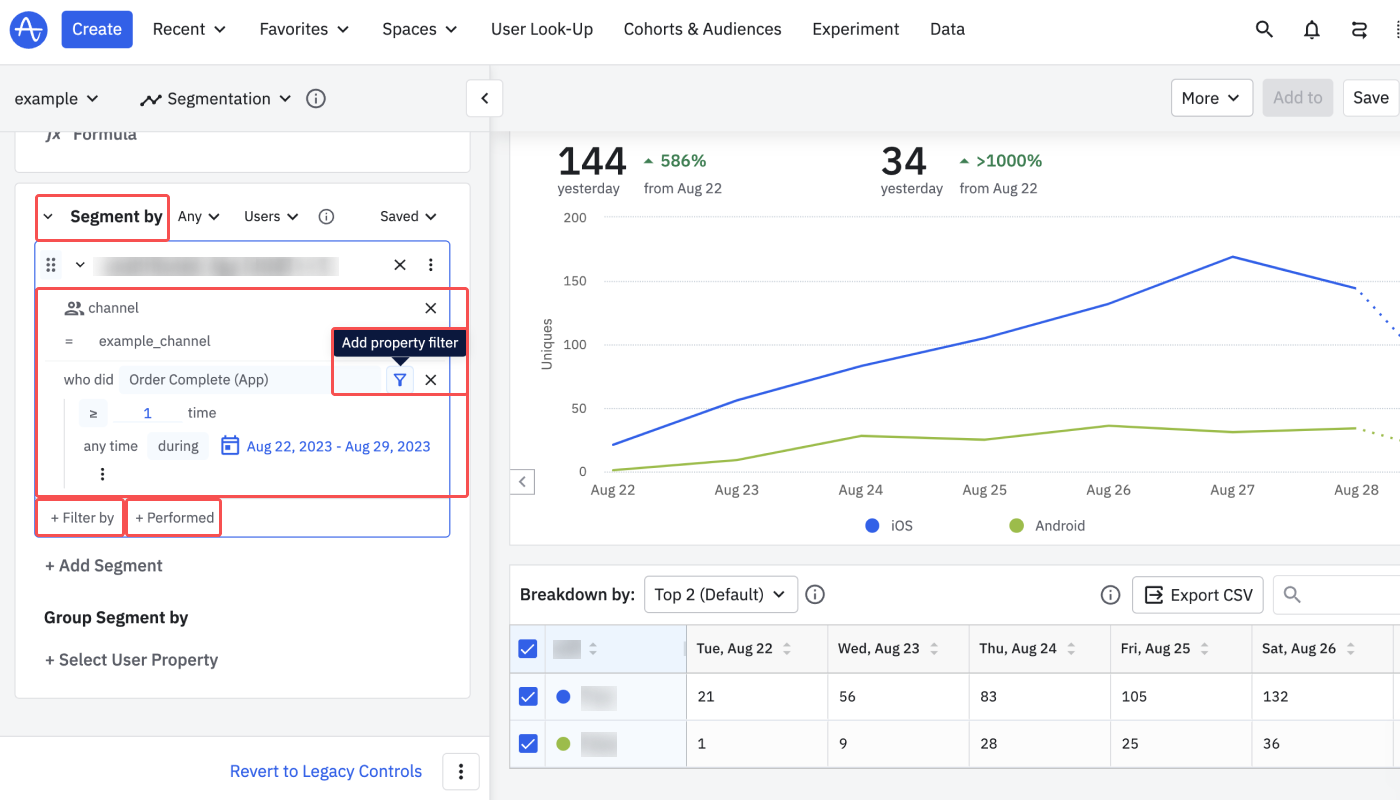
After selecting an event, scroll down to find Segment by where you can configure the user conditions. Click Filter by to use the user properties imported from Airbridge for filter configuration.
Click Performed to select an event and view the number of users who performed the event. You can then click Add Property filter to use the properties imported from Airbridge for filter configuration.
For example, if the chart has been configured like in the image below, you can view the number of users who performed the Order Complete event more than 1 time during Aug 22, 2023 - Aug 29, 2023, and the channel property is example_channel.
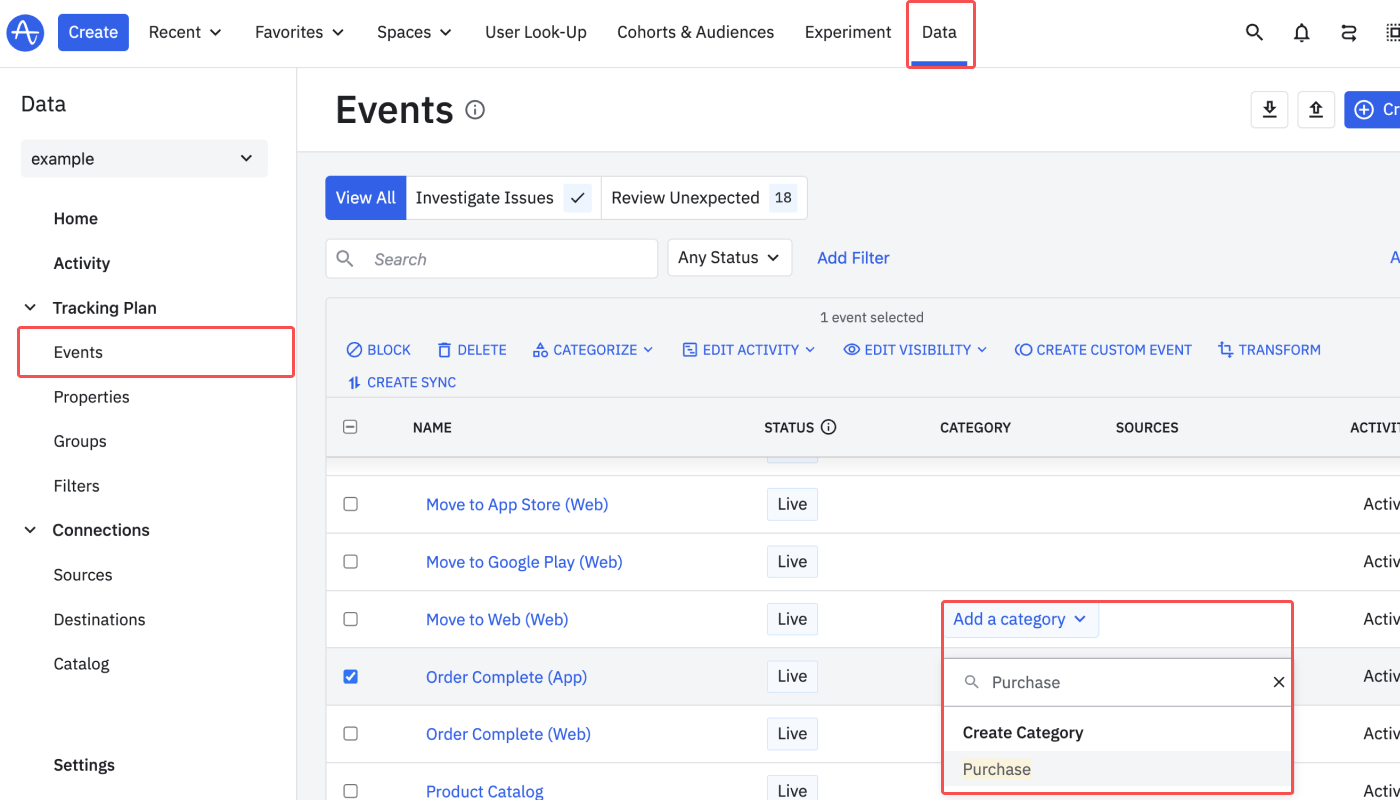
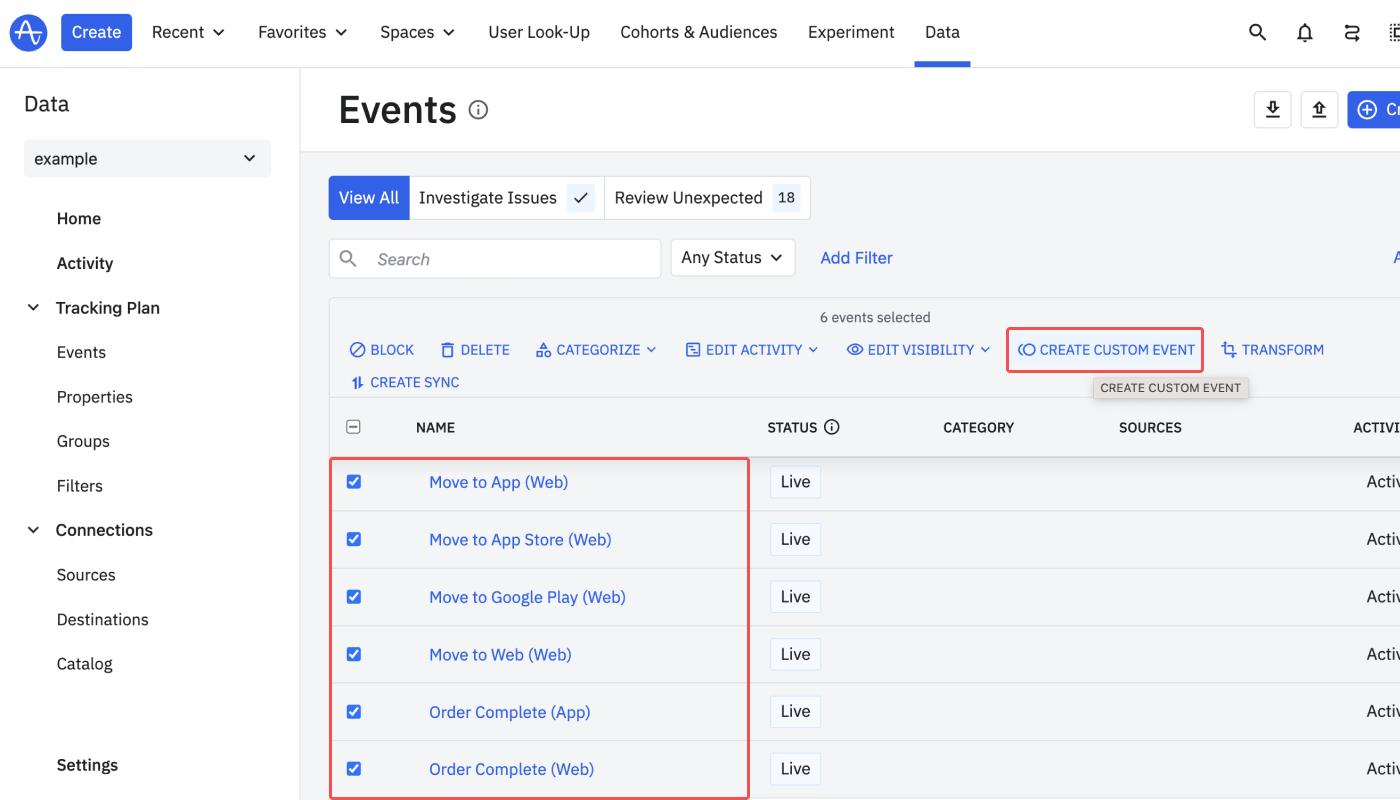
Navigate to [Data]>[Events] to manage events.
Add a category
Hover over the CATEGORY column and click Add a category to find the events easily. Only events with the Live status can be added to a category.
Create custom events
Select events you frequently use for chart configuration and click CREATE CUSTOM EVENT to group them into a single custom event.
The process for matching Airbridge users with Amplitude users varies based on the integration methods.
V1 integration method
Ad ID is used for user matching, which is GAID for Android and IDFA, IDFV for iOS. If Airbridge has not collected an Ad ID, Amplitude receives null or other values that cannot be used for user matching. In this case, user matching may fail. Amplitude discards the data after 72 hours when the continued attempts to match the user fail.
The V2 integration method shows a higher success rate in user matching. In particular, for apps with Amplitude JS SDK or React Native SDK, the V2 integration method is recommended as Ad ID collection is not possible due to Apple and Google’s privacy policies.
V2 integration method
The following identifiers are used for user matching. The identifiers are listed by their priority.
Amplitude Device ID (device.alias.amplitude_device_id)
Amplitude Device ID (user.alias.amplitude_device_id)
Airbridge Device ID (device.deviceUUID)
Browser Client ID(browser.clientID)
If the Amplitude Device ID is not available, Airbridge sends the Airbridge Device ID and the Browser Client ID to Amplitude, which shows a lower success rate of user matching.
In particular, to perform user matching for apps with Amplitude JS SDK or React Native SDK, the Amplitude Device ID must be available by Airbridge as Ad ID (GAID for Android and IDFA, IDFV for iOS) collection is not possible due to Apple and Google’s privacy policies.
Should a user matching fail, Amplitude will identify the user as a new user. Consequently, this may lead to an inflated user count and result in overcharging for service fees. To avoid excessive charges, ensure that the pre-setup is completed before implementing the integration.
Events attributed to Meta ads shall not be sent or shared with third parties in accordance with the Meta Privacy Policy. The data shall only be used internally by the entity that ran the ad for the purpose of analyzing the performance of the Meta ads campaign.
Accordingly, Airbridge sends the channel event property of events attributed to Meta ads as “Restricted” to any third parties.
However, Meta ads web campaign data collected through tracking links or campaign data collected through custom channel tracking links are not masked when sent to third parties.
In case a null value has been sent as a property to Amplitude, the previously sent value remains as the user property of the user within Amplitude. Refer to Amplitude’s user guide on user properties.
Let’s say the event property X of a user has been sent from Airbridge to Amplitude in the order shown in the following table. A null value has been sent after the sneakers are sent. In this case, the user property X will show sneakers in Amplitude.
Sending Order | Event Property X sent from Airbridge | User Property X logged to Amplitude |
|---|---|---|
1 | sneakers | sneakers |
2 |
| sneakers |
3 | boots | boots |
To make sure that unintended user property values are logged to Amplitude when no data has been collected, Airbridge sends - instead of a null value for some event properties. Refer to this section of the article to see the list of event properties of which - is sent when no data has been collected.
Let’s say the event property Y of a user has been sent from Airbridge to Amplitude in the order shown in the following table. - has been sent after sneakers. In this case, the user property Y will show - in Amplitude.
Sending Order | Event Property Y sent from Airbridge | User Property Y logged to Amplitude |
|---|---|---|
1 | sneakers | sneakers |
2 |
|
|
3 | boots | boots |
Note
When no data is collected,
-is sent to Amplitude as the touchpoint-related properties. For the connections that fall into the following conditions, however, null values are sent as the touchpoint-related properties.
Connections created before 2024-02-29
Connections not activated or not edited after 2024-02-29
Example case
When no data has been collected for the Channel and Campaign properties, Airbridge sends - to Amplitude.
When no data has been collected for the Custom User Properties, Airbridge sends a null value to Amplitude.
Refer to the table to see how the second delivery of properties is logged to Amplitude.
Campaign:-is sent and loggedCustom User Properties:nullis sent and thereforesneakersremains as the property value in Amplitude which was sent through the first delivery
Sending Order | Event Properties sent from Airbridge | User Properties logged to Amplitude |
|---|---|---|
1 |
|
|
2 |
|
|
3 |
|
|
When implementing the V2 integration method, make sure the Session Start Timestamp is unchecked when selecting event properties to send to Amplitude to avoid session duplication. The Session Start Timestamp is the Session ID of the session collected through the Airbridge SDK. It is unchecked by default. When implementing the V1 integration method, the Session Start Timestamp is not sent by default.
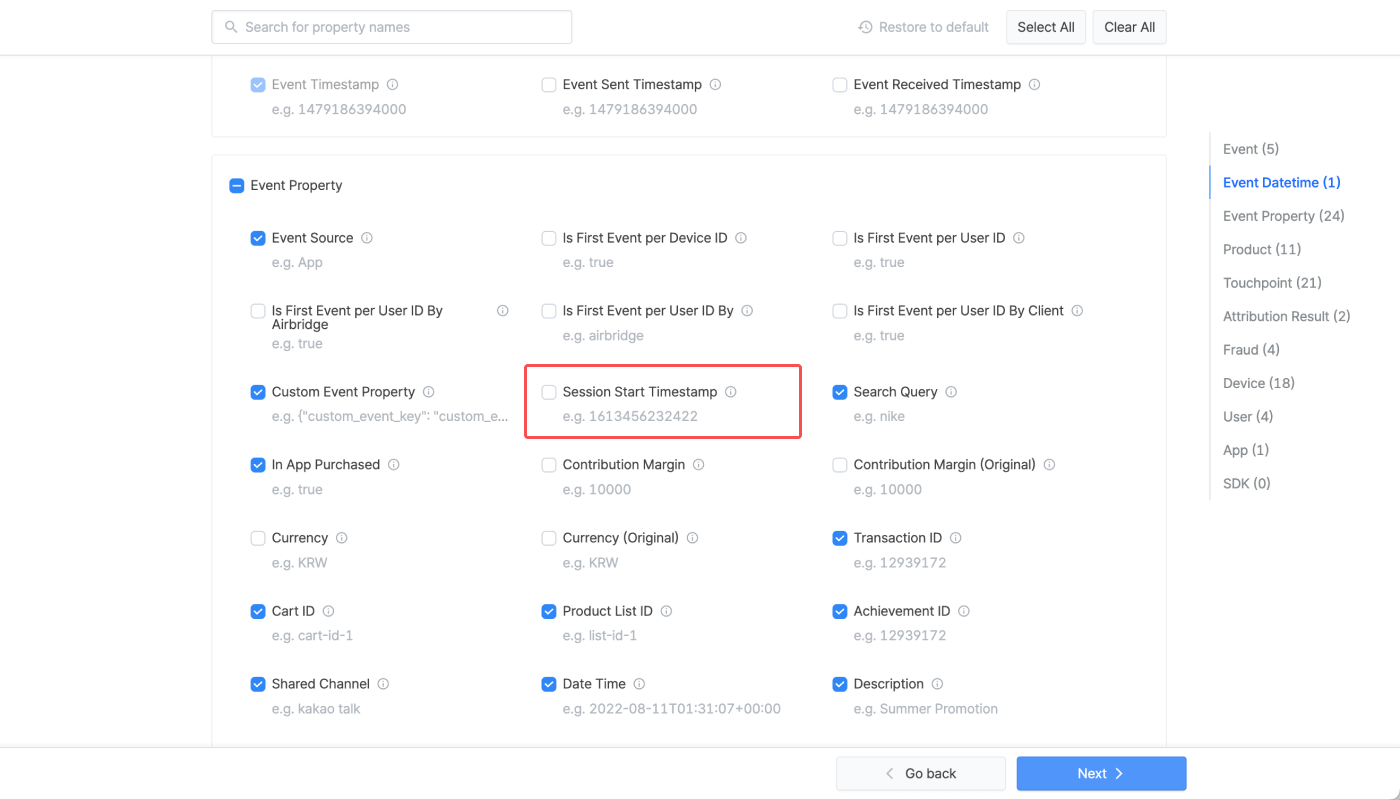
Session duplication occurs when the Airbridge SDK and the Amplitude SDK collect the same session and log them as different Session IDs. Therefore, the Session Start Timestamp, which is the Session ID in Airbridge shall not be sent to Amplitude to avoid duplication.
When the Session Start Timestamp is not sent, Airbridge sends null as the Session ID. In Amplitude, the Session ID with a null value will be logged as -1. Amplitude excludes such sessions from aggregation to avoid session duplication for the User Session Chart and Pathfinder Chart.

When the Session Start Timestamp is sent to Amplitude, the session count could be inflated, and duplicate data with different Session IDs from the same session could be shown simultaneously.
When it comes to events that involve individual product items defined by the Semantic Attributes, Airbridge logs events defined by actions regardless of how many products are involved in the action, whereas Amplitude and Mixpanel log events by individual product items. Therefore, Airbridge sends such events by individual product items following the Airbridge Event Taxonomy.
Semantic Attributes with products.$0 are attributes that involve product items.
Example case
Let’s say the Order Complete event has been defined with a Semantic Attribute, as shown below. When the event occurs, the product ID is logged per product item.
Category | Action | Label | Value | Attribute |
|---|---|---|---|---|
airbridge.ecommerce.order.completed | - | - | - | eventData.goal.semanticAttributes.products.$0.productID |
Based on this taxonomy design, if a user orders 5 different product items and then 1 Order Complete event occurs, 1 Order Complete event will be logged to Airbridge, whereas in Amplitude and Mixpanel, 5 Order Complete events will be logged.
Was this helpful?