CleverTap
Airbridge supports integration with CleverTap - a retention cloud that empowers digital brands to increase customer retention and lifetime value. By enabling the integration, you can leverage the attribution data from Airbridge and the AI/ML-powered insights from CleverTap to deliver hyper-personalized engagement campaigns to customers.
Once the integration is complete, the install events, in-app events, and attribution data can be sent to CleverTap. Follow the below steps for the setup.
Once the integration is complete, the install events, in-app events, and attribution data can be sent to CleverTap. Follow the below steps for the setup.
Follow the steps below to implement the integration.
Before enabling the integration with CleverTap in the Airbridge dashboard, the SDK setup must be completed. Refer to the developer guide below.
If the SDK setup is not completed, Airbridge cannot be successfully connected to CleverTap even if the integration is enabled in the Airbridge dashboard.
Attention
Before you follow the steps listed below, the CleverTap ID must be set as a device alias in the Airbridge SDK. If the codes are not added to the Airbridge SDK, the Airbridge data may not be sent to CleverTap. Make sure to read the Developer Guide for CleverTap integration and complete the pre-setup first.
1. Log in to your CleverTap dashboard.
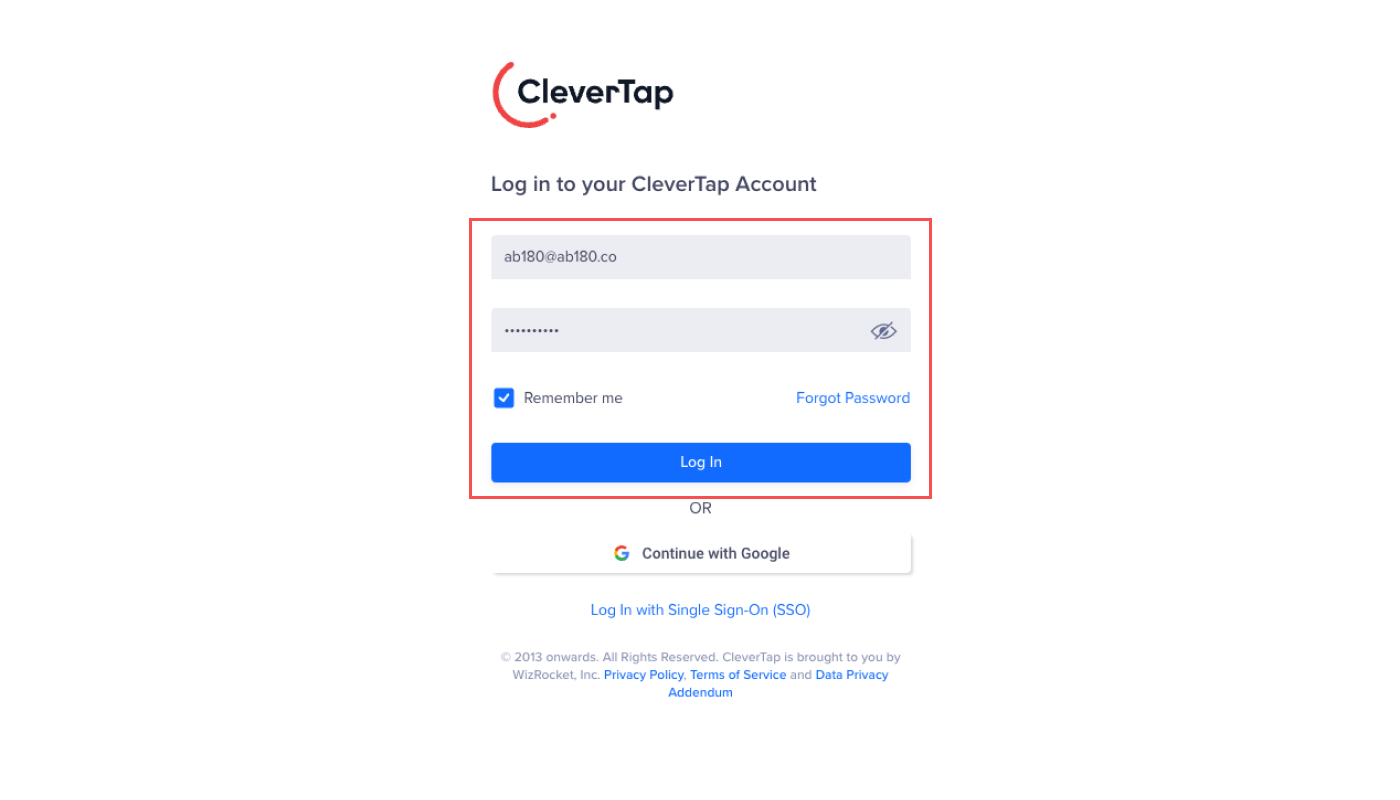
CleverTap Dashboard URL by Region
To log in to the CleverTap dashboard(dashboard.clevertap.com), you must access the URL assigned to the region your account is registered in. Go to the CleverTap guide to find the CleverTap Dashboard URL by region.
2. Select the [Settings] icon on the left menu bar, and select the [Project] menu. The credentials, which are the Project ID, Project Token, Passcode, and Region information, can be found under the project title. The actual values are shown when you click the [Eye] icon.
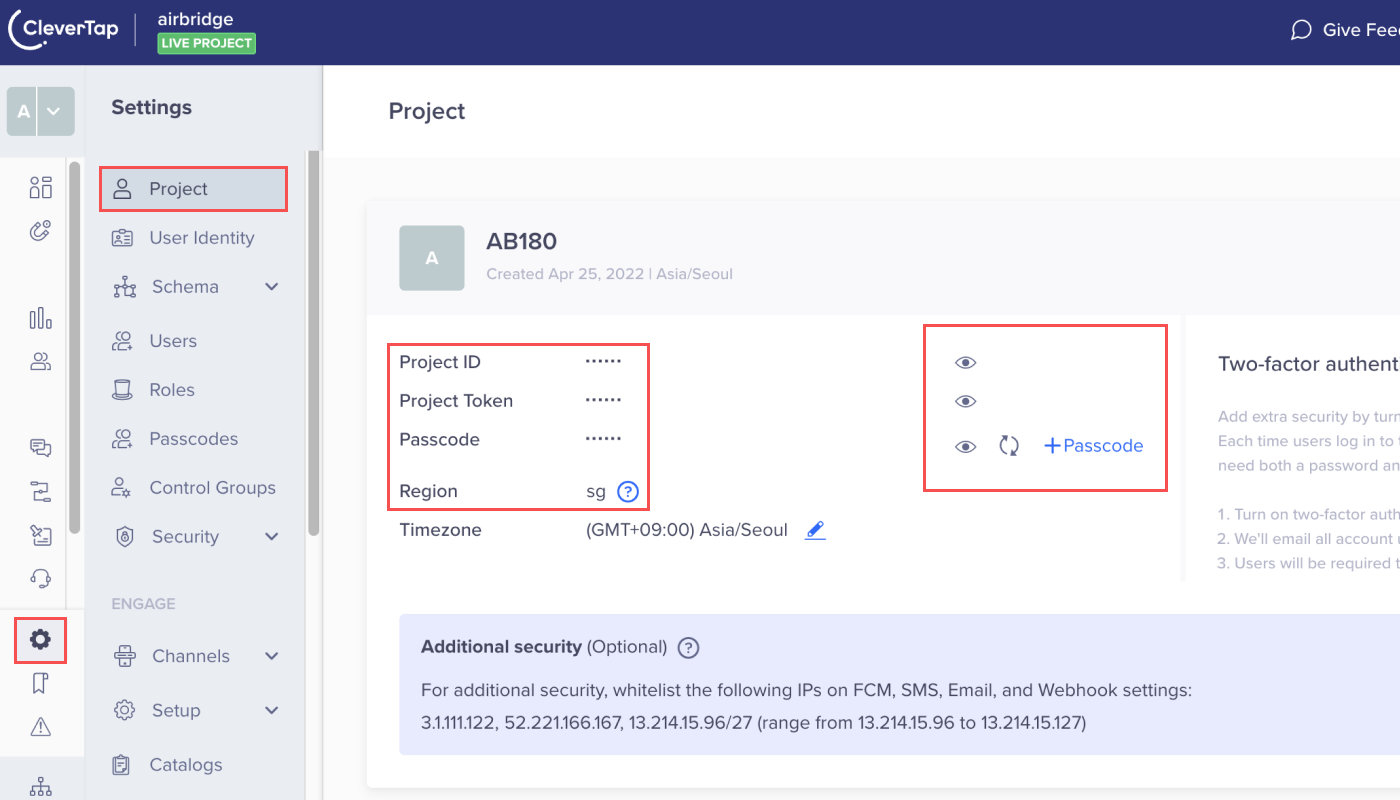
The Project ID, Project Token, and Region are assigned when creating a CleverTap account and can’t be changed. The Passcode can be generated and managed for different purposes. Click the “+Passcode” and generate a new Passcode for the integration with Airbridge.
3. Copy the newly generated Passcode by clicking the [Copy] icon at the right end of the Passcode field. If you don’t copy the Passcode, you can’t close the window even if you click the “Done” button. The Passcode is not shown again, so save the copied Passcode somewhere safe.

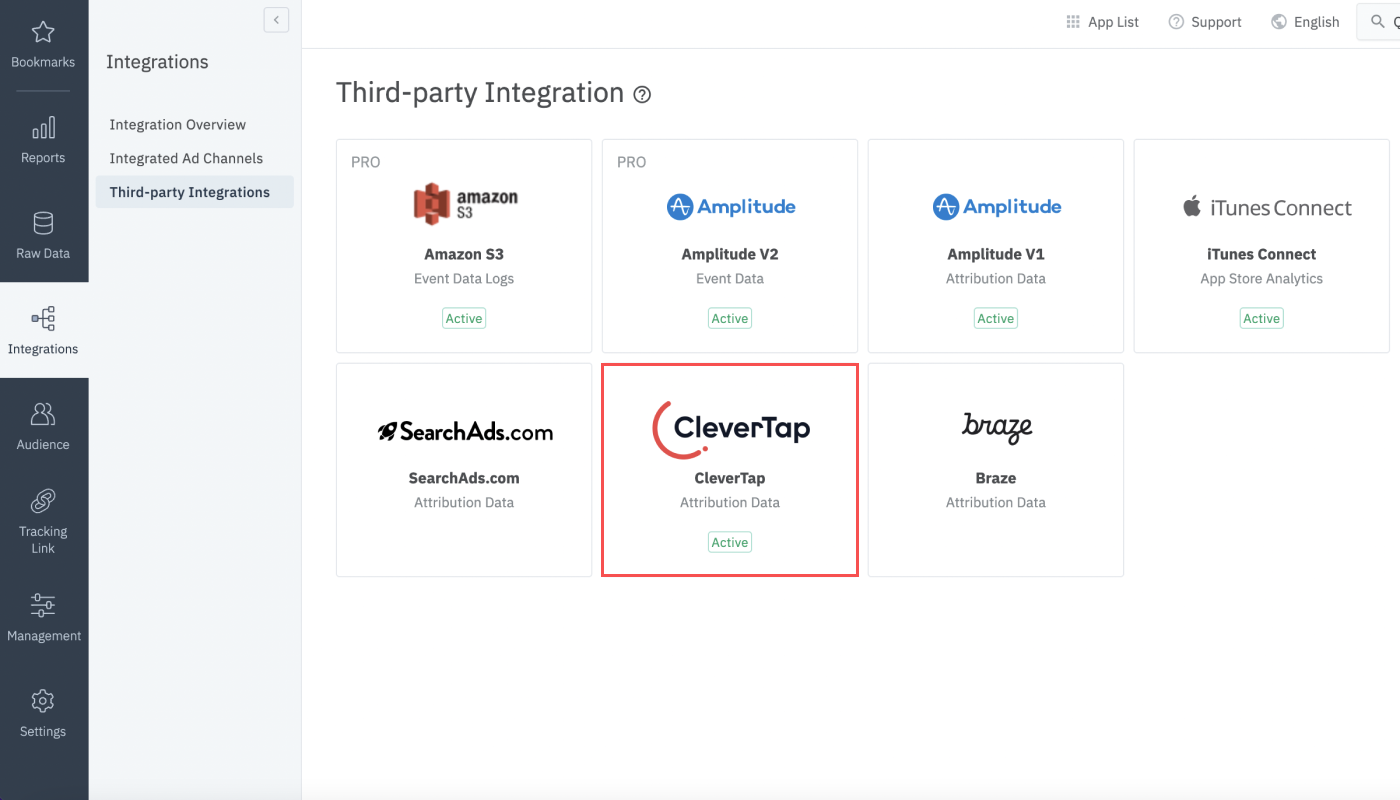
4. Log in to your Airbridge dashboard, go to [Integrations]>[Third-party Integrations] and select “CleverTap.”
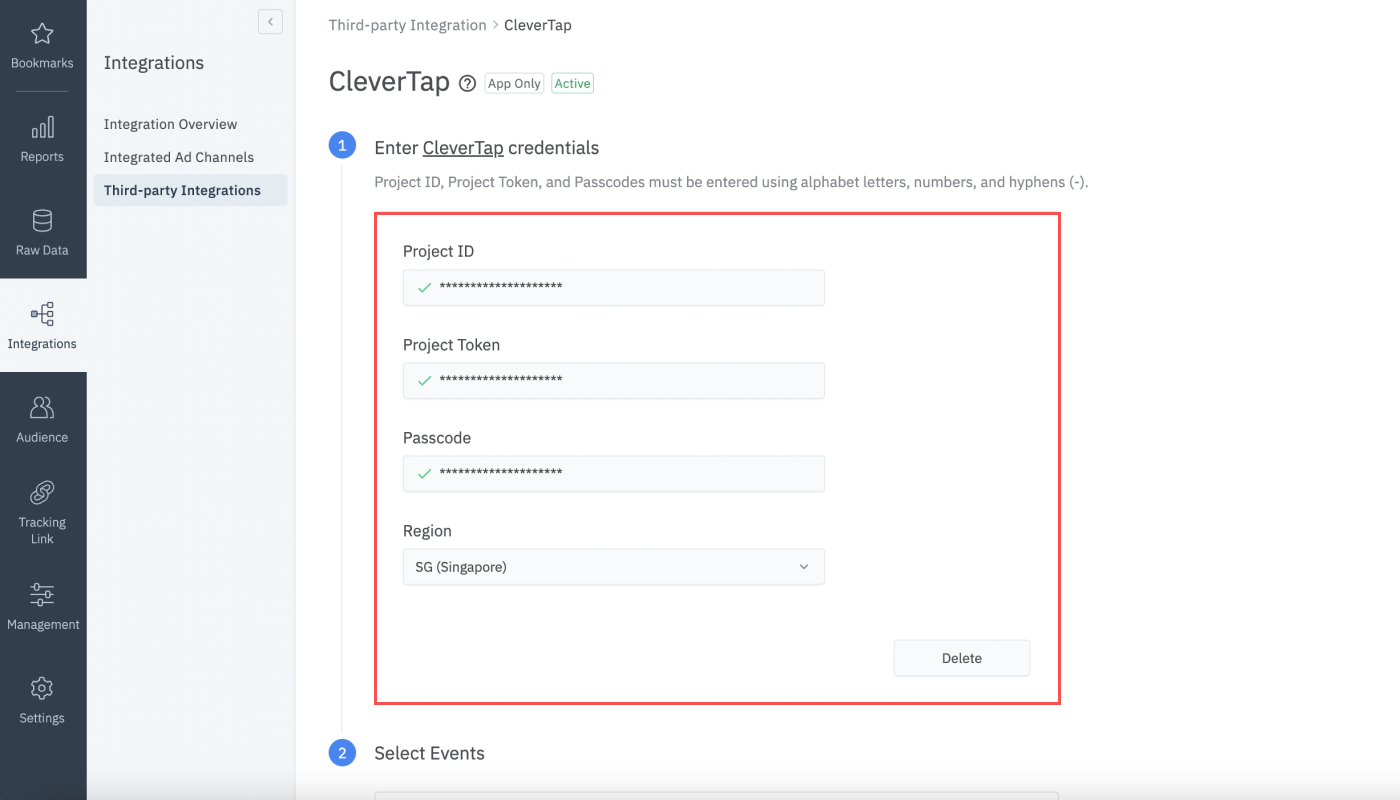
5. Enter the CleverTap credentials to the respective fields and click the “Submit” button. The Project ID, Project Token, and Passcode consist of alphabet letters, numbers, and hyphens (-).
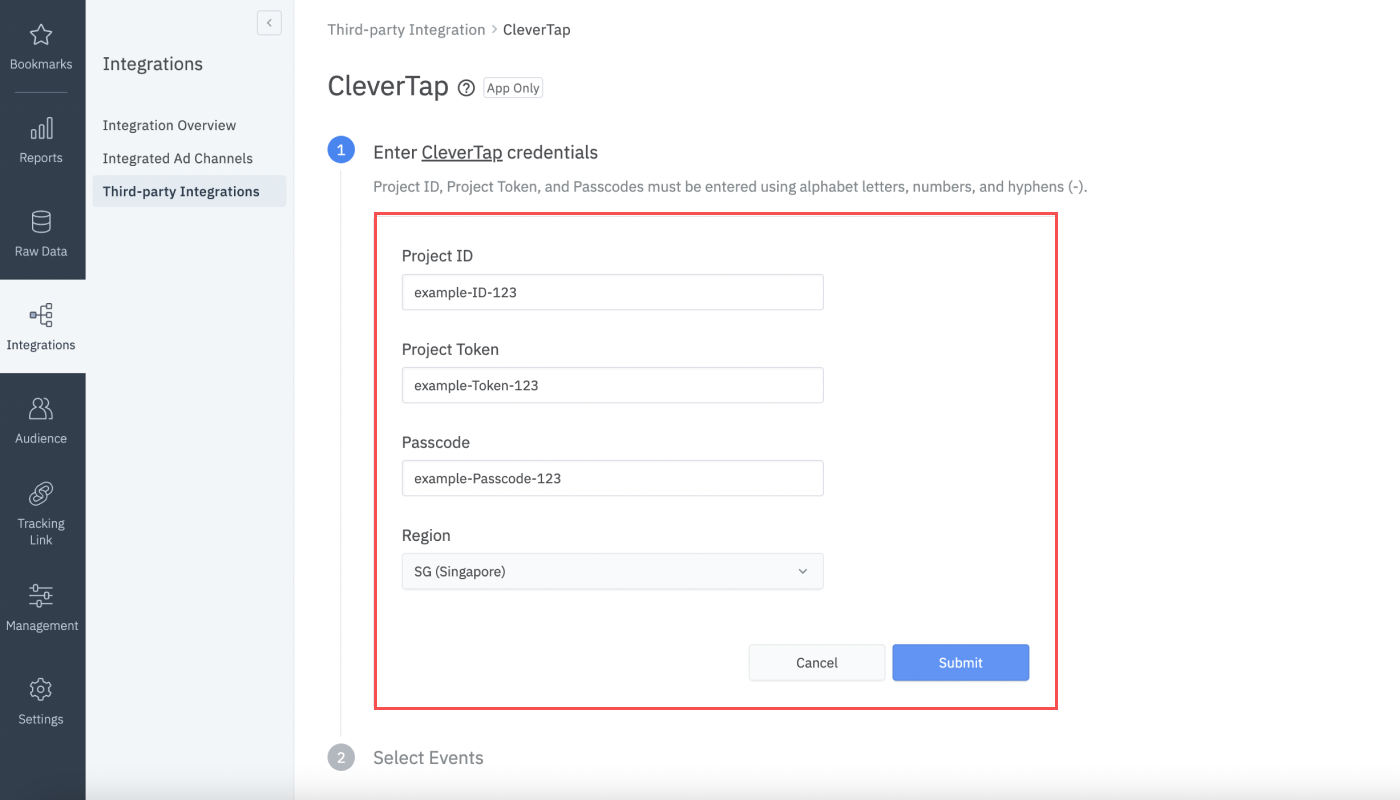
6. The entered values are displayed as asterisks (*). You can see the actual value by clicking the asterisks.
Automatic Event Sending
Once the credentials are successfully submitted, the Attributed Install Events are automatically sent to CleverTap. You can’t stop the automatic sending of the Attributed Install Events. Please give enough consideration before the integration setup.
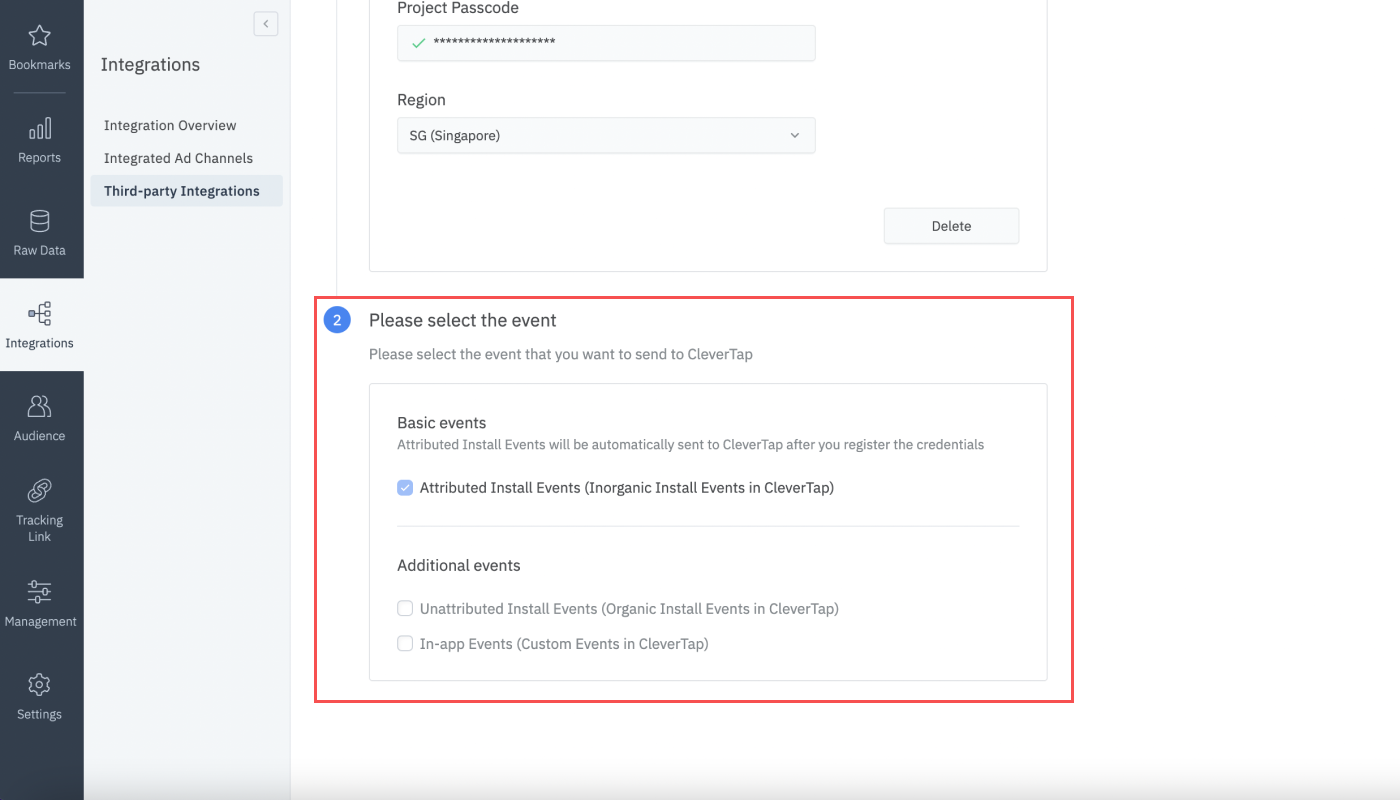
After submitting the CleverTap credentials, you can select the Events you want to send to CleverTap by checking the checkboxes. Events that occur after the credentials are submitted will be sent to CleverTap. If you uncheck the checkboxes, Airbridge will stop sending the unchecked Events. If you check the checkboxes again, Airbridge will resume sending the checked Events.
The following events can be sent to CleverTap:
Attributed Install Events
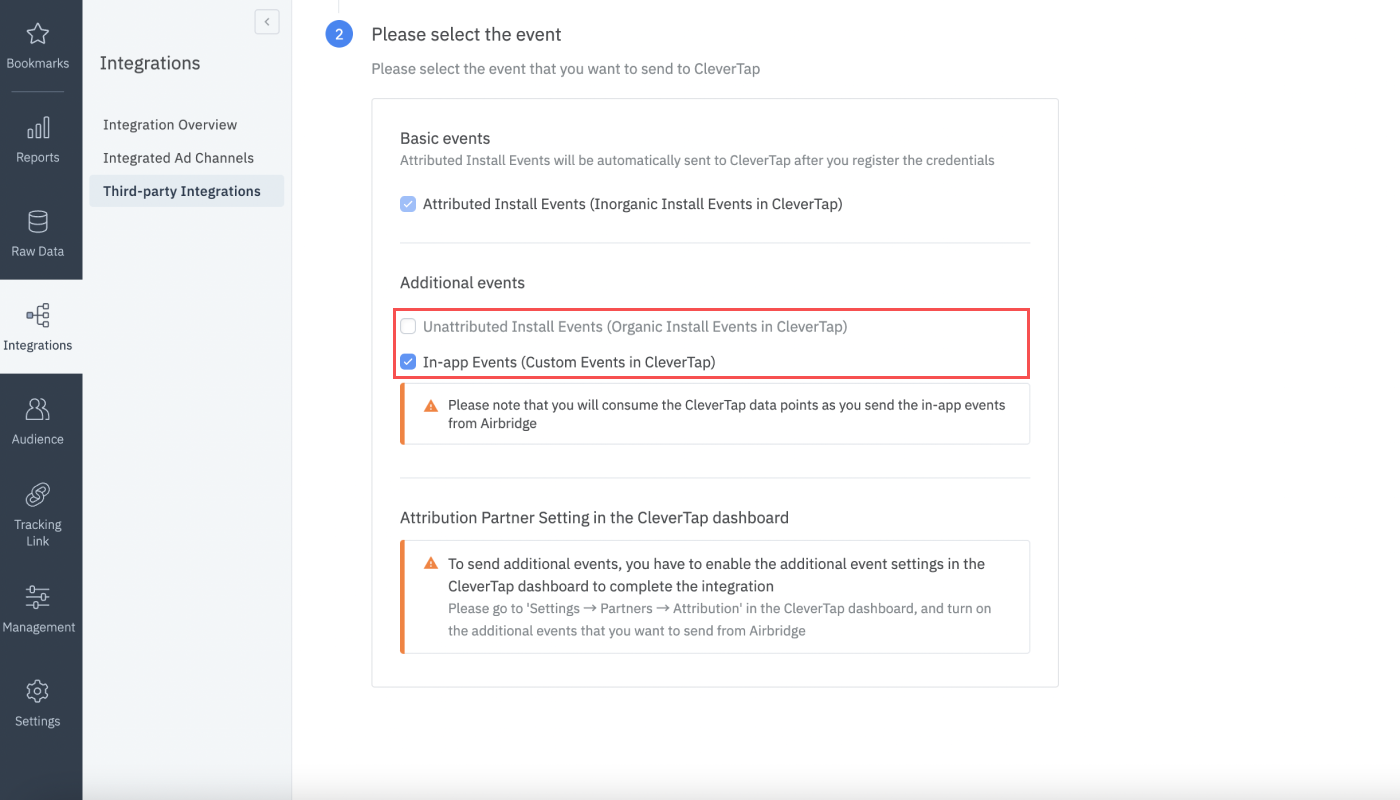
Attributed Install Events are Inorganic Install Events in CleverTap and are automatically sent to CleverTap when the credentials for integration are submitted. Attributed Install Events are sent to CleverTap as default at all times and can’t be unchecked.
Unattributed Install Events
Unattributed Install Events are Organic Install Events in CleverTap. If you want to send Unattributed Install Events to CleverTap, check the checkbox and make sure to enable the tracking of event data on CleverTap Settings.
In-app Events
In-app Events are Custom Events in CleverTap. If you want to send In-app Events to CleverTap, check the checkbox and make sure to enable the tracking of event data on CleverTap Settings.
When you select In-app Events, all types of in-app events are sent to CleverTap. You can not pick and choose particular in-app event types to be sent to CleverTap.
Attention
All types of in-app events will be sent to CleverTap when you select In-app Events to be sent to CleverTap. If you are using CleverTap based on data point plan, this may result in an unexpectedly high count of data points. Please be reminded that any event sent to CleverTap is counted as one data point under the data point plan.
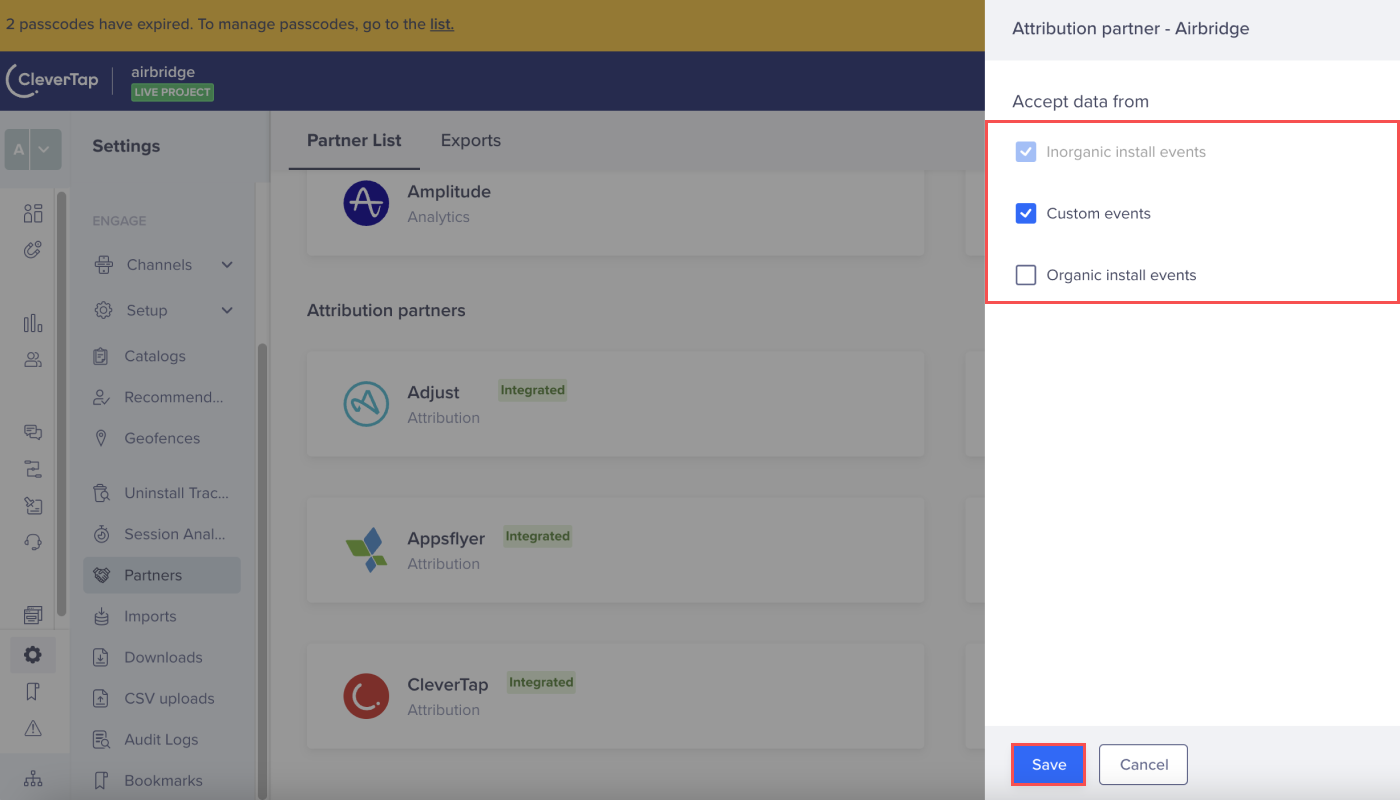
To accept the Unattributed Install Events and In-app Events in CleverTap, you must enable the tracking of event data from Airbridge. Without this step, the Events can’t be sent to CleverTap.
1. Select the [Settings] icon on the left menu bar, and select [Partners] in the CleverTap dashboard.
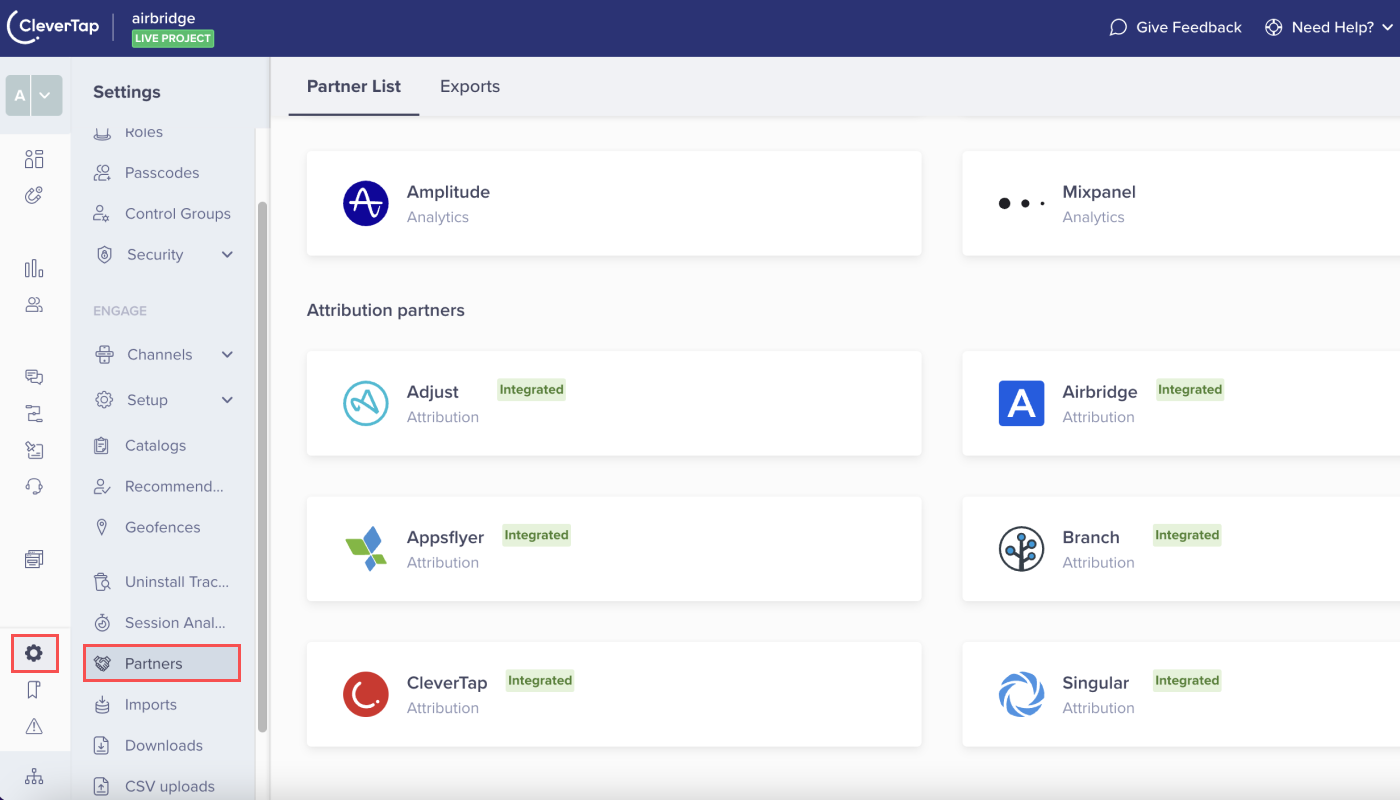
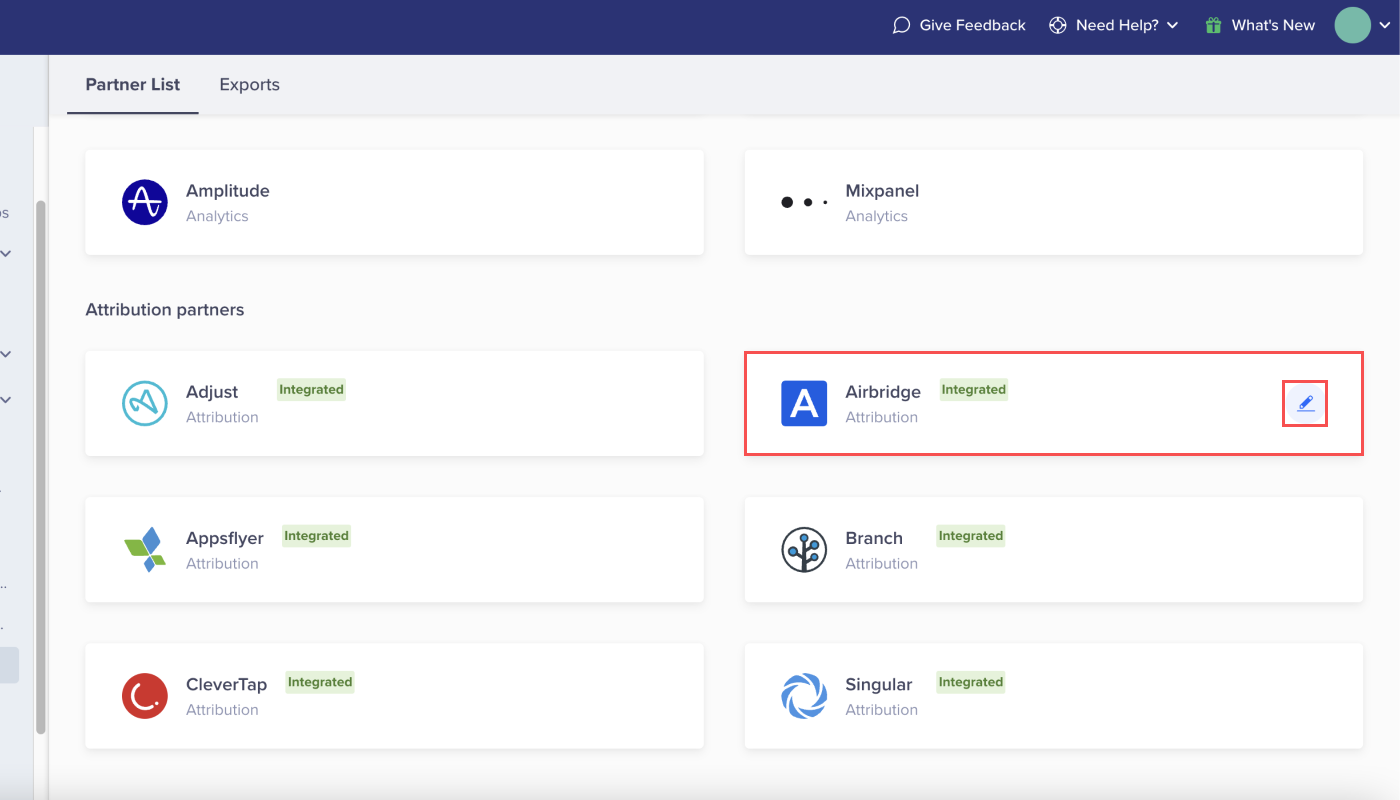
2. Click the [Edit] icon, and check the checkboxes next to the events you want to enable tracking under ‘Accept data from.’
If you need to update the credentials, click on the respective fields, enter a new value, and click the “Done” button.

Passcode Refresh after Integration
The Passcode can be refreshed in CleverTap. If you refresh the Passcode after submitting the CleverTap credentials to Airbridge, you must update the refreshed Passcode. If you don’t update the refreshed Passcode, the integration is disabled from the point of time you refresh the Passcode.
If you want to disable integration, click the “Delete” button to delete the credentials. Please note that all events sent to CleverTap before you delete the credentials remain in CleverTap. If you want to re-enable the integration, all credentials must be submitted again.

You can decide anytime whether to send or not to send Unattributed Install Events and In-app Events to CleverTap. If you uncheck the checkboxes, Airbridge will stop sending the unchecked Events. If you check the checkboxes again, Airbridge will resume sending the checked Events.
When Airbridge is successfully integrated with CleverTap, you can leverage Airbridge attribution data on CleverTap to glean actionable insights.
CleverTap stores the Attributed Install Events and Unattributed Install Events data received from Airbridge under [UTM Visited]. In the CleverTap dashboard, go to [Analytics]>[Events] and find the [UTM Visited] option in the [Select event] drop-down list to use it as a filter option. In-app Events can be found under the ‘Custom events’ category in the drop-down list. Event names remain unmodified and can be selected as filter options.

The attribution data and events sent to CleverTap can be used to build granular user segments. The following table shows the attribution data types that can be selected as the first filter option.
Attribution data types | Description | Example |
|---|---|---|
UTM source | Attributed channel name | moloco |
UTM medium | Attributed publisher name | UNITY |
UTM campaign | Attributed campaign name | happynewyear_festival |
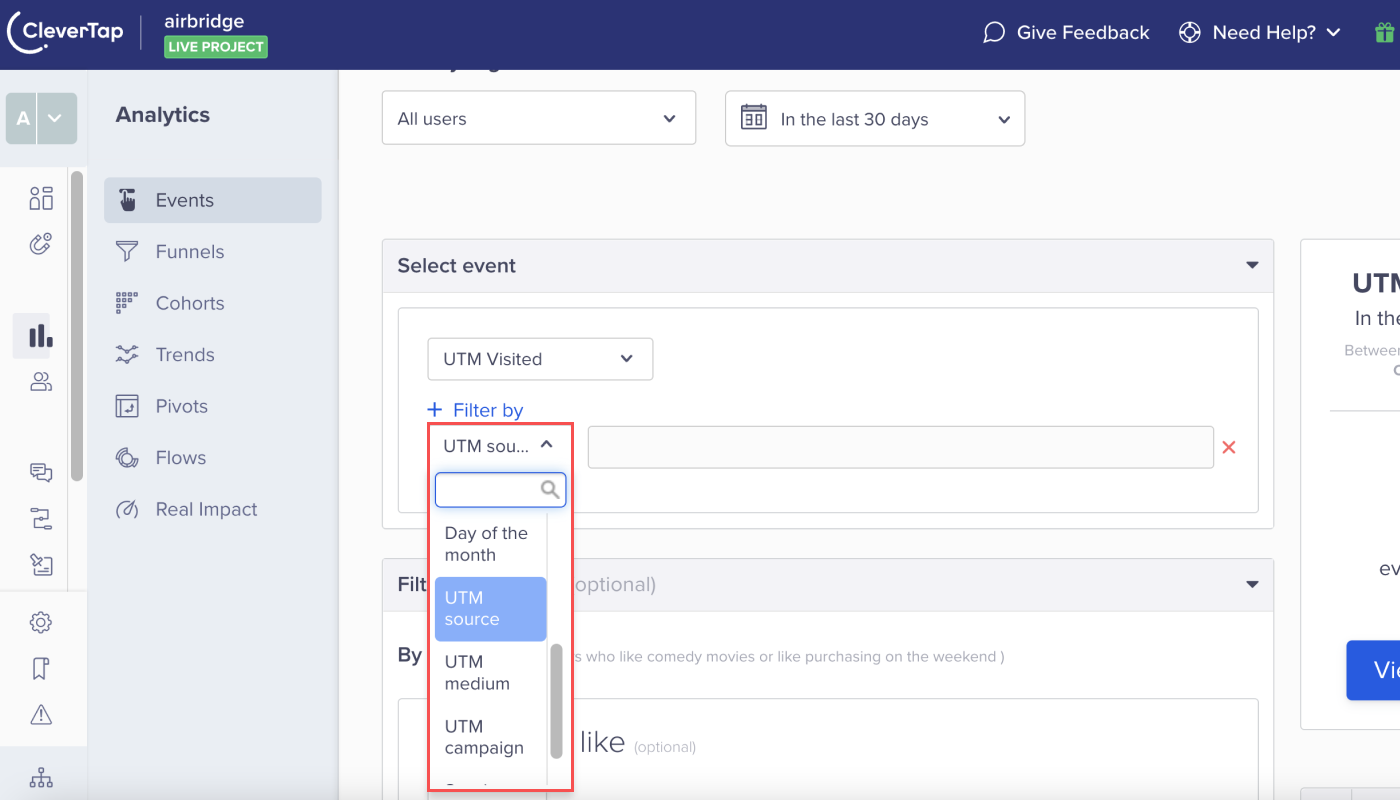
The following event property types can be selected as the second filter option.
Event Property types |
Description |
Example | Note |
|---|---|---|---|
event_type | Event type | inorganic_install |
|
device_identifier | CleverTap device ID | __gf5b0260118ba4a | User Alias for Clever device ID |
platform | OS | Android |
|
abr_ad_group | Attributed ad target group | 2030_male |
|
abr_ad_creative | Attributed ad creative | image |
|
abr_content | Attributed ad type | banner |
|
abr_term | Attributed ad keyword | jeans |
|
abr_action | Additional Event info | pants | Sent with In-App Events only |
abr_label | Additional Event info | black | Sent with In-App Events only |
abr_value | Additional Event info(numeric) | 100000 | Sent with In-App Events onl |
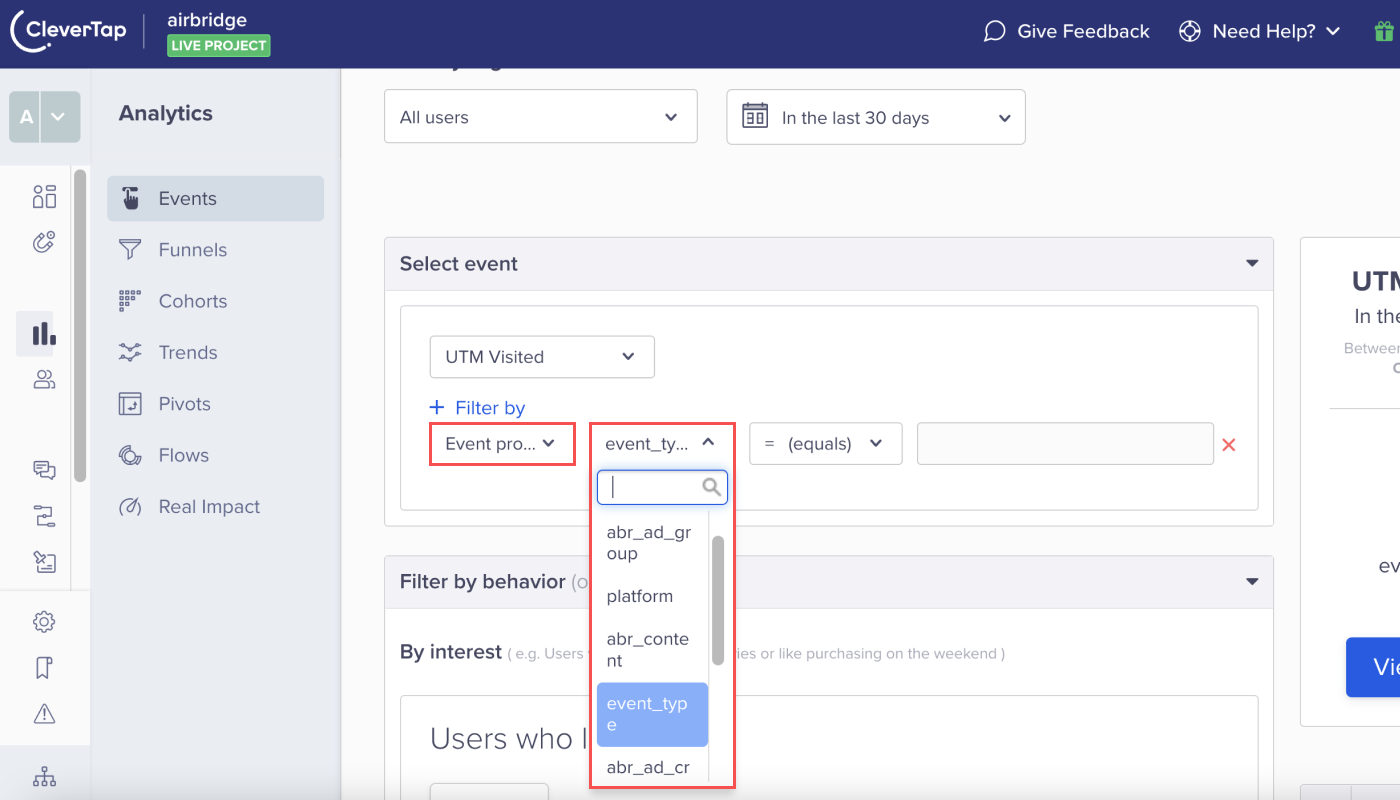
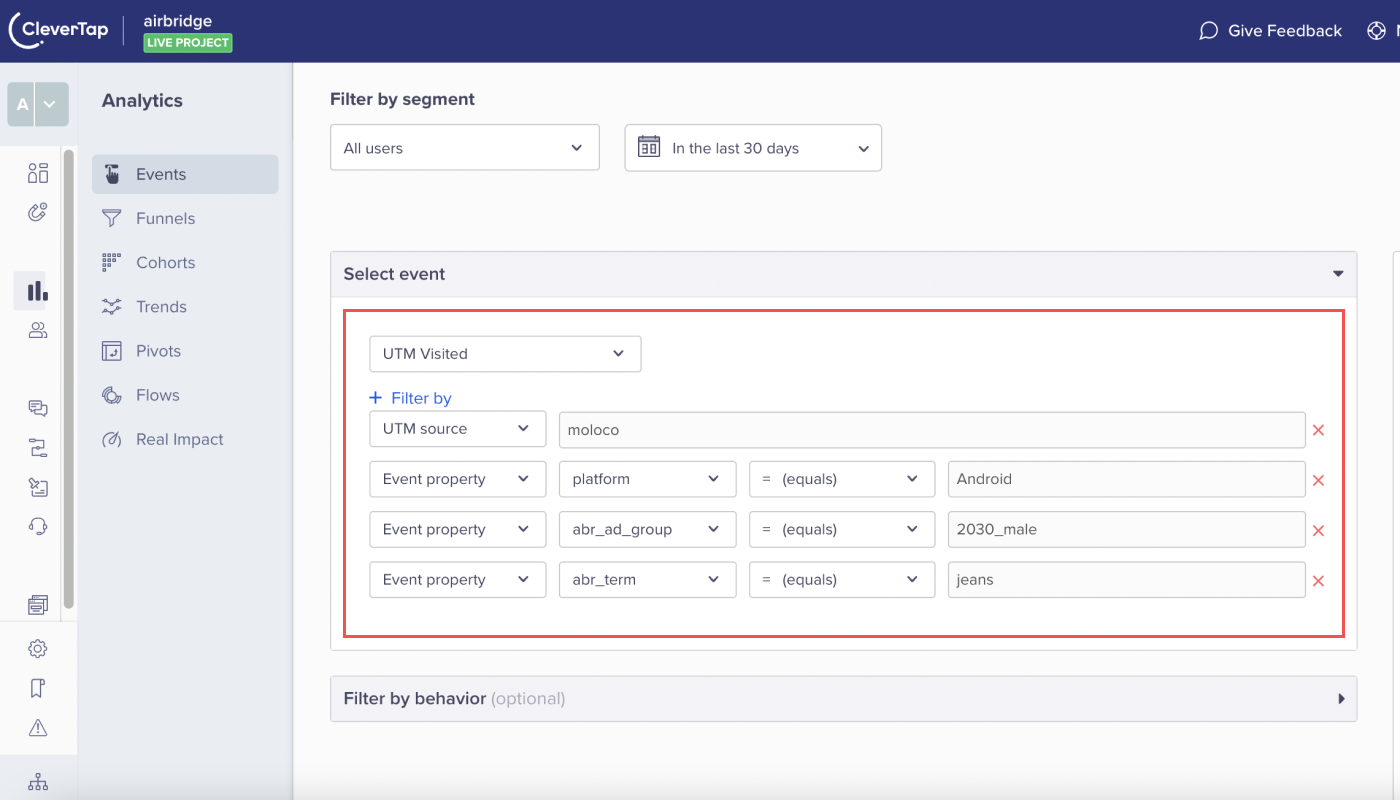
After the integration, you can build user segments by events using the Airbride event data as filter options.
Attributed channel name (UTM source): moloco
OS (platform): Android
Ad target group (abr_ad_group): Males in their 20s to 30s (2030_male)
Ad keyword (abr_term): jeans (jeans)
If you want to create a user segment in CleverTap that matches the above factors, the filters should be selected, as shown in the image below.
Was this helpful?