Create Tracking Links in the Airbridge Dashboard
Create different tracking link types for integrated channels and custom channels. For more details on channel types, see this article.
Channel type |
Description |
|---|---|
Integrated channel | Ad channels integrated with Airbridge. Find the list in the Airbridge dashboard [Integrations]>[Ad Channel Integration]. |
Custom channel | Channels that you define. These include owned and earned media for content publishing or customer engagement like push notifications, and ad channels not integrated with Airbridge. |
Follow the steps below to create tracking links for ads you’ll run on ad channels integrated with Airbridge. First, go to [Tracking Link]>[Link Generation]>[Integrated Channels] in the Airbridge dashboard.
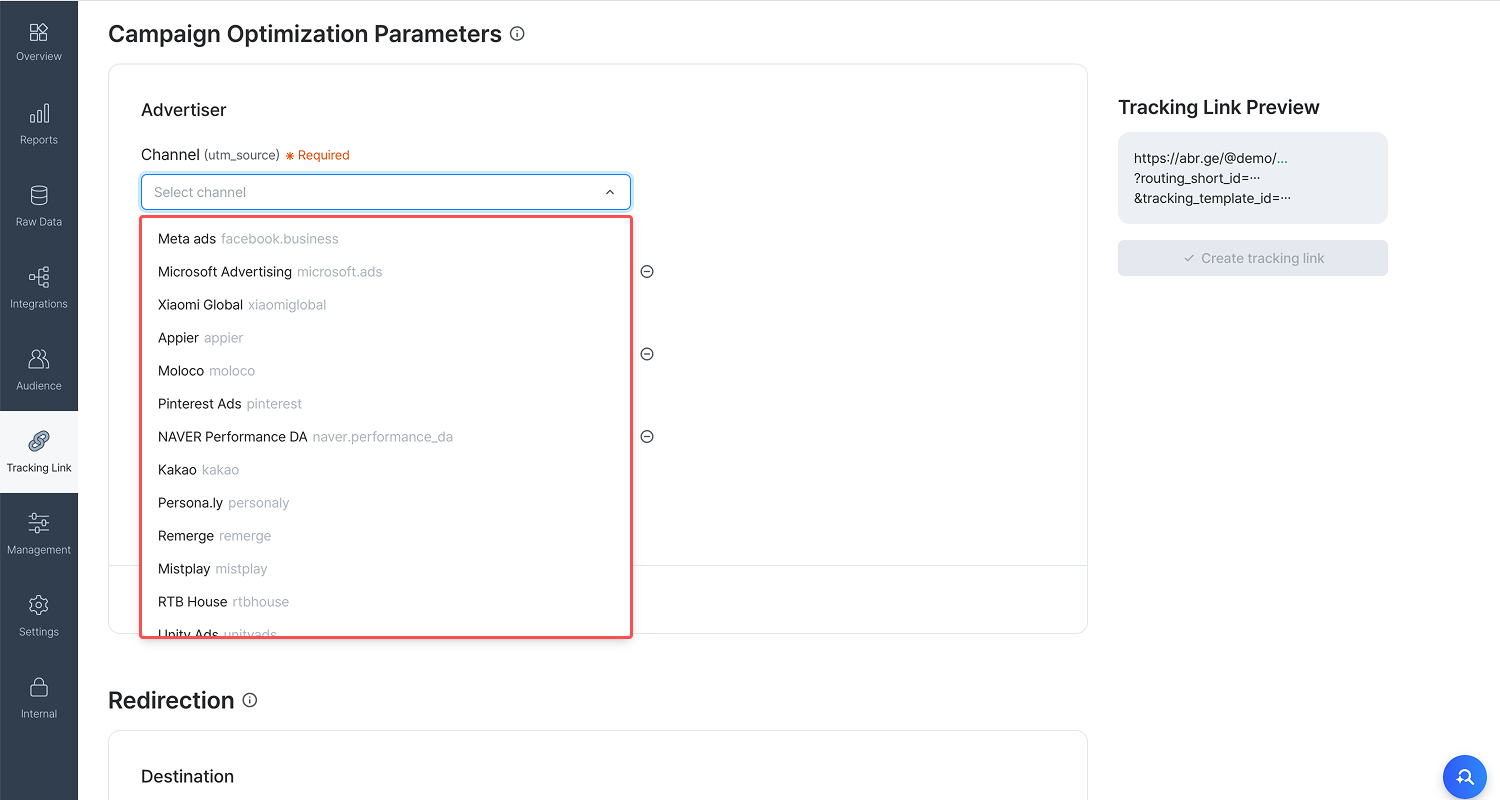
Go to [Campaign Optimization Parameters]>[Advertiser] and select [Channel]. [Channel] is a required field. Once you select an ad channel, [Tracking Link Preview] displays the tracking link format predefined for the ad channel.

Note
If your ad channel isn’t listed, ask the ad channel to submit an Integration Request to Airbridge. Integrated channel tracking links are supported only for ad channels integrated with Airbridge.
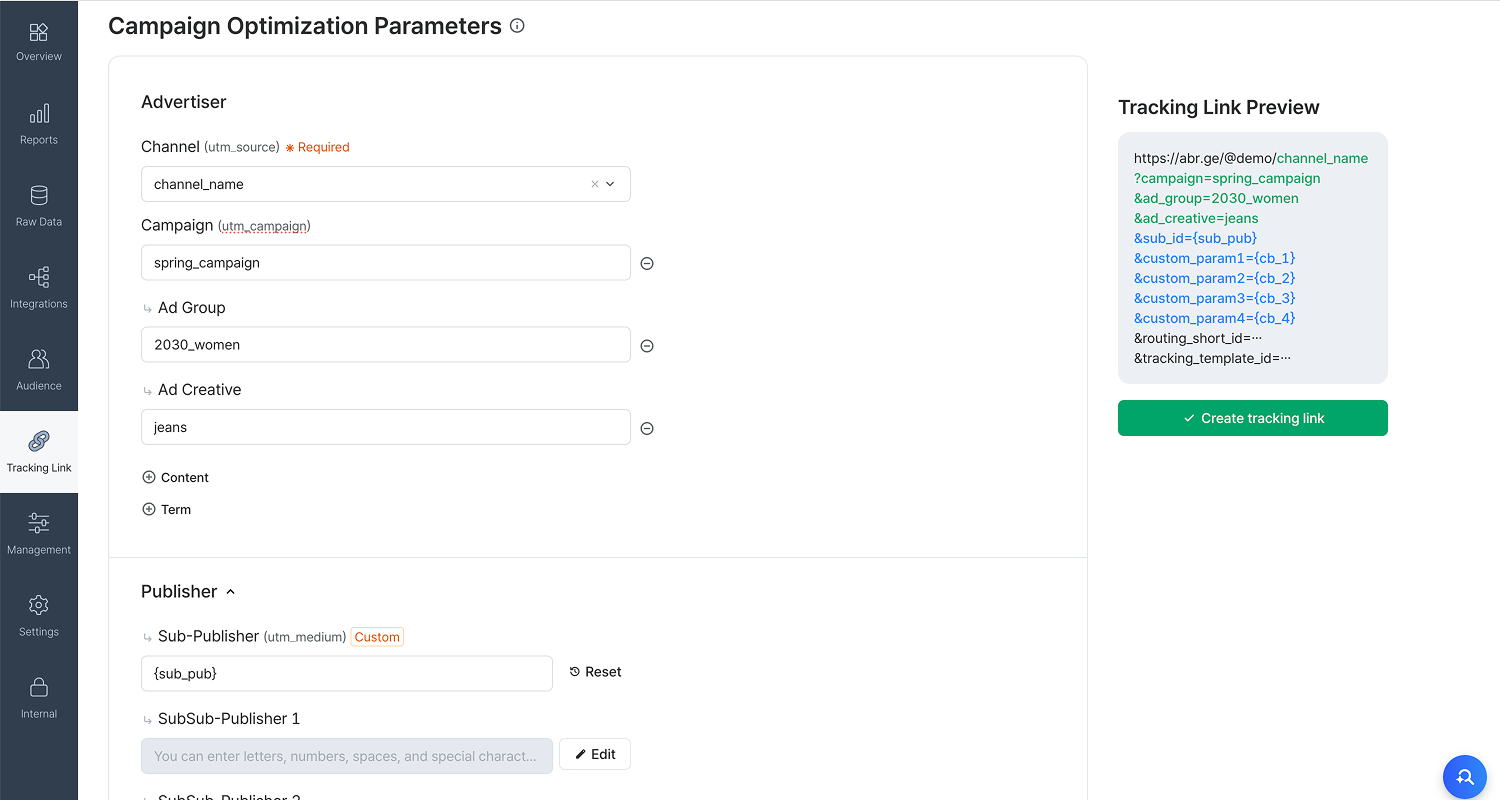
Enter the information you want to collect when ads with the tracking link are viewed or clicked. Use fields such as [Campaign], [Ad Group], and [Ad Creative] under [Advertiser], or [Sub-Publisher] under [Publisher], as needed. The field names become parameter names, and the information you enter becomes parameter values in the tracking link.
For example, if you enter “spring_campaign” in [Campaign] as shown in the image below, they appear in your tracking link as “campaign=spring_campaign”. When you collect data with this tracking link, you'll see “spring_campaign” in Airbridge reports when you select Campaign as a GroupBy.
If any field is pre-filled, we recommend not changing it. These are preset values agreed between the ad channel and Airbridge.
[Redirection] is where you set the destination for users who click the tracking link.
Note
To set [App (Deep Link)] as the [Destination], register deep link information in the Airbridge dashboard [Tracking Link]>[Deep Links]. For instructions, see this article.
If you select [App (Deep Link)] as the [Destination], users who have the app are sent to a specific app page. In [Deep Link], enter the URL of the app page where you want to send users. For instructions, see this article.
Attention
Only URL scheme deep links can be entered in [Deep Link]. Enter a specific app page URL that starts with the URL scheme registered in Airbridge.
Encode any characters other than letters, numbers, and the special characters = ? & #
You can add a stopover Airpage to cover edge cases on iOS non-Safari browsers. See this article for details.
Use [Fallback Path] to set where users without the app are sent when they click the tracking link applied with deep linking. You can send users to app stores to encourage app installation or to a web URL to show them specific content. The available options depend on the platform.
Platform |
Available options |
Notes |
|---|---|---|
Android | · Google Play Store: Default store listing · Google Play Store: Custom store listing · Web URL | You can create up to 50 custom store listing pages. See Google Play Store guide for more details. |
iOS | · Apple App Store: Default product page · Apple App Store: Custom product page · Web URL | You can create up to 35 custom product pages. See Apple App Store guide for more details. |
Desktop | · Web URL · Google Play Store | · Web URL: You can enter either a web URL or a Google Play Store custom store listing URL. · Google Play Store: You can enter only the default Google Play Store listing URL. |
Note
If no UTM parameters are added to a web URL, Airbridge automatically adds them during user redirection. If you added UTM parameters to a web URL, only those parameters will remain in the redirected web URL. See this article for more details.
Note
To set [App Store] as the [Destination], go to [Settings]>[App Settings]>[App Info]>[Platform] and either search and select your app name or directly enter the app store URL.
If you select [App Store] as the [Destination], users are sent to the appropriate app store or [Web URL] based on their platform. See the table below for the available options for each platform.
Platform |
Available options |
Notes |
|---|---|---|
Android | · Google Play Store: Default store listing · Google Play Store: Custom store listing · Web URL | You can create up to 50 custom store listing pages. See Google Play Store guide for more details. |
iOS | · Apple App Store: Default product page · Apple App Store: Custom product page · Web URL | You can create up to 35 custom product pages. See Apple App Store guide for more details. |
Desktop | · Web URL · Google Play Store | · Web URL: You can enter either a web URL or a Google Play Store custom store listing URL. · Google Play Store: You can enter only the default Google Play Store listing URL. |
Note
If no UTM parameters are added to a web URL, Airbridge automatically adds them during user redirection. If you added UTM parameters to a web URL, only those parameters will remain in the redirected web URL. See this article for more details.
If you select [Website] as the [Destination], users are sent to the appropriate [Web URL] based on their platform.
Note
If no UTM parameters are added to a web URL, Airbridge automatically adds them during user redirection. If you added UTM parameters to a web URL, only those parameters will remain in the redirected web URL. See this article for more details.
When you click Create tracking link, up to 3 types of tracking links are created for different touchpoint types. These are Click, Impression, and S2S Click. The types created depend on the ad channel. Check the details of the created tracking links.
The [Re-engagement Parameter] toggle is off by default. If you create a tracking link with the toggle off, Airbridge measures performance based on all events. If you create a tracking link with the toggle on, Airbridge measures performance based on certain events, depending on whether the setting is TRUE or FALSE.
We recommend keeping the toggle off. If you want to turn it on, see the table below before continuing.
Toggle status | Setting | Events tracked | Description |
|---|---|---|---|
Off | - | All events | Tracks all events. Recommended for most campaigns. |
On | TRUE | · Deeplink Opens (App) · Deeplink Pageviews (App) · Subsequent events of Deeplink Opens (App) and Deeplink Pageviews (App) | Excludes Install (App) events and their subsequent events. Measures only users who have the app. Best for re‑engagement campaigns. |
On | FALSE | · Installs (App) · Subsequent events of Installs (App) | Excludes Deeplink Opens (App), Deeplink Pageviews (App), and their subsequent events. Measures only users without the app. Best for user acquisition (UA) campaigns. |
Follow the steps below to create tracking links for owned and earned media for content publishing or customer engagement like push notifications, and ad channels not integrated with Airbridge. First, go to [Tracking Link]>[Link Generation]>[Custom Channels] in the Airbridge dashboard.
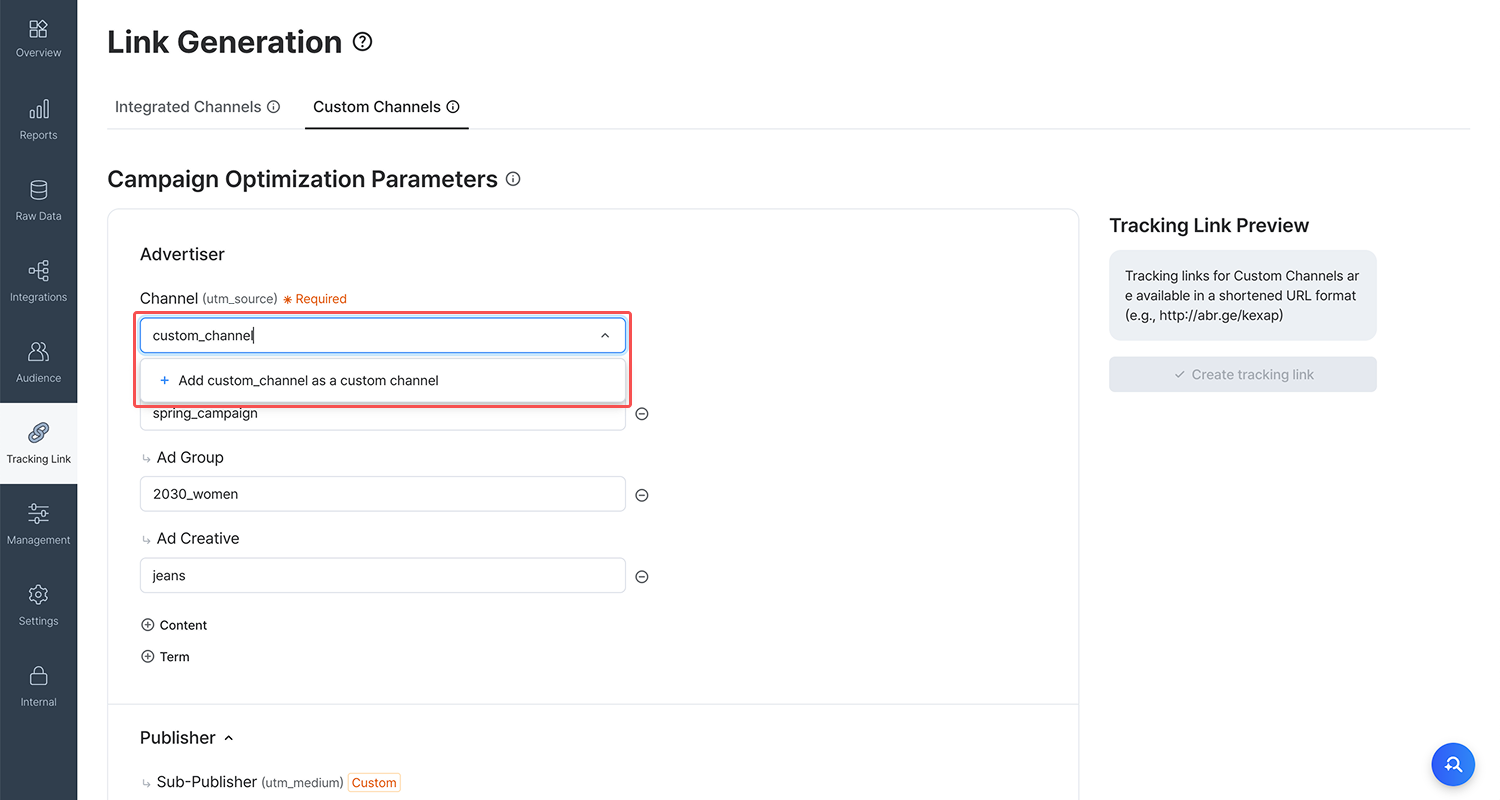
Go to [Campaign Optimization Parameters]>[Advertiser] and select [Channel]. [Channel] is a required field. When you enter a new channel name, it’s added automatically. Channel names must be unique and can only include lowercase letters, numbers, and the special characters . - _

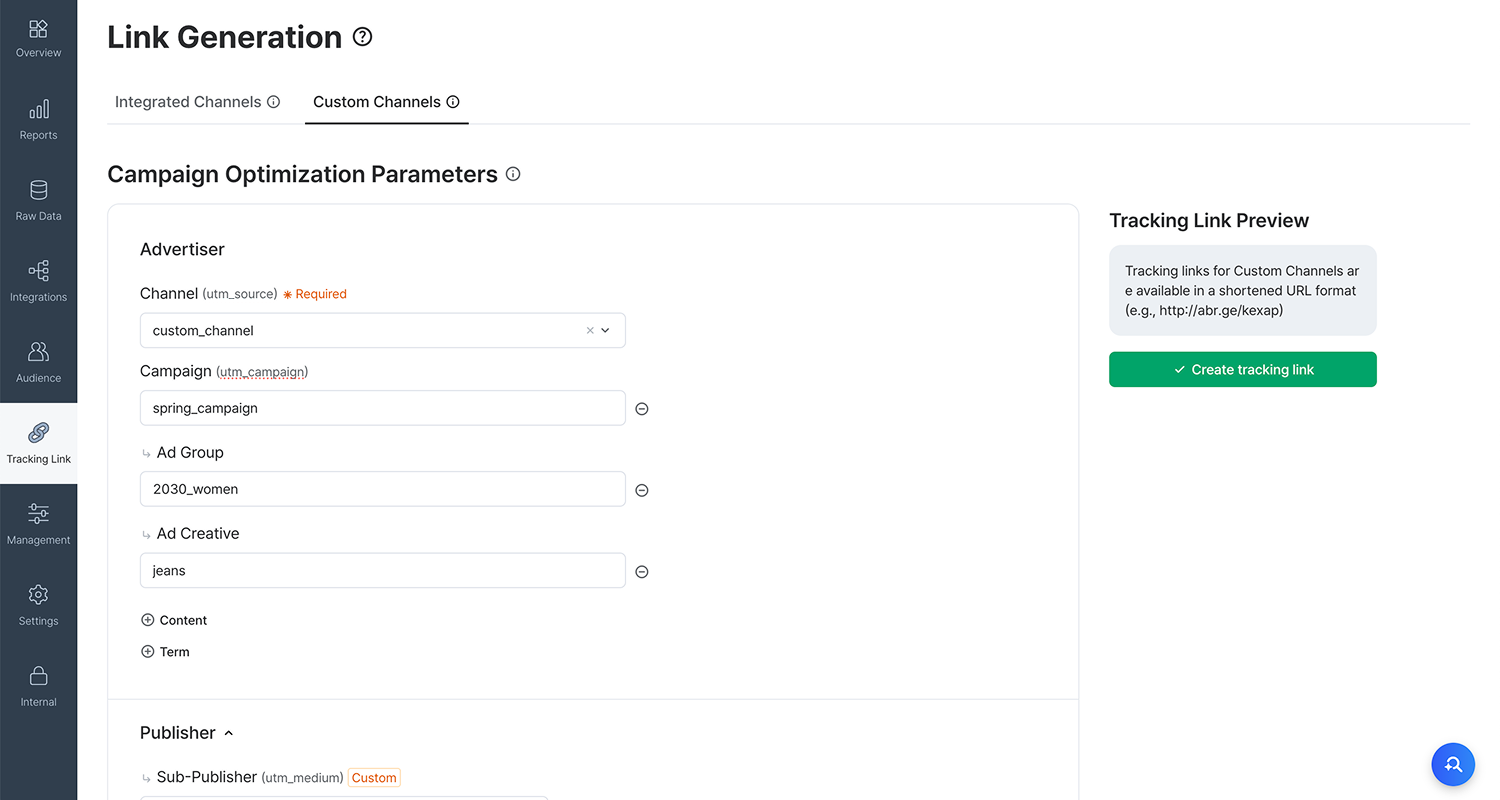
Enter the information you want to collect when ads or content with the tracking link are viewed or clicked. Use fields such as [Campaign], [Ad Group], and [Ad Creative] under [Advertiser], or [Sub-Publisher] under [Publisher], as needed. The field names become parameter names, and the information you enter becomes parameter values in your tracking link.
For example, if you enter “spring_campaign” in [Campaign] as shown in the image below, they appear in your tracking link as “campaign=spring_campaign”. When you collect data with this tracking link, you'll see “spring_campaign” in Airbridge reports when you select Campaign as a GroupBy.
Tracking links for redirection only
You can create tracking links that only redirect users by entering
ab_redirection_onlyin [Channel]. Data collected by these links is excluded from attribution and performance measurement. Use this option for customer engagement campaigns or any ads or content designed solely to send users to a destination.
[Redirection] is where you set the destination for users who click the tracking link.
Note
To set [App (Deep Link)] as the [Destination], register deep link information in the Airbridge dashboard [Tracking Link]>[Deep Links]. For instructions, see this article.
If you select [App (Deep Link)] as the [Destination], users who have the app are sent to a specific app page. In [Deep Link], enter the URL of the app page where you want to send users. For instructions, see this article.
Attention
Only URL scheme deep links can be entered in [Deep Link]. Enter a specific app page URL that starts with the URL scheme registered in Airbridge.
Encode any characters other than letters, numbers, and the special characters = ? & #
You can add a stopover Airpage to cover edge cases on iOS non-Safari browsers. See this article for details.
Use [Fallback Path] to set where users without the app are sent when they click the tracking link applied with deep linking. You can send users to app stores to encourage app installation or to a web URL to show them specific content. The available options depend on the platform.
Platform |
Available options |
Notes |
|---|---|---|
Android | · Google Play Store: Default store listing · Google Play Store: Custom store listing · Web URL | You can create up to 50 custom store listing pages. See Google Play Store guide for more details. |
iOS | · Apple App Store: Default product page · Apple App Store: Custom product page · Web URL | You can create up to 35 custom product pages. See Apple App Store guide for more details. |
Desktop | · Web URL · Google Play Store · Airpage | · Web URL: You can enter either a web URL or a Google Play Store custom store listing URL. · Google Play Store: You can enter only the default Google Play Store listing URL. · Airpage: You can show users QR codes that send them to an app store to encourage app installation. |
Note
If no UTM parameters are added to a web URL, Airbridge automatically adds them during user redirection. If you added UTM parameters to a web URL, only those parameters will remain in the redirected web URL. See this article for more details.
Note
To set [App Store] as the [Destination], go to [Settings]>[App Settings]>[App Info]>[Platform] and either search and select your app name or directly enter the app store URL.
If you select [App Store] as the [Destination], users are sent to the appropriate app store or [Web URL] based on their platform. See the table below for the available options for each platform.
Platform |
Available options |
Notes |
|---|---|---|
Android | · Google Play Store: Default store listing · Google Play Store: Custom store listing · Web URL | You can create up to 50 custom store listing pages. See Google Play Store guide for more details. |
iOS | · Apple App Store: Default product page · Apple App Store: Custom product page · Web URL | You can create up to 35 custom product pages. See Apple App Store guide for more details. |
Desktop | · Web URL · Google Play Store · Airpage | · Web URL: You can enter either a web URL or a Google Play Store custom store listing URL. · Google Play Store: You can enter only the default Google Play Store listing URL. · Airpage: You can show users QR codes that send them to an app store to encourage app installation. |
Note
If no UTM parameters are added to a web URL, Airbridge automatically adds them during user redirection. If you added UTM parameters to a web URL, only those parameters will remain in the redirected web URL. See this article for more details.
If you select [Website] as the [Destination], users are sent to the appropriate [Web URL] based on their platform.
Note
If no UTM parameters are added to a web URL, Airbridge automatically adds them during user redirection. If you added UTM parameters to a web URL, only those parameters will remain in the redirected web URL. See this article for more details.
When you click Create tracking link, both the standard tracking link and short link, its shortened version, are created. A social share preview and a QR code are created as well. Check the details of the created tracking links.
The following customization options are supported for custom channel tracking links:
Replace the default abr.ge domain in short links with your own custom domain. Add your custom domain following this article.
Customize the text that appears after the domain in your short link. Include brand keywords to add a branding element. For example, if you enter “appname” as the short link ID, your short link will be “https://custom_domain/appname”.
Note
To use a short link ID, add your custom domain first.
Customize the image, title, and description that appear when ads or content with a custom channel tracking link are shared on social media. For more details, see this article.
You can use Airpage as the [Desktop] fallback path when you select [App (Deep Link)] or [App Store] as the destination for custom channel tracking links. To use Airpage, go to [Settings]>[App Settings]>[App Info]>[Airpage] and enter the URL. For more details, see this article.
This is where you can switch the [Re-engagement Parameter] toggle on or off, which is off by default. If you create a tracking link in this default state, Airbridge measures performance based on all events that occurred from ads with this tracking link. If you switch it on, Airbridge measures performance based on certain events, depending on whether the setting is TRUE or FALSE.
We recommend keeping the toggle switched off. If you're considering switching it on, refer to the table below.
Toggle status | Setting | Events tracked | Description |
|---|---|---|---|
Off | - | All events | Tracks all events. Recommended for most campaigns. |
On | TRUE | · Deeplink Opens (App) · Deeplink Pageviews (App) · Subsequent events of Deeplink Opens (App) and Deeplink Pageviews (App) | Excludes Install (App) events and their subsequent events. Measures only users who have the app. Best for re‑engagement campaigns. |
On | FALSE | · Installs (App) · Subsequent events of Installs (App) | Excludes Deeplink Opens (App), Deeplink Pageviews (App), and their subsequent events. Measures only users without the app. Best for user acquisition (UA) campaigns. |
Was this helpful?
Social share preview