
AttentionFor connections created or modified after May 14, 2026,
${VERSION} in the folder path is fixed at 3.0. Existing connections keep their current version as long as you don’t change them.Before you begin
You need permissions to create an Amazon S3 bucket, IAM policy, and IAM role in the AWS Management Console. Amazon S3 integration takes 4 steps.- Connection setup: Enter bucket details, create the IAM policy and role, and test the connection.
- Event selection: Choose events to send to Amazon S3.
- Property selection: Choose properties for those events.
- Review and add: Review your selections and add the connection.
Step 1: Connection setup
To create a connection, find the following information in the AWS Management Console.- Bucket name
- Region
- IAM role ARN
Find your bucket name and region in the Amazon S3 console
Find your bucket name and region in the Amazon S3 console.- Sign in to the AWS Management Console and open the Amazon S3 console.
- In [Buckets], find the name and region of the bucket you want to integrate with Airbridge. If you don’t have a bucket or want to integrate a new one, click Create bucket. See the AWS S3 user guide for details.
Submit your Amazon S3 bucket to Airbridge
Enter the bucket name and region you found into the Airbridge dashboard.- In the Airbridge dashboard, go to [Integrations]>[Third-party Integration] and click Amazon S3.
- Click Add connection.
- Enter the bucket name and region from the Amazon S3 console.
- Choose CSV or Parquet as the integration format and click Submit.
- Once your information is submitted correctly, the IAM policy you need will appear. Click Copy to copy the policy.
Create the IAM policy in the IAM console
Create an IAM policy in the IAM console to grant access to your Amazon S3 resources.- Open the IAM console.
- Go to [Access management]>[Policies] and click Create policy in the top right.
- Click the [JSON] tab in the top right. Paste the policy you copied from the Airbridge dashboard into the policy editor and click Next in the bottom right.
- In [Review and create], enter a policy name. Leave the other settings as they are. Click Create policy in the bottom right to finish.
Create the IAM role in the IAM console
Create an IAM role in the IAM console that can delegate access to AWS resources.- From the Airbridge dashboard, copy the account ID and external ID.
- In the IAM console, go to [Access management]>[Roles] and click Create role.
- In [Trusted entity type], select AWS account.
- In [AWS account], select Another AWS account and enter the account ID from the Airbridge dashboard. Under options, select Require external ID and enter the external ID from the Airbridge dashboard. Click Next.
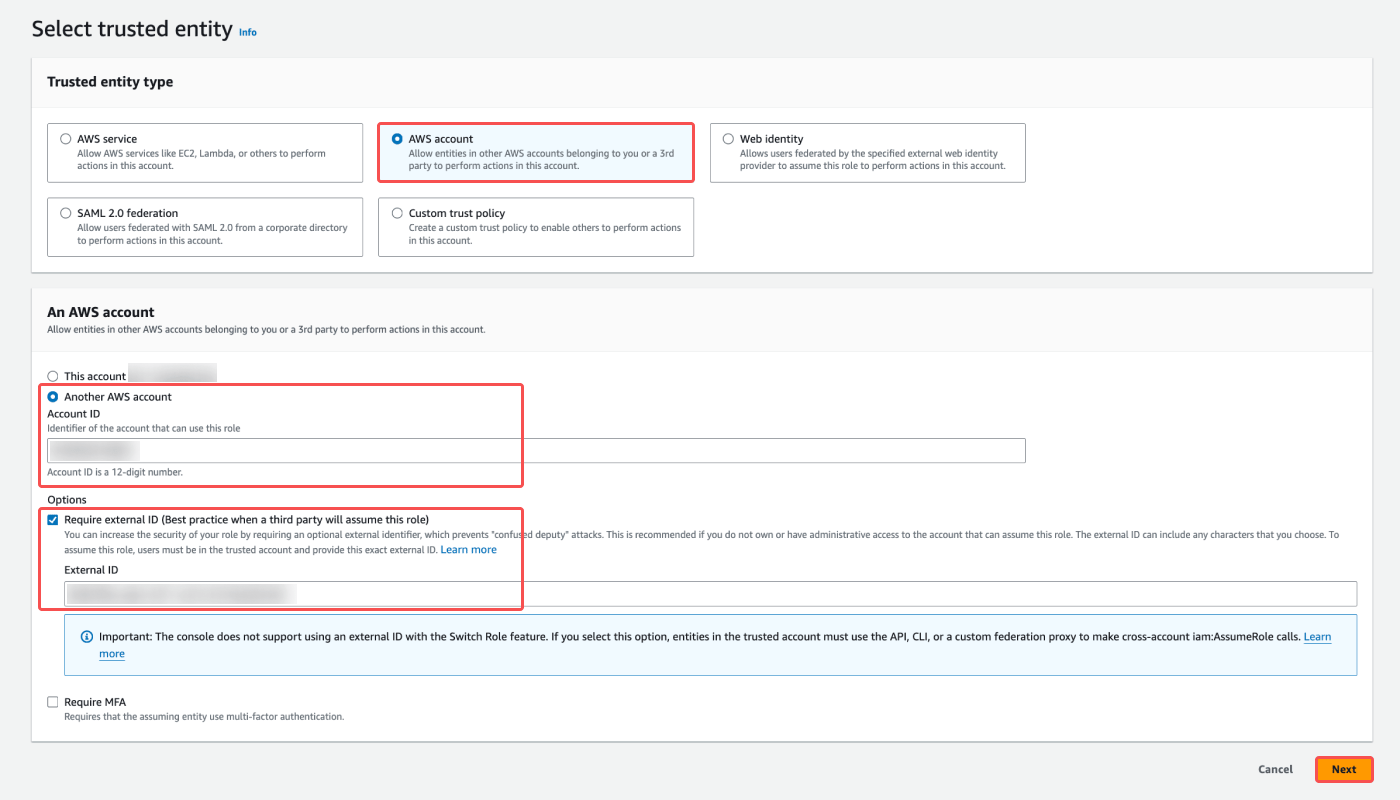
- In [Add permissions], search for the policy you created for the Airbridge-Amazon S3 integration by name. Select the checkbox and click Next.
- In [Role details], enter a role name. Leave the other settings as they are. Click Create role to finish.
Submit the IAM role ARN to Airbridge
Enter the IAM role ARN you found in the IAM console into the Airbridge dashboard.- In the IAM console, go to [Access management]>[Roles] and click the IAM role you created for the Airbridge-Amazon S3 integration.
- Copy the ARN.
- Paste the IAM role ARN into the Airbridge dashboard and click Submit.
Test the connection
Test whether the information you entered can connect to Amazon S3.- In the Airbridge dashboard, click Test connection.
- If the test succeeds, click Next in the bottom right to move to event selection.
Step 2: Select events to send
Select events to send to Amazon S3. You can only select events that Airbridge has collected at least once.- Select events from app, web, tracking link categories.
- Click Next in the bottom right.
NoteEvents newly collected after you create the connection won’t be sent until you add them manually.
Step 3: Select properties to send
Select properties to send to Amazon S3 for the events you chose.- Select properties by category.
- Click Next in the bottom right.
NoteRequired properties cannot be deselected.
Step 4: Review and add the connection
Review your selected events and properties, then add the connection.- Review [Events to send] and [Properties to send]. To make changes, click Edit on the right.
- Under [Data transfer status], check the transfer status by data source.
- Click Save connection in the bottom right to create the connection.
Check data sending status
You can check data sending status on the following pages in the Airbridge dashboard.Data sending status messages
See the table below for the specific meaning of each status message.Find your data in cloud storage
Airbridge always sends the previous day’s data based on the app’s time zone around 7:00 PM UTC. Once you complete the Amazon S3 integration, data is delivered to the following paths in your bucket starting the next day.- App events:
${YOUR-BUCKET-NAME}/${YOUR-APP-NAME}/app/${VERSION}/date=${year}-${month}-${day}/
- Web events:
${YOUR-BUCKET-NAME}/${YOUR-APP-NAME}/web/${VERSION}/date=${year}-${month}-${day}/
- Tracking link events:
${YOUR-BUCKET-NAME}/${YOUR-APP-NAME}/tracking-link/${VERSION}/date=${year}-${month}-${day}/
Sent files contain only the properties you selected. Property changes can reorder columns in the file, so always use column names to identify data.
AttentionFor connections created or modified after May 14, 2026,
${VERSION} in the folder path is fixed at 3.0. Existing connections keep their current version as long as you don’t change them.Manage integration
Refer to the sections below to edit or delete your integration.Edit Amazon S3 integration
If your Amazon S3 integration details change, follow these steps to update them.- In the Airbridge dashboard, go to [Integrations]>[Third-party Integration] and click Amazon S3.
- Click the connection you want to update.
- Click the field you want to edit and enter the new value.
- When done, click Done.
Delete an Amazon S3 connection
- In the Airbridge dashboard, go to [Integrations]>[Third-party Integration] and click Amazon S3.
- Click the delete icon for the connection you want to remove.
- Enter the confirmation phrase and click Delete.
Resolve integration errors
You can check integration setup status under [Integrations]>[Integration Overview] in the Airbridge dashboard. If an error occurs, see the Check Integration Status guide for resolution steps.Important notes
Number of cloud storage integrations
Airbridge supports one cloud storage integration by default. Integrating with more than one storage requires additional charges.Editing a connection updates the folder path
Editing the connection details such as events or properties updates the${VERSION} in your Amazon S3 storage path to 3.0. Once updated, data can no longer be retrieved from the previous folder path. Check with your internal S3 administrator before switching to the 3.0 path.