Testing - iOS SDK
Test whether the Airbridge SDK functions as intended using the Airbridge dashboard.
Attention
Install the Airbridge SDK before conducting the test.
After completing the Airbridge iOS SDK setup, you can test the SDK using real-time logs and test sites. Prepare the following information before testing.
Airbridge uses IDFA (Identifier for Advertisers) provided by Apple as an identifier for attribution.
Airbridge offers the "My Device ID by Airbridge" app, which quickly finds a device's IDFA. Scan the QR code below with the test device and download the app.

When the SDK is installed, app install events are automatically collected. Follow the steps below to check whether the SDK collects app install events as intended.
The attributed install event test is available on the [Settings]>[Test Console] page in the Airbridge dashboard. Attributed events are events with winning touchpoints determined by the Airbridge attribution model.
Event collection: If the app install event is collected as intended, the organic app install event test is unnecessary.
Attribution: The app install is collected by the SDK and attributed by Airbridge.
Once the app install event attribution is confirmed to function as intended, any subsequent events will also be attributed as app install events, which are treated as Target Events.
Attention
If your iOS app displays the ATT prompt, allow app tracking to conduct the test.
1. Prepare a test device where the app is not installed, or if the app is already installed, delete it before testing.
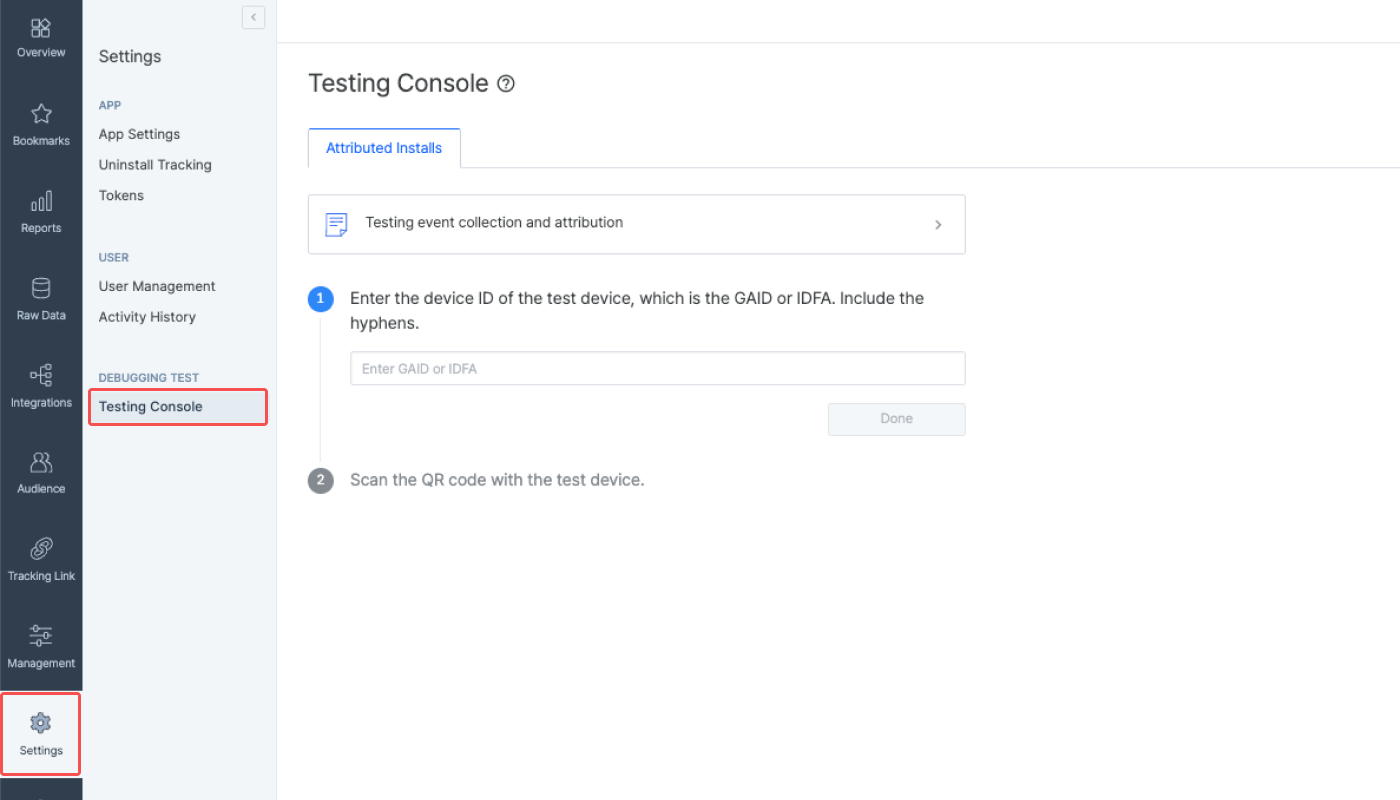
2. Navigate to the [Attributed Installs] tab on the [Settings]>[Testing Console] page in the Airbridge dashboard and enter the device ID of the test device. Include the hyphens.
You can use the My Device ID app by Airbridge to quickly find the device ID of your test device.
You can quickly find the device ID and other device information, such as the device model and OS version of the test device, using the My Device ID by Airbridge app. Scan the QR code below to download.

The device ID type varies depending on the OS of your test device device. For more details on device IDs, refer to this article.
3. Scan the QR code with the test device. Or click Copy URL and send the copied URL to the test device. Click the URL from the test device. The copied URL is the tracking link embedded in the QR code.
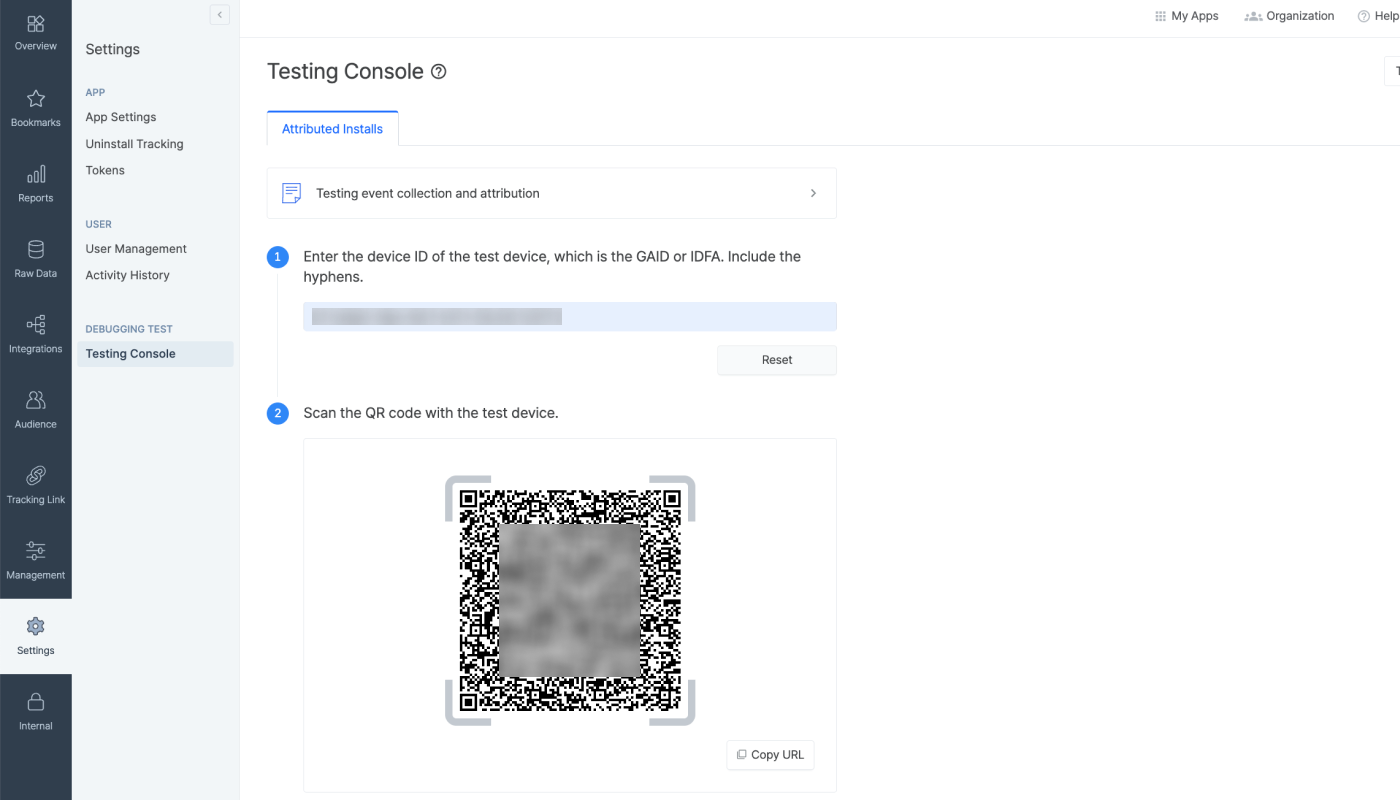
4. Upon scanning the QR code, a testing page will open. After the testing page opens, install the app. Closing the testing page won't affect the test result.
Released apps: Go to the app store and install the app.
Unreleased or testing apps: Download the app file manually or install the app using programs such as the Google Play Console or Test Flight.
The app must be opened after download so the SDK can collect the app install event. Also, allow tracking on the ATT prompt to proceed with the test.
5. Once the app is installed and opened, you can find the test result in the Airbridge dashboard.
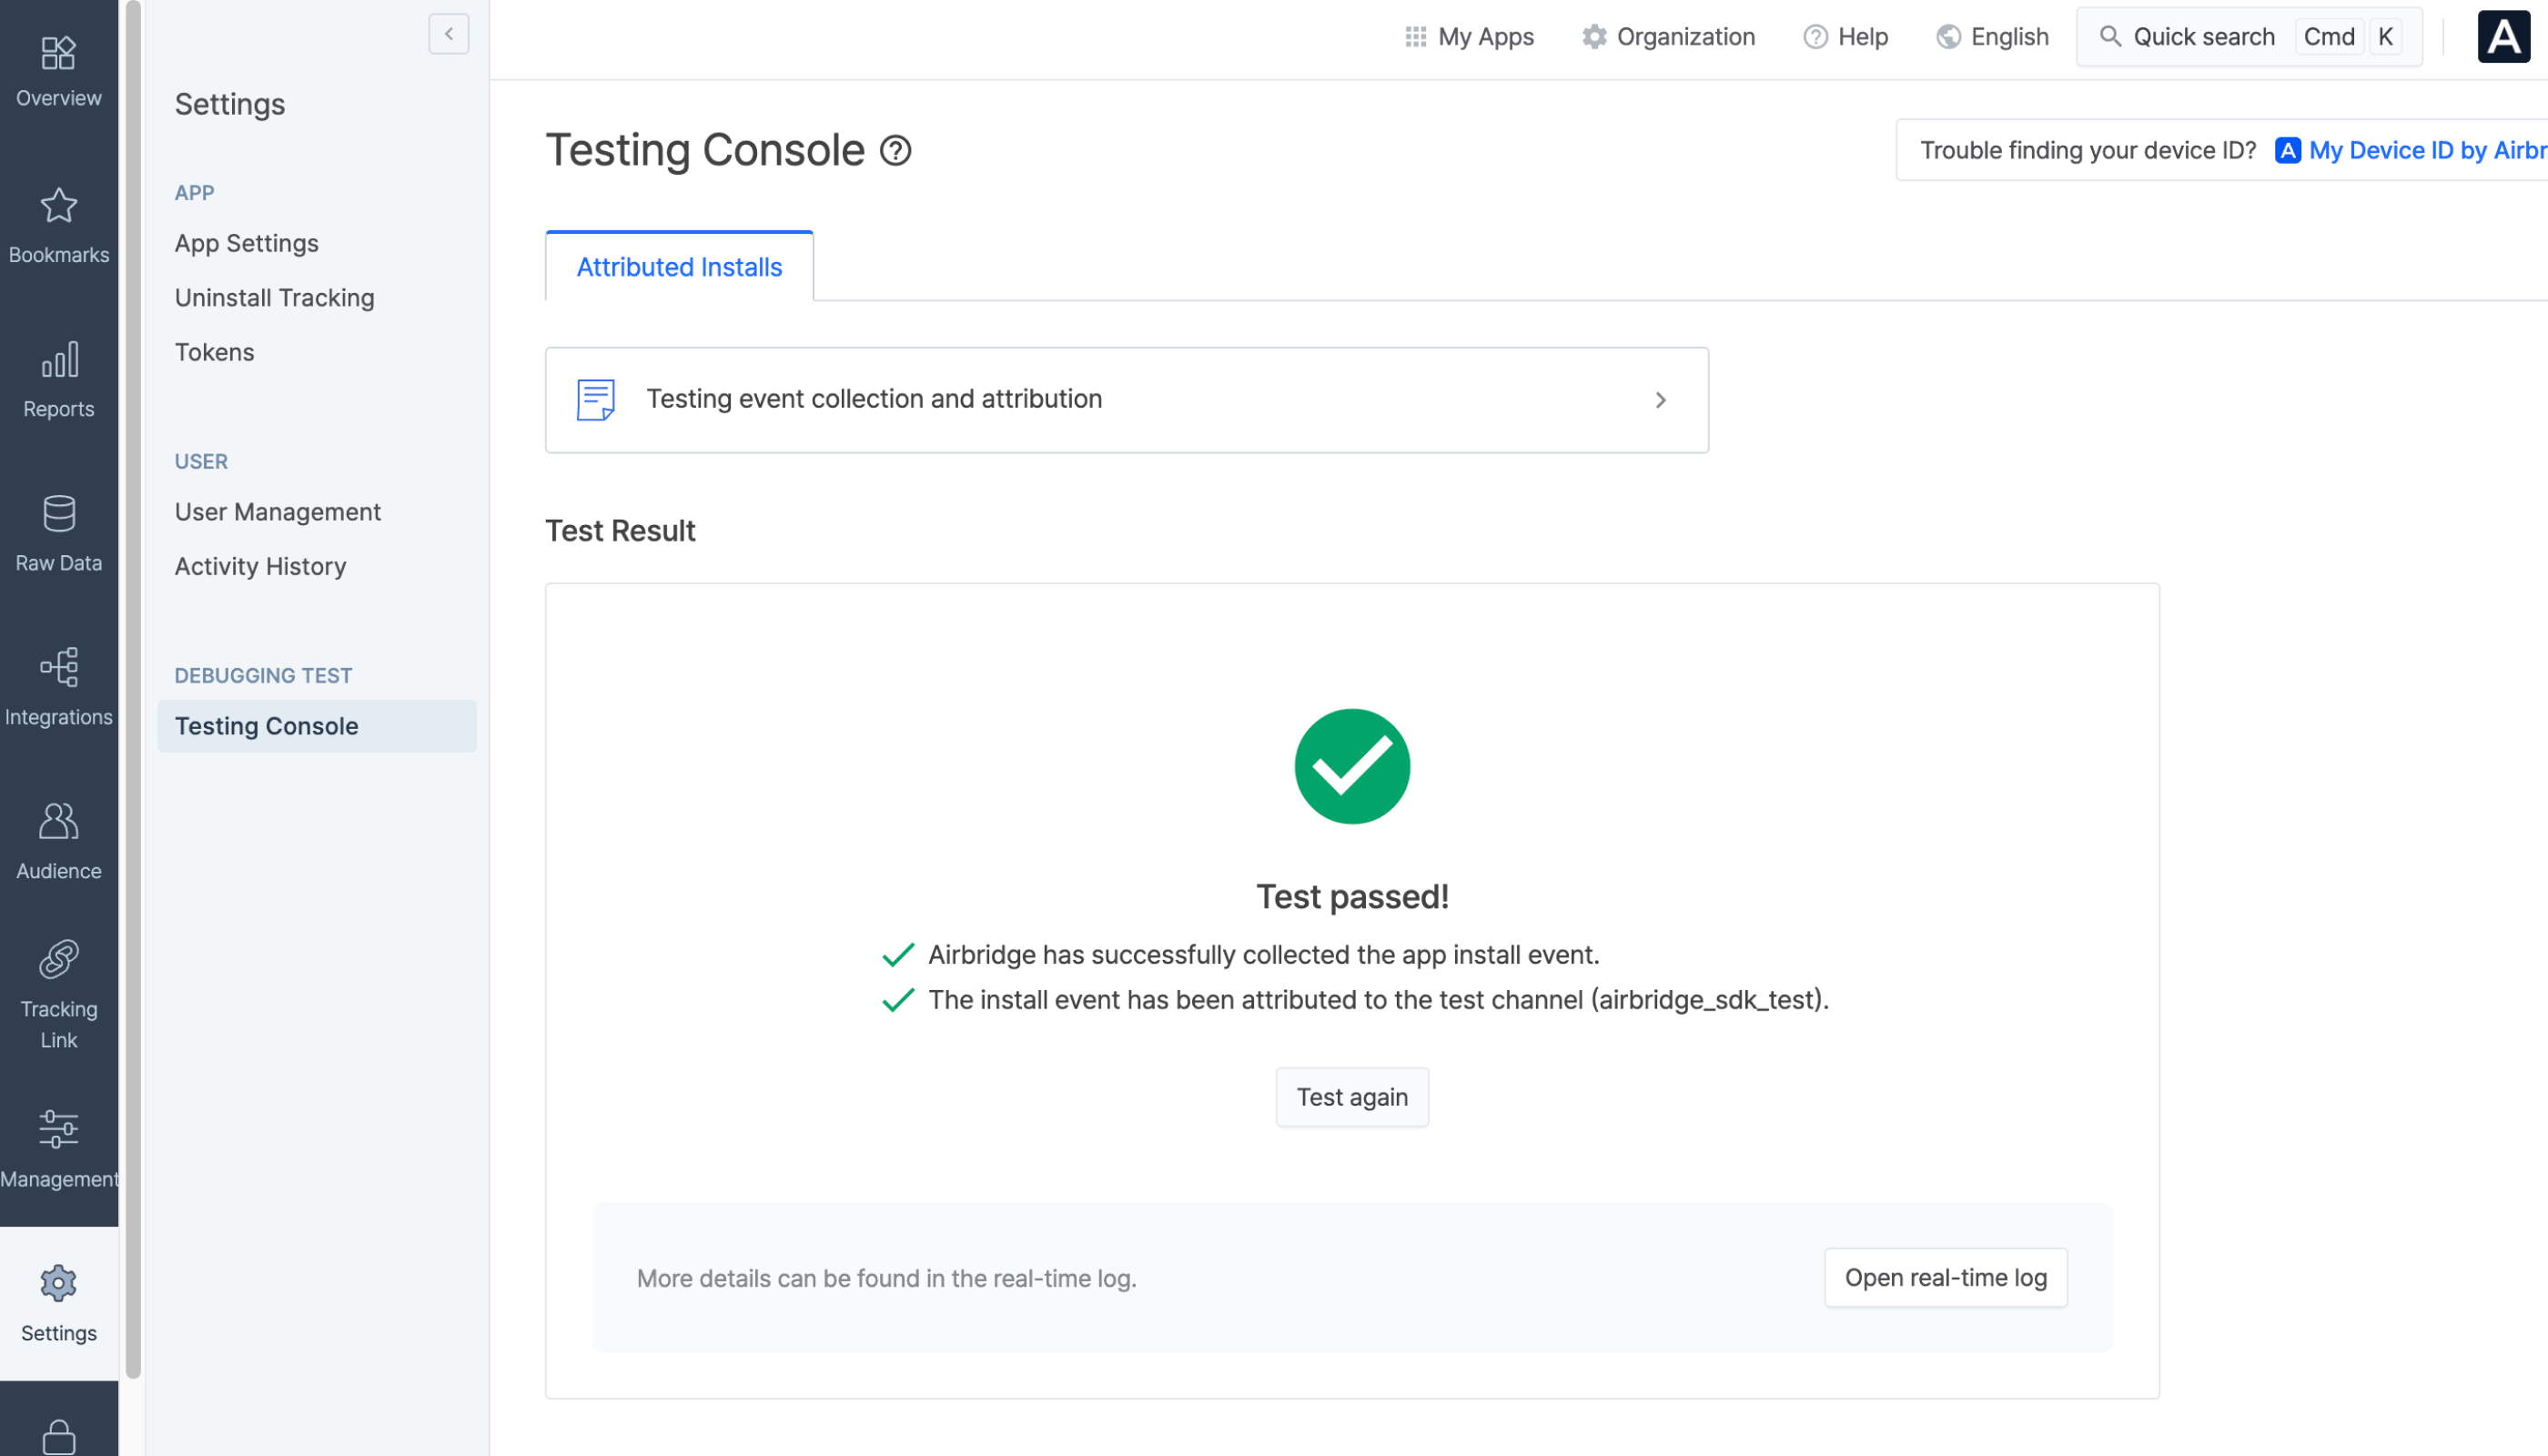
6. If the test result is delayed or if the test fails, delete the app from the test device and conduct the test again. If no attribution result is available, go through the checklist to avoid mistakes that lead to attribution failure.
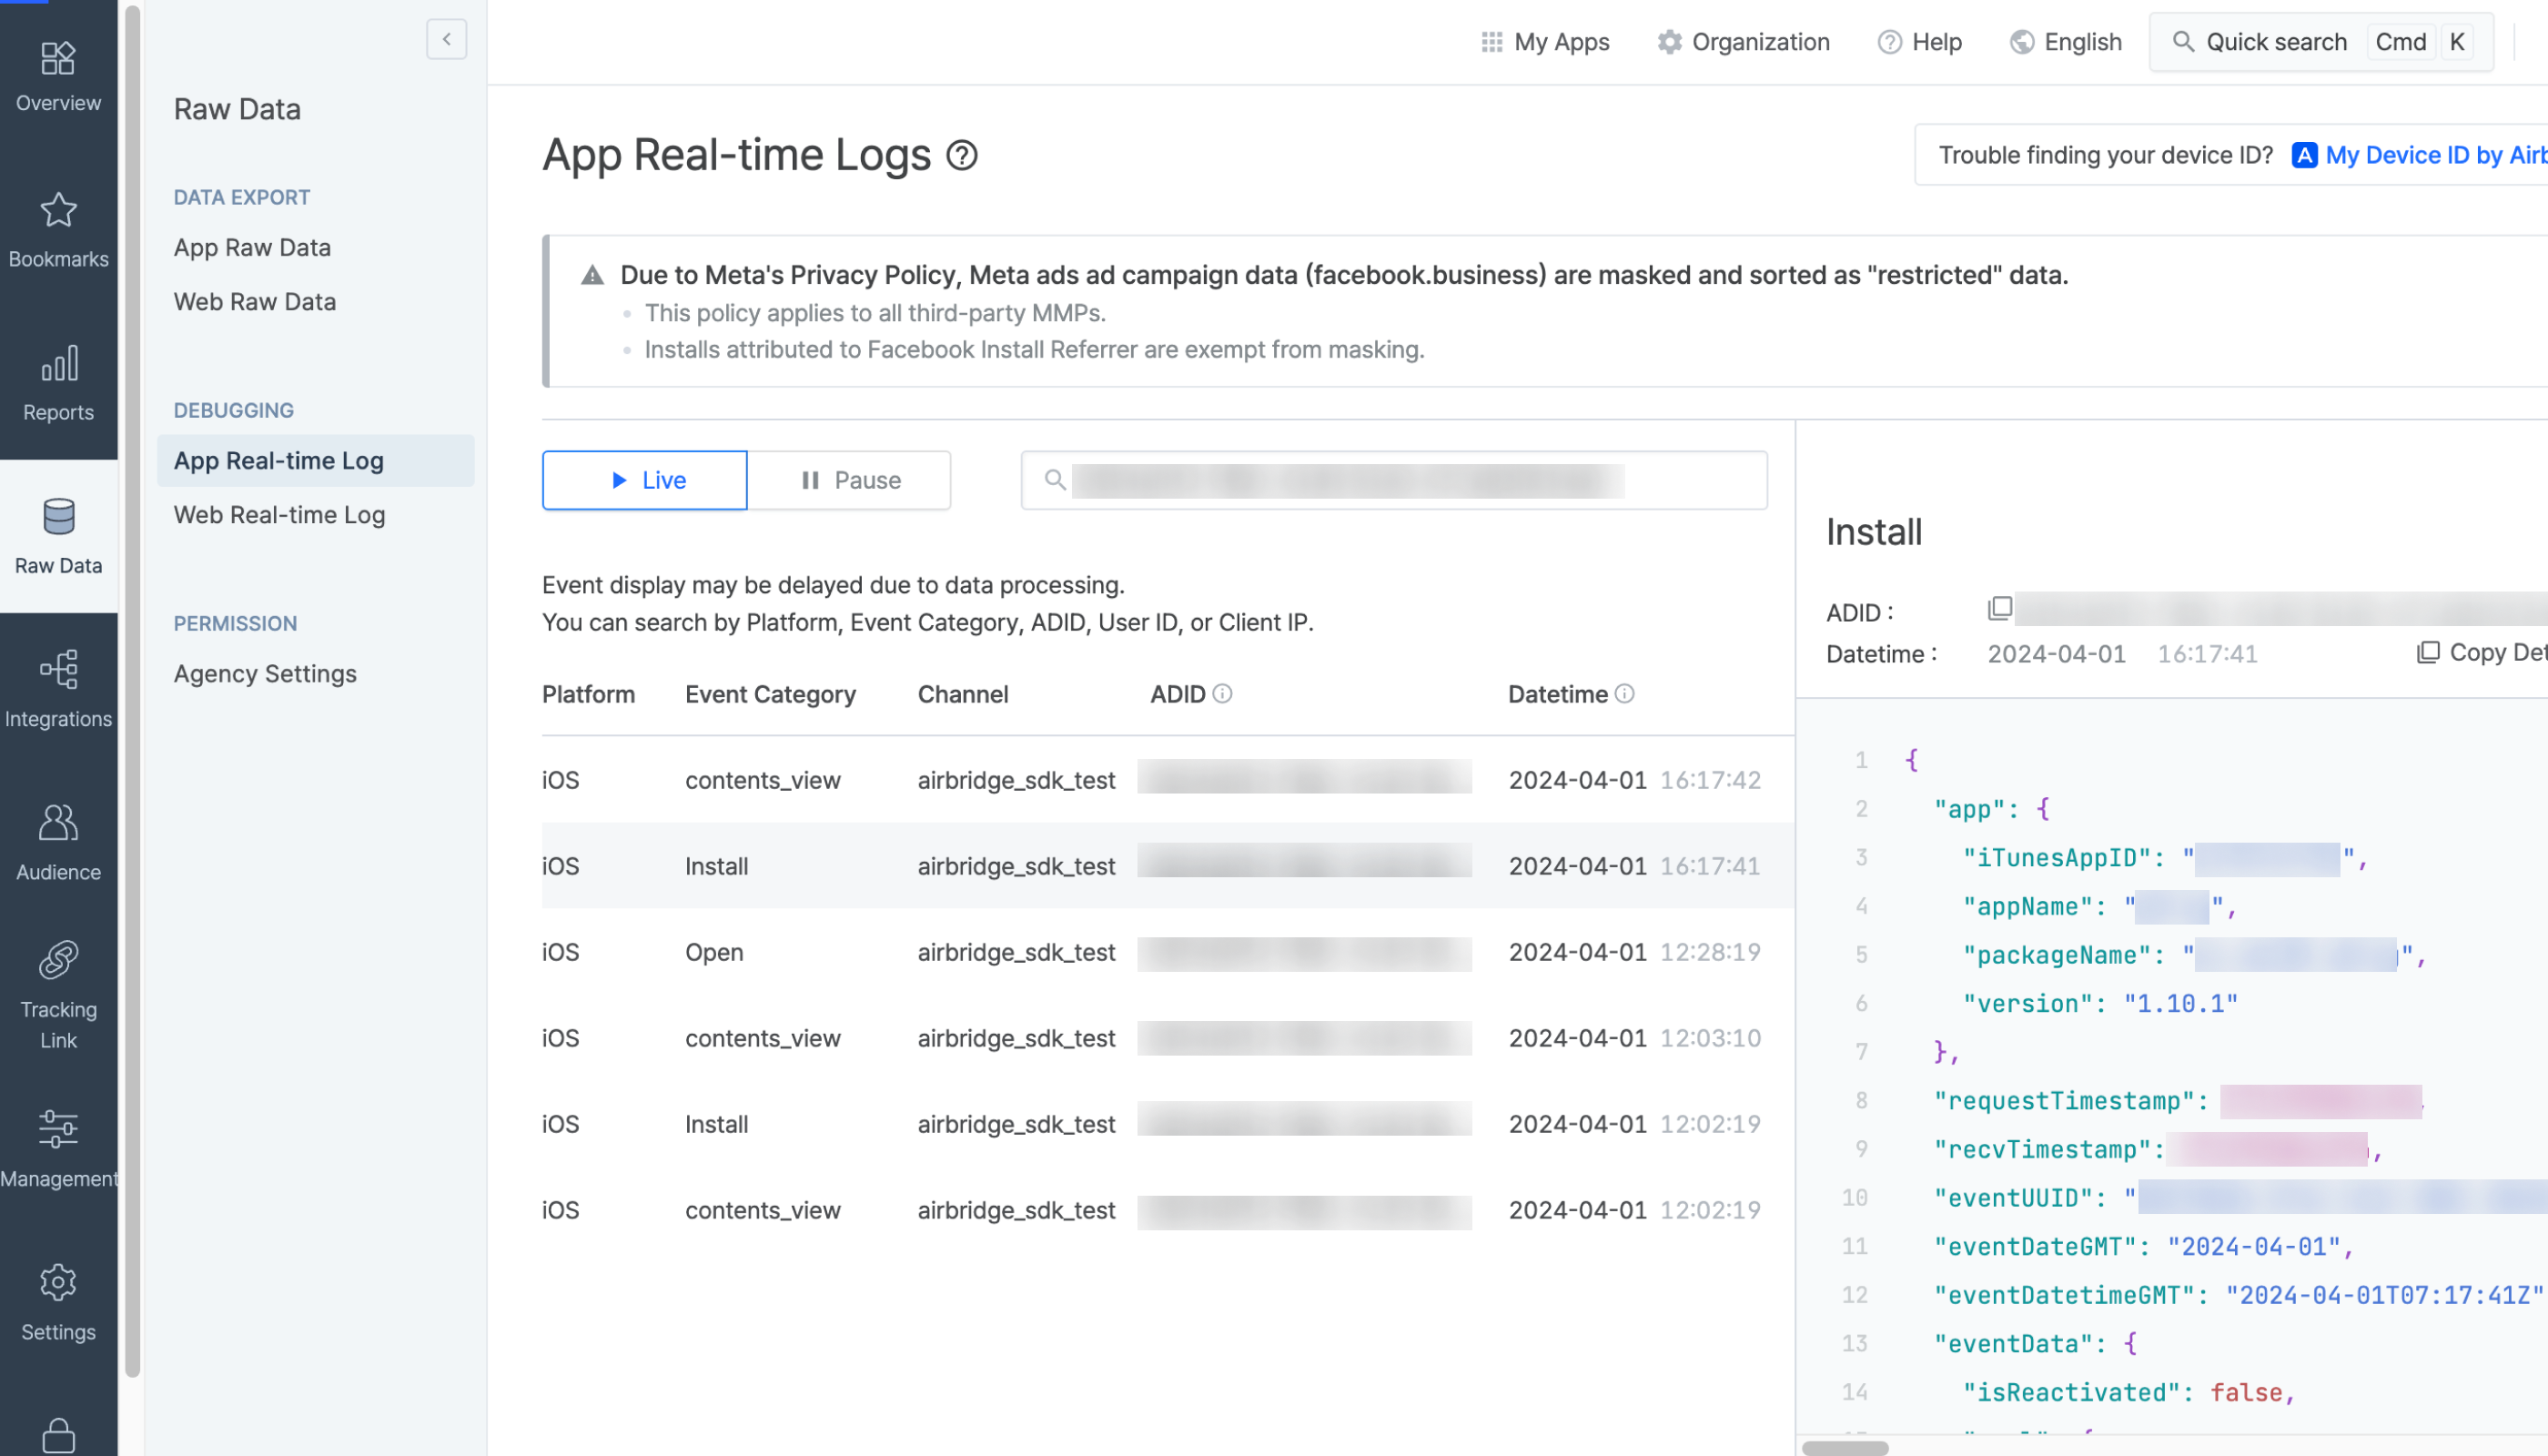
7. Click Open real-time logs to view the details of the test result on the [Raw Data]>[App Real-time Logs] page. You can also use the Actuals Report for the same purpose.
Note
Airbridge users with Agency or Media Partner app roles don’t have access to the [App Real-time Logs] page in the Airbridge dashboard.
If the app install event from the test device has been collected successfully, you can see the install event details on the [Raw Data]>[App Real-time Logs] page. If the install event details are available in the real-time logs, as in the image below, the app install event collection and attribution are deemed to be successful even if the test result did not show due to delays or initially showed failure on the dashboard.
Android
Event Category: Install
gaid: GAID entered in the Airbridge dashboardattributionResult.channel: airbridge_sdk_testattributionResult.attributedTouchpointOriginURL:https://abr.ge/@${YOUR_APP_NAME}/test_sdk?campaign=test_sdk_campaign&device_uuid=${YOUR_GAID}
iOS
Event Category: Install
ifa: IDFA entered in the Airbridge dashboardattributionResult.channel: airbridge_sdk_testattributionResult.attributedTouchpointOriginURL:https://abr.ge/@${YOUR_APP_NAME}/test_sdk?campaign=test_sdk_campaign&device_uuid=${YOUR_IDFA}
Configure the Actuals Report as detailed below to confirm the app install event collection and attribution.
Date range: Include the date the test was conducted.
Metric: Select
Install (App).GroupBy: Select
Channel.
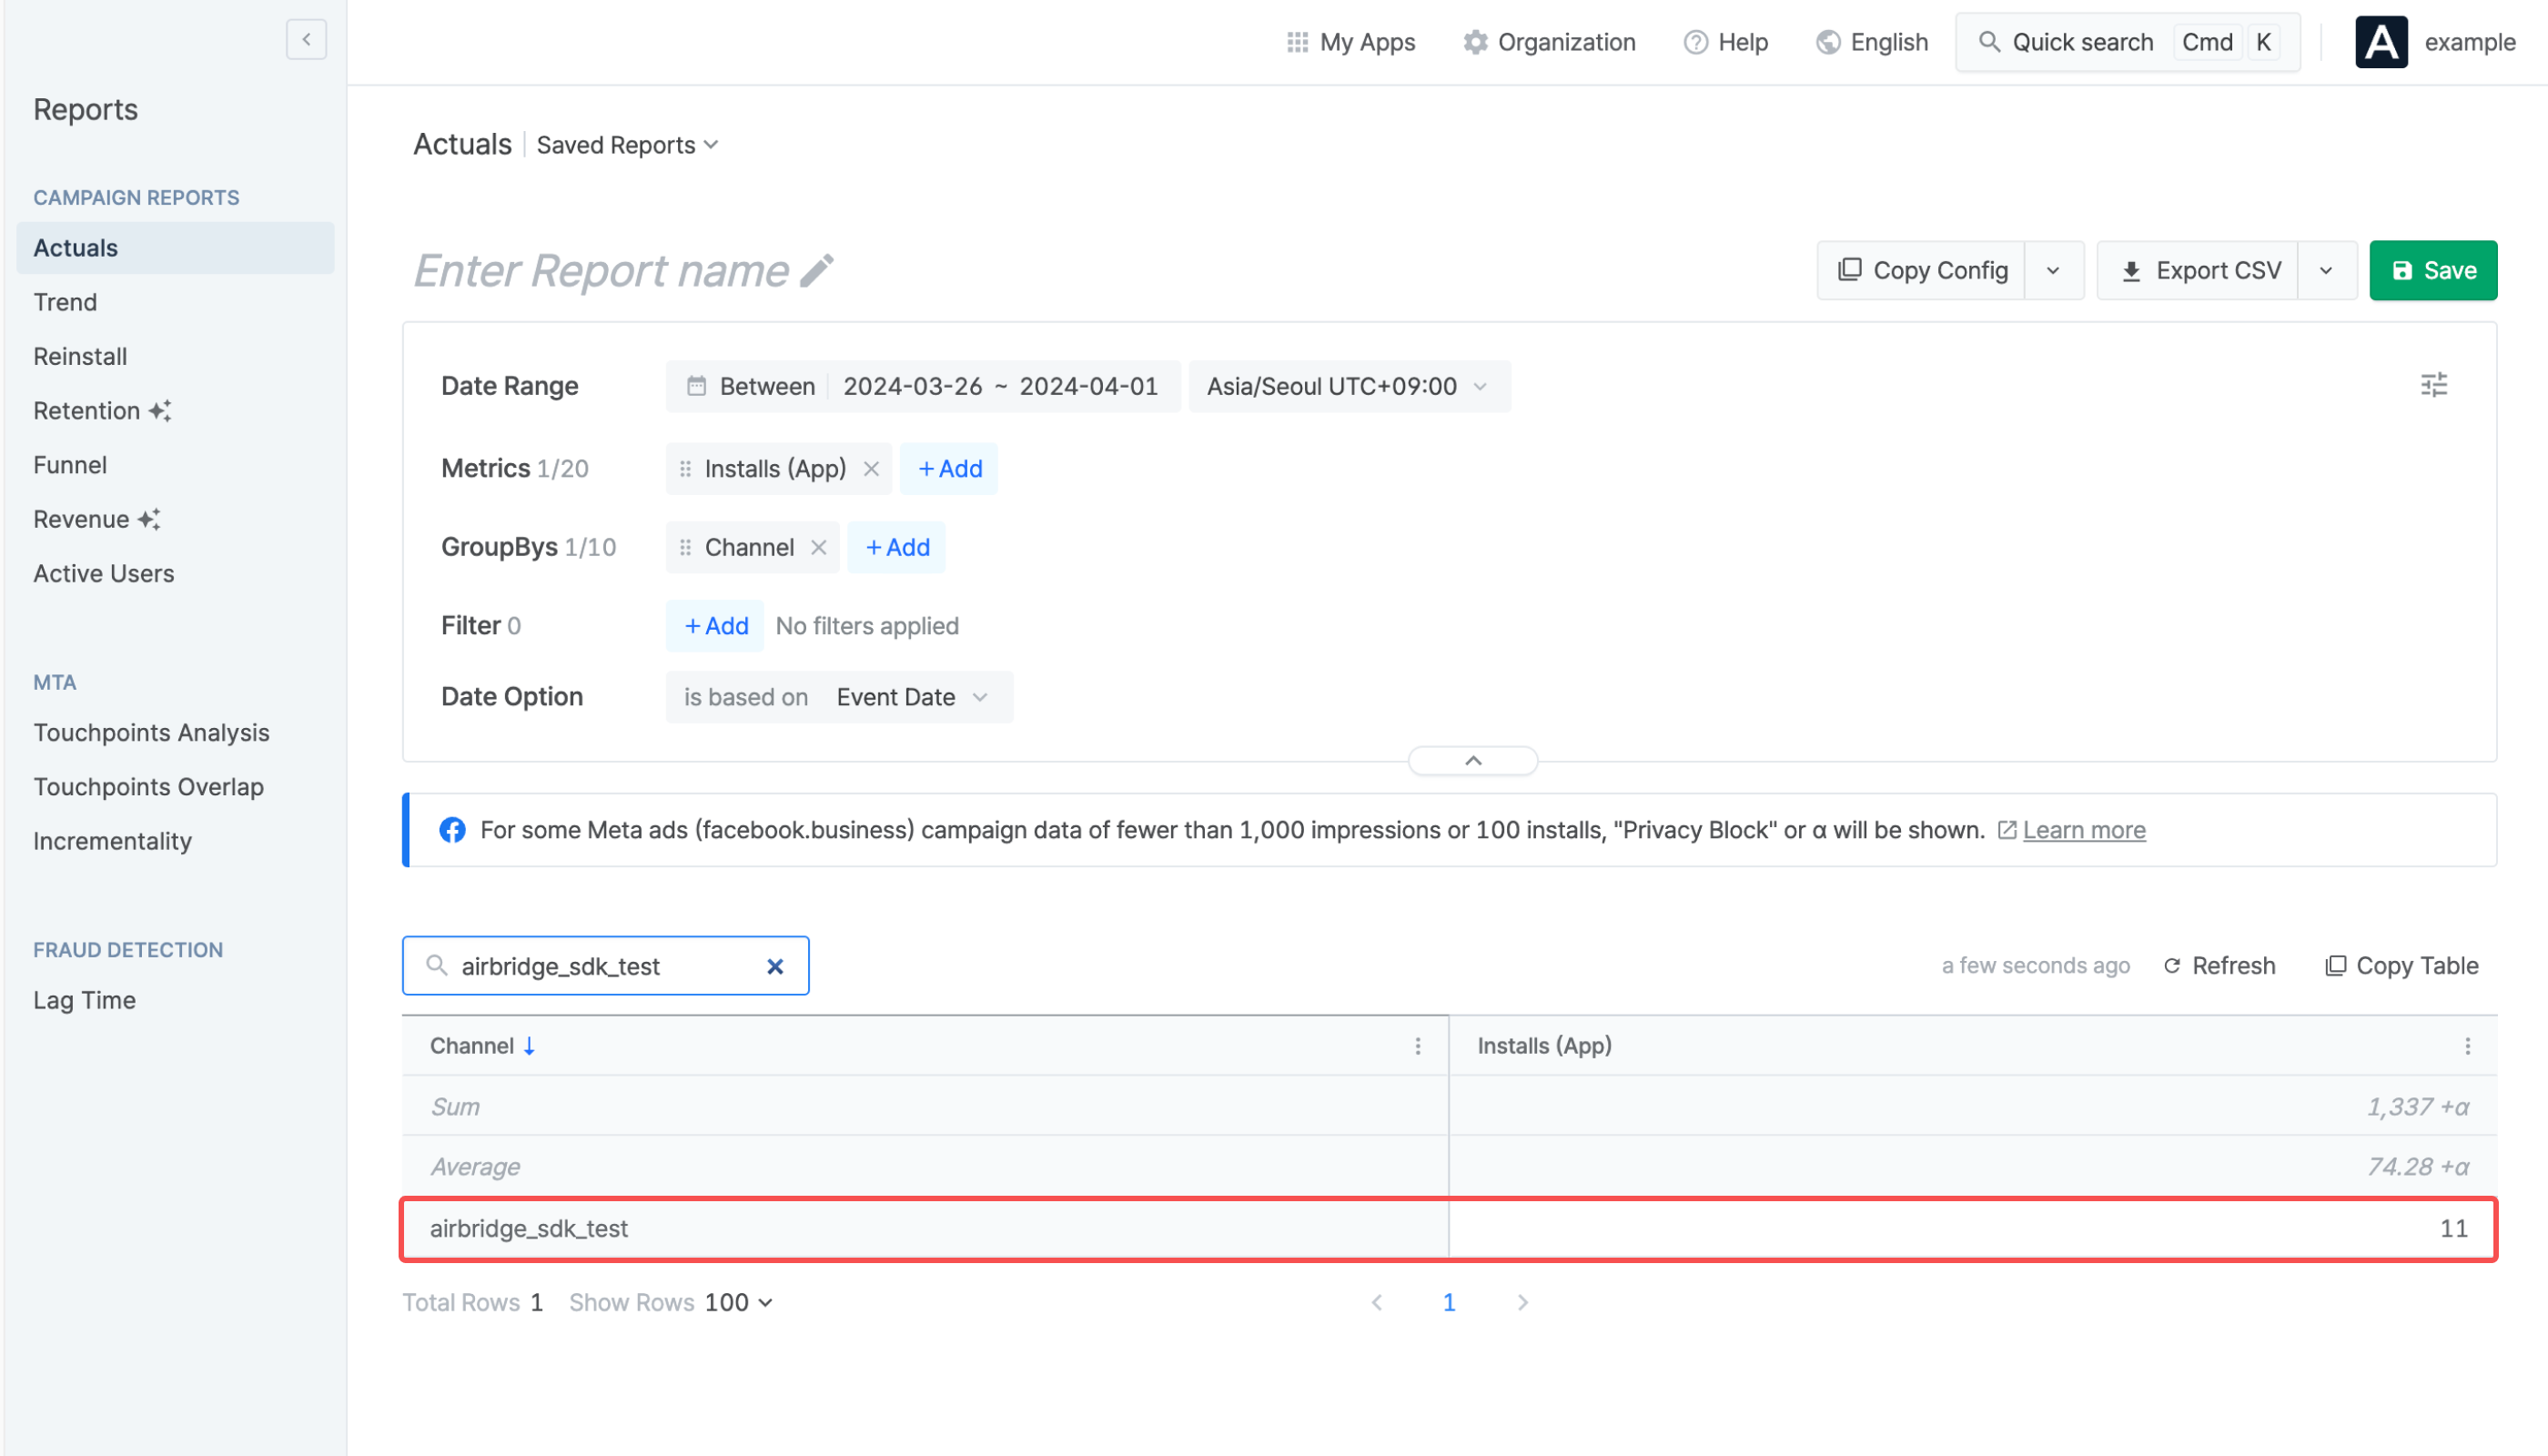
If the app install event has been successfully attributed to the test channel, airbridge_sdk_test, the Actuals Report will show the number of installs as in the image below.
Organic app install events are installs that occur without any interaction with a paid ad. By testing organic app installs, you can confirm that events are collected by the Airbridge SDK. However, this test does not confirm whether events are attributed successfully or not.
1. Prepare a test device. If your app is already installed, delete it from the device before conducting the test.
2. Download and launch the app on the test device.
3. Check whether the install event details can be found on the [Raw Data]>[App Real-time Logs] page. It may take up to 10 minutes to view the event details in the real-time logs from the actual event occurrence time.
4. If the test result is delayed and the install event details can’t be found on the [App Real-time Logs] page, delete the app from the test device and conduct the test again.
On the [Raw Data]>[App Real-time Logs] page in the Airbridge dashboard, you can check in the real-time logs whether in-app events are collected as designed in the event taxonomy. Search by the device ID to find the logs.
Note
Airbridge users with Agency or Media Partner app roles don’t have access to the [App Real-time Logs] page in the Airbridge dashboard.
In order to confirm whether an event has been collected as intended according to the event taxonomy, check the event details on the [App Real-time Logs] page.

Refer to the information below to learn where to find the event parameters.
Category:
eventData.goal.categoryAction:
eventData.goal.actionLabel:
eventData.goal.labelValue:
eventData.goal.valueSemantic Attribute:
eventData.goal.semanticAttributesCustom Attribute:
eventData.goal.customAttributes
Note
Airbridge users with Agency or Media Partner app roles don’t have access to the [App Real-time Logs] page in the Airbridge dashboard.
In order to confirm whether user data has been collected, check the event details on the [App Real-time Logs] page.

Refer to the information below to learn where to find the event parameters.
User info:
user(User data must be included inuser.)User ID:
user.externalUserIDUser phone number:
user.externalUserPhonUser alias:
user.aliasUser attribute:
user.attributesInfo on client-side data hashing:
user.isClientSideHashed
The deep linking test is available in the [Deep Linking] tab on the [Settings]>[Test Console] page in the Airbridge dashboard.
Before testing the deep link, make sure the following items have been set up.
Item | Description | Resources |
|---|---|---|
HTTP Deep Link (App links) | Setup is required. | |
Scheme Deep Link | Setup is required. | |
Deferred Deep Link | The setup is completed automatically. No additional setup is required. | |
Custom Domain | Setup is optional. | |
App Install | - If you don't need to test the deferred deep link, install the app on your test device in advance. - If you need to test the deferred deep link, the app should not be installed on the test device. If the app is installed, delete the app from the test device. |
The deep link information and app information required to enable deep linking must be submitted to the Airbridge dashboard before starting the test. This stage won’t show in your dashboard if the deep link information and app information have already been submitted. You may move on to the actual testing.
To test deep linking, make sure the required deep link information is submitted to the Airbridge dashboard for at least 1 platform. If you want to add or edit the deep link info, click Go to Settings. You can check and update the information on the [Tracking Link]>[Deep Links] page. For more details, refer to this article.
Refresh to see the latest version
If you've completed the setup in a different browser tab, refresh the Airbridge dashboard tab to reflect the most recent changes.
The deep link fallback path should be configured in advance so that users who haven’t installed the app on their devices are redirected to the app store. Click Go to Settings and fill in the “Platform” section on the [Settings]>[App Settings] page. For more details, refer to this article.
Enter the deep link configured for the app you want to test. The deep link must be in the form of the URL scheme deep link. It should preferably be set to a specific in-app location instead of the home screen.
Attention
Encode the deep link before entering it into the required field. If you don't, the link will not conform to the standard URL format, and deep linking will not function properly.
Click the [switch] icon on the right to change the input method. This allows you to add the path and parameters separately to input a deep link.
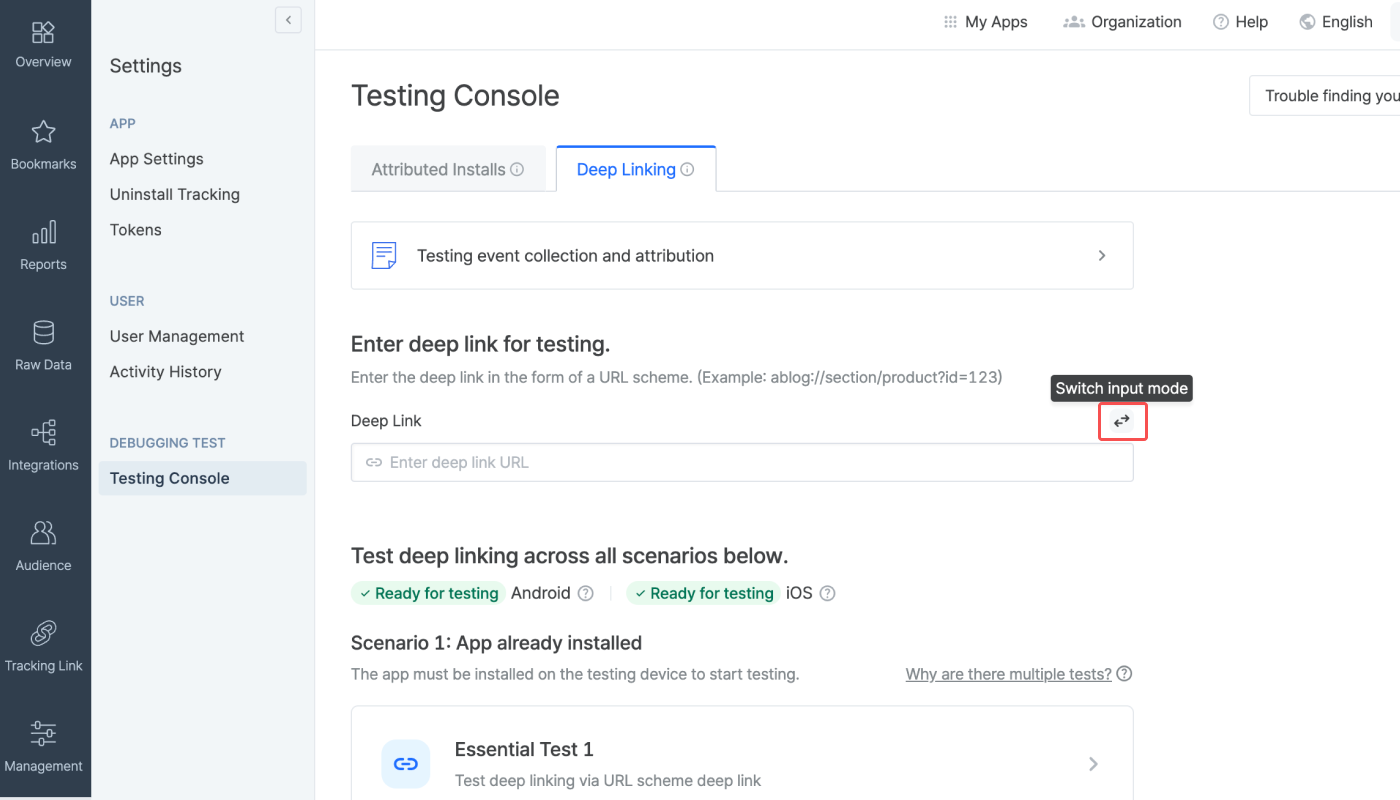
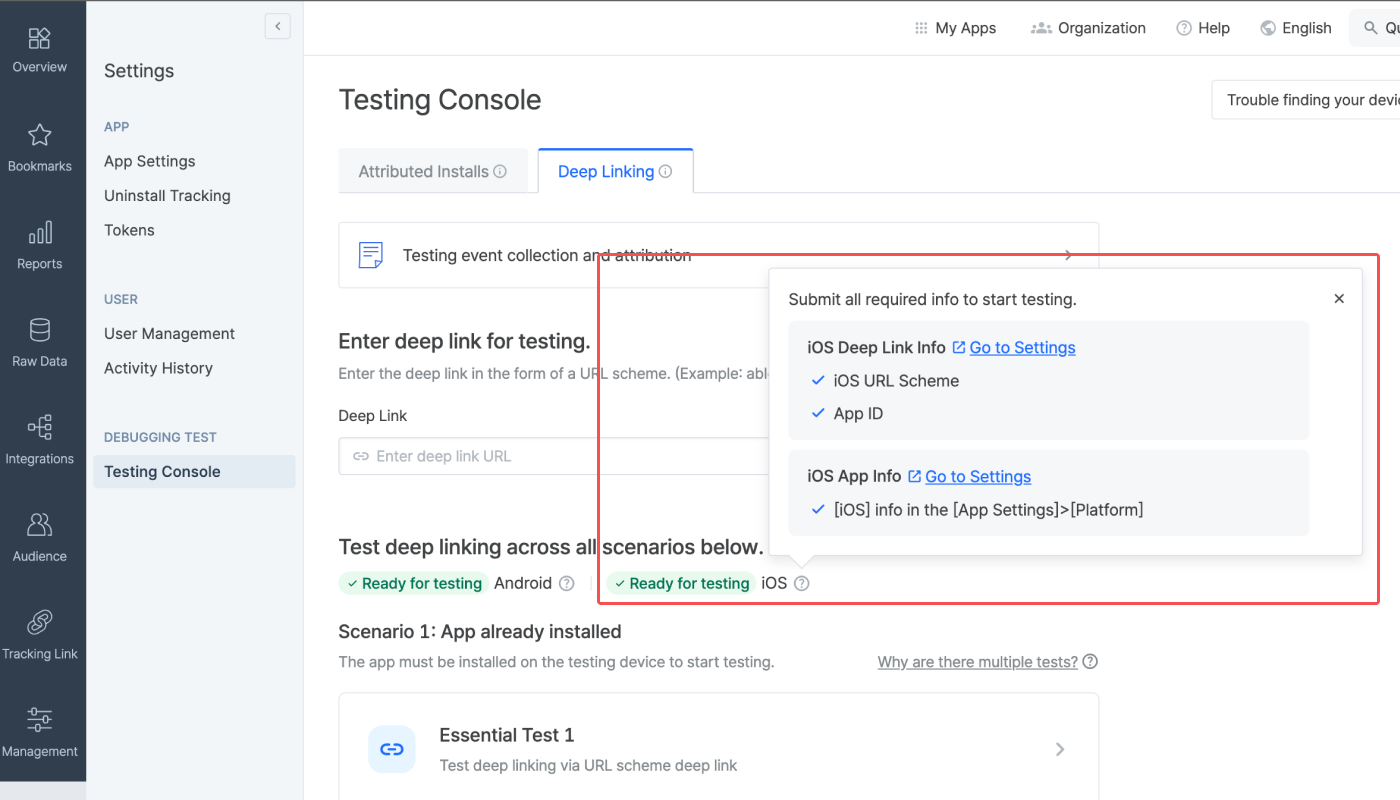
Check if the info required for testing deep linking is submitted to the Airbridge dashboard. If all info is submitted for a platform, the “Ready for testing” tag will show. If not, the “Info incomplete” tag will show. Click the tooltip next to the platform name to see the required info for testing. If you see the “Info incomplete” tag for the platform you want to run the deep linking test, click Go to Settings to add or edit the required info to get ready for testing.
Refresh to see the latest version
If you've completed the setup in a different browser tab, refresh the Airbridge dashboard tab to reflect the most recent changes.
The testing console offers tests for 2 deep-linking scenarios. There are 3 tests for “Scenario 1: App already installed” and 1 test for “Scenario 2: App not installed." Complete all 4 tests if you are using a custom domain to create tracking links. If not, complete all tests except for the Custom Domain Test.
Why are there multiple tests?
Airbridge supports various deep linking methods, including URL scheme deep links, Universal Links, and App Links. When an app is launched, the system automatically selects the most suitable method based on factors such as the operating system, browser, and whether the app is installed. Test across all possible cases to ensure reliable deep-linking performance.
Testing Scenario 1 allows you to make sure the deep linking functions as intended for users who have already installed the app on their devices. You can run 3 types of tests, including a test for cases when the app is opened via URL scheme deep links, when the app is opened via Universal Links or App Links, and when the tracking link is created using a custom domain.
Before you start the test, check the following items.
1. Prepare a mobile test device.
2. Check whether the app is installed on the test device. If not, download the app.
3. Open the app at least once after download.
4. Make sure the default browser setting is Chrome or Safari. The deep linking test may not work in other browsers.
5. Make sure you have a stable network connection.
Note
If there are no issues with the deep link settings and the deep linking tests have been successfully completed, Airbridge deep linking works on most browsers. Note that deep linking tests are only supported on Chrome and Safari.
1. Click the test you want to run.
2. Scan the QR code with the test device and access the testing page. If you're unable to scan the QR code, use the URL at the bottom of the QR code.
3. Once you access the testing website, click Trigger deep linking. The test will run automatically on the 5 items displayed. If an issue is identified, follow the instructions and refer to the Airbridge user guide to resolve it. Then, start the test again.
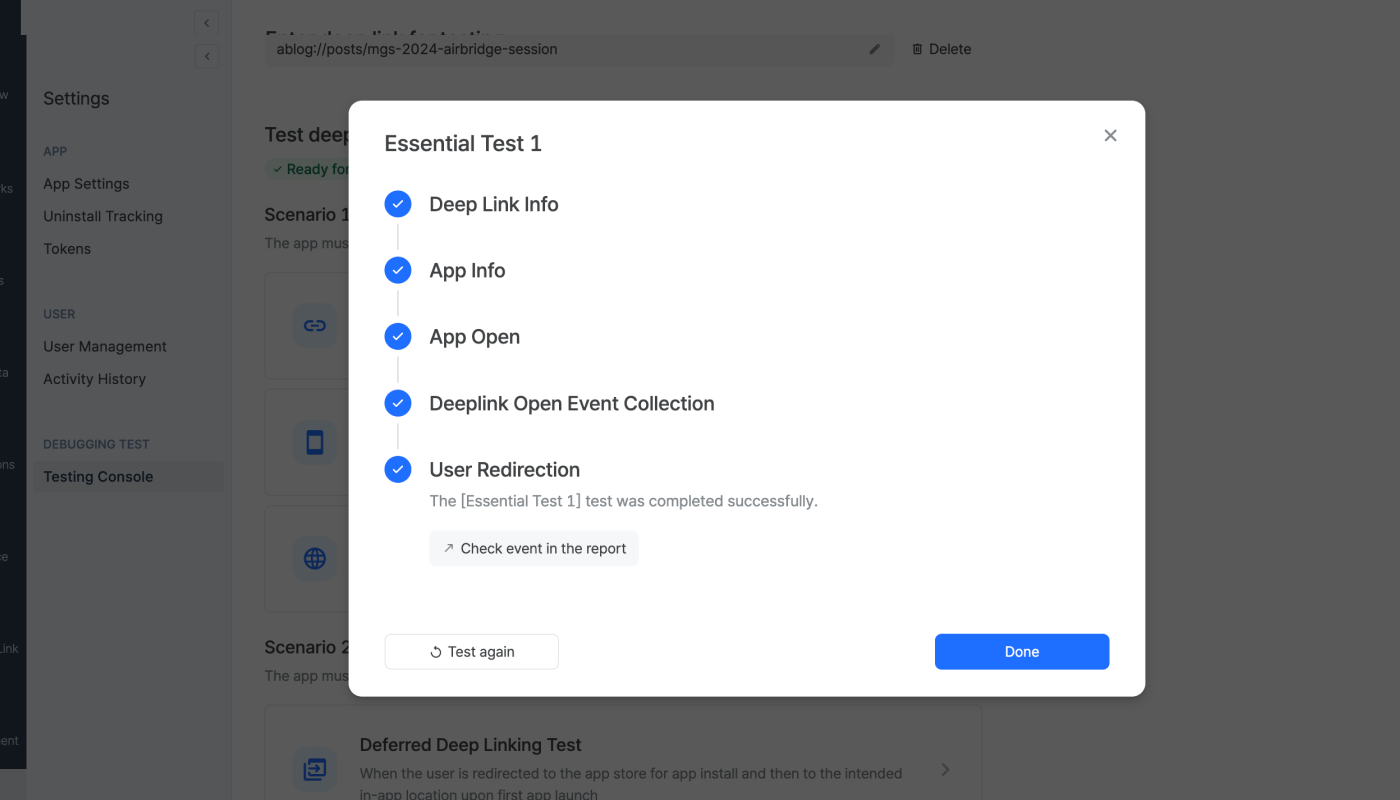
When the test is completed successfully, you can find the Deeplink Open event on the [Raw Data]>[App Real-time Log] page.
After completing the Essential Test 1, the following items can be found in the SDK log.
eventData.deeplinkis{YOUR_SCHEME}://....The
{YOUR_SCHEME}://...is passed to the deep link callback.
After completing the Essential Test 2, the following items can be found in the SDK log.
eventData.deeplinkishttps://{YOUR_APP_NAME}.airbridge.io...The
{YOUR_SCHEME}://...is passed to the deep link callback.
After completing the Essential Test 2, the following items can be found in the SDK log.
eventData.deeplinkishttps://{YOUR_CUSTOM_DOMAIN}.airbridge.io...The
{YOUR_SCHEME}://...is passed to the deep link callback.
4. After returning to the [Testing Console] tab, click Done and close the test window.
Testing Scenario 2 allows you to make sure the deep linking functions as intended for users who have not installed the app on their devices. You can run 1 test for deferred deep linking.
Before you start the test, check the following items.
1. Prepare a mobile test device.
2. Check whether the app is not installed on the test device. If installed, delete the app from the device.
3. Make sure the default browser setting is Chrome or Safari. The deep linking test may not work in other browsers.
4. Make sure you have a stable network connection.
1. Click the test you want to run.
2. Scan the QR code with the test device and access the testing page. If you're unable to scan the QR code, use the URL at the bottom of the QR code.
3. Once you access the testing page, click Trigger deep linking. The test will run automatically on the 3 items displayed. If an issue is identified, follow the instructions and refer to the Airbridge user guide to resolve it.
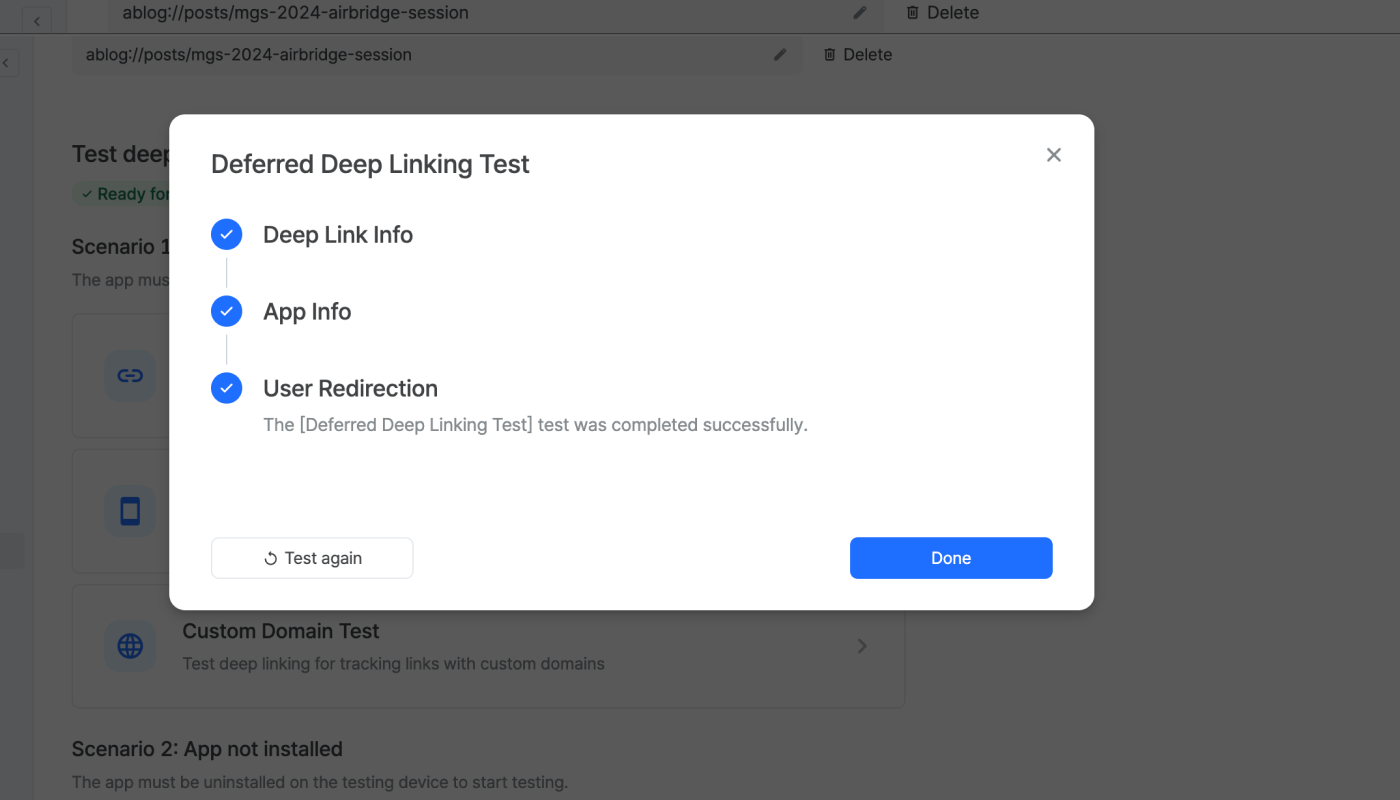
When the test is completed successfully, you can find the Deeplink Open event on the [Raw Data]>[App Real-time Log] page.
After completing the Deferred Deep Linking Test, the following items can be found in the SDK log.
eventData.deeplinkishttps://{YOUR_SCHEME}.airbridge.io...The
{YOUR_SCHEME}://...is passed to the deep link callback.
4. After returning to the [Testing Console] tab, click Done and close the test window.
Check whether the deep link has been properly implemented.
Refer to the deep linking setup instructions.
Check whether the deep link has been properly implemented.
Refer to the deep linking setup instructions.
Check whether the deep link has been properly implemented.
Refer to the deep linking setup instructions.
You must set up the app to redirect the user using the deep link passed to the onSuccess function. Refer to this article for guidance.
You must set up the app to redirect the user using the deep link passed to the onSuccess function. Refer to this article for guidance.
The IDFA, which is required for attribution, may not be collected due to the Tracking Authorize Timeout period. For example, if the install event is sent to Airbridge before the ATT prompt appears in the app, the IDFA cannot be collected because the user did not allow data tracking before the event was sent.
Therefore, if the IDFA has not been collected in several test settings, check whether the Tracking Authorize Timeout period is adequately set.
Opening the app for the first time after downloading is not recorded as an Open event but as an Install event.
Make sure the Airbridge SDK has been successfully installed. Refer to this article for guidance.
Make sure you launched the app right after downloading the app to set the app ready for testing.
Make sure to allow data tracking on the ATT prompt in the test device.
If the attribution still fails even after allowing data tracking on the ATT prompt, check whether the Tracking Authorize Timeout period is adequately configured.
Was this helpful?