
Dashboard Setup
- Sign in to your Airbridge account.
- Click Add a new app.
- Add your app to Airbridge. Once you’re done, go to [Tracking Links]>[Deep Links] and submit the deep link information to Airbridge.
Submit deep link information for Android
Submit deep link information for Android
Android URI SchemeInput the URI scheme of the deep links you will use. The deep links you use to create tracking links for user redirection must use this URI Scheme.Android Package NameInput the app’s package name. Example:
com.example.applicationsha256_cert_fingerprintsInput the SHA256 hash value of the KeyStore file used to sign the app. To find the hash values, refer to the information below.Shell
Result
Submit deep link information for iOS
Submit deep link information for iOS
iOS URI SchemeInput the URI scheme of the deep links you will use. The deep links you use to create tracking links for user redirection must use this URI Scheme.iOS App IDGo to the Apple Developer, find the App ID Prefix and the Bundle ID, and input them in the format of
App ID Prefix + . + Bundle ID.SDK Setup
Install the Airbridge SDK in your app and complete the essential setup.Android SDK
Android SDK
For complete documentation, refer to Android SDK.In app
SDK installation
To install the Airbridge Android SDK, declare the SDK repository in the file containingrepositories block (either build.gradle or settings.gradle in the project). Then, add the SDK package to the app’s build.gradle file.Replace $HERE_LATEST_VERSION with the latest version from the SDK version list.In project build.gradle or settings.gradle file:build.gradle file:SDK initialization
Create aMainApplication class and add it to AndroidManifest.xml. Then initialize the SDK in the class’s onCreate function. You can find YOUR_APP_NAME and YOUR_APP_SDK_TOKEN in the Airbridge dashboard [Settings]>[Tokens].AndroidManifest.xml
Backup rule setup
Configure backup rules in yourAndroidManifest.xml file based on your existing tags.- Add content to
xmlns:toolsin the<manifest>tag. - If
<application>tag includesandroid:allowBackup, add the value totools:replace. - If
<application>tag includesandroid:dataExtractionRules, add the value totools:replace, and add the rules below to the file. - If
<application>tag includesandroid:fullBackupContent, add the value totools:replace, and add the rules below to the file.
AndroidManifest.xml
Deep linking setup
Complete all three configurations below to enable deep linking.Enable deep links to open your app
Create anActivity class to handle deep links and add it to AndroidManifest.xml. Then, add Intent Filters for three Airbridge deep links. When a tracking link is activated, Airbridge opens the app using the most appropriate deep link based on the browser, app installation status, and other factors.You can find YOUR_SCHEME in the Airbridge dashboard [Tracking Link]>[Deep Links]. Note that you should remove the :// portion. You can find YOUR_APP_NAME and YOUR_APP_SDK_TOKEN in the Airbridge dashboard [Settings]>[Tokens].AndroidManifest.xml
Enable deep links to redirect users
In theonResume function of your deep link handling Activity, call handleDeeplink function to convert Airbridge deep links to the original deep links configured in the tracking links. Then, redirect users to the appropriate app pages.When the app is opened via an Airbridge deep link, isAirbridgeDeeplink is true, and the configured deep link is delivered to the callback function’s uri.When the app is opened via a non-Airbridge deep link, isAirbridgeDeeplink is false, and the callback function is not called.Enable deferred deep links to redirect users
When the app is opened according to its lifecycle, callhandleDeferredDeeplink function to retrieve the deep link configured in the tracking link that was activated before the app was installed. Then, redirect users to the appropriate destinations. You can call handleDeferredDeeplink function from any class or function at any point in your app’s lifecycle.When the function is called for the first time after app installation, isFirstCalled is true. The callback’s uri contains the configured deep link if the tracking link was activated before the installation, otherwise null.When the function is called after app installation, isFirstCalled is false, and the callback is not called.AttentionWhen the app is opened via a deep link, Airbridge passes null to onSuccess regardless of whether a deferred deep link exists or not, ensuring that only the deep link is processed.
Send events
Call thetrackEvent function to send events. We recommend using Airbridge’s standard categories and semantic attributes, though you can also define custom categories and custom attributes. For more details, refer to Android SDK.iOS SDK
iOS SDK
For complete documentation, refer to iOS SDK.Display the ATT prompt on the device immediately after app open or at your desired time.You can set a timeout to control how long the SDK waits for the user’s response to the ATT prompt before collecting install events and activating deferred deep links. The default timeout is 30 seconds, and you can set it up to 1 hour. If you don’t use the ATT prompt, set the timeout to 0 seconds.
SDK installation
Use one of the following methods to install the Airbridge iOS SDK:- SwiftPackageManager
- CocoaPods
- Tuist
- Manual install
- Navigate to [File]>[Add Packages…] in Xcode.
- Enter the following address into the search bar and click Add Package.
- Click Add Package again.
- The Airbridge iOS SDK will be added to Package Dependencies.
SDK initialization
Initialize the SDK when the app opens according to its lifecycle. You can findYOUR_APP_NAME and YOUR_APP_SDK_TOKEN in the Airbridge dashboard [Settings]>[Tokens].ATT prompt setup
Enter the description that will be displayed in the ATT prompt as the value for theNSUserTrackingUsageDescription key in the Info.plist file.- Xcode
- Tuist
- Navigate to [YOUR_PROJECT]>[Info]>[Custom iOS Target Properties] in Xcode.
- Hover your mouse over the key items, click + that appears, and enter
Privacy - Tracking Usage Description. - Enter the text for the ATT prompt as value.
Deep linking setup
Complete all three configurations below to enable deep linking.Enable deep links to open your app
Configure three types of Airbridge deep links in your app. When a tracking link is activated, Airbridge opens the app using the most appropriate deep link based on the browser, app installation status, and other factors.You can findYOUR_SCHEME in the Airbridge dashboard [Tracking Link]>[Deep Links]. Note that you should remove the :// portion. You can find YOUR_APP_NAME and YOUR_APP_SDK_TOKEN in the Airbridge dashboard [Settings]>[Tokens].- Xcode
Scheme deep link setup in the appIn Xcode, go to [YOUR_PROJECT]>[Info]>[URL Types]. Then, click “+” and enter
YOUR_SCHEME.Universal Link setup in the appIn Xcode, go to [YOUR_PROJECT]>[Signing & Capabilities]. Then, click “+ Capability” and select “Associated Domains”. Lastly, add applinks:YOUR_APP_NAME.airbridge.io and applinks:YOUR_APP_NAME.abr.ge.Enable deep links to redirect users
When the app opens via a deep link according to its lifecycle, calltrackDeeplink function to enable the SDK to collect the deep link event. Then, call handleDeeplink function to convert Airbridge deep link to the scheme deep link configured in the tracking link. Lastly, redirect users to appropriate app pages.When the app is opened via an Airbridge deep link, isAirbridgeDeeplink is true, and the configured deep link is delivered to the callback function’s url.When the app is opened via a non-Airbridge deep link, isAirbridgeDeeplink is false, and the callback function is not called.Enable deferred deep links to redirect users
When the app opens according to its lifecycle, callhandleDeferredDeeplink function to retrieve the deep link configured in the tracking link that was activated before the app was installed. Then, redirect users to the appropriate destinations. You can call handleDeferredDeeplink function from any class or function at any point in your app’s lifecycle.When the function is called for the first time after app installation, isFirstCalled is true, and the callback’s uri contains the configured deep link if the tracking link was activated before the installation, otherwise null.When the function is called after app installation, isFirstCalled is false, and the callback is not called.AttentionWhen the app is opened via a deep link, Airbridge passes null to onSuccess regardless of whether a deferred deep link exists or not, ensuring that only the deep link is processed.
Send events
Call thetrackEvent function to send events. We recommend using Airbridge’s standard categories and semantic attributes, though you can also define custom categories and custom attributes. For more details, refer to iOS SDK.Web SDK
Web SDK
For the complete documentation, refer to Web SDK.If you install via npm, yarn, or pnpm, import
SDK installation
Add the following code to install the Airbridge Web SDK:airbridge as shown below. If you install via script tag, airbridge is automatically added to the window.SDK initialization
Add the following code to initialize the SDK when your website loads. You can findYOUR_APP_NAME and YOUR_WEB_SDK_TOKEN in the Airbridge dashboard [Settings]>[Tokens].Deep linking setup
Call theopenDeeplink function to redirect users from the website to the app. Specify destinations to redirect users with the app installed to the app, and users without the app to the app store or website.Sent events
Call theevents.send function to send events. We recommend using Airbridge’s standard categories and semantic attributes, though you can also define custom categories and custom attributes. For more details, refer to Web SDK.React Native SDK
React Native SDK
For complete documentation, refer to React Native SDK.AndroidIn the AndroidIn the AndroidIn the Call the
SDK installation
Add the following code to install the Airbridge React Native SDK.SDK initialization
Add the following code to initialize the SDK when your app opens. You can findYOUR_APP_NAME and YOUR_APP_SDK_TOKEN in the Airbridge dashboard [Settings]>[Tokens].iOSIn the ios/YOUR_PROJECT_NAME/AppDelegate.m file:android/app/src/main/java/.../MainApplication.kt file:SDK setup
Configure the settings required to use the Airbridge React Native SDK.- Create an
airbridge.jsonfile in the root directory of your React Native project, and enter the settings in JSON format as shown above. - Omit any keys for settings that are not required.
Backup rule setup
Configure backup rules in yourAndroidManifest.xml file based on your existing tags.- Add content to
xmlns:toolsin the<manifest>tag. - If
<application>tag includesandroid:allowBackup, add the value totools:replace. - If
<application>tag includesandroid:dataExtractionRules, add the value totools:replaceand add the rules below to the file. - If
<application>tag includesandroid:fullBackupContent, add the value totools:replace, and add the rules below to the file.
AndroidManifest.xml
ATT prompt setup
Display the ATT prompt at your desired time. Follow Apple’s guidelines for implementation.You can set a timeout to control how long the SDK waits for the user’s response to the ATT prompt before collecting install events and delivering deferred deep links. The default timeout is 30 seconds, and you can set it up to 1 hour. If you don’t use the ATT prompt, set the timeout to 0 seconds.Create anairbridge.json file in the root directory of your React Native project and configure the timeout:Deep linking setup
Complete all three configurations below to enable deep linking.Enable deep links to open your app
Configure three types of Airbridge deep links in your app. When a tracking link is activated, Airbridge opens the app using the most appropriate deep link based on the browser, app installation status, and other factors.You can findYOUR_SCHEME in the Airbridge dashboard [Tracking Link]>[Deep Links]. Note that you should remove the :// portion. You can find YOUR_APP_NAME and YOUR_APP_SDK_TOKEN in the Airbridge dashboard [Settings]>[Tokens].iOSIn the ios/YOUR_PROJECT_NAME.xcodeproj file:- Xcode
Scheme deep link setup in the appIn Xcode, go to [YOUR_PROJECT]>[Info]>[URL Types]. Then, click “+” and enter
YOUR_SCHEME.Universal Link setup in the appIn Xcode, go to [YOUR_PROJECT]>[Signing & Capabilities]. Then, click “+ Capability” and select “Associated Domains”. Lastly, add applinks:YOUR_APP_NAME.airbridge.io and applinks:YOUR_APP_NAME.abr.ge.android/app/src/main/AndroidManifest.xml file:AndroidManifest.xml
Enable deep links to redirect users
When the app is opened via a deep link, call thetrackDeeplink function to enable the SDK to collect the deep link event.iOSIn the ios/YOUR_PROJECT_NAME/AppDelegate.m file:android/app/src/main/java/.../MainActivity.kt file:setOnDeeplinkReceived function to enable the SDK to convert an Airbridge deep link to the original deep link configured in the tracking link. Then, redirect users to the appropriate destinations.Enable deferred deep links to redirect users
No additional configuration is needed since deferred deep links are automatically delivered to theOnDeeplinkReceived callback.Send events
Call thetrackEvent function to send events. We recommend using Airbridge’s standard categories and semantic attributes, though you can also define custom categories and custom attributes. For more details, refer to React Native SDK.Flutter SDK
Flutter SDK
For the complete documentation, refer to Flutter SDK.Open a The Airbridge Flutter SDK requires Flutter 1.20.0 or higher and Dart 2.12.0 or higher.AndroidIn the AndroidIn the AndroidIn the Call the
SDK installation
To install the Airbridge Flutter SDK, add the following to thedependencies block in your pubspec.yaml file. Replace $HERE_LATEST_VERSION with the latest version from the SDK version list.Terminal in the root directory of the project, and run the following command:Shell
SDK initialization
Add the following code to initialize the SDK when your app opens. You can findYOUR_APP_NAME and YOUR_APP_SDK_TOKEN in the Airbridge dashboard [Settings]>[Tokens].iOSIn the ios/YOUR_PROJECT_NAME/AppDelegate.m file:android/app/src/main/java/.../MainApplication.kt file:SDK setup
Configure the settings required to use the Airbridge Flutter SDK.- Create an
airbridge.jsonfile in the root directory of the Flutter project, and enter the settings in JSON format as shown above. - Omit any keys for settings that are not required.
Backup rule setup
Configure backup rules in yourAndroidManifest.xml file based on your existing tags.- Add content to
xmlns:toolsin the<manifest>tag. - If
<application>tag includesandroid:allowBackup, add the value totools:replace. - If
<application>tag includesandroid:dataExtractionRules, add the value totools:replaceand add the rules below to the file. - If
<application>tag includesandroid:fullBackupContent, add the value totools:replace, and add the rules below to the file.
AndroidManifest.xml
ATT prompt setup
Display the ATT prompt at your desired time. Follow Apple’s guidelines for implementation.You can set a timeout to control how long the SDK waits for the user’s response to the ATT prompt before collecting install events and delivering deferred deep links. The default timeout is 30 seconds, and you can set it up to 1 hour. If you don’t use the ATT prompt, set the timeout to 0 seconds.Create anairbridge.json file in the root directory of the Flutter project and configure the timeout:Deep linking setup
Complete all three configurations below to enable deep linking.Enable deep links to open your app
Configure three types of Airbridge deep links in your app. When a tracking link is activated, Airbridge opens the app using the most appropriate deep link based on the browser, app installation status, and other factors.You can findYOUR_SCHEME in the Airbridge dashboard [Tracking Link]>[Deep Links]. Note that you should remove the :// portion. You can find YOUR_APP_NAME and YOUR_APP_SDK_TOKEN in the Airbridge dashboard [Settings]>[Tokens].iOSIn the ios/YOUR_PROJECT_NAME.xcodeproj file:- Xcode
Scheme deep link setup in the appIn Xcode, go to [YOUR_PROJECT]>[Info]>[URL Types]. Then, click “+” and enter
YOUR_SCHEME.Universal Link setup in the appIn Xcode, go to [YOUR_PROJECT]>[Signing & Capabilities]. Then, click “+ Capability” and select “Associated Domains”. Lastly, add applinks:YOUR_APP_NAME.airbridge.io and applinks:YOUR_APP_NAME.abr.ge.android/app/src/main/AndroidManifest.xml file:AndroidManifest.xml
Enable deep links to redirect users
When the app is opened via a deep link, call thetrackDeeplink function to enable the SDK to collect the deep link event.iOSIn the ios/YOUR_PROJECT_NAME/AppDelegate.m file:android/app/src/main/java/.../MainActivity.kt file:setOnDeeplinkReceived function to enable the SDK to convert an Airbridge deep link to the original deep link configured in the tracking link. Then, redirect users to the appropriate destinations.Enable deferred deep links to redirect users
No additional configuration is needed since deferred deep links are automatically delivered to theOnDeeplinkReceived callback.Send events
Call thetrackEvent function to send events. We recommend using Airbridge’s standard categories and semantic attributes, though you can also define custom categories and custom attributes. For more details, refer to Flutter SDK.Cordova-Ionic SDK (Deprecated)
Cordova-Ionic SDK (Deprecated)
Deprecated SDKThis SDK has been deprecated. Migrate to the latest versions of Android SDK v4 and iOS SDK v4.Starting October 1, 2026, we will fix only critical issues that could cause your app to be rejected in app store review, and on October 1, 2028, all support will end.
SDK installation
Add the following code to install the Airbridge Cordova-Ionic SDK:SDK initialization
Add the following code to initialize the SDK when your app opens. You can findYOUR_APP_NAME and YOUR_APP_SDK_TOKEN in the Airbridge dashboard [Settings]>[Tokens].iOSIn the ios/YOUR_PROJECT_NAME/AppDelegate.mfile:android/app/src/main/java/.../MainApplication.kt file:SDK setup
Configure the settings required to use the Airbridge Cordova-Ionic SDK.- Create an
airbridge.jsonfile in the root directory of your Cordova-Ionic project, and enter the settings in JSON format as shown above. - Omit any keys for settings that are not required.
ATT prompt setup
Display the ATT prompt at your desired time. Follow Apple’s guidelines for implementation.You can set a timeout to control how long the SDK waits for the user’s response to the ATT prompt before collecting install events and delivering deferred deep links. The default timeout is 30 seconds, and you can set it up to 1 hour. If you don’t use the ATT prompt, set the timeout to 0 seconds.Create anairbridge.json file in the root directory of your Cordova-Ionic project and configure the timeout:Deep linking setup
Complete all three configurations below to enable deep linking.Enable deep links to open your app
Configure three types of Airbridge deep links in your app. When a tracking link is activated, Airbridge opens the app using the most appropriate deep link based on the browser, app installation status, and other factors.You can findYOUR_SCHEME in the Airbridge dashboard [Tracking Link]>[Deep Links]. Note that you should remove the :// portion. You can find YOUR_APP_NAME and YOUR_APP_SDK_TOKEN in the Airbridge dashboard [Settings]>[Tokens].iOSIn the ios/YOUR_PROJECT_NAME.xcodeproj file:- Xcode
Scheme deep link setup in the appIn Xcode, go to [YOUR_PROJECT]>[Info]>[URL Types]. Then, click “+” and enter
YOUR_SCHEME.Universal Link setup in the appIn Xcode, go to [YOUR_PROJECT]>[Signing & Capabilities]. Then, click “+ Capability” and select “Associated Domains”. Lastly, add applinks:YOUR_APP_NAME.airbridge.io and applinks:YOUR_APP_NAME.abr.ge.android/app/src/main/AndroidManifest.xml file:AndroidManifest.xml
Enable deep links to redirect users
When the app is opened via a deep link, call thetrackDeeplink function to enable the SDK to collect the deep link event.iOSIn the ios/YOUR_PROJECT_NAME/AppDelegate.m file:android/app/src/main/java/.../MainActivity.kt file:setOnDeeplinkReceived function to enable the SDK to convert an Airbridge deep link to the original deep link configured in the tracking link. Then, redirect users to the appropriate destinations.Enable deferred deep links to redirect users
No additional configuration is needed since deferred deep links are automatically delivered to theOnDeeplinkReceived callback.Send events
Call thetrackEvent function to send events. We recommend using Airbridge’s standard categories and semantic attributes, though you can also define custom categories and custom attributes. For more details, refer to Cordova-Ionic SDK.Expo SDK
Expo SDK
For complete documentation, refer to Expo SDK.
SDK installation
Add the following code to install the Airbridge Expo SDK.SDK initialization
Add the following code to initialize the SDK when your app opens according to its lifecycle. You can findYOUR_APP_NAME and YOUR_APP_SDK_TOKEN in the Airbridge dashboard [Settings]>[Tokens].app.json
SDK setup
Configure the settings required to use the Airbridge Expo SDK.- Create an
airbridge.jsonfile in the root directory of your Expo project, and enter the settings in JSON format as shown above. - Omit any keys for settings that are not required.
Backup rule setup
Configure backup rules in yourAndroidManifest.xml file based on your existing tags.- Add content to
xmlns:toolsin the<manifest>tag. - If
<application>tag includesandroid:allowBackup, add the value totools:replace. - If
<application>tag includesandroid:dataExtractionRules, add the value totools:replaceand add the rules below to the file. - If
<application>tag includesandroid:fullBackupContent, add the value totools:replace, and add the rules below to the file.
AndroidManifest.xml
ATT prompt setup
Display the ATT prompt at your desired time. Follow Apple’s guidelines for implementation.You can set a timeout to control how long the SDK waits for the user’s response to the ATT prompt before collecting install events and delivering deferred deep links. The default timeout is 30 seconds, and you can set it up to 1 hour. If you don’t use the ATT prompt, set the timeout to 0 seconds.Create anairbridge.json file in the root directory of your Expo project and configure the timeout:Deep linking setup
Complete all three configurations below to enable deep linking.Enable deep links to open your app
Configure three types of Airbridge deep links in your app. When a tracking link is activated, Airbridge opens the app using the most appropriate deep link based on the browser, app installation status, and other factors.You can findYOUR_SCHEME in the Airbridge dashboard [Tracking Link]>[Deep Links]. Note that you should remove the :// portion. You can find YOUR_APP_NAME and YOUR_APP_SDK_TOKEN in the Airbridge dashboard [Settings]>[Tokens].app.json
Enable deep links to redirect users
Call thesetOnDeeplinkReceived function to enable the SDK to convert an Airbridge deep link to the original deep link configured in the tracking link. Then, redirect users to the appropriate destinations.Enable deferred deep links to redirect users
No additional configuration is needed since deferred deep links are automatically delivered to theOnDeeplinkReceived callback.Send events
Call thetrackEvent function to send events. We recommend using Airbridge’s standard categories and semantic attributes, though you can also define custom categories and custom attributes. For more details, refer to Expo SDK.Unity SDK
Unity SDK
For the complete documentation, refer to Unity SDK.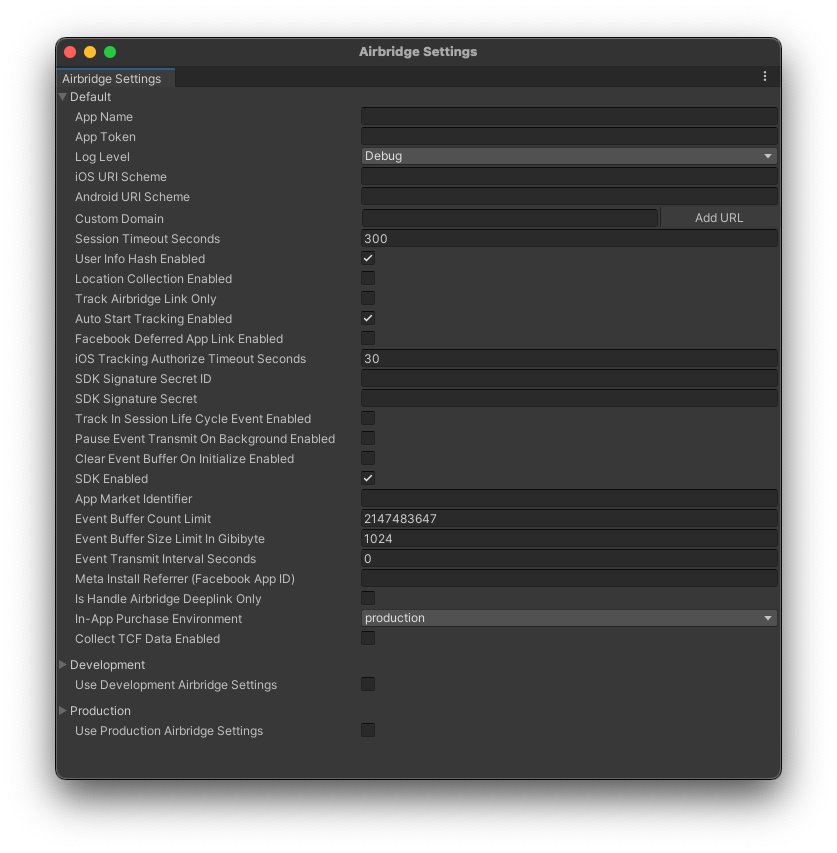
SDK installation
Follow the steps below to install the Airbridge Unity SDK:- Download the latest version of the Airbridge Unity SDK package.
- In Unity top menu bar, select [Assets], then select [Import Package]>[Custom Package…] to add the downloaded package.
- The Airbridge tab will appear in the top menu bar when the installation is complete.
SDK initialization
When setting up the SDK, enter the correctApp Name and App Token, which can be found in the Airbridge dashboard [Settings]>[Tokens].SDK setup
Configure the settings required to use the Airbridge Unity SDK.- In the Unity top menu bar, select [Airbridge]>[Airbridge Settings] to open the configuration window shown above, then enter the required settings.
- Skip any settings that are not required.
Backup rule setup
Configure backup rules as needed in your custom main manifest file (Assets/Plugins/Android/AndroidManifest.xml) based on the content of each tag.- Add the
toolsnamespace to the<manifest>tag. - If
<application>tag includesandroid:allowBackup, add the value totools:replace. - If
<application>tag includesandroid:dataExtractionRules, add the value totools:replace, and add the rules below to the file. - If
<application>tag includesandroid:fullBackupContent, add the value totools:replace, and add the rules below to the file.
AndroidManifest.xml
ATT prompt setup
Display the ATT prompt at your desired time. Follow Apple’s guidelines for implementation.You can set a timeout to control how long the SDK waits for the user’s response to the ATT prompt before collecting install events and delivering deferred deep links. The default timeout is 30 seconds, and you can set it up to 1 hour. If you don’t use the ATT prompt, set the timeout to 0 seconds.Go to SDK setup and set the timeout value in theiOS Tracking Authorize Timeout Seconds field.Deep linking setup
Complete all three configurations below to enable deep linking.Enable deep links to open your app
Configure three types of Airbridge deep links in your app. When a tracking link is activated, Airbridge opens the app using the most appropriate deep link based on the browser, app installation status, and other factors.Go to SDK setup and enterYOUR_SCHEME in iOS URI Scheme and Android URI Scheme fields. You can find YOUR_SCHEME in the Airbridge dashboard [Tracking Link]>[Deep Links]. Note that you should remove the :// portion.Enable deep links to redirect users
When the app is opened via a deep link, call thetrackDeeplink function to enable the SDK to collect the deep link event.Call the SetOnDeeplinkReceived function to enable the SDK to convert an Airbridge deep link to the original deep link configured in the tracking link. Then, redirect users to the appropriate destinations.Enable deferred deep links to redirect users
No additional configuration is needed since deferred deep links are automatically delivered to theOnDeeplinkReceived callback.Send events
Call theTrackEvent function to send events. We recommend using Airbridge’s standard categories and semantic attributes, though you can also define custom categories and custom attributes. For more details, refer to Unity SDK.Unreal SDK
Unreal SDK
For the complete documentaion, refer to Unreal SDK.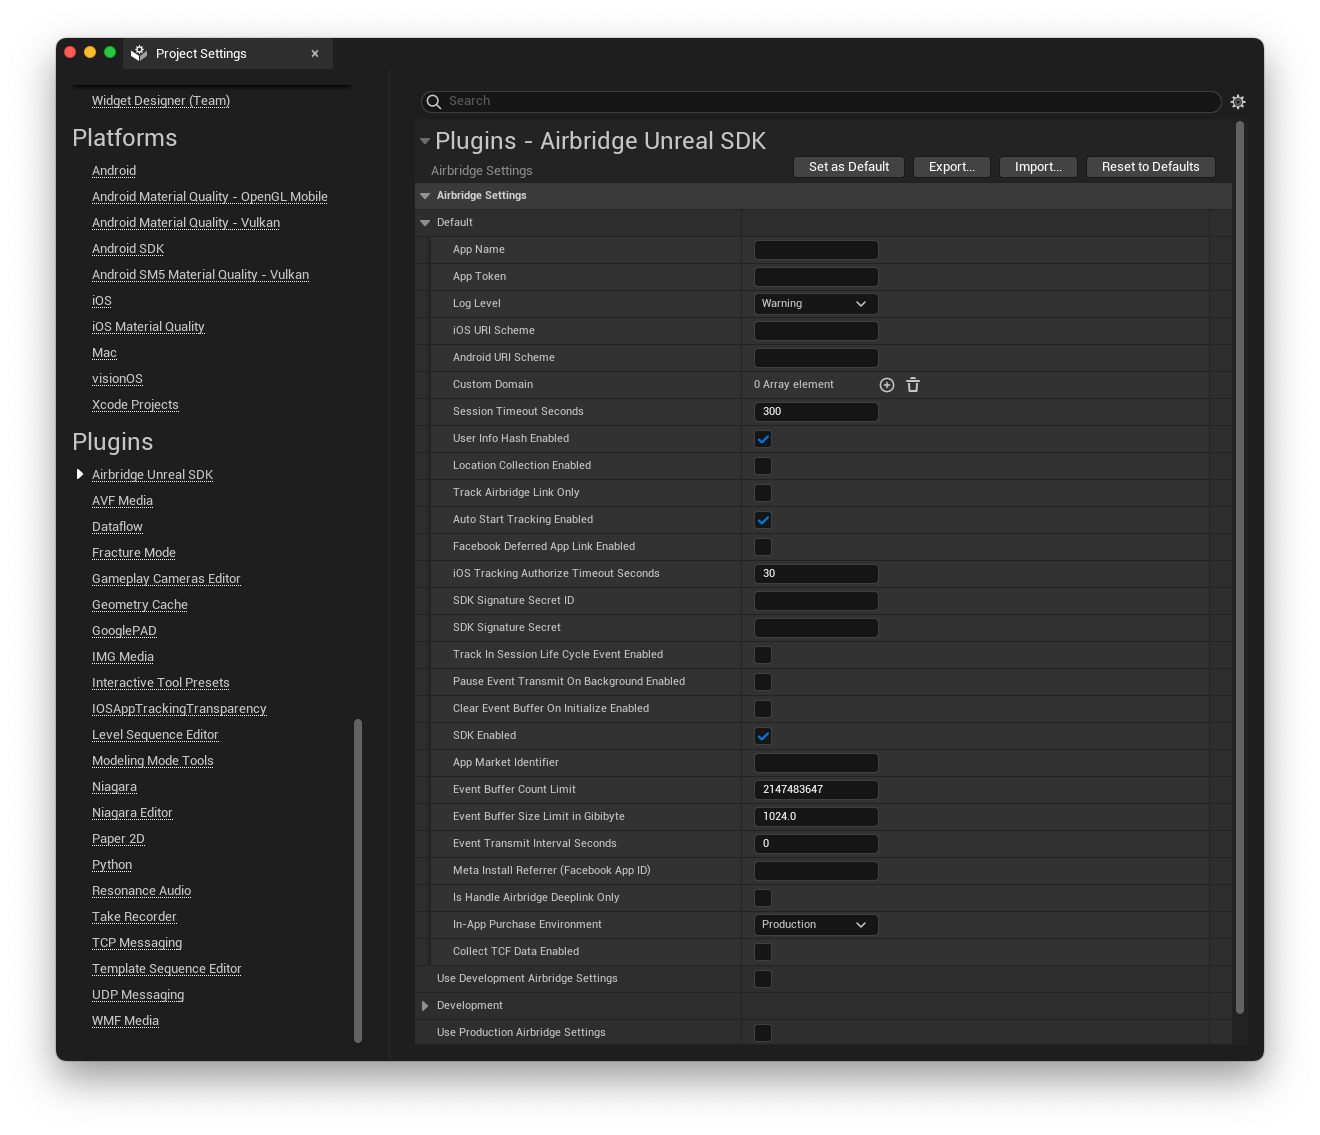
SDK installation
Follow the steps below to install the Airbridge Unreal SDK.- Download the latest version of the Airbridge Unreal SDK.
- Create a
Pluginsfolder in the root directory of the Unreal Engine project. - Move the Airbridge Unreal SDK into the
Pluginsfolder.
SDK initialization
When setting up the SDK, enter the correctApp Name and App Token, which can be found in the Airbridge dashboard [Settings]>[Tokens].SDK setup
Configure the settings required to use the Airbridge Unreal SDK.- In Unreal Engine, open the [Project Settings] window, then under Plugins section select Airbridge Unreal SDK to open the configuration window shown above.
- Enter the required settings. Skip any settings that are not required.
- After entering the required settings, select the Set as Default button.
Backup rule setup
Configure backup rules as needed in your custom main manifest file (Assets/Plugins/Android/AndroidManifest.xml) based on the content of each tag.- Add the
toolsnamespace to the<manifest>tag. - If
<application>tag includesandroid:allowBackup, add the value totools:replace. - If
<application>tag includesandroid:dataExtractionRules, add the value totools:replace, and add the rules below to the file. - If
<application>tag includesandroid:fullBackupContent, add the value totools:replace, and add the rules below to the file.
AndroidManifest.xml
ATT prompt setup
Display the ATT prompt at your desired time. Follow Apple’s guidelines for implementation.You can set a timeout to control how long the SDK waits for the user’s response to the ATT prompt before collecting install events and delivering deferred deep links. The default timeout is 30 seconds, and you can set it up to 1 hour. If you don’t use the ATT prompt, set the timeout to 0 seconds.Go to SDK setup and set the timeout in theiOS Tracking Authorize Timeout Seconds field.Deep linking setup
Complete all three configurations below to enable deep linking.Enable deep links to open your app
Configure three types of Airbridge deep links in your app. When a tracking link is activated, Airbridge opens the app using the most appropriate deep link based on the browser, app installation status, and other factors.Go to SDK setup and enterYOUR_SCHEME in iOS URI Scheme and Android URI Scheme fields. You can find YOUR_SCHEME in the Airbridge dashboard [Tracking Link]>[Deep Links]. Note that you should remove the :// portion.Enable deep links to redirect users
When the app is opened via a deep link, call thetrackDeeplink function to enable the SDK to collect the deep link event.Call the SetOnDeeplinkReceived function to enable the SDK to convert an Airbridge deep link to the original deep link configured in the tracking link. Then, redirect users to the appropriate destinations.Enable deferred deep links to redirect users
No additional configuration is needed since deferred deep links are automatically delivered to theOnDeeplinkReceived callback.Send events
Call theTrackEvent function to send events. We recommend using Airbridge’s standard categories and semantic attributes, though you can also define custom categories and custom attributes. For more details, refer to Unreal SDK.Testing
Follow the steps below to verify that the SDK has been successfully installed.Check the device ID
Install the My Device ID by Airbridge app to find the device ID of your test device. The app also shows device information such as the device model and operating system version. The available device ID types vary by operating system, so see the Identifiers guide. Scan the QR code below or download the app from the store.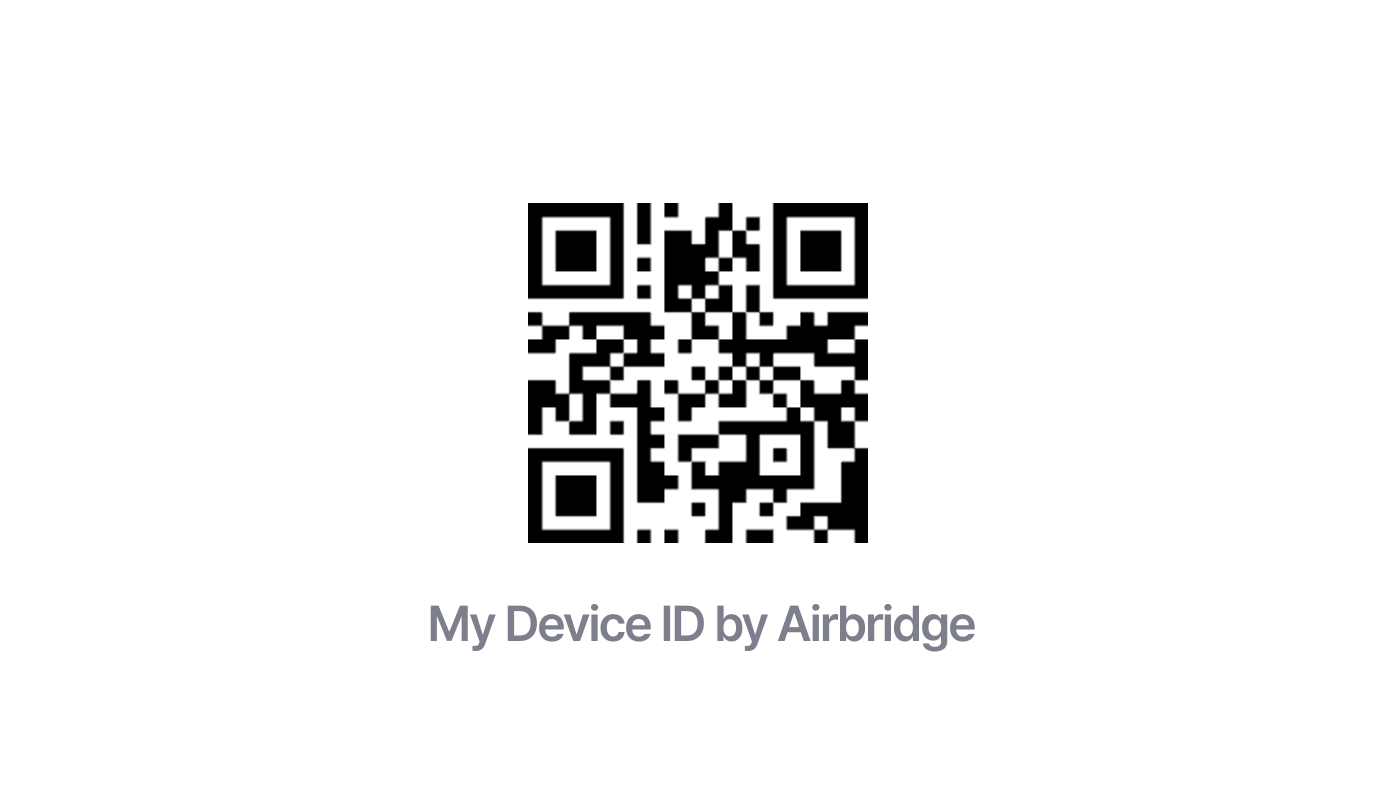


App install collection
- Navigate to [Settings]>[Testing Console]>[Attributed Installs].
- Enter the ADID of the test device, which is GAID or IDFA.
- Delete your app from the test device and scan the QR code.
- Check the results.
- If the test fails, revisit the SDK setup and SDK initialization steps and make sure the SDK is properly implemented.
Deep linking
- Navigate to [Settings]>[Testing Console]>[Deep Linking].
- Input the deep link of the app you want to test. It should be entered in the format of
scheme://product/12345. - Complete the Essential Test 1, 2, and 3 by following the instructions on the dashboard.
- Check the results.
- If the test fails, revisit the dashboard setup, SDK setup, and deep link setup steps and make sure the SDK is properly implemented.