

Deprecated SDKThis SDK has been deprecated. Migrate to the latest version, Unity SDK v4.Starting October 1, 2026, we will fix only critical issues that could cause your app to be rejected in app store review, and on October 1, 2028, all support will end.
Install SDK
NoteThe Airbridge Unity SDK requires Unity version 2018.4 or later.
AttentionThe Airbridge Unity SDK uses the Unity Jar Resolver, the External Dependency Manager for Unity, to manage library dependencies.For Airbridge Unity SDK v1.9.2 and earlier, the following setup is required.
- Set up the Unity package by referring to the repository below.
- Set up the EDM4U by referring to the setup guide below.
Install package
- Download the latest version of the Airbridge Unity SDK.
- Navigate to [Assets] >[Import Package]>[Custom Package…] in Unity and add the package file.
- The [AB180] tab will appear in the top menu bar once the package is installed.
Set up project
Navigate to [AB180]>[Airbridge Settings] in the top menu bar to open the following screen.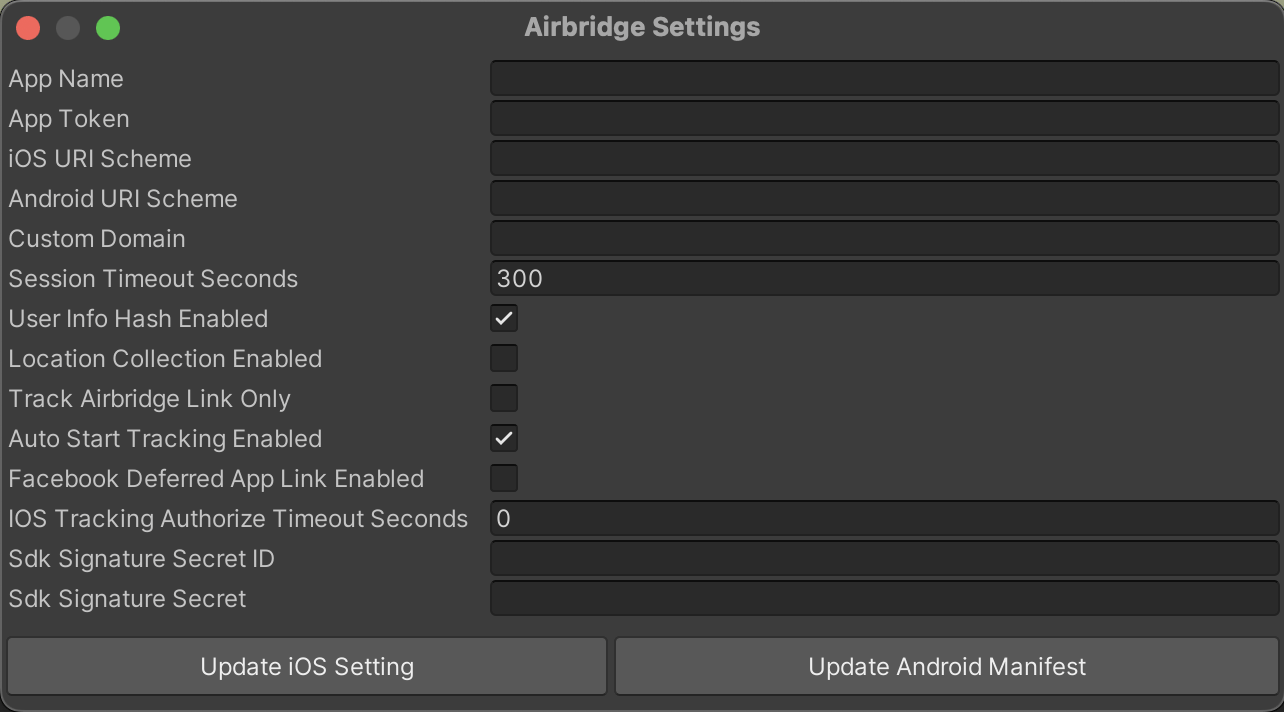
AttentionAfter filling out the fields, click Update iOS App Setting or Update Android Manifest to apply changes.
AttentionIf you want to manually merge the
Android Manifest file, navigate to [Project]>[Plugins]>[Airbridge]>[Android] and refer to the AndroidManifest.xml file.Set up app information
In the Airbridge dashboard, navigate to [Settings]>[Tokens] and copy the App Name and Token.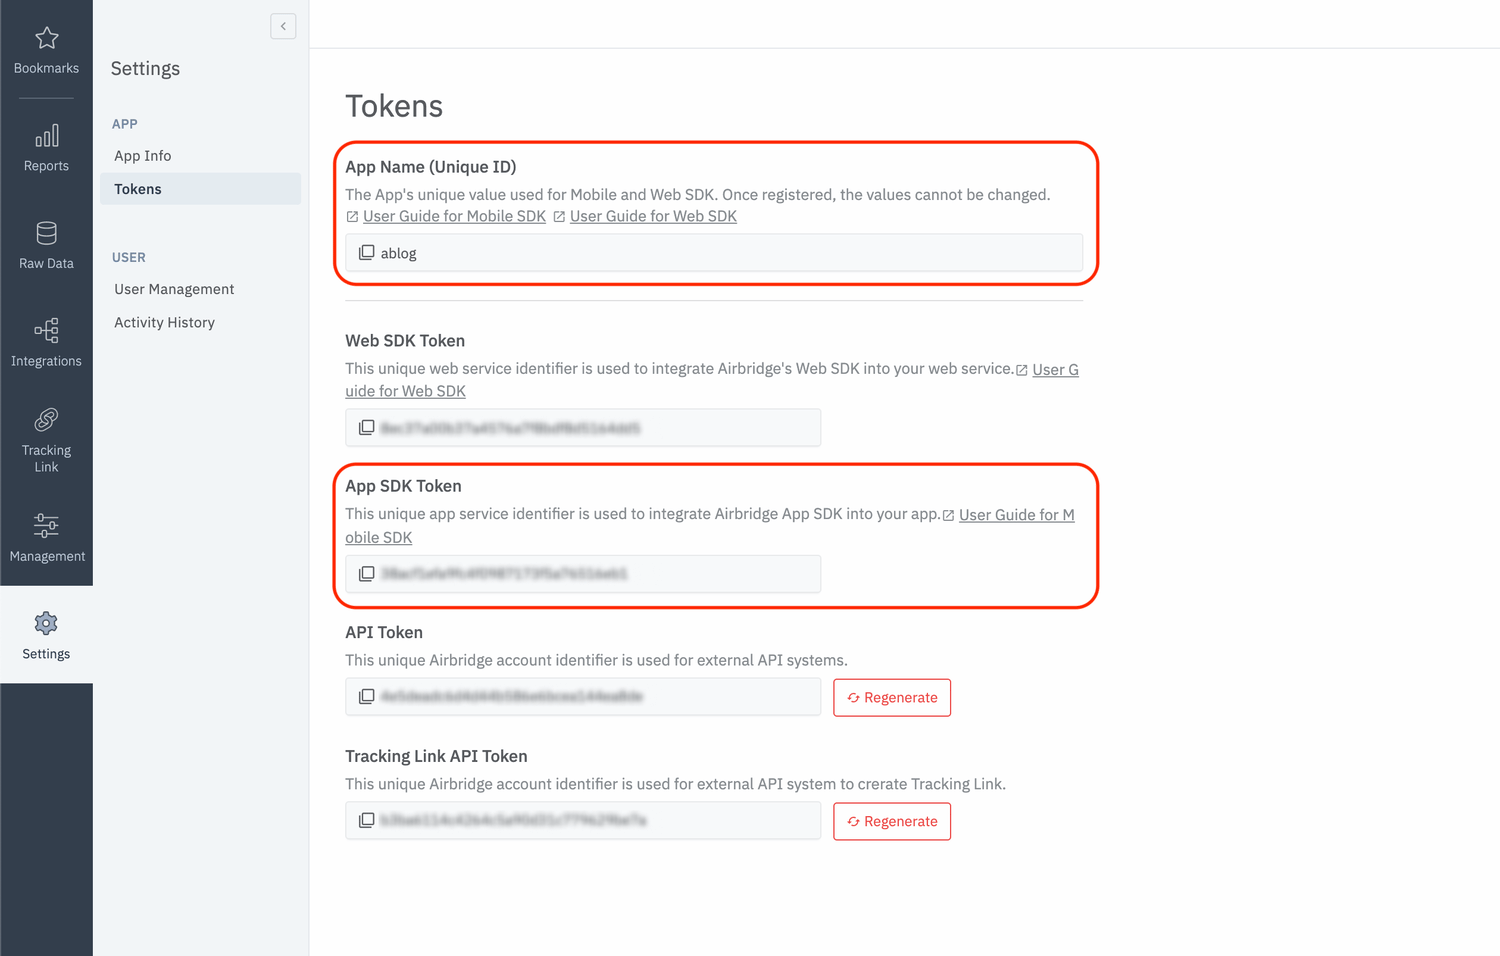
Initialization
The Airbridge Unity SDK does not require initialization. However, in particular cases, a migration process may be required per platform.Set up Application Entry Point
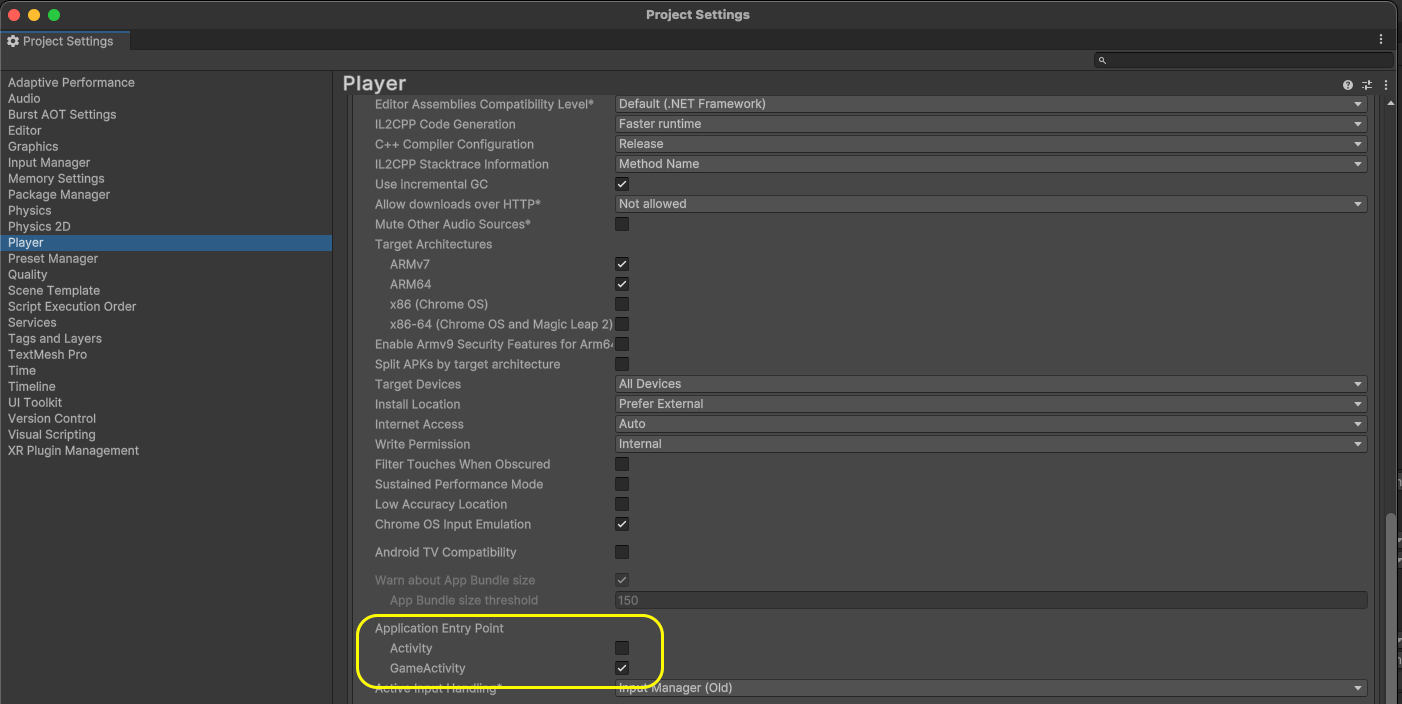
If the Application Entry Point is set to Activity
If the Application Entry Point is set to Activity
The Android Manifest file is automatically updated with the value entered in the [AB180]>[Airbridge Settings], and therefore, no action is required.
If the Application Entry Point is set to GameActivity
If the Application Entry Point is set to GameActivity
v1.16.3 or later
The Android Manifest file is automatically updated with the value entered in the [AB180]>[Airbridge Settings], and therefore, no action is required.v1.16.2 or earlier
The custom Activity provided by the Airbridge Unity SDK is an Activity that inherits from com.unity3d.player.UnityPlayerActivity, and therefore, the following actions are required.- Remove the
Assets/Plugins/Airbridge/Android/java/co/ab180/airbridge/unity/AirbridgeActivity.javafile. - Create a Custom Activity file (
AirbridgeGameActivity.java) as follows.
- Register the Custom Activity as follows in the Android Manifest file (
{UNITY_PROJECT}/Plugins/Android/AndroidManifest.xml).
If the Application Entry Point is set to Activity and GameActivity
If the Application Entry Point is set to Activity and GameActivity
AttentionFor development purposes, you can set up 2 application entry points.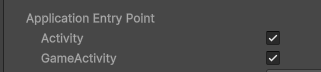
v1.16.3 or later
- Refer to the
AirbridgeActivity.java.templatefile andAirbridgeGameActivity.java.templatefile located inside the{UNITY_PROJECT}/Plugins/Airbridge/Android/java/co/ab180/airbridge/unityfolder to create your activities. - Apply each activity to your Android Manifest file.
- The Android Manifest file will then be automatically updated with the values set in the [AB180]>[Airbridge Settings].
v1.16.2 or earlier
Airbridge Unity SDK does not provide a custom Activity that inherits from com.unity3d.player.UnityPlayerGameActivity, and setting the Intent Filter to the value set in the “AB180 → Airbridge Settings” is only automatic for one Activity, so the following additional work is required.- Create a Custom Activity file (
AirbridgeGameActivity.java) as follows.
- Set the Android Manifest file (
{UNITY_PROJECT}/Plugins/Android/AndroidManifest.xml) as follows.
YOUR_APP_NAME: App Name set in the [AB180]>[Airbridge Settings] at the top menu bar in UnityYOUR_APP_URI_SCHEME: Android URI Scheme set in the [AB180]>[Airbridge Settings] at the top menu bar in Unity
- For Unity version 6, refer to the GameActivity guide.
- For Unity versions earlier than version 6, refer to the Activity guide.
SDK testing
After completing the Airbridge Unity SDK setup, you can test whether it works properly by following the methods below.Using the Airbridge Dashboard
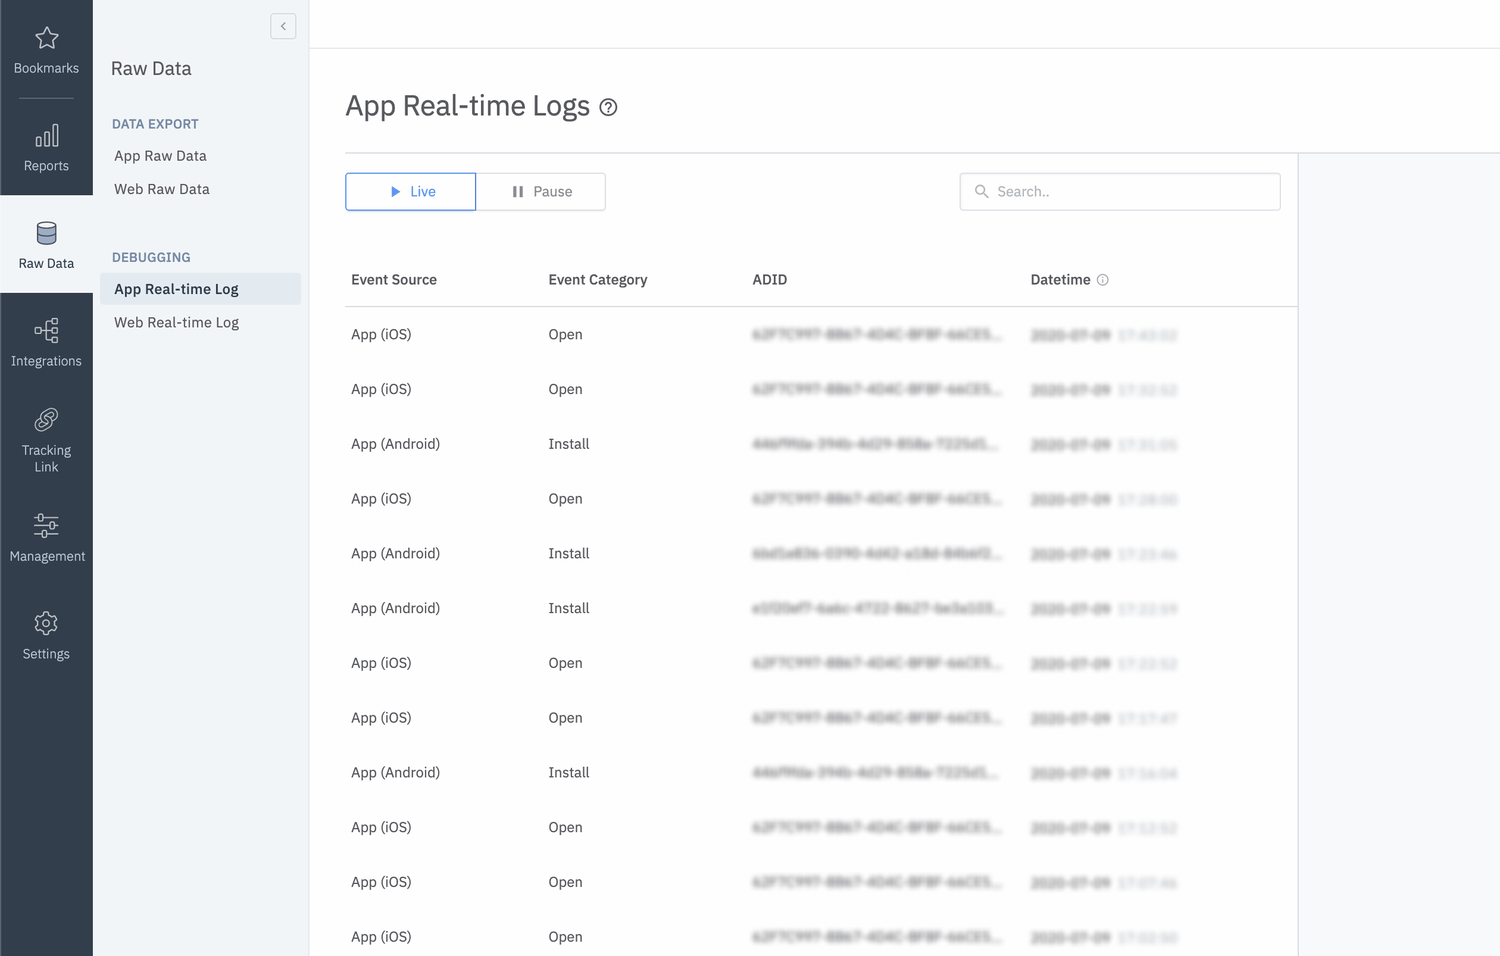
- Install and open the app on a test device.
- Navigate to [Raw Data]>[App Real-time Logs] in the Airbridge dashboard.
- Enter the Google Advertising ID (GAID) of the test device to find it in the logs.
AttentionIt may take up to 5 minutes for the logs to appear on the [Real-time Logs] page.
Using the logs
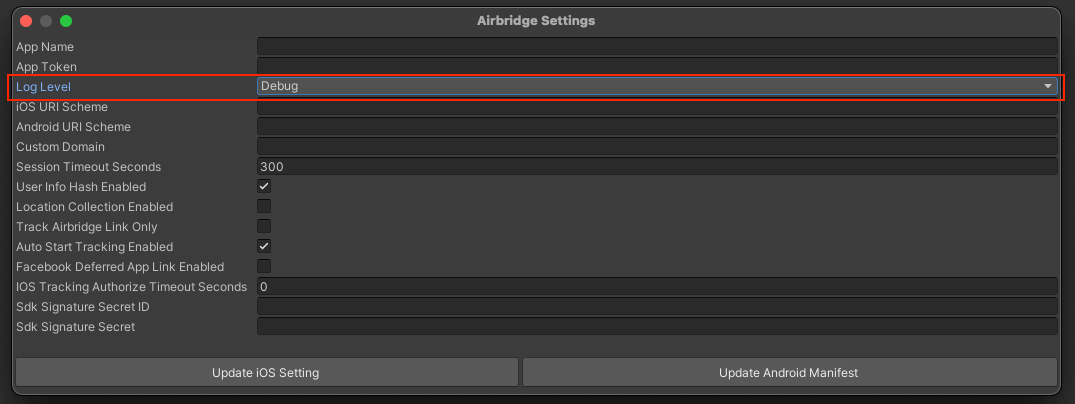
Deep Linking
Set up dashboard
Refer to the guides below to set up the Airbridge dashboard for deep linking.Set up project
iOS
Navigate to [AB180]>[Airbridge Settings] in Unity and enter the iOS URI Scheme, which can be found on the [Tracking Link]>[Deep Links] page in the Airbridge dashboard.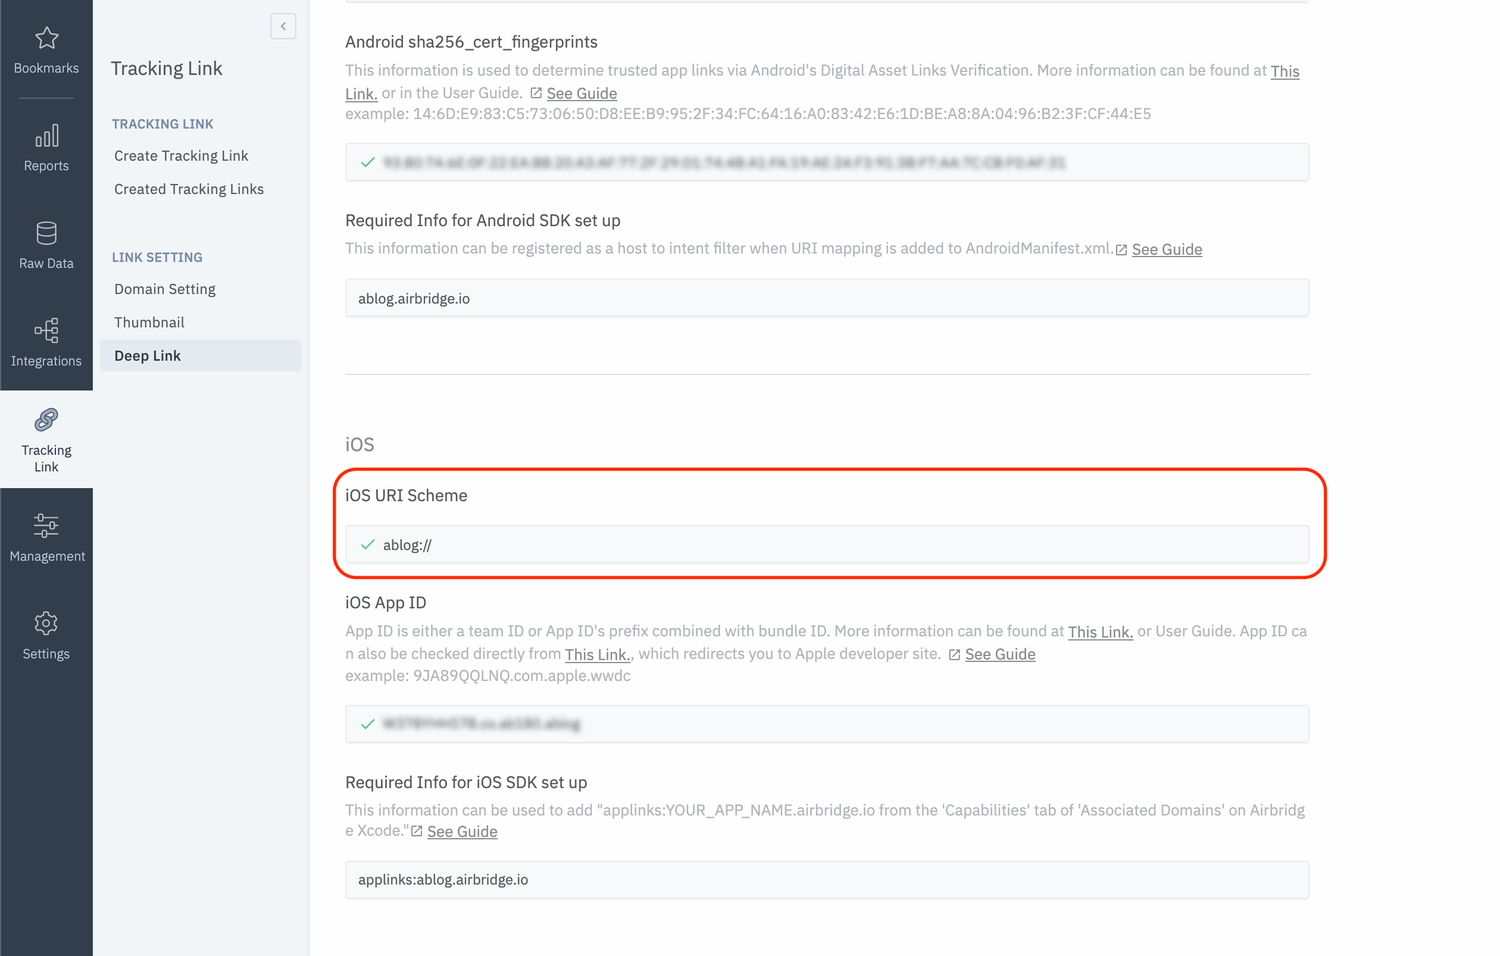
Android
Navigate to [AB180]>[Airbridge Settings] in Unity and enter the Android URI Scheme, which can be found on the [Tracking Link]>[Deep Links] page in the Airbridge dashboard.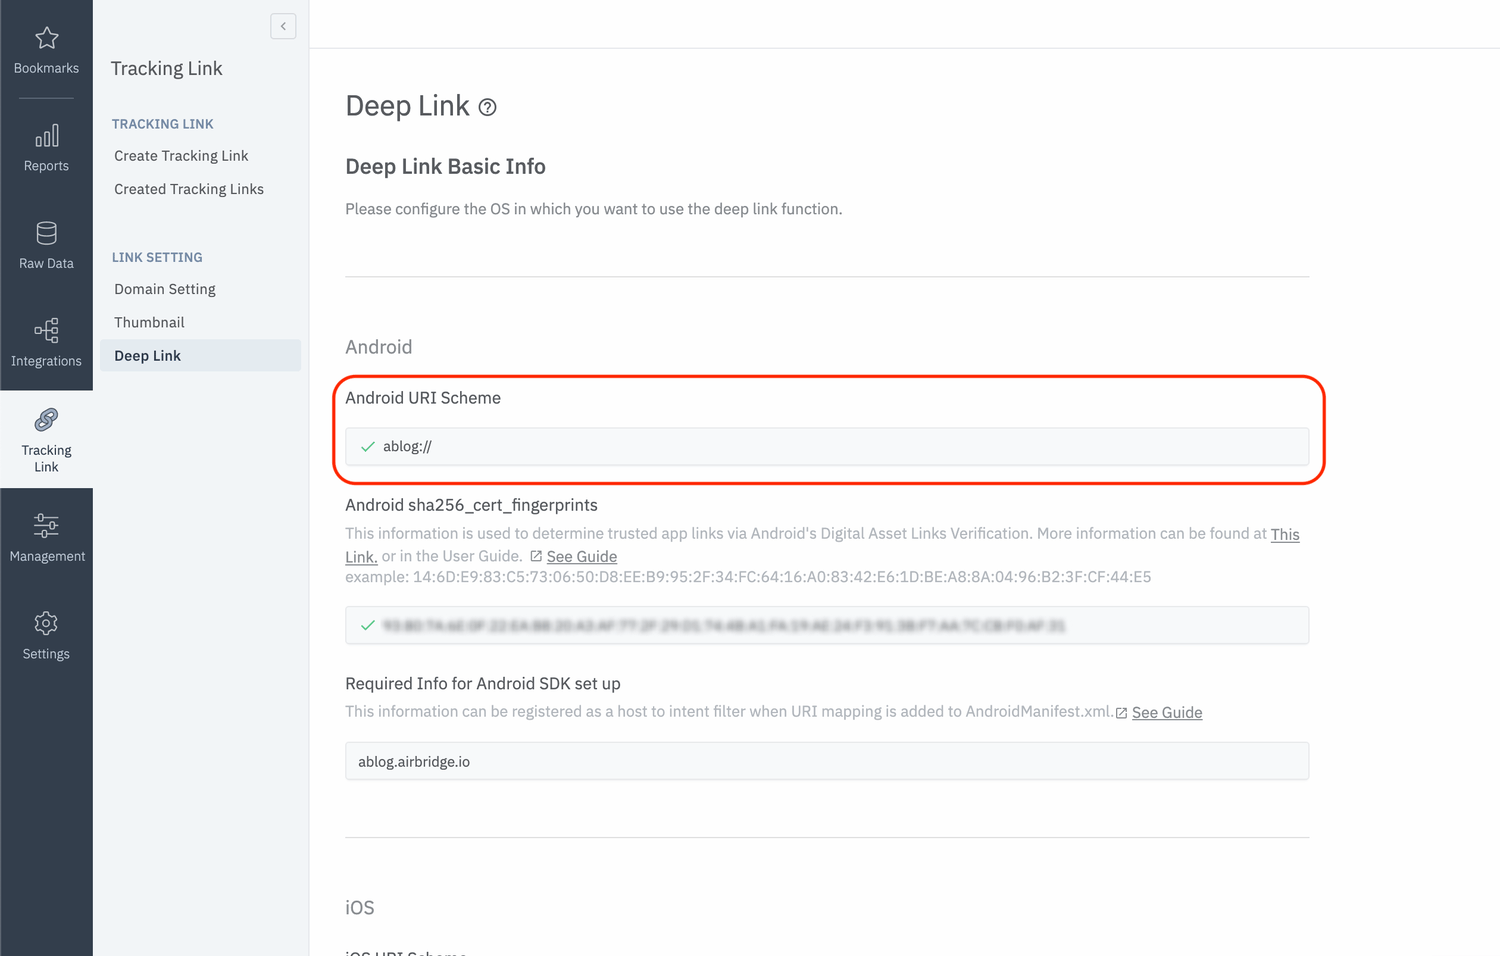
Set up a custom domain
When generating tracking links in the Airbridge dashboard, you can use tracking links in the form ofdeeplink.page or abr.ge. However, for branding purposes and to improve click-through rates (CTR), you can use customized URLs as tracking links, such as go.my_company.com/abcd, by following the steps below.
- Set up the custom domain in the Airbridge dashboard by referring to this user guide.
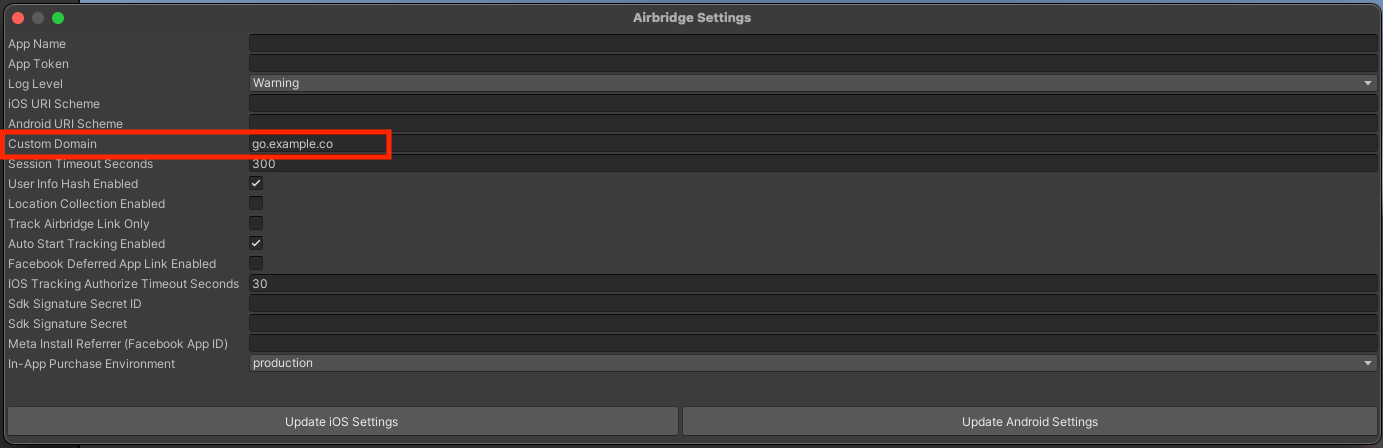
- Navigate to [AB180]>[Airbridge Settings] in Unity and enter the custom domain.
Set up deep link callback
To receive the deep link data clicked by the user, register the object name usingSetDeeplinkCallback to receive messages like below.
SetDeeplinkCallback is set as above.
The Airbridge Unity SDK uses Unity’s
UnitySendMessage method to forward deep link information.Deep link testing
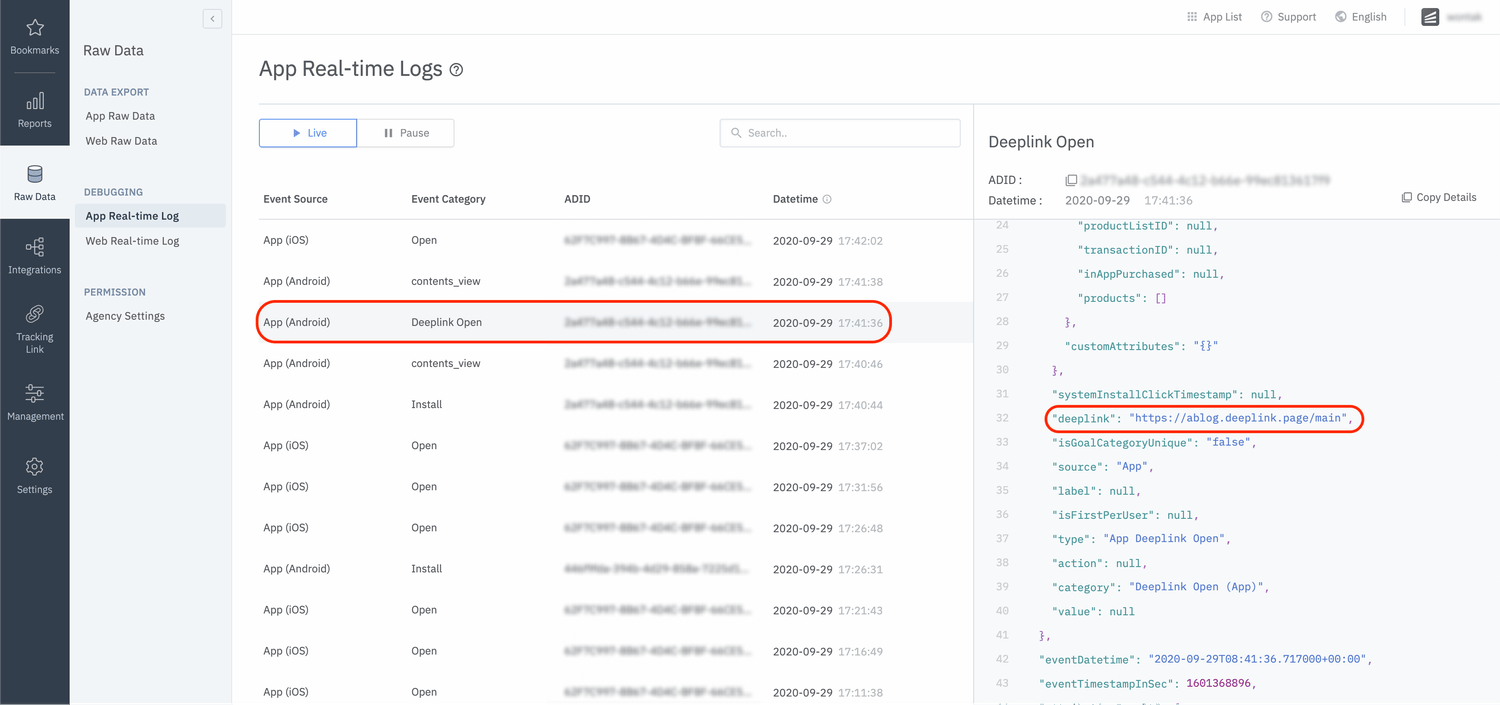
Click on your URI scheme to test if your deep link has been properly set up in the Airbridge SDK.YOUR_APP_URI_SCHEME://
User Data
User identifier
To measure the fragmented contributions of users between web and app, Airbridge collects the following user identifier information.- User Email: Email address
- User Phone: Phone number
- User ID: Unique User ID (The ID value that specifies the user must be the same in both web and mobile)
- User Alias: Identifiers that can represent users (e.g. loyalty program ID, affiliate integrated ID, etc)
The user’s email and phone numbers are hashed (SHA256) by default and then sent to servers.
Once the user identifier has been configured, all events will be forwarded with the corresponding identity information.
AttentionThe user identifier properties can be reset or overwritten through user events.
User Attribute
Additional user attributes can be used for more accurate Multi-Touch Attribution (MTA) analyses, additional internal data analyses, and linking third-party solutions.AttentionThe user identifier properties can be reset or overwritten through user events.
Testing
Make sure that your user information settings are being properly sent through the SDK.- Configure user identifier information.
- Send an event using the SDK.
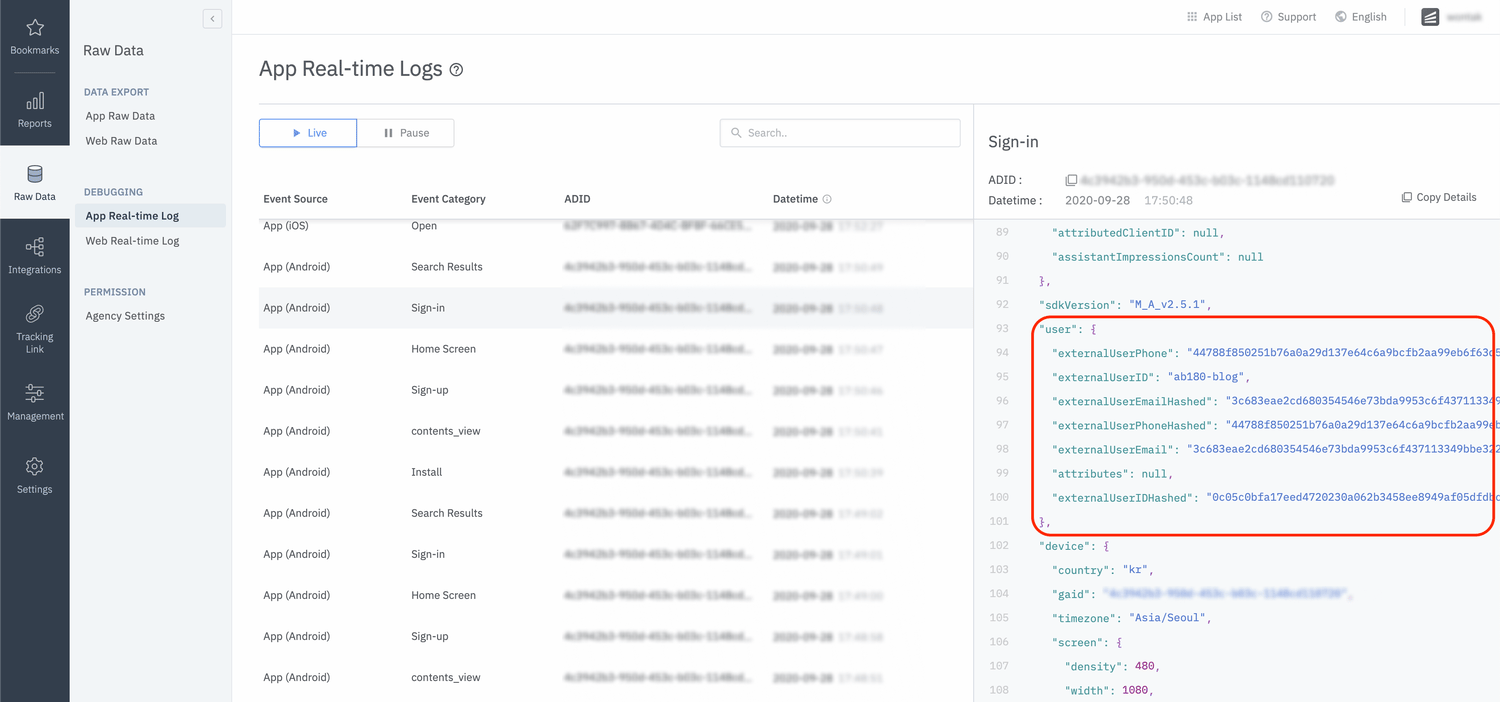
- Click the event at “Airbridge dashboard → Raw Data → App Real-time Logs”
- Check if the user information is correctly sent under the
userblock.
Device Setup
Setup Device Alias
Setup a device alias through the Airbridge SDK. The alias will be sustained even after the app closes, unless otherwise deleted.Event Setup
When important user actions occur, in-app events can be sent to measure performance by channel. All event parameters are optional. However, more information about the event will help provide a more accurate analysis. All events called by the Airbridge SDK can be sent with the following fields.Standard Events
Send standard user events with the SDK.action, label, value, attributes can also be used when sending standard events.
Sign Up
Sign In
Sign Out
AttentionAll user identifier properties will disappear after
sign out is called.View Home Screen
View Search Result
View Product List
View Product Detail
Add To Cart
Purchase
Custom Events
Send custom events with the SDK.To configure and deliver
Semantic Attributes directly, please refer to this guide.Verify Event Transmission
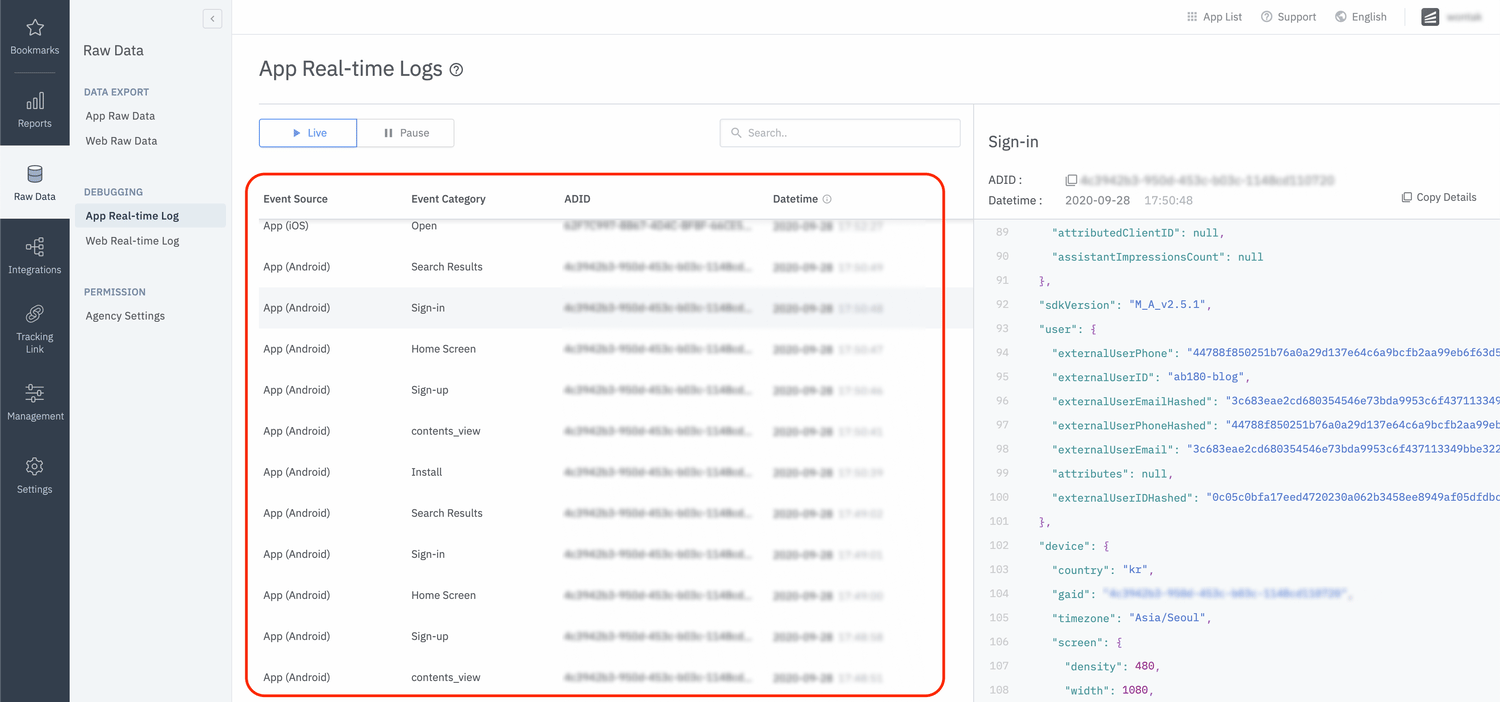
Make sure that the events are being properly sent through the SDK.- Send an event with the SDK.
- Check if the event shows up at “Airbridge dashboard → Raw Data → App Real-time Logs”.
Advanced Setup
SDK Signature Setup
Protection against SDK spoofing is possible once you input the “SDK Signature Secret ID” and “SDK Signature Secret” values in the “AB180 -> Airbridge Settings menu”.The SDK Signature Credentials are required for the SDK Signature setup. Refer to this article to learn how to create them.
Hash User Identifier
Email addresses and phone numbers are hashed by default. (SHA256) Settings can be changed by configuring the “User Info Hash Enabled” field at “AB180 → Airbridge Settings”.AttentionOther security measures must be taken internally when sensitive personal information such as “User Email” and “User Phone” is being handled.
Session Timeout Setup
The Airbridge Unity SDK does not send app open events again if the user reopens the app within the time configured at the “Session Timeout Seconds” field at “AB180 → Airbridge Settings”. Session timeout is in milliseconds and must range between 0 and 604800000 (7 days). The default value is 1000 * 60 * 5 (5 minutes).Setting up Opt-In
This feature is useful for conducting data collection and transmission in compliance with GDPR or CCPA. You can explicitly start data collection and transmission by navigating toAB180 > Airbridge Settings in the top menu bar of Unity, and selecting the Auto Start Tracking Enabled field.
When this feature is disabled, the following function must be explicitly called for proper data collection.
Setting up Opt-Out
AttentionThe instructions below are optional. Proceed only if necessary.
setAutoStartTrackingEnabled to true, call the stopTracking function at the point where events cannot be collected. From the point when the stopTracking function is called, events are not collected.
Track Airbridge Link Only
If it is difficult to see the performance of re-engagement through Airbridge at a glance due to too many deep link actions within the advertiser’s app, “Track Airbridge Link Only” field at “AB180 → Airbridge Settings” can be used to only filter results received through Airbridge deep links. This option will measure deep links only if the following requirements are met.- The app is opened through a
airbridge.iolink - The app is opened through a
deeplink.pagelink - The app is opened through a Custom Domain Setup that is registered on the Airbridge dashboard
- The app is opened through a link that contains
airbridge_referrerinformation in the query
Location Collection (Android only)
Airbridge Unity SDK can collect user location information through the “Location Collection Enabled” field at “AB180 → Airbridge Settings”AttentionLocation information must be collected for legal purposes through legal methods.
Facebook Deferred App Links
You can receive Facebook Deferred App Links from the Airbridge Unity SDK through by configuring “Facebook Deferred App Link Enabled” at “AB180 → Airbridge Settings”.AttentionThe Facebook SDK setting must be installed in advance to use this feature.See - https://developers.facebook.com/docs/unity/
Tracking Authorize Timeout (iOS only)
When the AppTrackingTransparency.framework is used to present an app-tracking authorization request to the user, IDFA will not be collected when the install event occurs because the install event occurs before the selection. The “iOS Tracking Authorize Timeout Seconds” field at “AB180 → Airbridge Settings” allows you to delay the transmission of installation events so that the IDFA value may be included.Meta install referrer Collection Setup
Meta install referrer (MIR) Collection Setup supported by Airbridge Unity SDK in version 1.16.1 or higher. To collect data, set as below. You can pass your Facebook App ID through by configuring “Meta Install Referrer (Facebook App ID)” at “AB180 → Airbridge Settings”.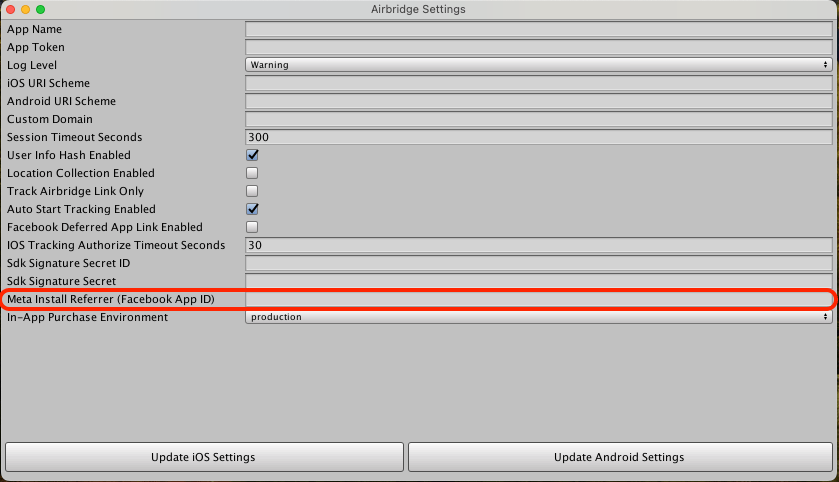
Uninstall Tracking
This feature is available for only Unity SDK v1.9.0+.
Reference
Android Uninstall Tracking
1. Setup Firebase Cloud Messaging Please refer to the official Firebase Cloud Messaging documentation for basic app setup. 2. Forward Firebase Push Token Forward the push token to Airbridge using theRegisterPushToken method.
iOS Uninstall Tracking
1. Setup Apple Push Notification Service Please refer to the official Unity Mobile Notifications Package documentation and install the package. 2. Forward Device Token Forward the device token to Airbridge using theRegisterPushToken method.
Hybrid App Setup
Additional events such as app installs, app open,s and deep link opens can’t be tracked with just the web SDK. The following simple setup allows in-app events to be called for a hybrid app.
AirbridgeUnity.CreateWebInterface allows you to control the web interface.
Please refer to the Unity Hybrid App Integration Guide for more information.
AttentionHybrid app setup is available for Airbridge Unity SDK v1.9.3+.