- Developers Guide
- SDK Integration (Previous)
- Flutter SDK (Previous)
Flutter SDK (Previous)

Add the following dependency under the dependencies block in your pubspec.yaml file.
dependencies:
  # Replace $HERE_LATEST_VERSION with latest version
  # - Versions: https://pub.dev/packages/airbridge_flutter_sdk/versions
  # - Example: airbridge_flutter_sdk: 0.0.0
  airbridge_flutter_sdk: $HERE_LATEST_VERSION
Open the Terminal at the top level of the project and run the following command.
The Airbridge Flutter SDK is only supported by Flutter v.1.20.0+ and Dart v.2.12.0+.
flutter pub get1. Add the following code under the flutter/assets block in your pubspec.yaml file.
flutter:
  assets:
    - assets/airbridge.json
2. Create an assets/airbridge.json file at the top of the project.
Add the following code to the ios/[Project Name]/AppDelegate.m file.
import airbridge_flutter_sdk

override func application(
    _ application: UIApplication,
    didFinishLaunchingWithOptions launchOptions: [UIApplication.LaunchOptionsKey: Any]?
  ) -> Bool {
    AirbridgeFlutter.initSDK(appName: "YOUR_APP_NAME", appToken: "YOUR_APP_TOKEN", withLaunchOptions: launchOptions)
}#import <airbridge_flutter_sdk/AirbridgeFlutter.h>
- (BOOL)application:(UIApplication *)application didFinishLaunchingWithOptions:(NSDictionary *)launchOptions {
[AirbridgeFlutter initSDKWithAppName:@"YOUR_APP_NAME" appToken:@"YOUR_APP_TOKEN" withLaunchOptions:launchOptions];
}The YOUR_APP_NAME and YOUR_APP_SDK_TOKEN can be found on the [Settings]>[Tokens] page in the Airbridge dashboard.
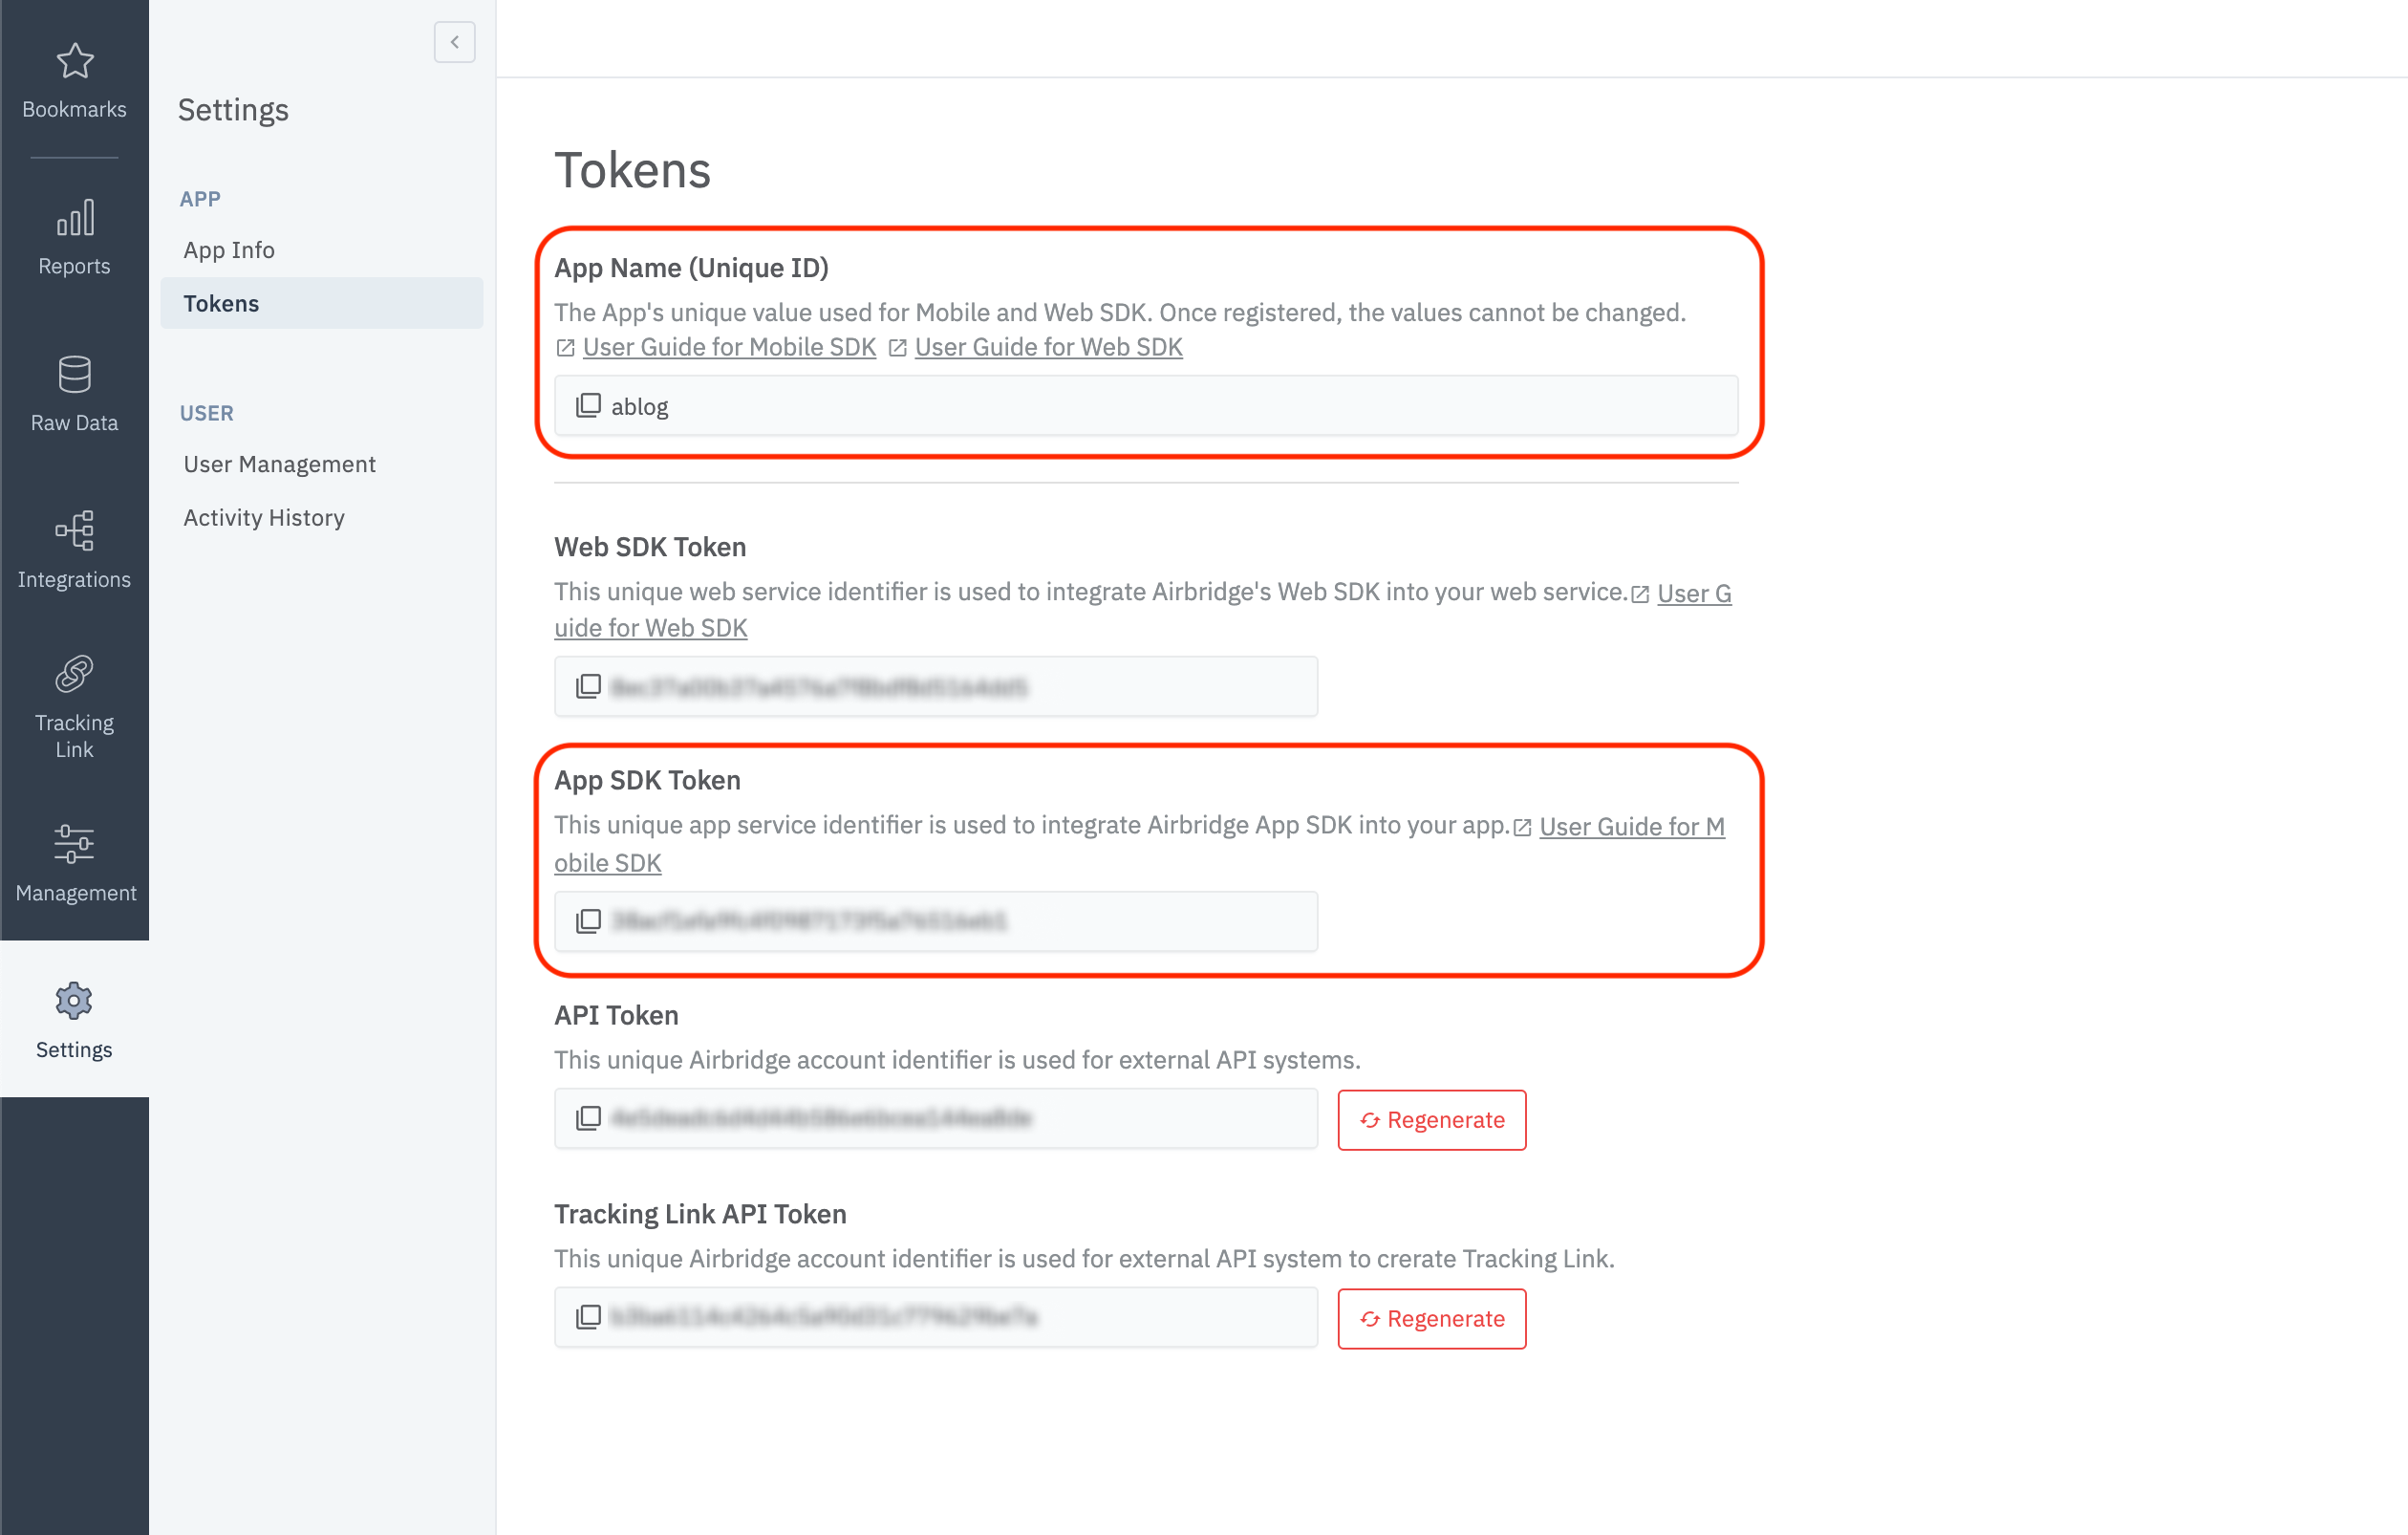
If the Android module Application Class is not defined in the project, create an Application class.
Add the AirbridgeFlutter.init code in the Application class, like in the example below.
import co.ab180.airbridge.flutter.AirbridgeFlutter;
import io.flutter.app.FlutterApplication;

public class MainApplication extends FlutterApplication {
    @Override
    public void onCreate() {
        super.onCreate();
        AirbridgeFlutter.init(this, "YOUR_APP_NAME", "YOUR_APP_TOKEN");
    }
}import co.ab180.airbridge.flutter.AirbridgeFlutter
import io.flutter.app.FlutterApplication
class MainApplication: FlutterApplication() {
override fun onCreate() {
super.onCreate()
AirbridgeFlutter.init(this, "YOUR_APP_NAME", "YOUR_APP_TOKEN")
}
}The YOUR_APP_NAME and YOUR_APP_SDK_TOKEN can be found on the [Settings]>[Tokens] page in the Airbridge dashboard.
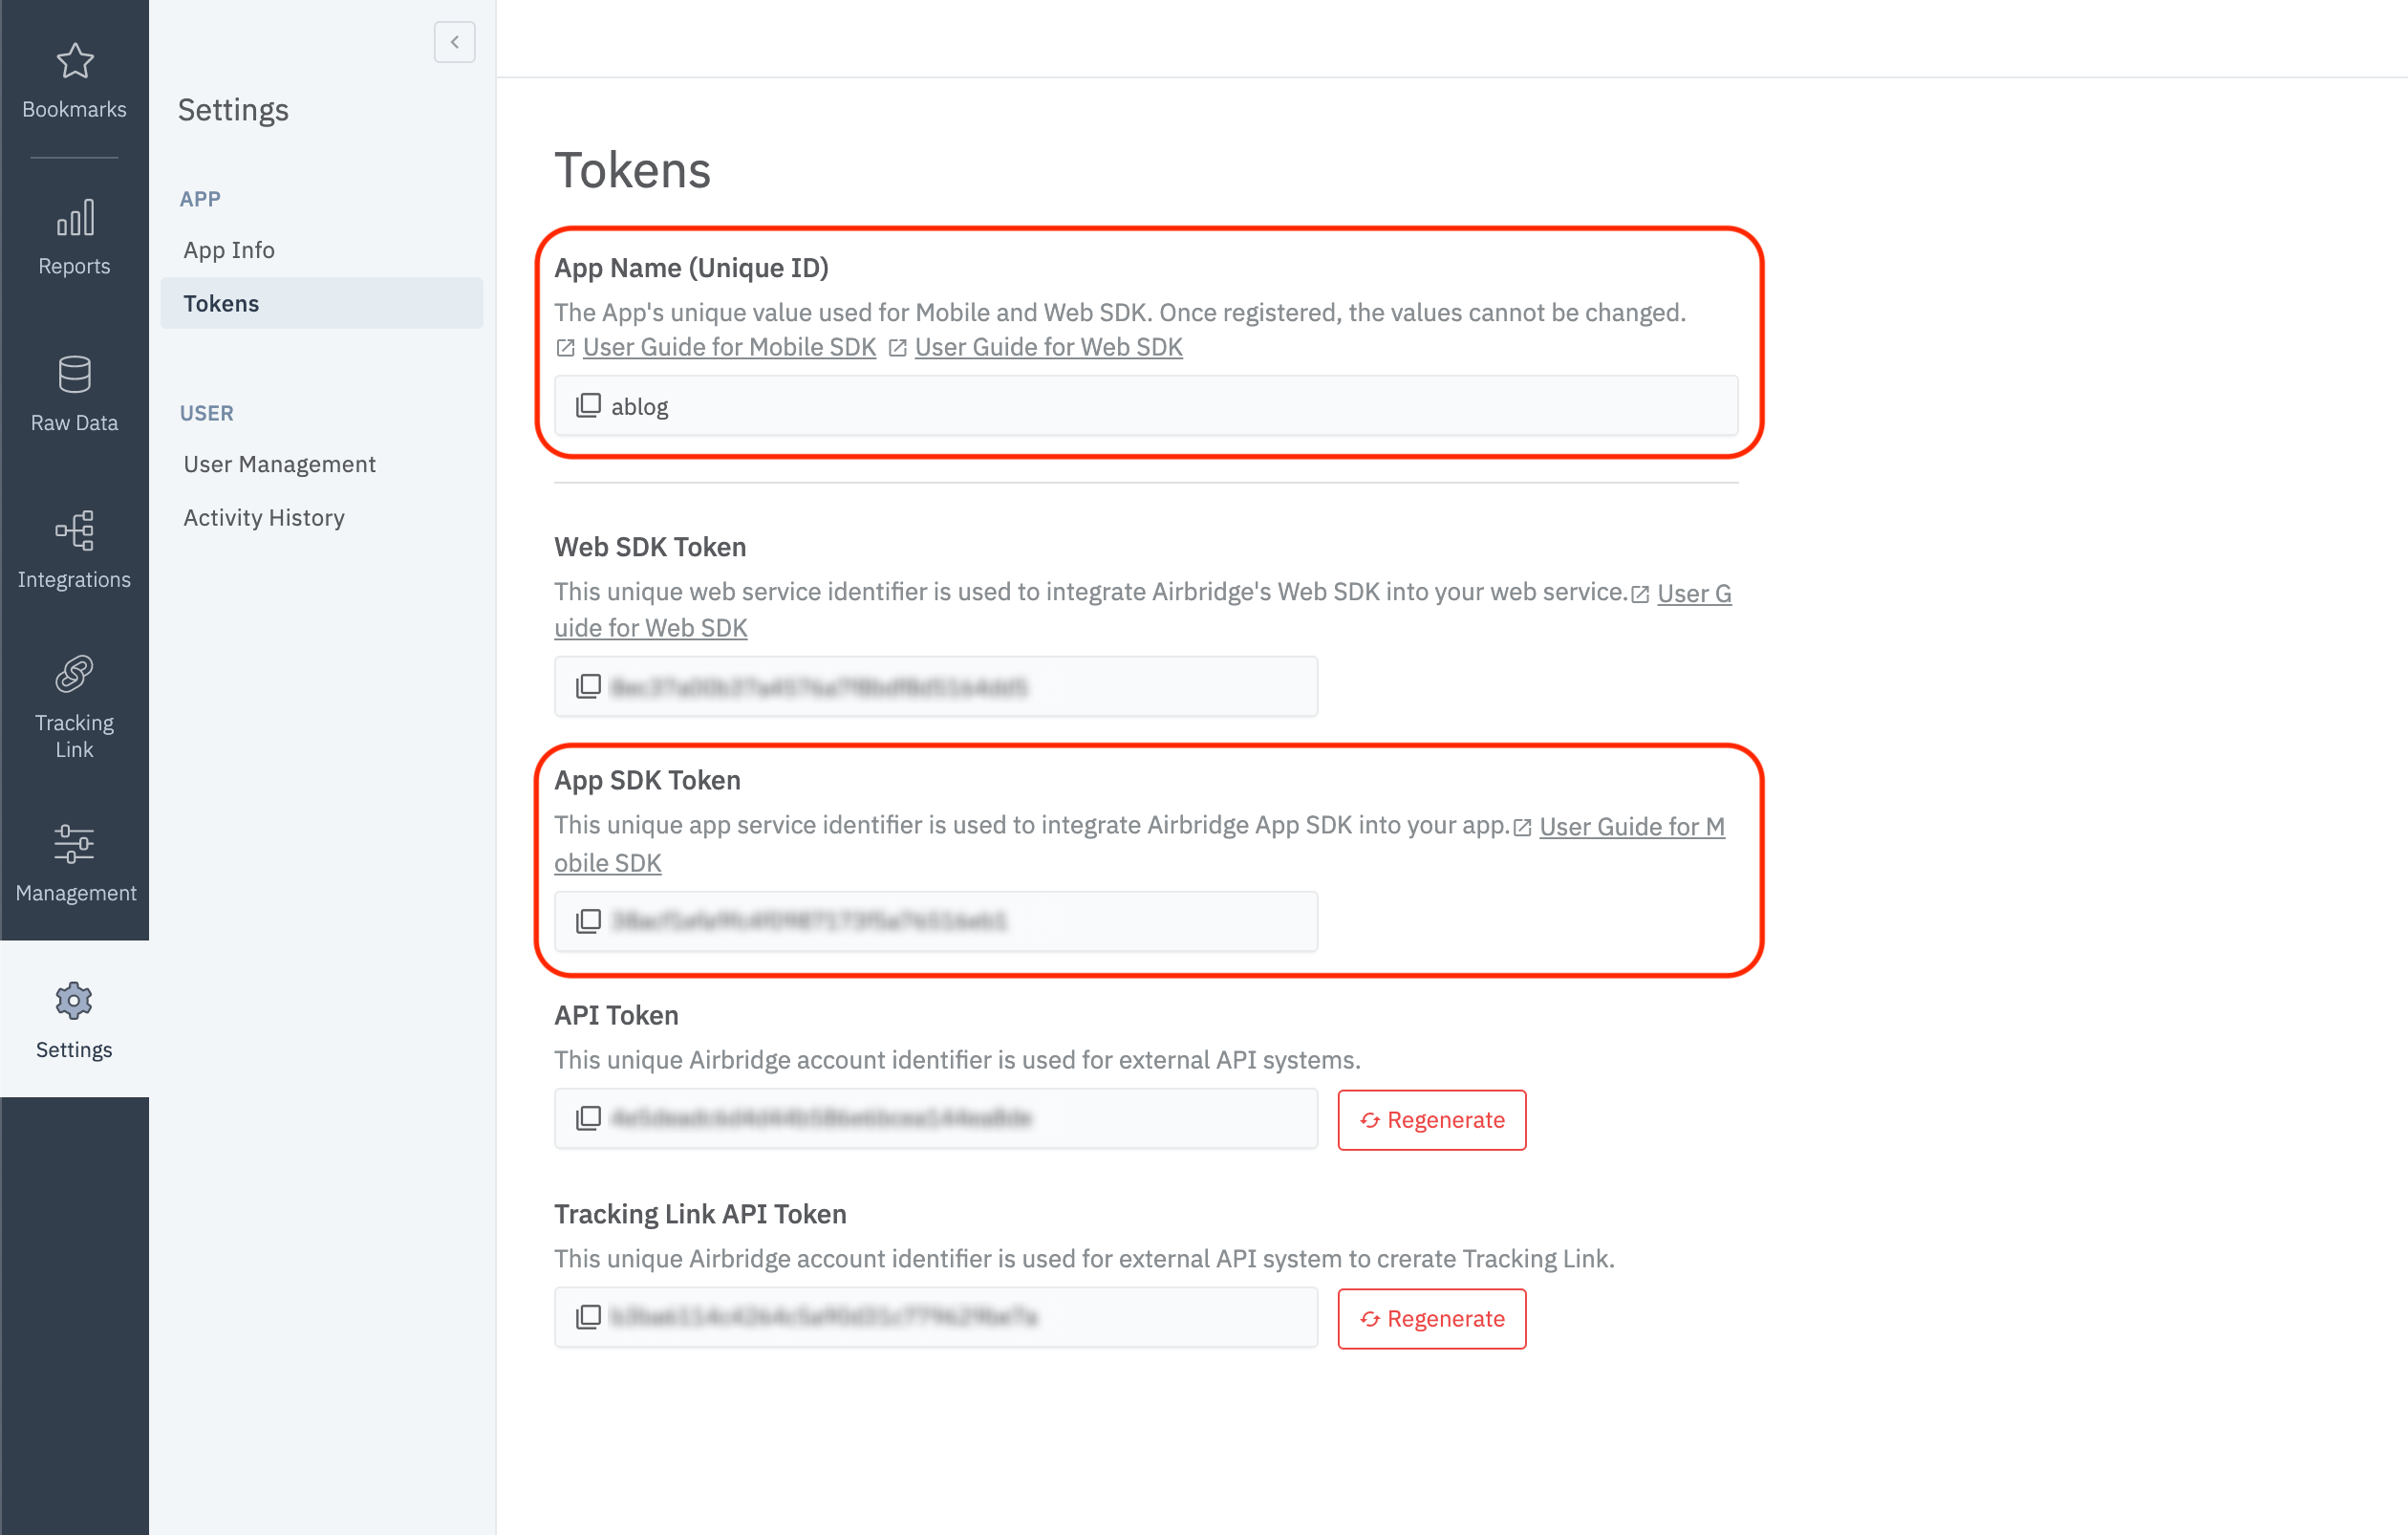
Add the Application class created above to the AndroidManifest.xml file in the Andoird module of the project like in the example below.
<application
    android:name=".MainApplication"
    ...>
    ...
</application>Add the
airbridge.jsonfile to the project folder.Add the configuration values in JSON format.
{
    "sessionTimeoutSeconds": 300,
    "autoStartTrackingEnabled": true,
    "userInfoHashEnabled": true,
    "trackAirbridgeLinkOnly": false,
    "facebookDeferredAppLinkEnabled": false,
    "locationCollectionEnabled": false,
    "trackingAuthorizeTimeoutSeconds": 30,
    "sdkSignatureSecretID": "YOUR_SDK_SIGNATURE_SECRET_ID",
    "sdkSignatureSecret": "YOUR_SDK_SIGNATURE_SECRET",
    "logLevel": "warning"
}
Attention
The default value of the
trackingAuthorizeTimeoutSecondsin the above code is 30s. Adjust accordingly depending on your ATT prompt settings to optimize the user experience. Refer to the Tracking Authorize Timeout section for more details.
Name | Type | Default | Description |
|---|---|---|---|
sessionTimeoutSeconds | Number | 300 | An app open event will not be sent when the app is reopened within the designated period. |
autoStartTrackingEnabled | Boolean | true | When set to false, no events will be sent until |
userInfoHashEnabled | Boolean | true | When set to false, user email and user phone information are sent without being hashed. |
trackAirbridgeLinkOnly | Boolean | false | When set to true, deep link events are sent only when app is opened with an Airbridge deep link. |
facebookDeferredAppLinkEnabled | Boolean | false | When set to true and the Facebook SDK is installed, Facebook Deferred App Link data is collected. |
metaInstallReferrer | String | null | Collects Meta Install Referrer for Android.
facebookInstallReferrer can be used instead of metaInstallReferrer. When using both keys, the metaInstallReferrer is applied. |
locationCollectionEnabled | Boolean | false | When set to |
trackingAuthorizeTimeoutSeconds | Number | 30 | When timeout is set, Install event sending is delayed until |
sdkSignatureSecretID | String | null | Protects against SDK spoofing. Both sdkSignatureSecretID and sdkSignatureSecret values must be applied. |
sdkSignatureSecret | String | null | Protects against SDK spoofing. Both sdkSignatureSecretID and sdkSignatureSecret values must be applied. |
logLevel | String | warning | Adjusts the log record level for Airbridge. |
Check if install events are sent when the application is installed and opened.
Install and open the app on a test device.
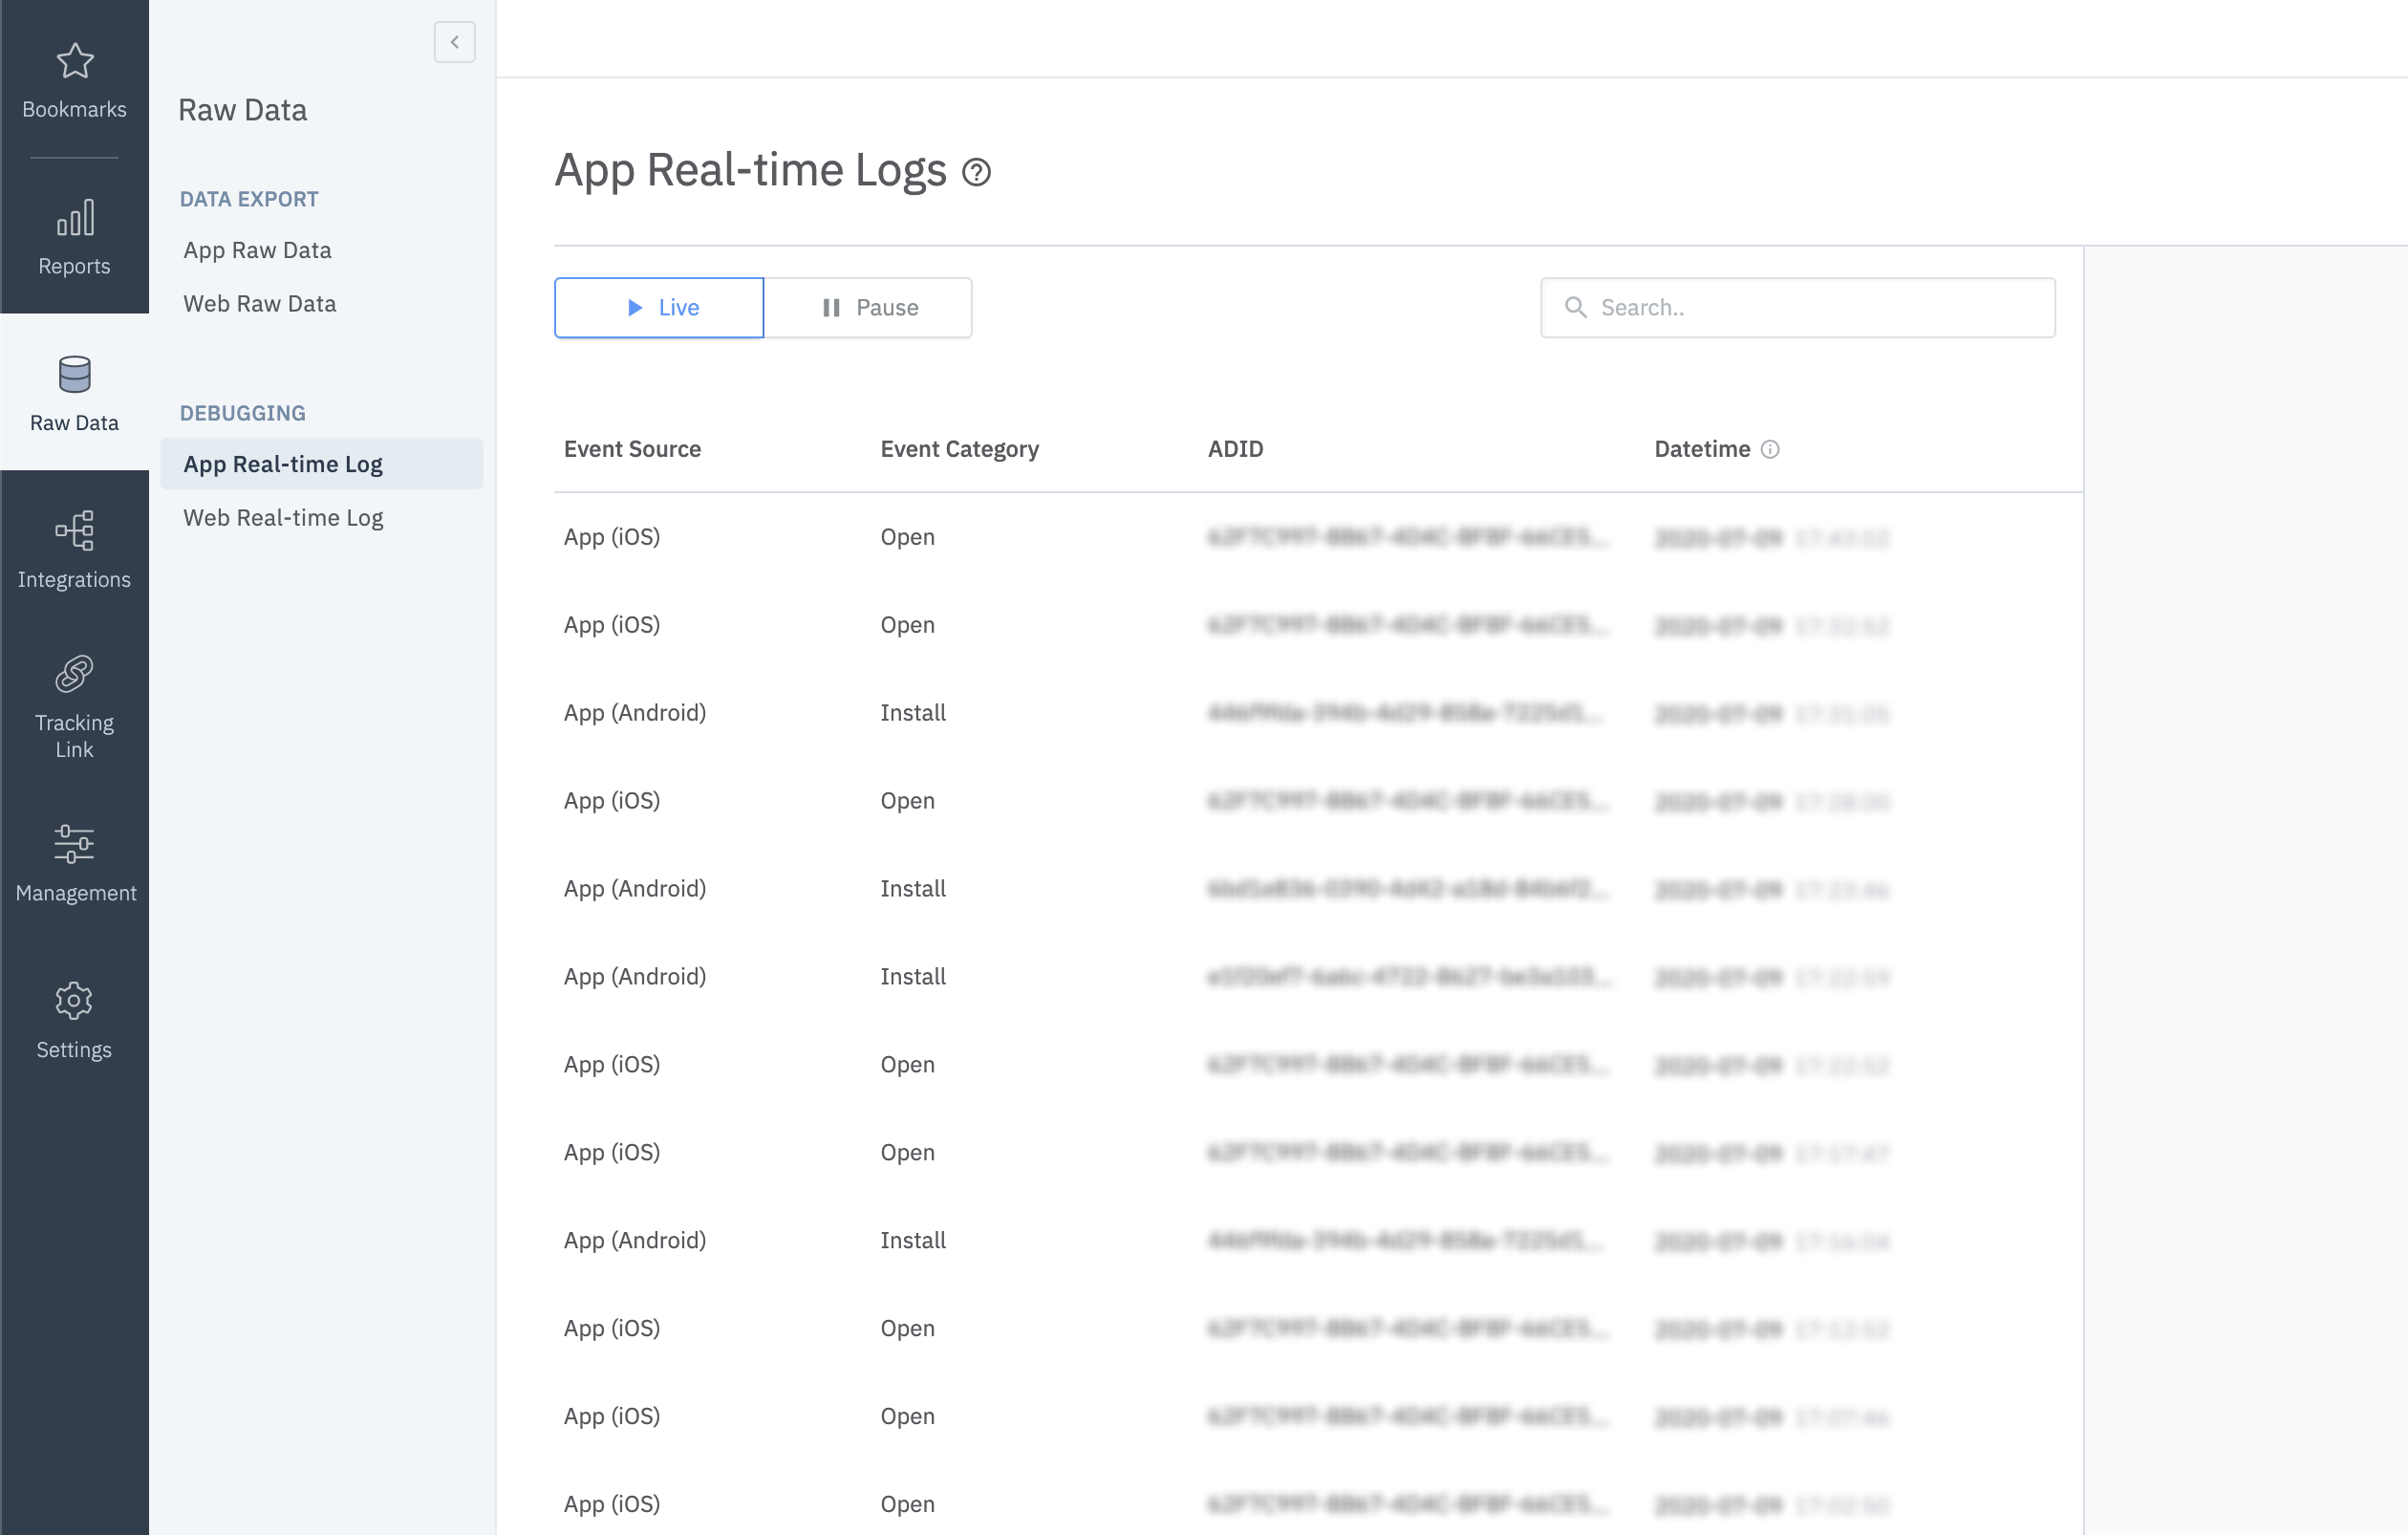
Navigate to [Raw Data]>[App Real-time Logs] in the Airbridge dashboard.
Enter the ADID (IDFA, IDFA, or GAID) of the test device into the search bar to find it in the logs.
It may take up to 5 minutes for the logs to be visible in the dashboard.
Attention
Logs may be delayed for up to 5 minutes.
Refer to the guides below for the deep link settings in the Airbridge dashboard.
Open the iOS module's
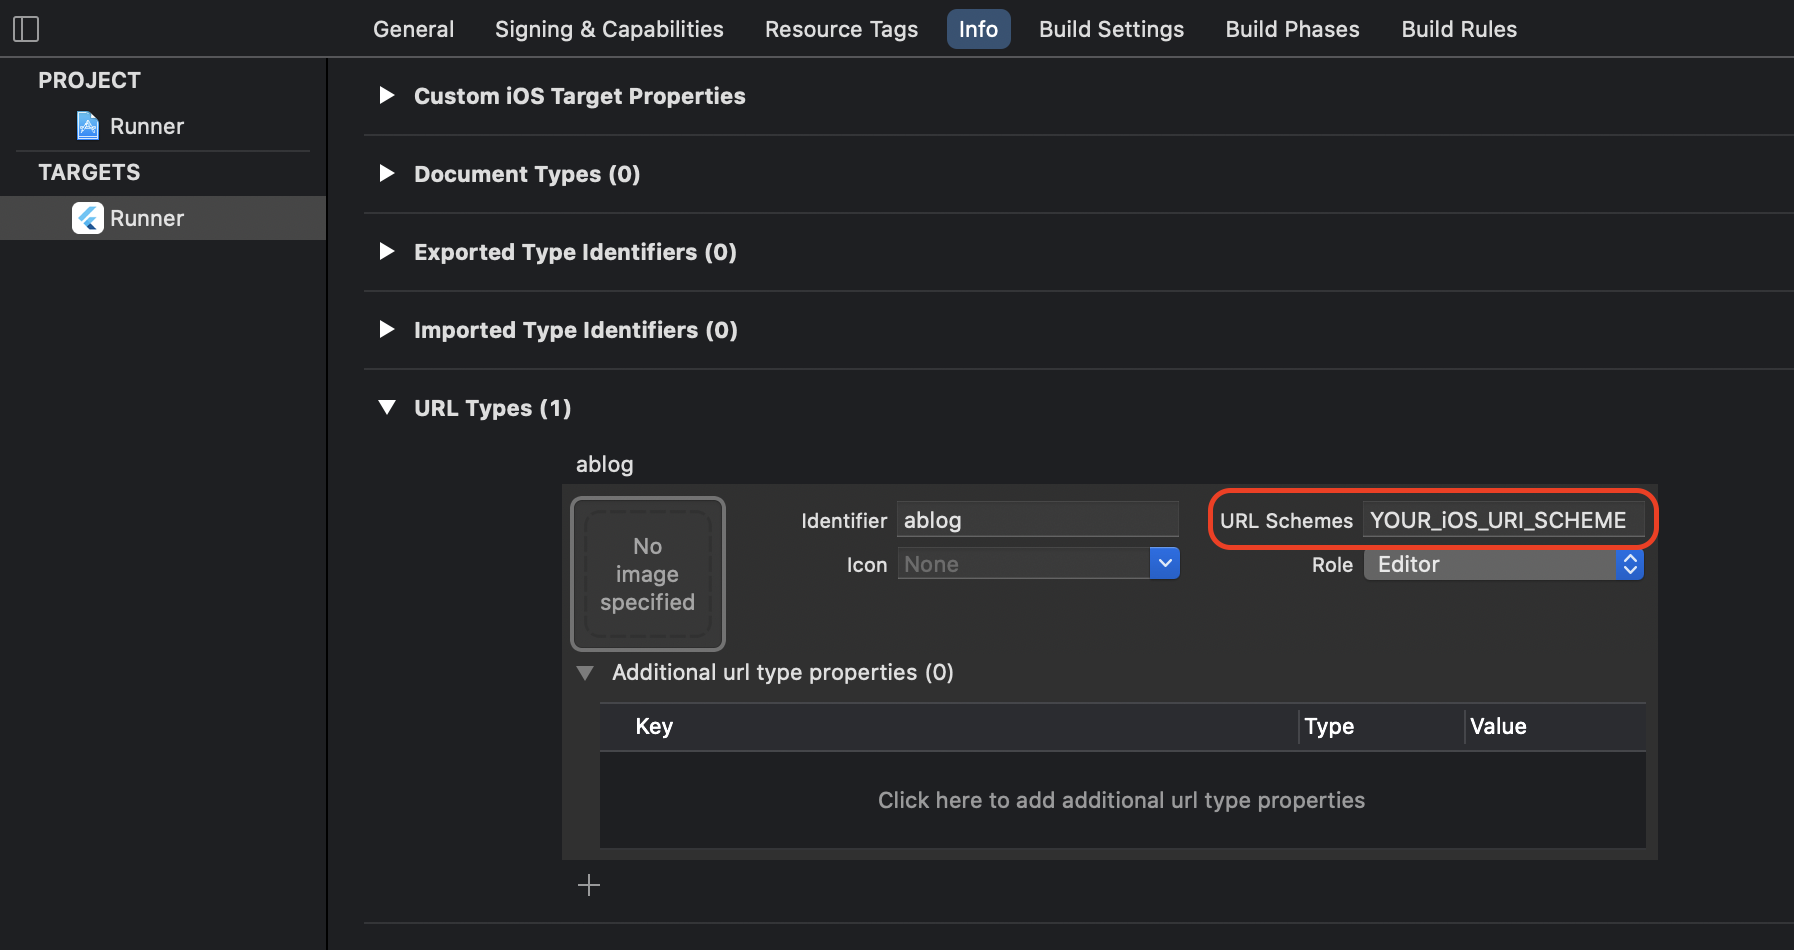
*.xcodeprojor*.xcworkspaceof the project in Xcode.Go to [Xcode]>[Project file]>[Info]>[URL Types].
From the Airbridge dashboard, copy "iOS URI Scheme" and paste it into Xcode's "URL Schemes field. (Do not include
://)
Open the iOS module's
*.xcodeprojor*.xcworkspaceof the project in Xcode.Go to [Xcode]>[Project file]>[Signing & Capabilities].
In the [Associated Domains] tab, add the following information.
applinks:YOUR_APP_NAME.airbridge.ioto "Associated Domains"applinks:YOUR_APP_NAME.deeplink.pageto "Associated Domains"
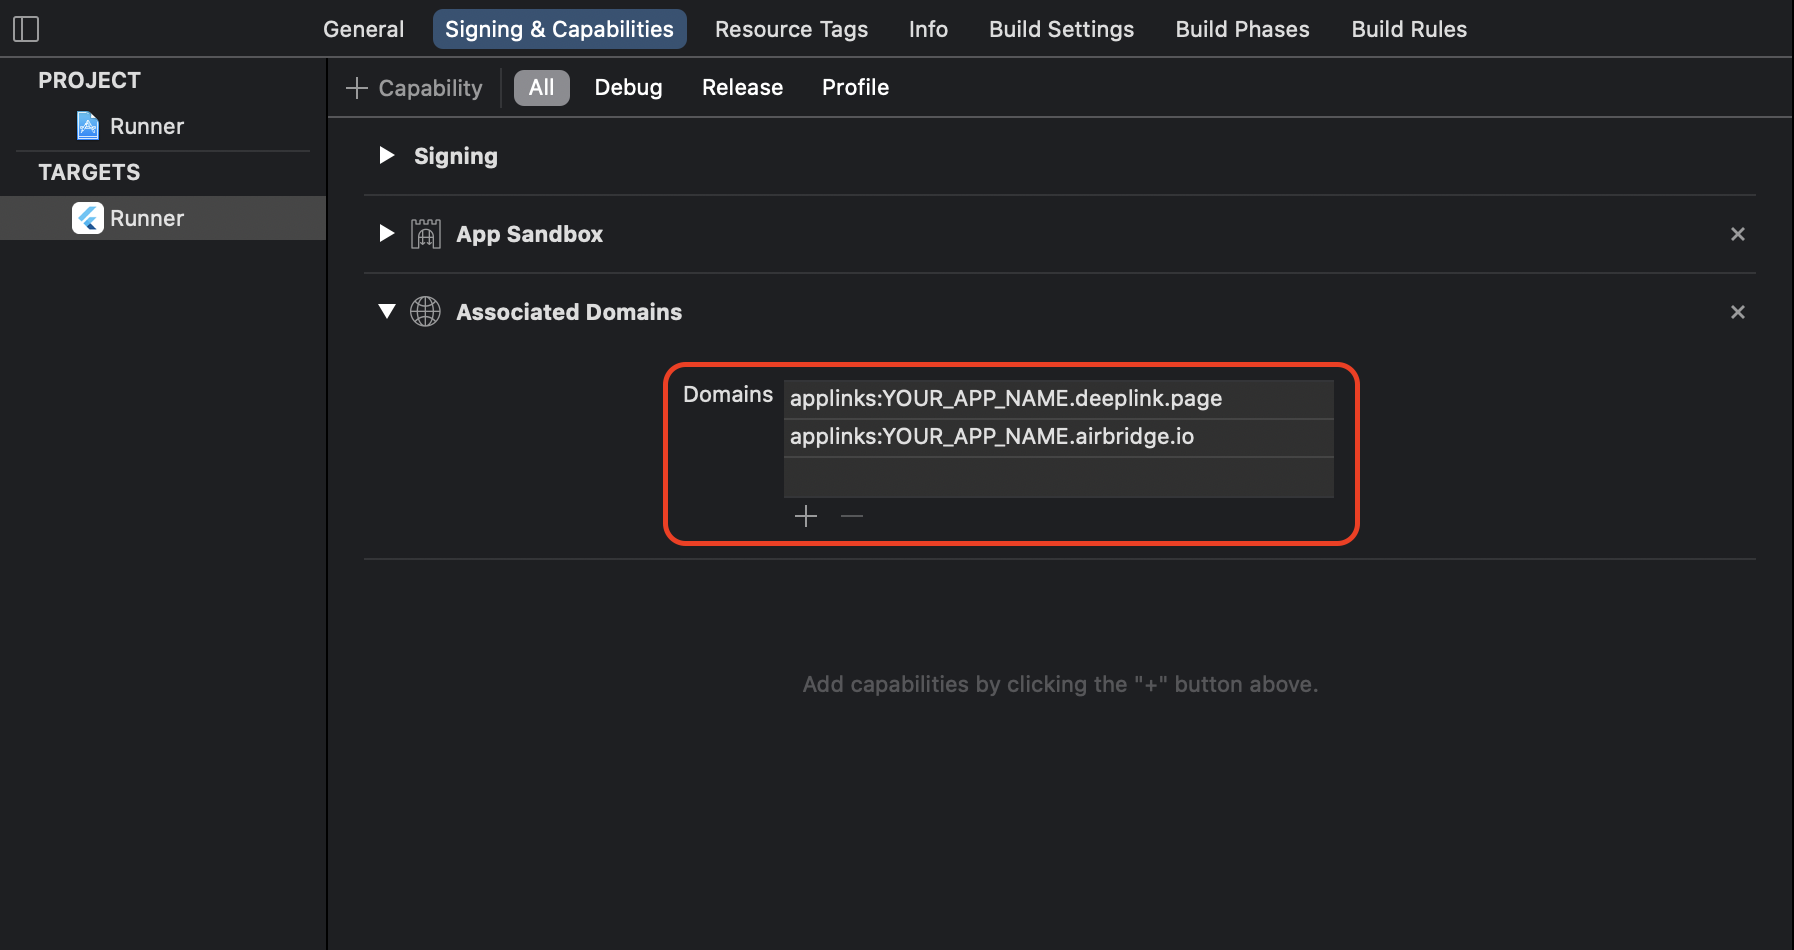
YOUR_APP_NAME can be found at [Settings]>[Tokens] in the Airbridge dashboard.
Open the AppDelegate in the project's iOS module.
Add the following functions.
override func application(
    _ application: UIApplication,
    continue userActivity: NSUserActivity,
    restorationHandler: @escaping ([UIUserActivityRestoring]?) -> Void
) -> Bool {
    AirbridgeFlutter.deeplink.handle(userActivity)

    return true
}

override func application(_ app: UIApplication, open url: URL, options: [UIApplication.OpenURLOptionsKey : Any] = [:]) -> Bool {
    AirbridgeFlutter.deeplink.handleURLSchemeDeeplink(url)

    return true
}- (BOOL)application:(UIApplication*)application
continueUserActivity:(NSUserActivity*)userActivity
restorationHandler:(void (^)(NSArray* _Nullable))restorationHandler
{
[AirbridgeFlutter.deeplink handleUserActivity:userActivity];
return YES;
}
- (BOOL)application:(UIApplication *)application
openURL:(NSURL *)url
options:(NSDictionary<UIApplicationOpenURLOptionsKey, id>*)options
{
[AirbridgeFlutter.deeplink handleURLSchemeDeeplink:url];
return YES;
}Follow the steps below and configure the Intent Filter.
Open the AndroidManifest.xml file in the project's Android module.
Add the following functions.
<activity ...>
    ...
    <intent-filter android:autoVerify="true">
        <action android:name="android.intent.action.VIEW" />

        <category android:name="android.intent.category.DEFAULT" />
        <category android:name="android.intent.category.BROWSABLE" />

        <data android:scheme="http" android:host="YOUR_APP_NAME.deeplink.page" />
        <data android:scheme="https" android:host="YOUR_APP_NAME.deeplink.page" />
    </intent-filter>
    <intent-filter android:autoVerify="true">
        <action android:name="android.intent.action.VIEW" />

        <category android:name="android.intent.category.DEFAULT" />
        <category android:name="android.intent.category.BROWSABLE" />

        <data android:scheme="http" android:host="YOUR_APP_NAME.airbridge.io" />
        <data android:scheme="https" android:host="YOUR_APP_NAME.airbridge.io" />
    </intent-filter>
    <intent-filter>
        <action android:name="android.intent.action.VIEW" />

        <category android:name="android.intent.category.DEFAULT" />
        <category android:name="android.intent.category.BROWSABLE" />

        <data android:scheme="YOUR_APP_URI_SCHEME" />
    </intent-filter>
    ...
</activity>
YOUR_APP_NAME and YOUR_APP_URI_SCHEME can be found at [Settings]>[Tokens] in the Airbridge dashboard.
Insert the following code to the android/app/src/main/java/.../MainActivity.java file.
Open the
MainActivityfile in the project's Android module.Add the following functions.
@Override
protected void onResume() {
    super.onResume()
    AirbridgeFlutter.processDeeplink(intent)
}

@Override
protected void onNewIntent(Intent intent) {
    super.onNewIntent(intent)
    setIntent(intent)
}override fun onResume() {
super.onResume()
AirbridgeFlutter.processDeeplink(intent)
}
override fun onNewIntent(intent: Intent) {
super.onNewIntent(intent)
setIntent(intent)
}Use the following method to set up the callback that should be called when the app is opened through a deep link.
Airbridge.deeplink.setDeeplinkListener((deeplink) {
    // airbridge deeplink = SCHEME://...
    print('$deeplink');
});
If setDeeplinkListener is called from the main function, make sure that WidgetsFlutterBinding.ensureInitialized(); is called first.
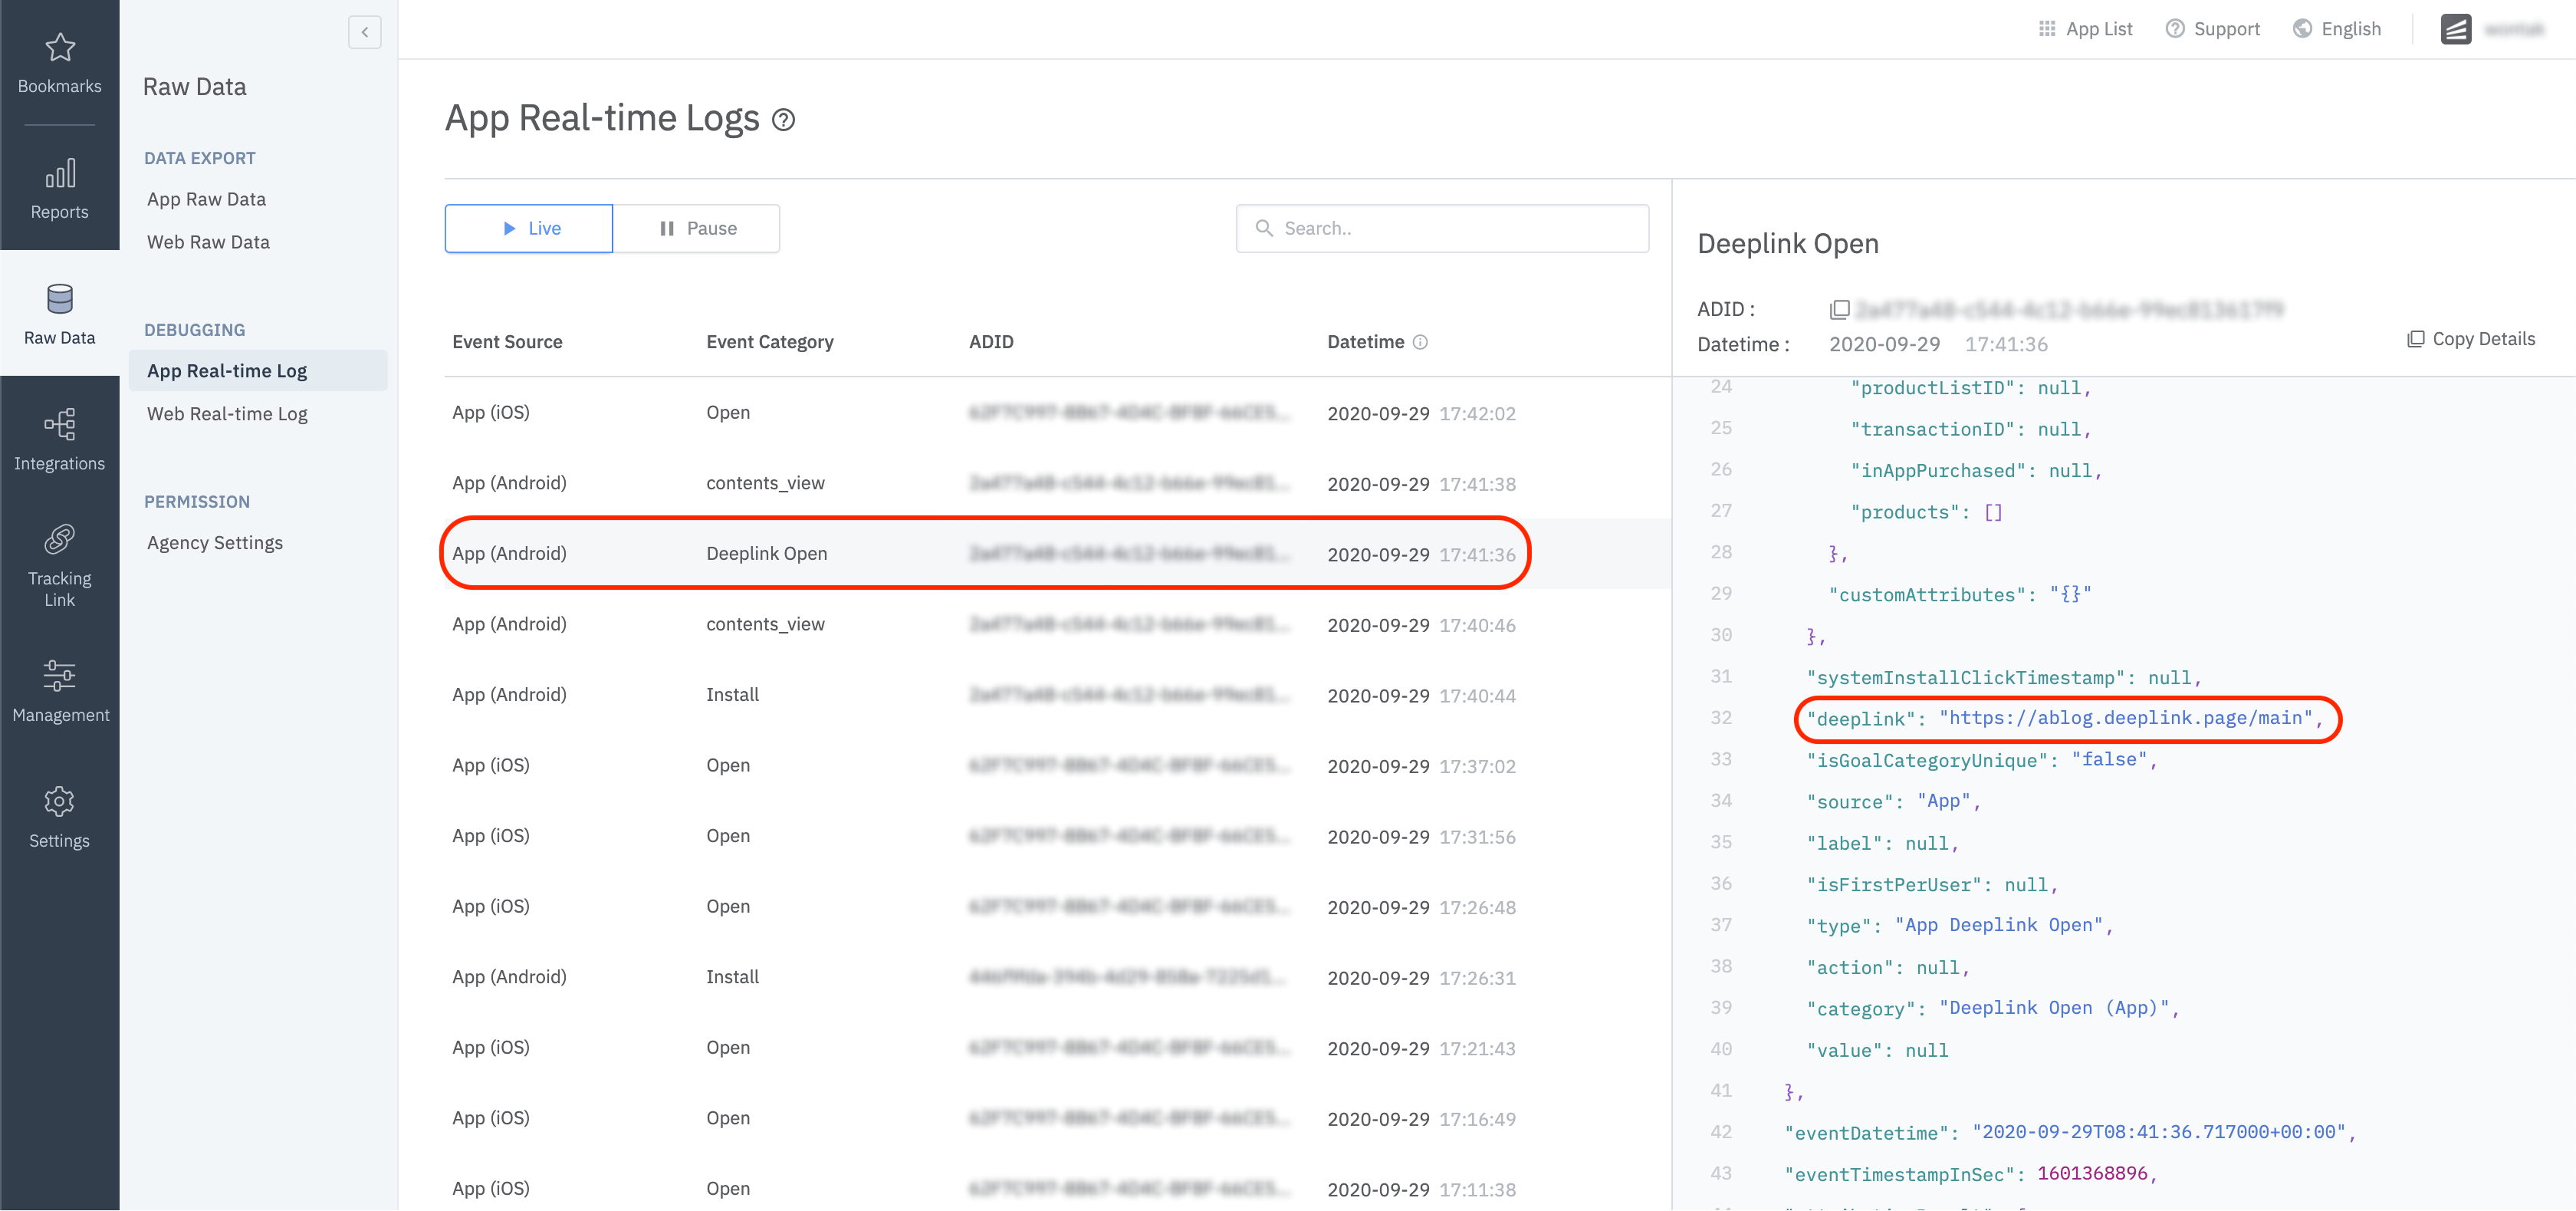
Check whether the app opens and the deep link event is sent when the Airbridge deep link is clicked on. The Airbridge deep link should follow the YOUR_SCHEME://... format. Your_Scheme is the iOS URI Scheme entered in your Airbridge dashboard.
Click the deep link.
Check whether the deep link event appears on the [Raw Data]>[App Real-time Logs] page in the Airbridge dashboard.
You can set up the SDK so that once a user identifier is sent to the SDK, all events collected thereafter contain the same user identifier. The following identifiers are collected.
User Email: Email address
User Phone: Phone number
User ID: Unique User ID (ID that identifies users on both web and mobile)
User Alias: Alternative identifier representing users (e.g., loyalty program ID, affiliate integrated ID, etc.)
The user email and phone number are hashed (SHA256) by default before being sent to servers.
Refer to the following method for the setup.
Airbridge.state.setUser(
    User(
    id: 'tester',
    email: 'tester@ab180.co',
    phone: '+82 10 0000-0000',
    alias: {
        'alias_key': 'alias_value',
    },
    )
);
Name | Description | Limitations |
|---|---|---|
id | User ID | - |
User email | Hashed by default | |
phone | User phone number | Hashed by default |
alias | User alias | - Maximum 10 aliases |
Attention
The user identifier can be reset or overwritten depending on the events performed by the user.
Below is an example of how a particular field can be updated.
Airbridge.state.updateUser(
    User(
        id: 'sam1234',
    )
);Additional user attributes can be collected for a more accurate multi-touch attribution and in-depth data analysis.
Airbridge.state.setUser(
    User(
    attributes: {
        'attr_key': 'attr_value',
    },
    )
);
Name | Description | Limitations |
|---|---|---|
attributes | User attribute | - Maximum 100 attributes |
Attention
The user attribute information can be reset or overwritten depending on the events performed by the user.
Check whether the user data setup has been successfully completed by following the steps below.
Complete the user setup.
Send an event through the SDK.
Navigate to [Raw Data]>[App Real-time Logs] in the Airbridge dashboard and find the event sent.
Set up the Airbridge SDK to collect device aliases when collecting events. The alias won't be deleted even after the user closes the app unless the user deletes the app.
Airbridge.setDeviceAlias("ADD_YOUR_KEY", "AND_YOUR_VALUE");
Airbridge.removeDeviceAlias("DELETE_THIS_KEY");
Airbridge.clearDeviceAlias();
| Adds the key-value pair to the device identifier. |
| Deletes the device alias of the key. If there is no identifier, no action is executed. |
| Deletes all device aliases. |
When important user actions occur, those actions can be collected as in-app events.
Although all event parameters are optional, collecting as much information about the event as possible will help provide a more accurate analysis.
Action, label, value, customAttributes, and semanticAttributes can be used as event options.
Name | Type | Description |
|---|---|---|
category | String | Name of the event *Required |
action | String | Event attribute 1 |
label | String | Event attribute 2 |
value | Float | Event attribute value |
customAttributes | Map <String, dynamic> | Custom attributes |
semanticAttributes | Map <String, dynamic> | Semantic attributes |
static void trackEvent(String category, [ AirbridgeEventOption? option ]) {
    event.trackEvent(category, option);
}You can send in-app events through the SDK to Airbridge for ad performance measurement.
When sending the Sign-up event, the user identifier is sent through setUser and AirbridgeCategory.SIGN_UP is sent.
Airbridge.state.setUser(User(
    id: 'tester',
    email: 'tester@ab180.co',
    phone: '+82 10 0000-0000',
));
Airbridge.trackEvent(AirbridgeCategory.SIGN_UP);When sending the Sign-in event, the user identifier is sent through setUser if it is not entered already and AirbridgeCategory.SIGN_IN is sent.
Airbridge.state.setUser(User(
    ID: 'test',
    email: 'test@ab180.co',
    phone: '000-0000-0000',
));
Airbridge.trackEvent(AirbridgeCategory.SIGN_IN);When sending the Sign-in event, AirbridgeCategory.SIGN_OUT is sent, and the user identifier is reset.
Airbridge.trackEvent(AirbridgeCategory.SIGN_OUT);
Airbridge.state.setUser(User());Airbridge.trackEvent(AirbridgeCategory.HOME_VIEW);Airbridge.event.trackEvent(
AirbridgeCategory.PRODUCT_DETAILS_VIEW,
AirbridgeEventOption(
semanticAttributes: {
AirbridgeAttributes.PRODUCTS: [{
AirbridgeProduct.PRODUCT_ID: 'coke_zero',
AirbridgeProduct.NAME: 'Coke Zero',
AirbridgeProduct.PRICE: 1.99,
AirbridgeProduct.CURRENCY: 'USD',
AirbridgeProduct.POSITION: 1,
AirbridgeProduct.QUANTITY: 1,
},
]
}
));Airbridge.event.trackEvent(
AirbridgeCategory.PRODUCT_DETAILS_VIEW,
AirbridgeEventOption(
semanticAttributes: {
AirbridgeAttributes.PRODUCT_LIST_ID: 'ID-1234567890',
AirbridgeAttributes.PRODUCTS: [{
AirbridgeProduct.PRODUCT_ID: 'coke_zero',
AirbridgeProduct.NAME: 'Coke Zero',
AirbridgeProduct.PRICE: 1.99,
AirbridgeProduct.CURRENCY: 'USD',
AirbridgeProduct.POSITION: 1,
AirbridgeProduct.QUANTITY: 1,
}, {
AirbridgeProduct.PRODUCT_ID: 'burger_cheese_double',
AirbridgeProduct.NAME: 'Double Cheeseburger',
AirbridgeProduct.PRICE: 3.99,
AirbridgeProduct.CURRENCY: 'USD',
AirbridgeProduct.POSITION: 2,
AirbridgeProduct.QUANTITY: 1,
}
]
}
));Airbridge.event.trackEvent(
AirbridgeCategory.SEARCH_RESULT_VIEW,
AirbridgeEventOption(
semanticAttributes: {
AirbridgeAttributes.QUERY: 'product',
AirbridgeAttributes.PRODUCTS: [{
AirbridgeProduct.PRODUCT_ID: 'coke_zero',
AirbridgeProduct.NAME: 'product A',
AirbridgeProduct.PRICE: 1.99,
AirbridgeProduct.CURRENCY: 'USD',
AirbridgeProduct.POSITION: 1,
AirbridgeProduct.QUANTITY: 1,
}, {
AirbridgeProduct.PRODUCT_ID: 'burger_cheese_double',
AirbridgeProduct.NAME: 'product B',
AirbridgeProduct.PRICE: 3.99,
AirbridgeProduct.CURRENCY: 'USD',
AirbridgeProduct.POSITION: 2,
AirbridgeProduct.QUANTITY: 1,
}
]
}
));Airbridge.event.trackEvent(
AirbridgeCategory.ADD_TO_CART,
AirbridgeEventOption(
value: 5.98,
semanticAttributes: {
AirbridgeAttributes.CART_ID: 'ID-1234567890',
AirbridgeAttributes.CURRENCY: 'USD',
AirbridgeAttributes.PRODUCTS: [{
AirbridgeProduct.PRODUCT_ID: 'coke_zero',
AirbridgeProduct.NAME: 'Coke Zero',
AirbridgeProduct.PRICE: 1.99,
AirbridgeProduct.CURRENCY: 'USD',
AirbridgeProduct.POSITION: 1,
AirbridgeProduct.QUANTITY: 1,
}, {
AirbridgeProduct.PRODUCT_ID: 'burger_cheese_double',
AirbridgeProduct.NAME: 'Double Cheeseburger',
AirbridgeProduct.PRICE: 3.99,
AirbridgeProduct.CURRENCY: 'USD',
AirbridgeProduct.POSITION: 2,
AirbridgeProduct.QUANTITY: 1,
}
]
}
));Airbridge.event.trackEvent(
AirbridgeCategory.ORDER_COMPLETED,
AirbridgeEventOption(
value: 5.98,
semanticAttributes: {
AirbridgeAttributes.TRANSACTION_ID: 'transactionID-purchase',
AirbridgeAttributes.CURRENCY: 'USD',
AirbridgeAttributes.IN_APP_PURCHASED: true,
AirbridgeAttributes.PRODUCTS: [{
AirbridgeProduct.PRODUCT_ID: 'coke_zero',
AirbridgeProduct.NAME: 'Coke Zero',
AirbridgeProduct.PRICE: 1.99,
AirbridgeProduct.CURRENCY: 'USD',
AirbridgeProduct.POSITION: 1,
AirbridgeProduct.QUANTITY: 1,
}, {
AirbridgeProduct.PRODUCT_ID: 'burger_cheese_double',
AirbridgeProduct.NAME: 'Double Cheeseburger',
AirbridgeProduct.PRICE: 3.99,
AirbridgeProduct.CURRENCY: 'USD',
AirbridgeProduct.POSITION: 2,
AirbridgeProduct.QUANTITY: 1,
}
]
}
));To configure and send
Semantic Attributesmanually, refer to this article.
Send an event through the SDK and check whether the event is available in the Airbridge dashboard.
Send an event through the SDK.
Navigate to [Raw Data]>[App Real-time Logs] in the Airbridge dashboard and search for the event.
Meta Install Referrer (MIR) collection is supported by Airbridge Flutter SDK v3.5.4 or later. Add the method below to the airbridge.json to collect the Meta Install Referrer.
After the setup, you need to enter the decryption key into the Airbridge dashboard to view the decrypted Meta Install Referrer. Refer to this user guide to learn how to enter the decryption key.
{
    "metaInstallReferrer": "YOUR_META_APP_ID"
}This feature is supported by Flutter SDK v3.5.0 and later. Follow the method below to get the attribution result data through the Airbridge SDK.
Airbridge.setAttributionListener((result) {
    // do something
});
The table below lists the data fields that will be collected through the callback.
Field | Description |
|---|---|
attributedChannel | Channel (String) |
attributedCampaign | Campaign (String) |
attributedAdGroup | Ad Group (String) |
attributedAdCreative | Ad Creative (String) |
attributedContent | Content (String) |
attributedTerm | Keyword (String) |
attributedSubPublisher | Sub Publisher (String) |
attributedSubSubPublisher1 | Sub-sub Publisher 1 (String) |
attributedSubSubPublisher2 | Sub-sub Publisher 2 (String) |
attributedSubSubPublisher3 | Sub-sub Publisher 3 (String) |
Depending on policies and environments, restrictions on collecting device IDs like GAID and IDFA may be required. When installing the Restricted SDK version, the device IDs are not collected. The Restricted SDK is supported in v.3.4.3 and later.
Add the following line to the dependencies block in the pubspec.yaml file.
dependencies:
  airbridge_flutter_sdk_restricted : 3.4.3
Open the Terminal at the top-level file of the project and run the command below.
flutter pub getWith the SDK Signature, you can ensure SDK spoofing prevention and use verified events for ad performance measurement. The SDK Signature is supported for the Airbridge Flutter SDK v3.2.0 and later.
Add the following lines in the airbridge.json file.
{
    "sdkSignatureSecretID": "YOUR_SDK_SIGNATURE_SECRET_ID",
    "sdkSignatureSecret": "YOUR_SDK_SIGNATURE_SECRET"
}
The SDK Signature Credentials are required for the SDK Signature setup. Refer to this article to learn how to create them.
You can set the Airbridge SDK to not send an App Open event again if a user relaunches the app within a set session time by configuring the sessionTimeoutSeconds field in the airbridge.json file added in the previous step.
The session timeout value is in milliseconds. The value should be between 0 and 604800000 (7 days).
The default value is
1000 * 60 * 5(5 minutes).
If you want to send user identifiers, such as the user email and user phone, without hashing, configure the userInfoHashEnabled field in the airbridge.json file added in the previous step.
Attention
Privacy measures must be in place as this option allows sensitive personal information, such as
User EmailandUser Phone, to be accessed by third parties.
Configure the facebookDeferredAppLinkEnabled field in the airbridge.json file added in the previous step to receive the Facebook deferred app links through the Airbridge SDK.
When the
facebookDeferredAppLinkEnabledis set toYES, and the Facebook SDK is installed, the SDK collects the Facebook Deferred App Link.
Attention
To use this feature, the Facebook SDK must be set up accordingly. Refer to this Facebook document for the setup.
It may be difficult to measure re-engagement if the Airbridge SDK collects all types of deep link events. Configure the trackAirbridgeLinkOnly field in the airbridge.json file added in the previous step to track only Airbridge deep links.
When activating this feature, the SDK will collect Airbridge deep link events only in the following cases:
When the app is opened through an
airbridge.iodeep linkWhen the app is opened through a
deeplink.pagedeep linkWhen the app is opened through a deep link with the Custom Domain that is set in the Airbridge dashboard
When the app is opened through a deep link that contains the
airbridge_referrerin the query
The opt-in policy requires user consent before using user data. The opt-in setup is required to collect and transmit data after obtaining consent for personal data tracking from users, especially when GDPR or CCPA applies.
Configure the autoStartTrackingEnabled field in the airbridge.json file added in the previous step and call the following function to make sure data collection starts after users provide their explicit consent.
Airbridge.state.startTracking();When using the AppTrackingTransparency.framework to display the ATT prompt to the user, the IDFA is not collected when the install event occurs because the ATT prompt only appears after the user installs the app.
By setting the timeout of the trackingAuthorizeTimeoutSeconds in the airbridge.json file added in the previous step, the sending of the install event will be delayed for the set timeout period to wait for the user to finish responding to the ATT prompt.
Configure the locationCollectionEnabled field in the airbridge.json file added in the previous step to collect the user location information.
Attention
The collection of location information should be for legitimate purposes, requiring caution in its use.
This feature is supported for only Android and the following permission must be included in the AndroidManifest.xml.
<uses-permission android:name="android.permission.ACCESS_FINE_LOCATION" />
<uses-permission android:name="android.permission.ACCESS_COARSE_LOCATION" />When clicking tracking links, users are sent to a browser. However, you can redirect users to specific in-app locations without sending them to an external browser by using the method below.
Airbridge.placement.click('https://abr.ge/~~~', 'ablog://main', 'https://airbridge.io');
Airbridge.placement.impression('https://abr.ge/~~~');When a user clicks on the tracking link within the app, the Airbridge.click function is called. A click event is collected, and the user is redirected to the configured app or web fallback path.
The deep link and fallback path are backup links used when there is no network connection. Only custom URL scheme deep links can be used as deep link parameters. Note that they are all optional parameters.
When a user engages with a tracking link within the app, the Airbridge.click function is called. An impression event is collected.
When using the custom domain, tracking links with a custom short ID are not viable for use.
example:
http://deeplink.ab180.co/custom-> Not viable for useexample:
http://deeplink.ab180.co/a3b1c2-> Viable for useexample:
https://abr.ge/a3b1c2-> Viable for use
await Airbridge.state.deviceUUID()This feature is supported for Airbridge Flutter SDK v3.0.2 and later.
Airbridge Android SDK v2.6.0
Airbridge iOS SDK v1.28.2
For more information about uninstall tracking, refer to this article.
Airbridge.registerPushToken(token);Forward the push token to Airbridge using the registerPushToken method.
The silent push notifications Airbridge sends for uninstall tracking should not be displayed in the user's app. Make sure the silent push is silenced when the airbridge-uninstall-tracking is true in the forwarded remote data.
While basic events, such as Install, Open, and Deeplink Open events, can be automatically tracked by only installing the Android SDK in your hybrid app, in-app events, such as Sign-up, Purchase, etc., cannot be tracked as they are in-browser events that occur within a website of the WebView environment. Airbridge provides a simpler way to track in-app events by enabling the Flutter SDK to automatically pull all events from the Web SDK that is installed on the website of the WebView environment. This replaces the hassle of having to create bridge functions between native and WebView environments. Refer to the following method.
Airbridge.createWebInterface(
      webToken: 'YOUR_WEB_TOKEN',
      postCommandFunction: (arg) {
        return """...""";
    });
You can control the web interface through the Airbridge.createWebInterface. Refer to the Flutter Hybrid App Integration Guide for details.
An error like the one below may occur when creating iOS builds with Flutter SDK v3.0.1 or later as the Bitcod is not supported.
ld: XCFrameworkIntermediates/AirBridge/AirBridge.framework/AirBridge(AirBridge-arm64-master.o)' does not contain bitcode. You must rebuild it with bitcode enabled (Xcode setting ENABLE_BITCODE)Flutter SDK v3.0.1+ is updated to Airbridge iOS SDK v1.28.0+, and Bitcode is no longer supported. Refer to the Bitcode compile error guide for more details.
If you encounter the error message "Plugin project ... not found. Please update settings.gradle," edit the android/settings.gradle file as shown below.
include ':app'

def flutterProjectRoot = rootProject.projectDir.parentFile.toPath()

def plugins = new Properties()
def pluginsFile = new File(flutterProjectRoot.toFile(), '.flutter-plugins')
if (pluginsFile.exists()) {
    pluginsFile.withReader('UTF-8') { reader -> plugins.load(reader) }
}

plugins.each { name, path ->
    def pluginDirectory = flutterProjectRoot.resolve(path).resolve('android').toFile()
    include ":$name"
    project(":$name").projectDir = pluginDirectory
}Flutter issue: https://github.com/flutter/flutter/issues/16049
Airbridge Flutter SDK is a Swift plugin, and an error occurs when the Swift Plugin is used in a 100% Objective C project uses the Swift Plugin.
To solve this issue, click File > New > File... > Swift File to create an empty Swift file and a bridge header.
This issue does not occur when using Objective C & Swift Project and 100% Swift Project.
Reference : Android SDK Auto Backup
If you are experiencing build errors caused by overlapping of the Airbridge SDK backup rules and third-party SDK backup rules, please refer to the workaround below.
e.g) If you have an Airbridge SDK backup rule and an Appsflyer SDK backup rule that overlap, you will see the build error below.
Attribute application@fullBackupContent value=(@xml/appsflyer_backup_rules) from [com.appsflyer:af-android-sdk:6.6.1] AndroidManifest.xml:14:18-73
is also present at [io.airbridge:sdk-android:2.14.0] AndroidManifest.xml:27:18-78 value=(@xml/airbridge_auto_backup_rules).
Suggestion: add 'tools:replace="android:fullBackupContent"' to <application> element at AndroidManifest.xml:7:5-13:19 to override.
To resolve this issue, please set up as follows.
Create a
android/app/src/main/res/xmlfolder.Within the created xml folder, create a file (e.g.
custom_backup_rules.xml).Add the data backup rules defined in the Airbridge SDK as follows.
<?xml version="1.0" encoding="utf-8"?>
<full-backup-content>
    <!-- Airbridge Backup Rules -->
    <exclude domain="sharedpref" path="airbridge-internal" />
    <exclude domain="sharedpref" path="airbridge-install" />
    <exclude domain="sharedpref" path="airbridge-user-info" />
    <exclude domain="sharedpref" path="airbridge-user-alias" />
    <exclude domain="sharedpref" path="airbridge-user-attributes" />
    <exclude domain="sharedpref" path="airbridge-device-alias" />
    <exclude domain="database" path="airbridge.db" />

    <!-- Appsflyer Backup Rules -->
    <exclude domain="sharedpref" path="appsflyer-data"/>

	<!-- Your Custom Backup Rules -->
</full-backup-content><manifest
...
xmlns:tools="http://schemas.android.com/tools">
<application
...
android:allowBackup="true"
android:fullBackupContent="@xml/custom_backup_rules"
tools:replace="android:fullBackupContent">When updating the SDK, consider the content regarding versions between the previous version and the later version or your updated version.
For apps registered with Airbridge after November 4, 2023, an issue where the deep link URL provided in the deep link callback was decoded twice from the content entered in the Airbridge dashboard has been resolved. This issue was found in versions 3.4.2 to 3.4.7.
For apps registered with Airbridge after September 4, 2023, the "airbridge_referrer" will no longer be added to the deep link URL provided in the deep link callback.
When updating the app from iOS SDK v1.33.0 or earlier to v1.33.0 or later, the last calculated SKAN conversion value will be finalized, and no additional calculation will be processed.
For iOS SDK versions earlier than 1.33.0, the SKAN conversion value is calculated for up to 24 hours.
There is no issue for users who newly install the SDK.
deeplink.page has been deprecated. From v3.4.2 onwards, we recommend writing code using the abr.ge deep link domain.
deeplink.pageis still supported and operates for backward compatibility.
The Kotlin plugin has been updated to version 1.5.21.
The default setting for trackingAuthorizeTimeout changed from 0 seconds to 30 seconds.
The existing event API was deleted and replaced with the API below.
static void trackEvent(String category, [ AirbridgeEventOption? option ]) {
  event.trackEvent(category, option);
}Change the AppDelegate's AirbridgeFL class to the AirbridgeFlutter class.
Change the
AirbridgeFLclass of the MainApplication and MainActivity to theAirbridgeFlutterclass.Change the
processDeeplinkDatafunction in the MainActivity toprocessDeeplinkfunction.
Was this helpful?