- Marketers Guide
- Integration
- Third-party Platform Integration
Mixpanel
Airbridge supports integration with Amplitude. With the integration, you can send attribution data from Airbridge to Mixpanel and uncover insights into how users interact with your product in Amplitude.
Once the integration with Airbridge is complete, the event and event property data collected by Airbridge can be sent to Mixpanel.
Before enabling the integration with Mixpanel in the Airbridge dashboard, the SDK setup must be completed. Refer to the developer guide below.
If the SDK setup is not completed, Airbridge cannot be successfully connected to Mixpanel even if the integration is enabled in the Airbridge dashboard. Without the SDK setup, the probability of successful user matching may decline, which leads to inaccuracy in data analysis.
Attention
Before you follow the steps listed below, the right code snippets must be added to the Airbridge SDK. If this pre-setup is not completed, Airbridge cannot be successfully connected to Mixpanel even if you enable the integration in the Airbridge dashboard. Make sure to read the Developer Guide for Mixpanel integration and complete the pre-setup first.
To enable the integration with Mixpanel, the following credentials must be submitted to Airbridge.
Project ID
Project Token
Data Residency
Service Account Username
Service Account’s Secret
Follow the steps below to find the credentials in Mixpanel.
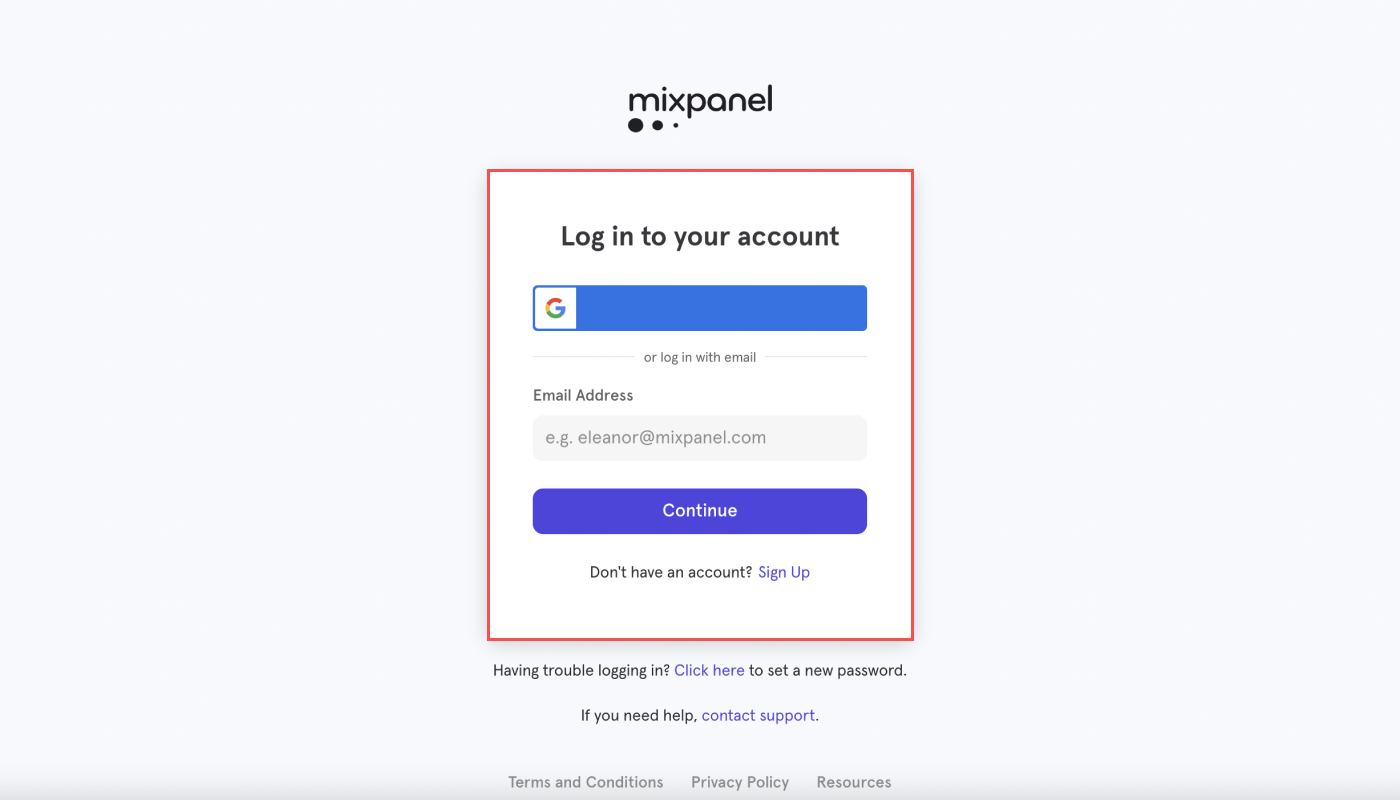
1. Log in to your Mixpanel account.
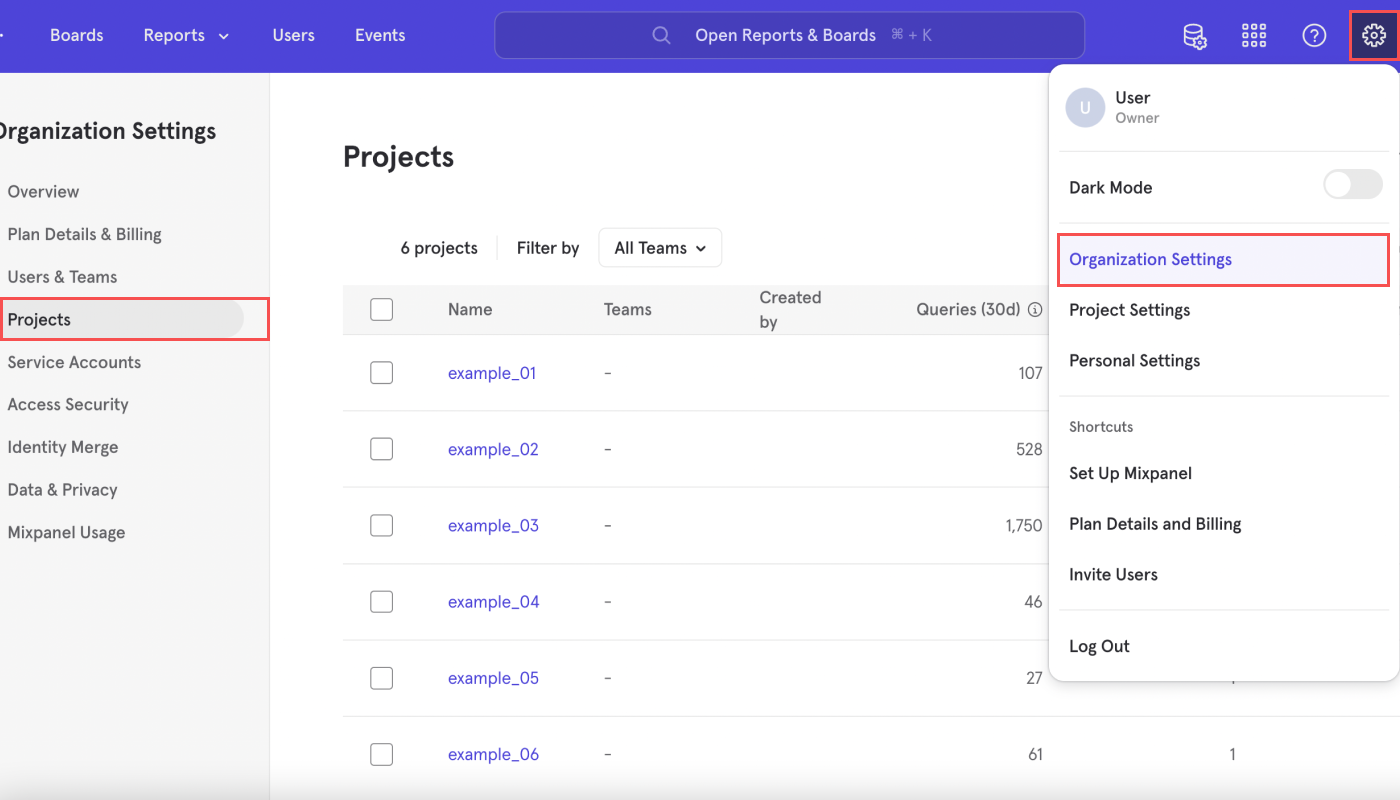
2. Click the [gear] icon in the upper right corner and navigate to [Organization Settings]>[Projects] to find the Project ID, Project Token, and Data Residency.
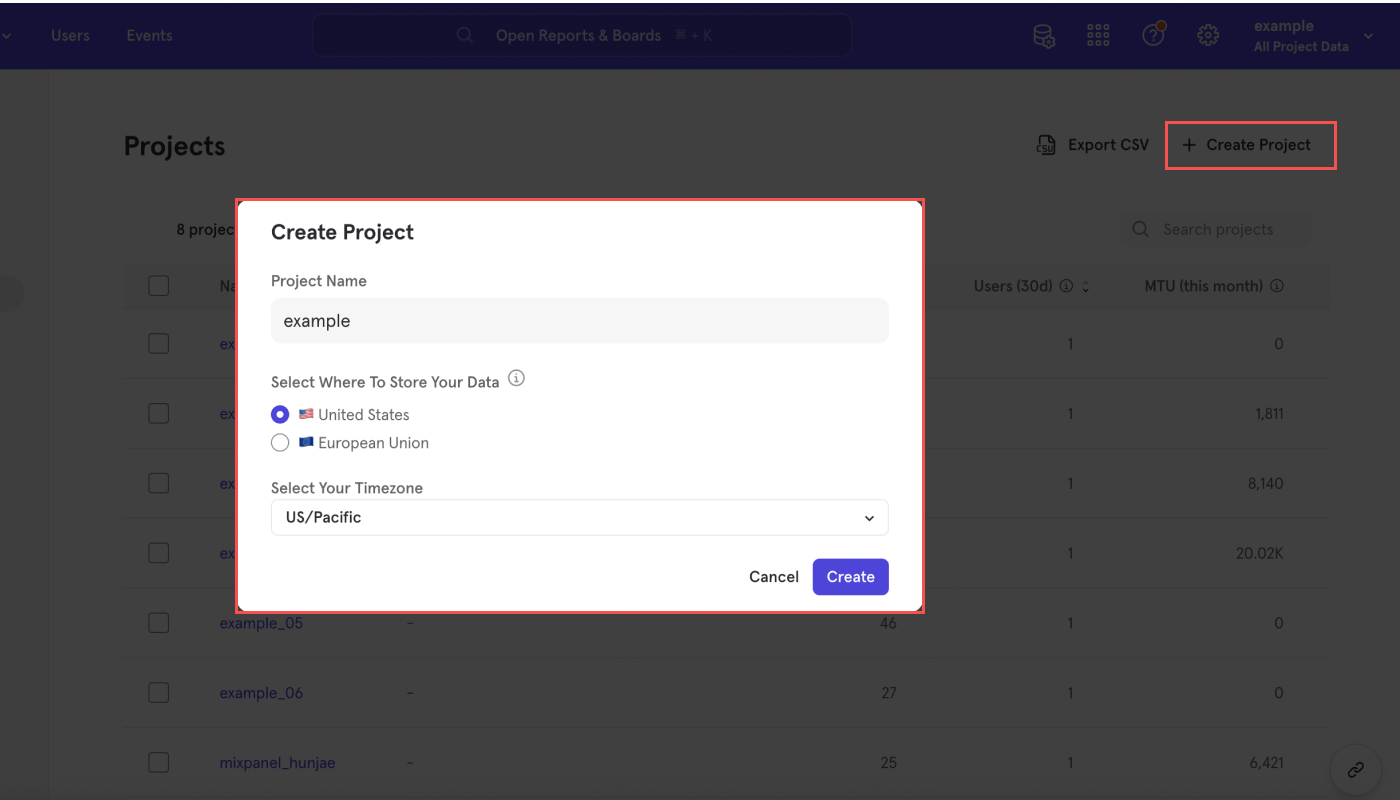
3. Select the project you want to connect with Airbridge. If you don’t want to select from existing projects, you can create a new project by click + Create Project. When the “Create Project” pop-up window opens, enter the project name, select where to store your data and your timezone, and click Create.
The location you select to store your data is the “Data Residency” information and cannot be changed afterward. The project name and timezone can be changed if necessary.
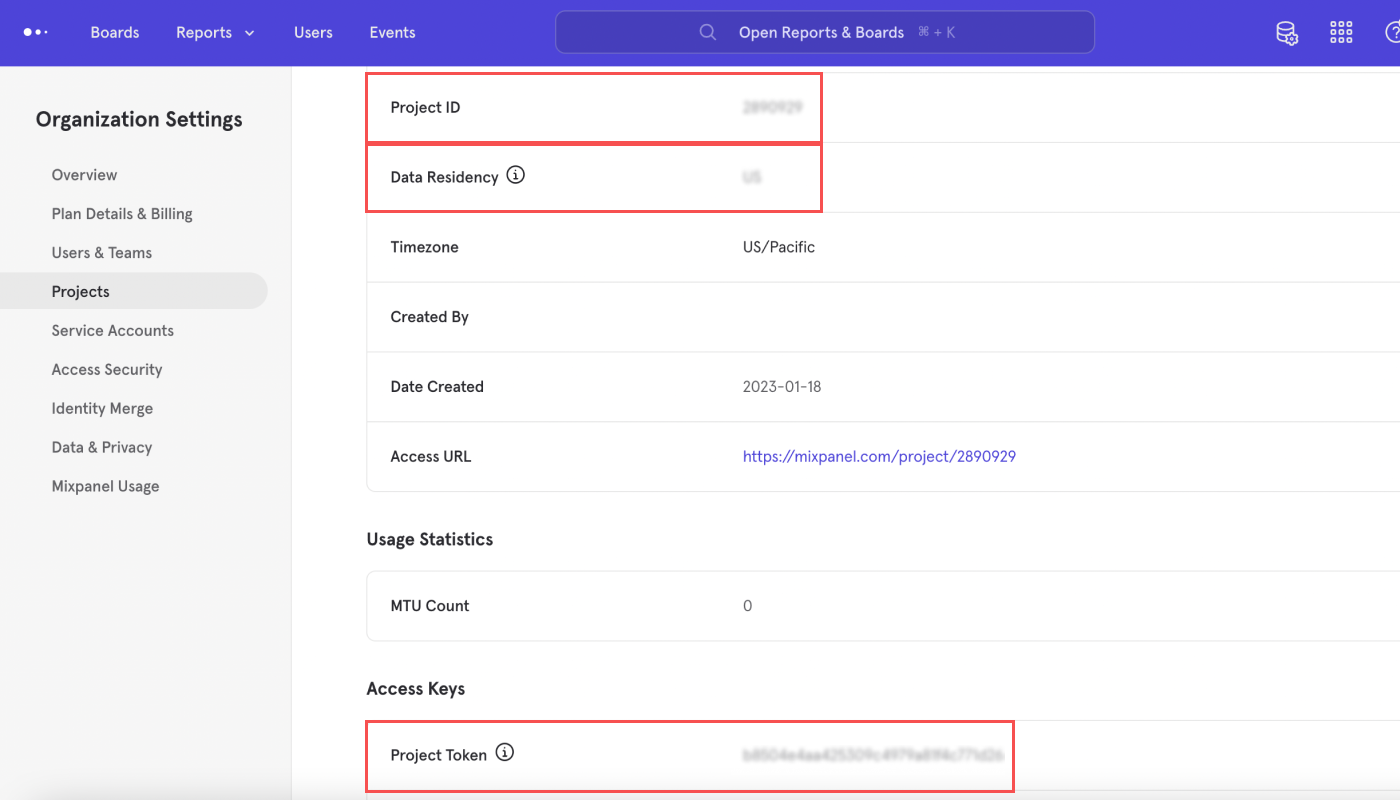
4. Find the Project ID, Project Token, and the Data Residency information of the project you want to connect with Airbridge.
5. To find the Service Account Username and the Service Account’s Secret, select the [Service Accounts] menu under the [Projects] from the left sidebar.
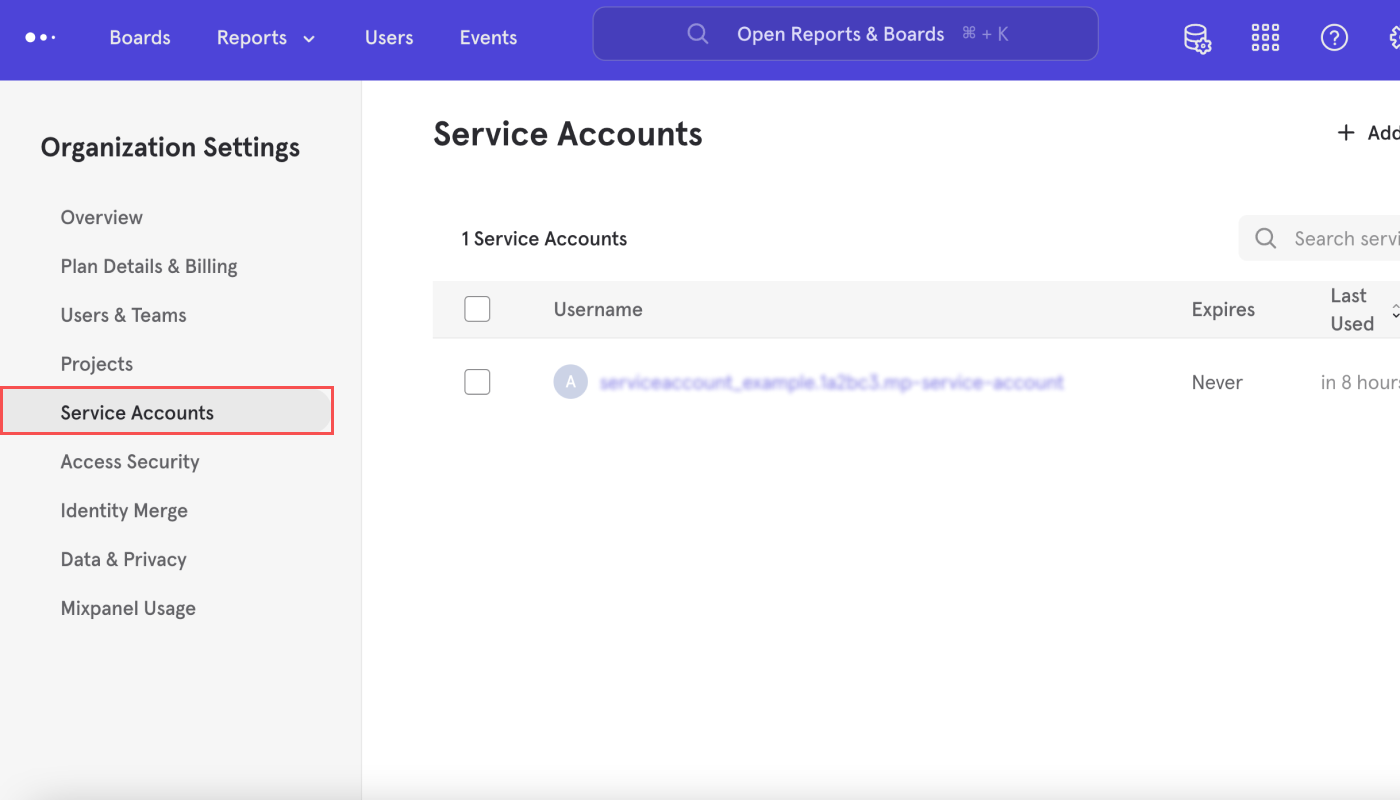
6. Select the service account you want to connect with Airbridge. If you don’t want to select from existing accounts, you can create a new service account by clicking + Add Service Account. When the “Create Service Account” pop-up window opens, enter the account name, select the organizational role, project, and expiry option, and click Create.
Roles: The organizational role must be set to Admin or Owner. If this role is set to a different role other than Admin or Owner, the project cannot be connected to Airbridge. The project role setting, however, does not affect the connection and can be selected as you want.
Projects: Select the project you want to connect with Airbridge. You must have already checked the Project ID and the Project Token of the project you want to select. If the service account you create is not linked with the project you want to connect with Airbridge, the integration will fail.
Expiry: If you select Never, the service account will never expire. If you select Specify…, you can enter a specific expiry date. We recommend you select Never because when the service account expires, the integration between Airbridge and Mixpanel will also be suspended.

7. After clicking Create, you are provided with the Service Account Username and the Service Account’s Secret. The Service Account Username can be found again when you click the service account name in the Service Account list.
The Service Account’s Secret, however, will never be shown to you again once you close the pop-up window. Please save the Service Account’s Secret somewhere secure.
If you didn’t save the Service Account’s Secret before closing the window, you must contact Mixpanel Support Team or create a new service account.
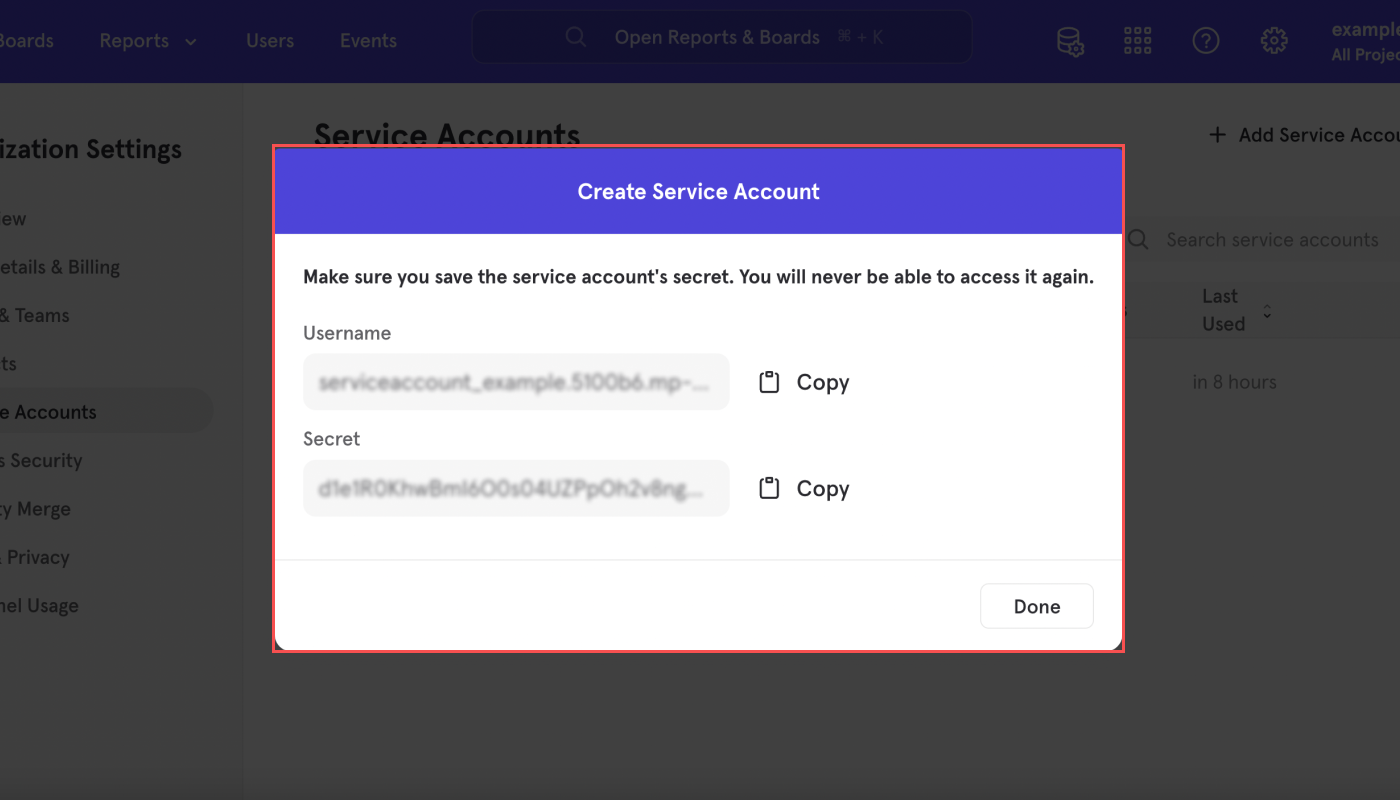
Attention
Make sure to save the service account’s secret somewhere secure. Once you close the pop-up window, the service account’s secret can never be accessed again.
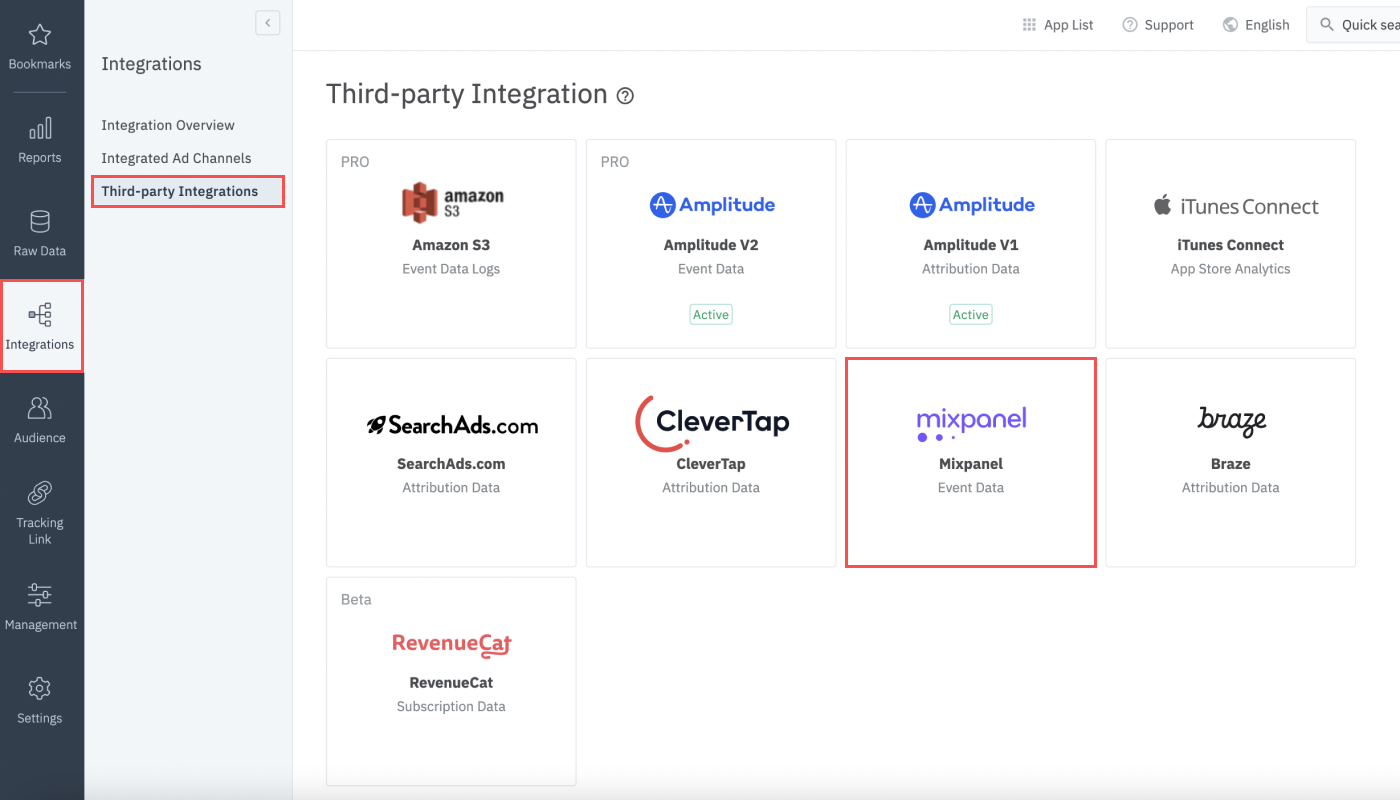
1. Log in to your Airbridge account, navigate to [Integrations]>[Third-party Integrations], and select “Mixpanel”.
2. Click + Add Connection.
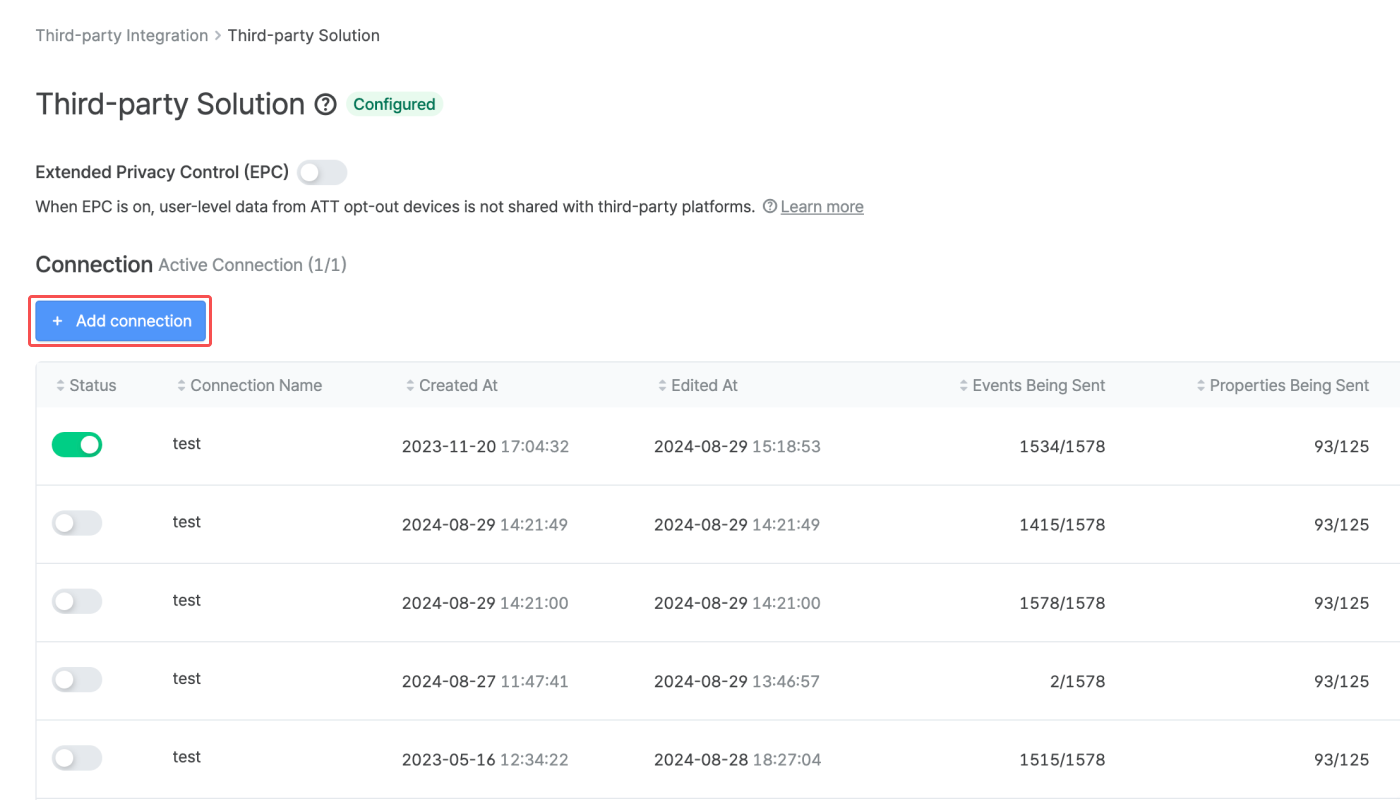
Connection
You need to activate a connection in order to enable integration between Airbridge and Mixpanel. To create a connection, you must create a connection name, provide the Mixpanel credentials, and select the events and event properties you want to send to Mixpanel. You can add several connections, but only one connection can be activated at a time. For example, if Connection A is already activated, you must deactivate Connection A before activating Connection B.
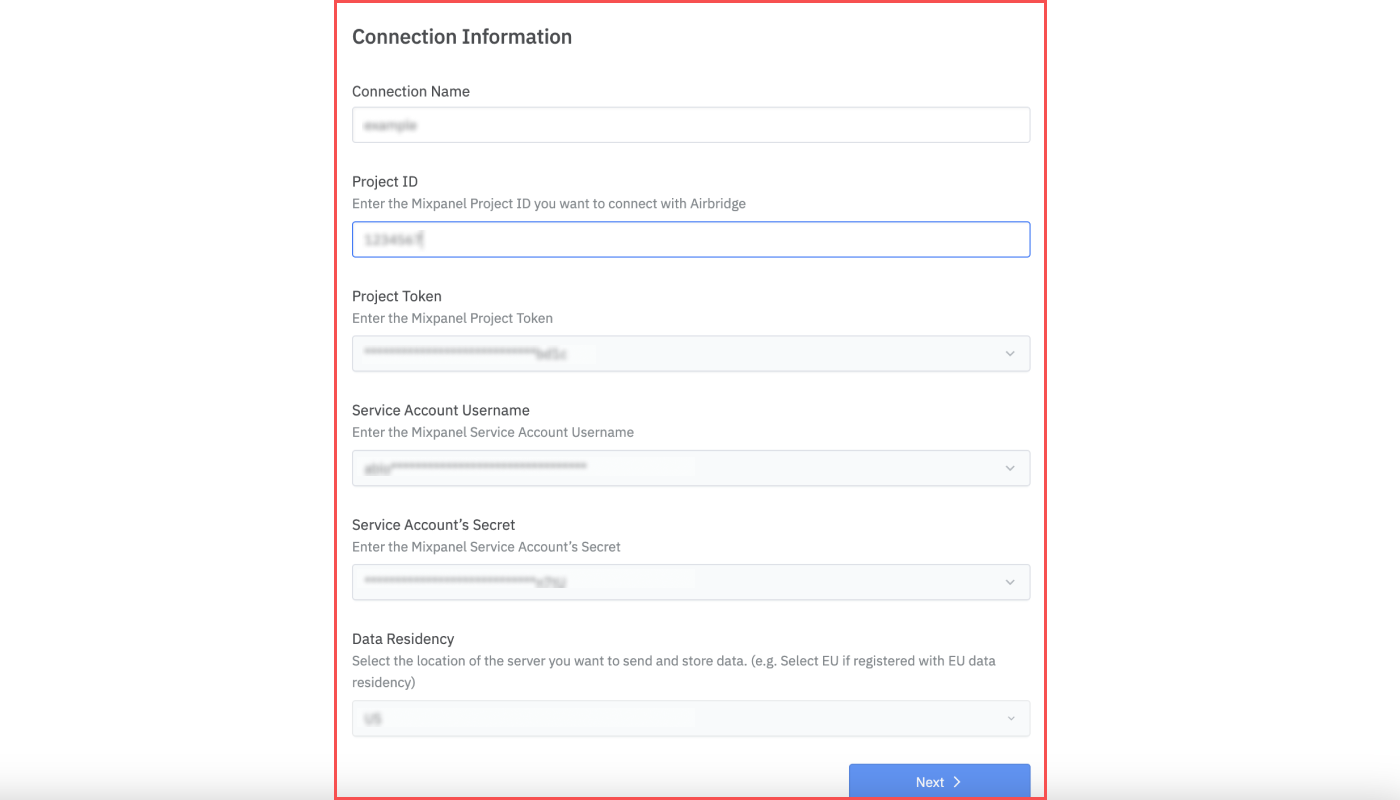
3. Enter a name for the connection. The name of the connection must be unique. Copy the credentials from Mixpanel and paste them into the respective fields. The Project Token, Service Account Username, and the Service Account’s Secret values can be used again in a new connection even if they were provided in a previously created connection.
If the Service Account Username and the Service Account’s Secret are not correct, you can’t move to the next stage. Make sure you copy and paste the Mixpanel credentials accurately.
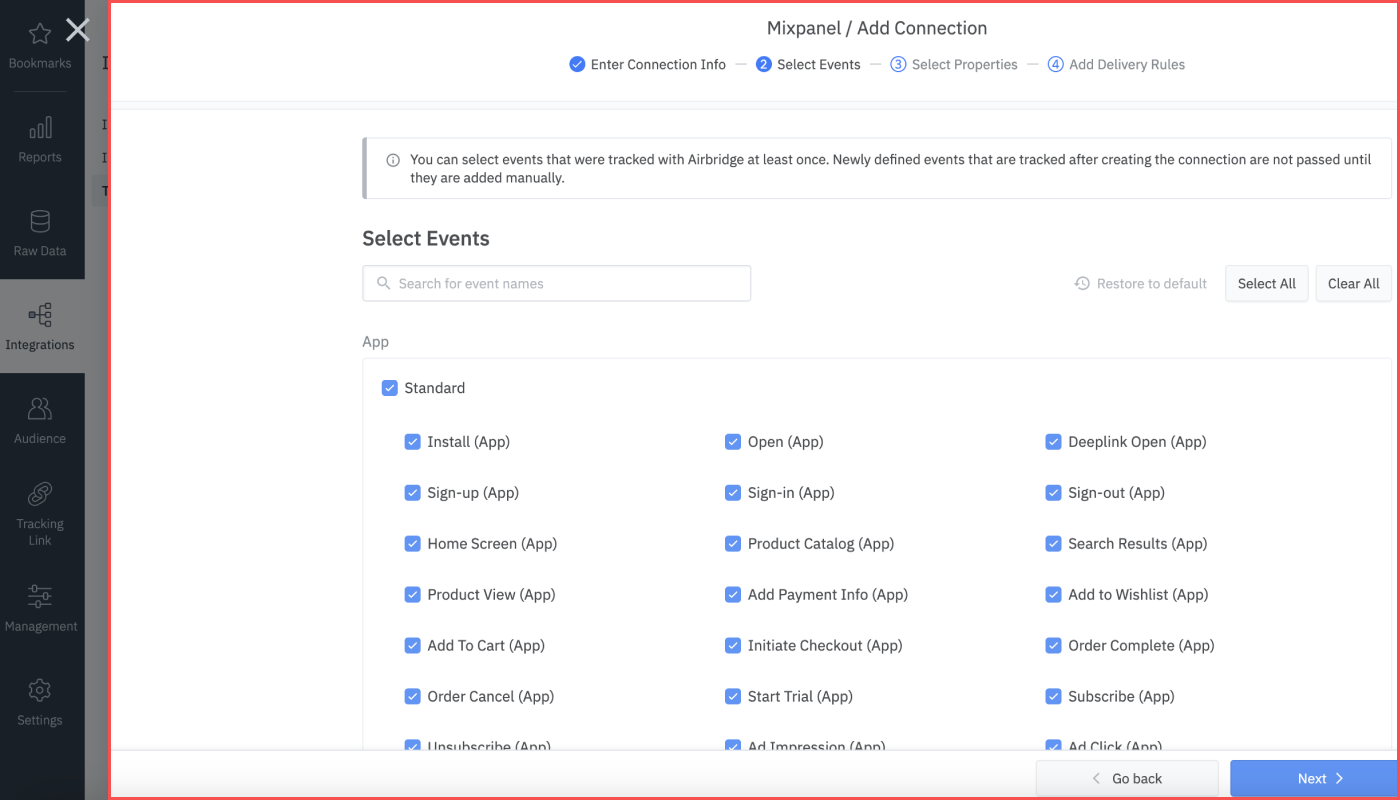
4. Select the events you want to send to Mixpanel. All events are selected by default. You can check or uncheck the checkboxes to choose a set of events, or use the “Select All” and “Clear All” buttons to select or unselect all events at once.
The Airbridge standard events can be selected regardless of whether they are being tracked or not. The custom events can be selected from the ones that have already been tracked.
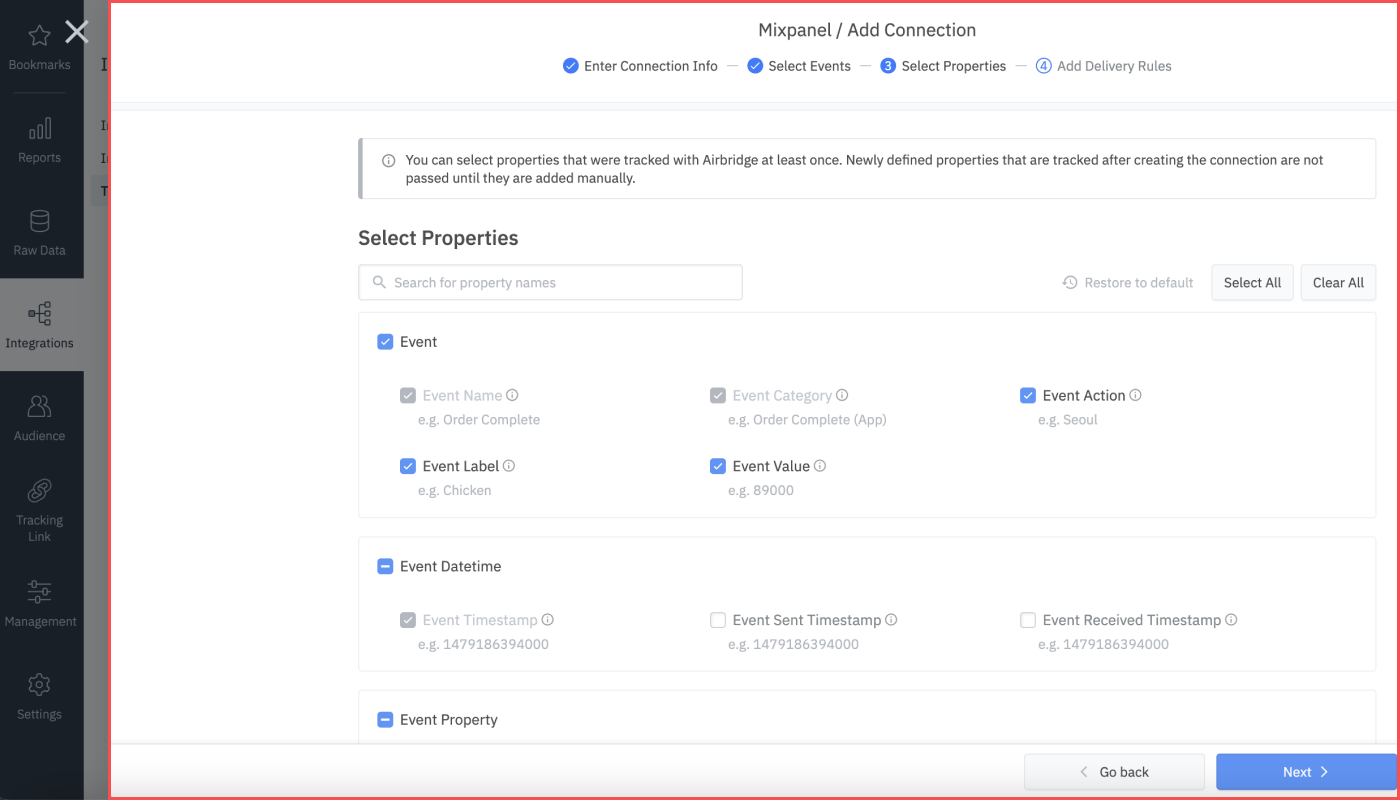
5. Select the properties you want to pass to Mixpanel. Use the “Select All” and “Clear All” buttons to select or unselect all events at once. The eight properties displayed in grey are sent to Mixpanel by default and cannot be unselected.
Enable cohort analysis
If you want to run a cohort analysis in Mixpanel with Airbridge data, make sure your connection sends the Install (App) events, Deeplink Open (App), Deeplink Pageview (App) events, and event properties that are updated down to the user level to Mixpanel. Refer to the event property list in the Additional Information.
6. Go to [Delivery Rules] to set the name format for the events and properties to be sent.
Choose the name format for the events and properties that Airbridge sends.
No [Airbridge] prefix: Event names and property names appear exactly as they appear in Airbridge. This is the default setting.
Add [Airbridge] prefix to event names and property names: Event names and property names appear with [Airbridge] prefix added at the beginning.
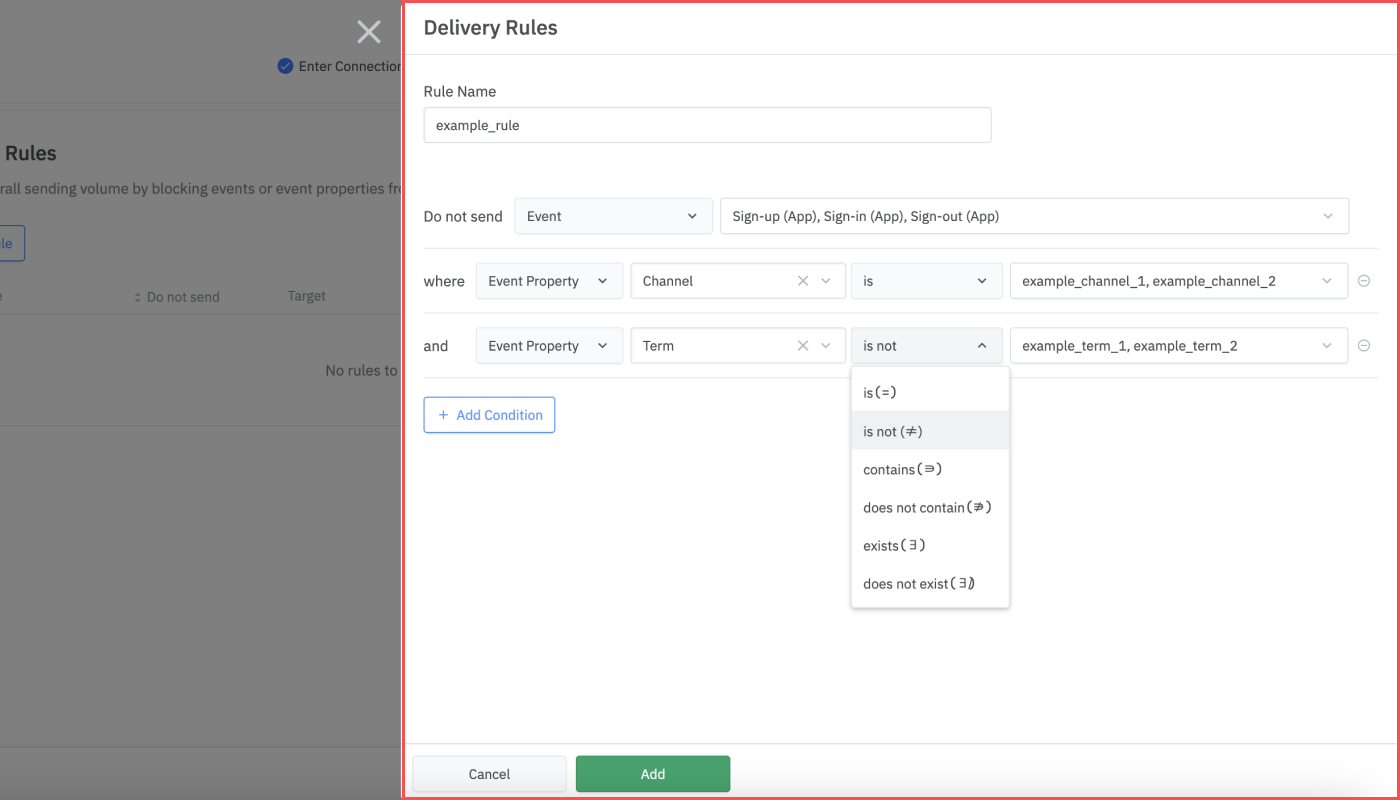
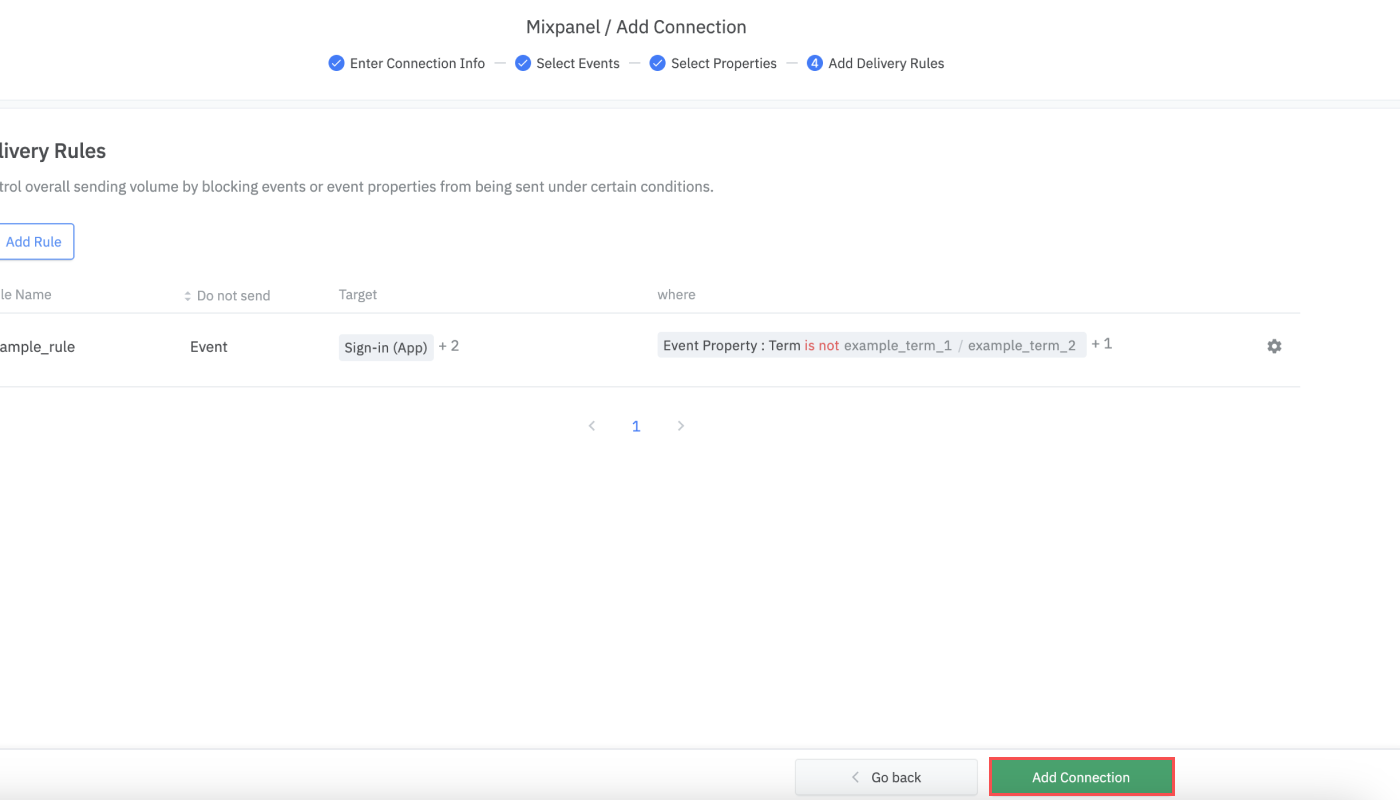
7. [Additional Delivery Rules] are optional. Click + Add Rule, enter a name for the delivery rule, and select the events or properties you don't want to send to Mixpanel. Select the conditions for the selected events and properties, again on a per-event or per-property basis. You can add multiple conditions for a rule. However, if you want to set different conditions for events or properties that you don't want to send, you must add two or more rules separately. The delivery rule names cannot be duplicated.
For example, if you set the delivery rules as shown in the image below, Airbridge will not send Sign-up, Sign-in, and Sign-out events that have the “example_channel_1” and “example_channel_2” properties but don’t have the “example_term_1” and “example_term_2” properties.
Event and event property options available for delivery rule setting
When adding conditions in the [Delivery Rules] setting page, the events you selected to send to Mixpanel in the [Select Events] page appear in the drop-down list box, whereas all properties are available for selection.
8. Once you have added all delivery rules, click Add Connection to finalize the connection setting. The events selected to construct the conditions of the delivery rules cannot be removed from the [Select Events] page.
9. Once the connection is added to the connection list, the status is set to Inactive by default. To activate the connection, switch on the toggle.

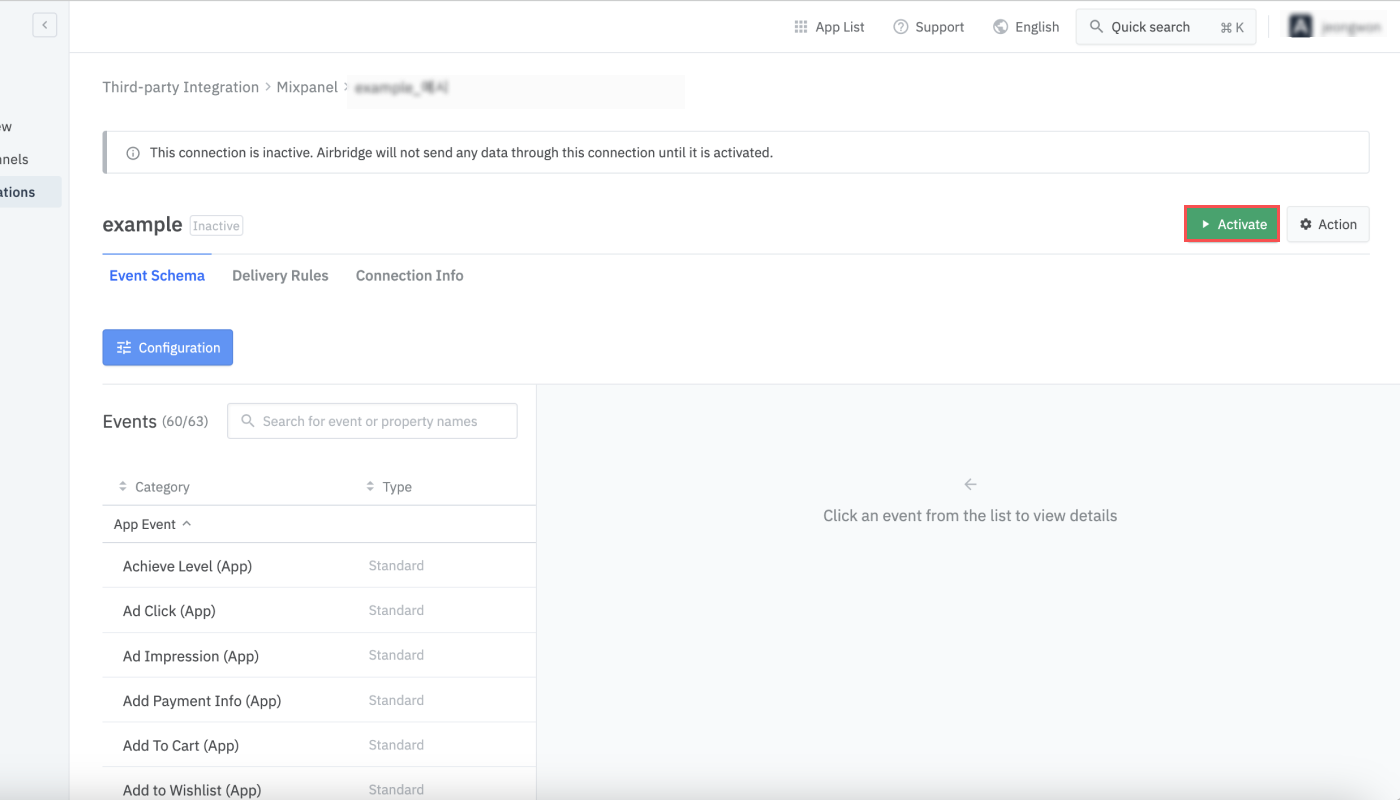
Or, when the status toggle of all connections are switched off, you can click the connection name of which you want to activate and click Activate to initiate the data delivery from Airbridge to Mixpanel. Once the connection is activated, the connection status tag that appears next to the connection name will change to Active.
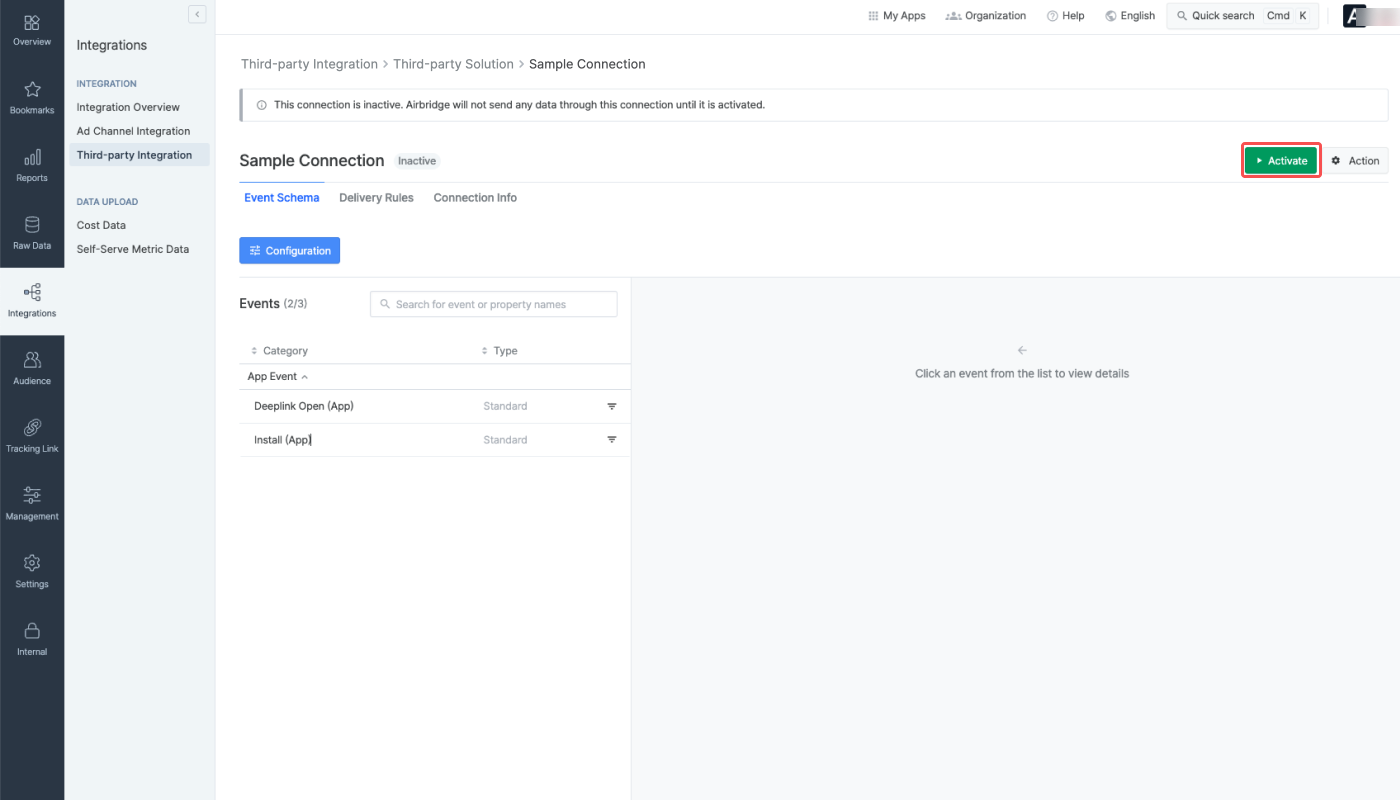
10. Click the green “Activate” button to initiate the data delivery from Airbridge to Mixpanel. Once the connection is activated, the connection status will change to Active.
Click the connection name to edit its settings, regardless of whether it is active or not. You can edit the event schema, delivery rules, and connection info. Be cautious when editing the connection settings of an active connection, as unintended events and event properties may be sent to Mixpanel.
Click Activate to activate a connection. Airbridge starts sending data upon activating a connection. When clicking Deactivate, data is no longer sent.
The third-party integration status is displayed under the third-party solution name on the [Integrations]>[Third-party Integration] page. Refer to the table below for the integration status types.
Event Schema
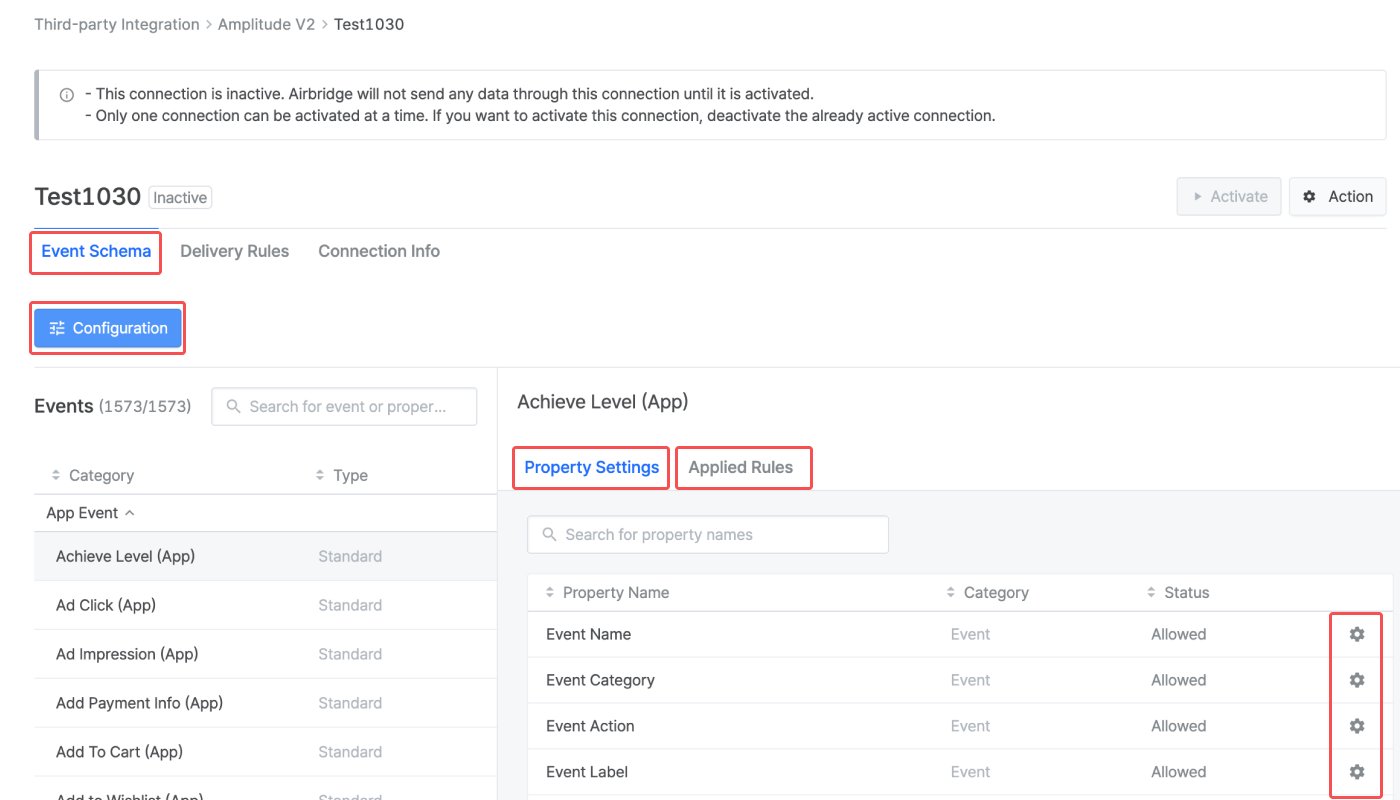
Click Configuration on the [Event Schema] tab page to edit the event and event property selection.
Click an event from the Events list and click the [gear] icon from the [Property Settings] tab. In the [Applied Rules] tab, the delivery rules can be configured at the event level.
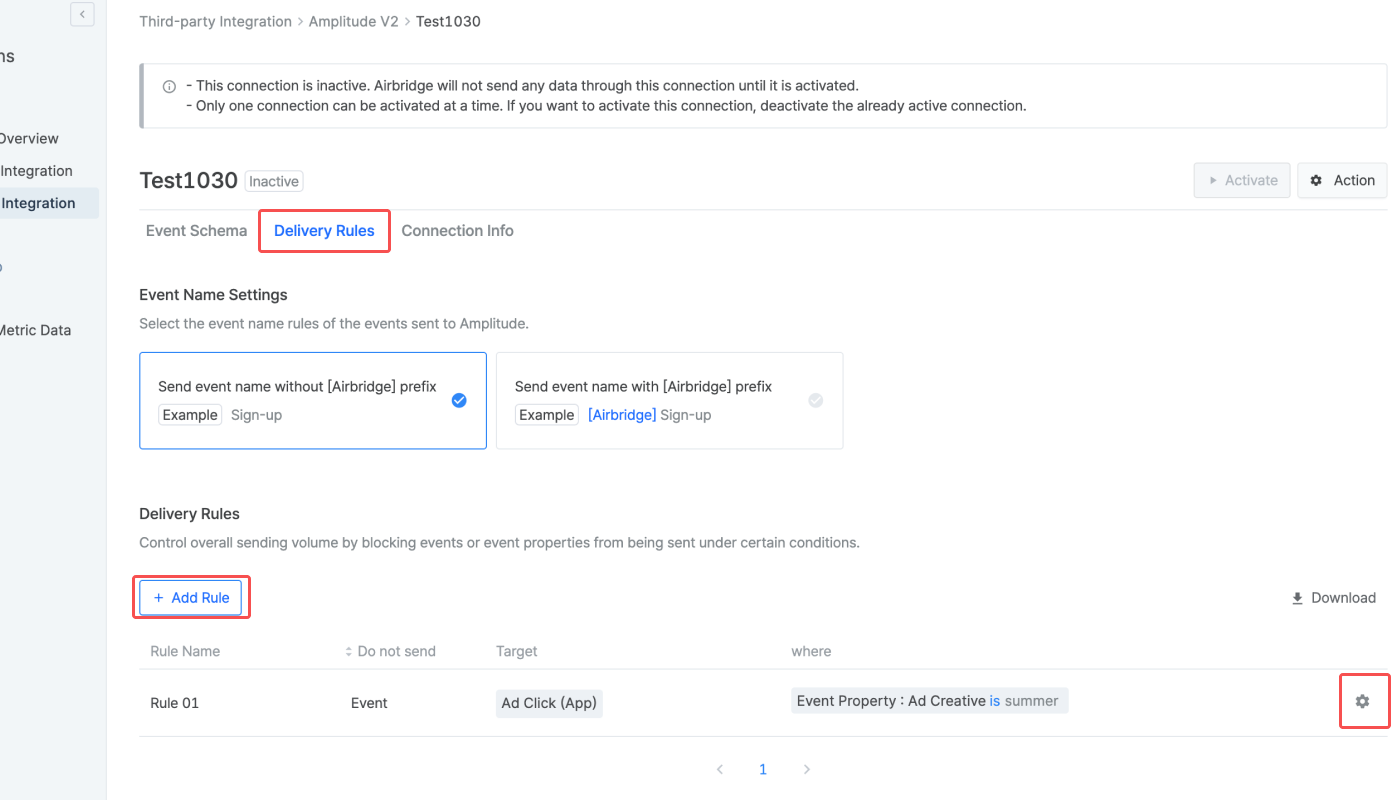
Delivery Rules
In the [Delivery Rules] tab, view all delivery rules applied to the connection. Click Add Rule to add new delivery rules. Click the [gear] icon to edit the rules. Click Download to export the delivery rules as a CSV file or Google Spreadsheet file.
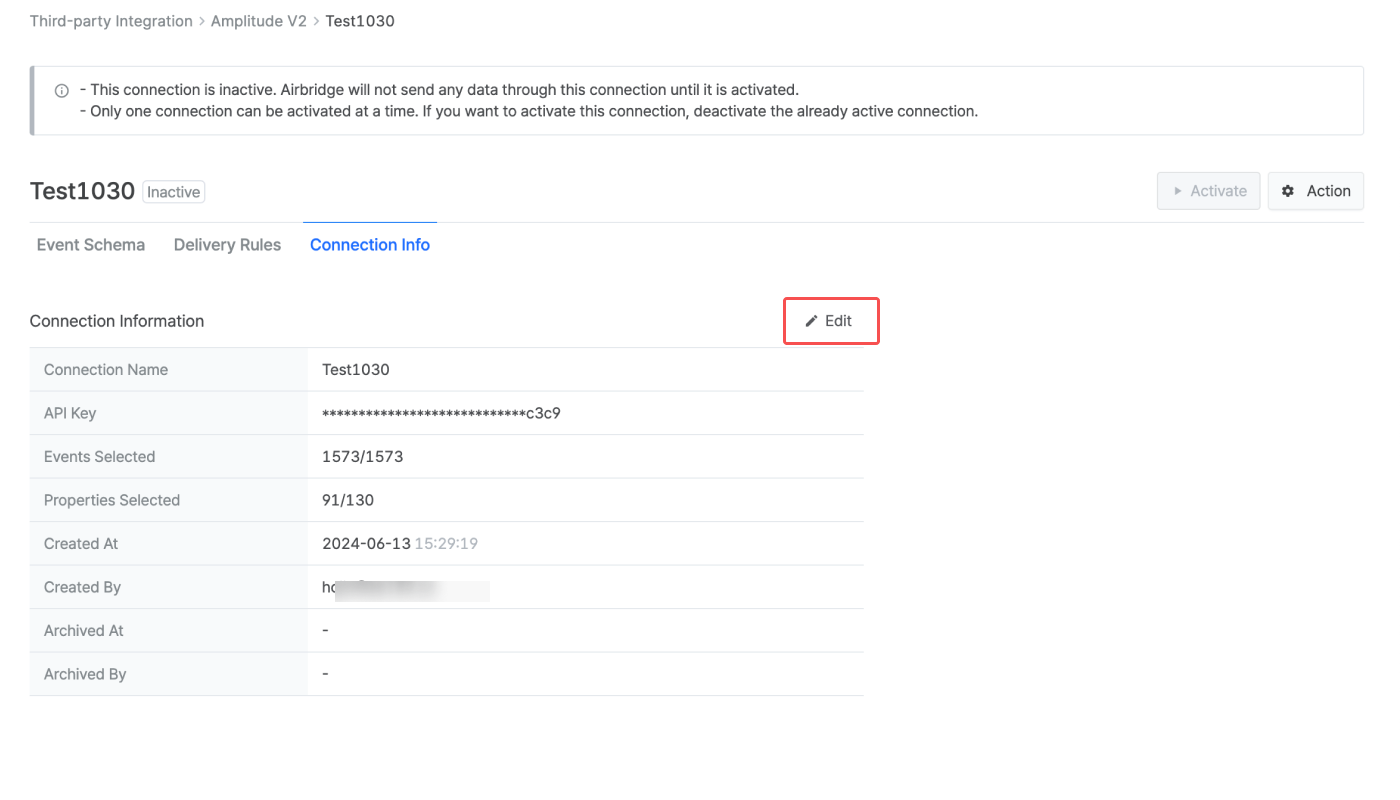
In the [Connection Info] tab, you can see the connection details. Click Edit to edit the connection name and the credentials used for the integration. The credentials are not fully disclosed.
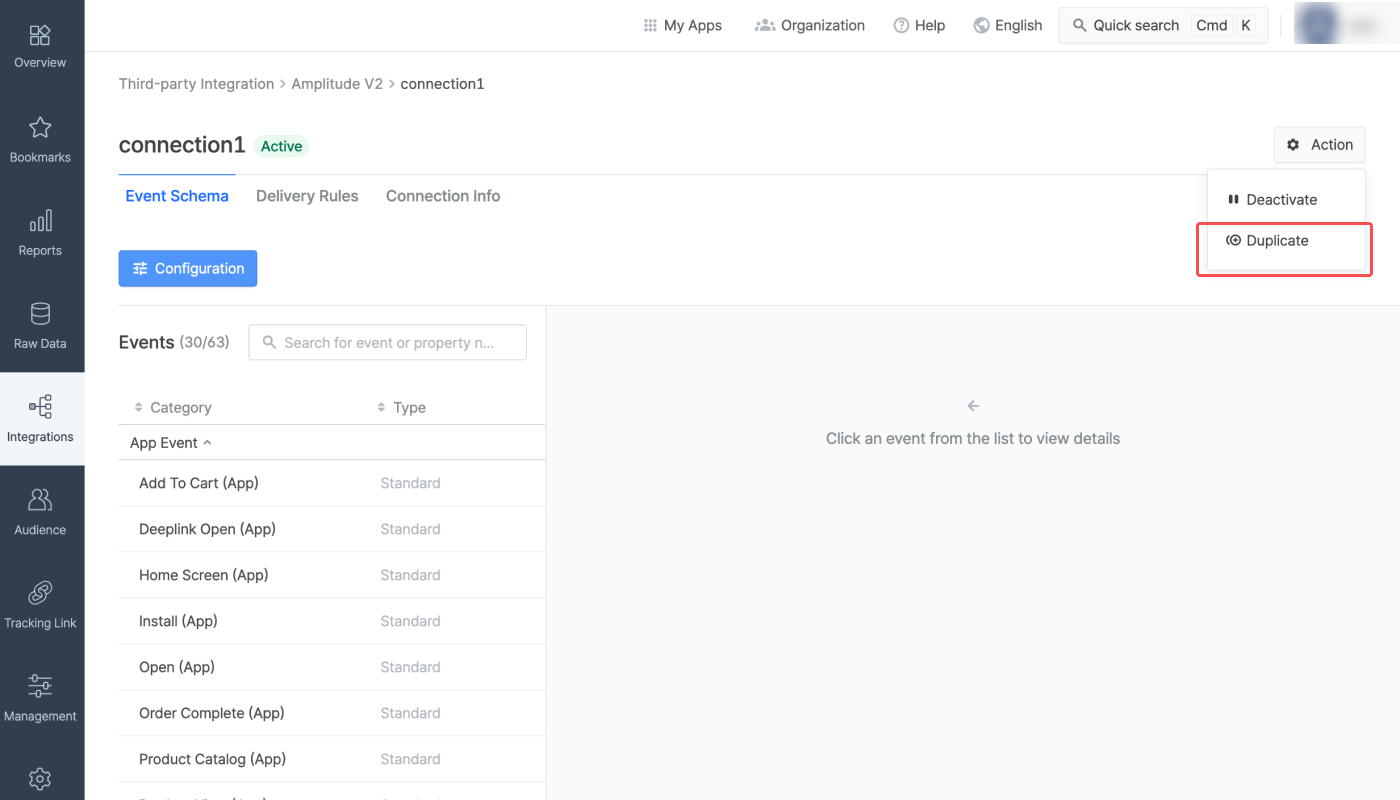
Click Action and select Duplicate to duplicate connection settings to create a new connection with a new connection name.
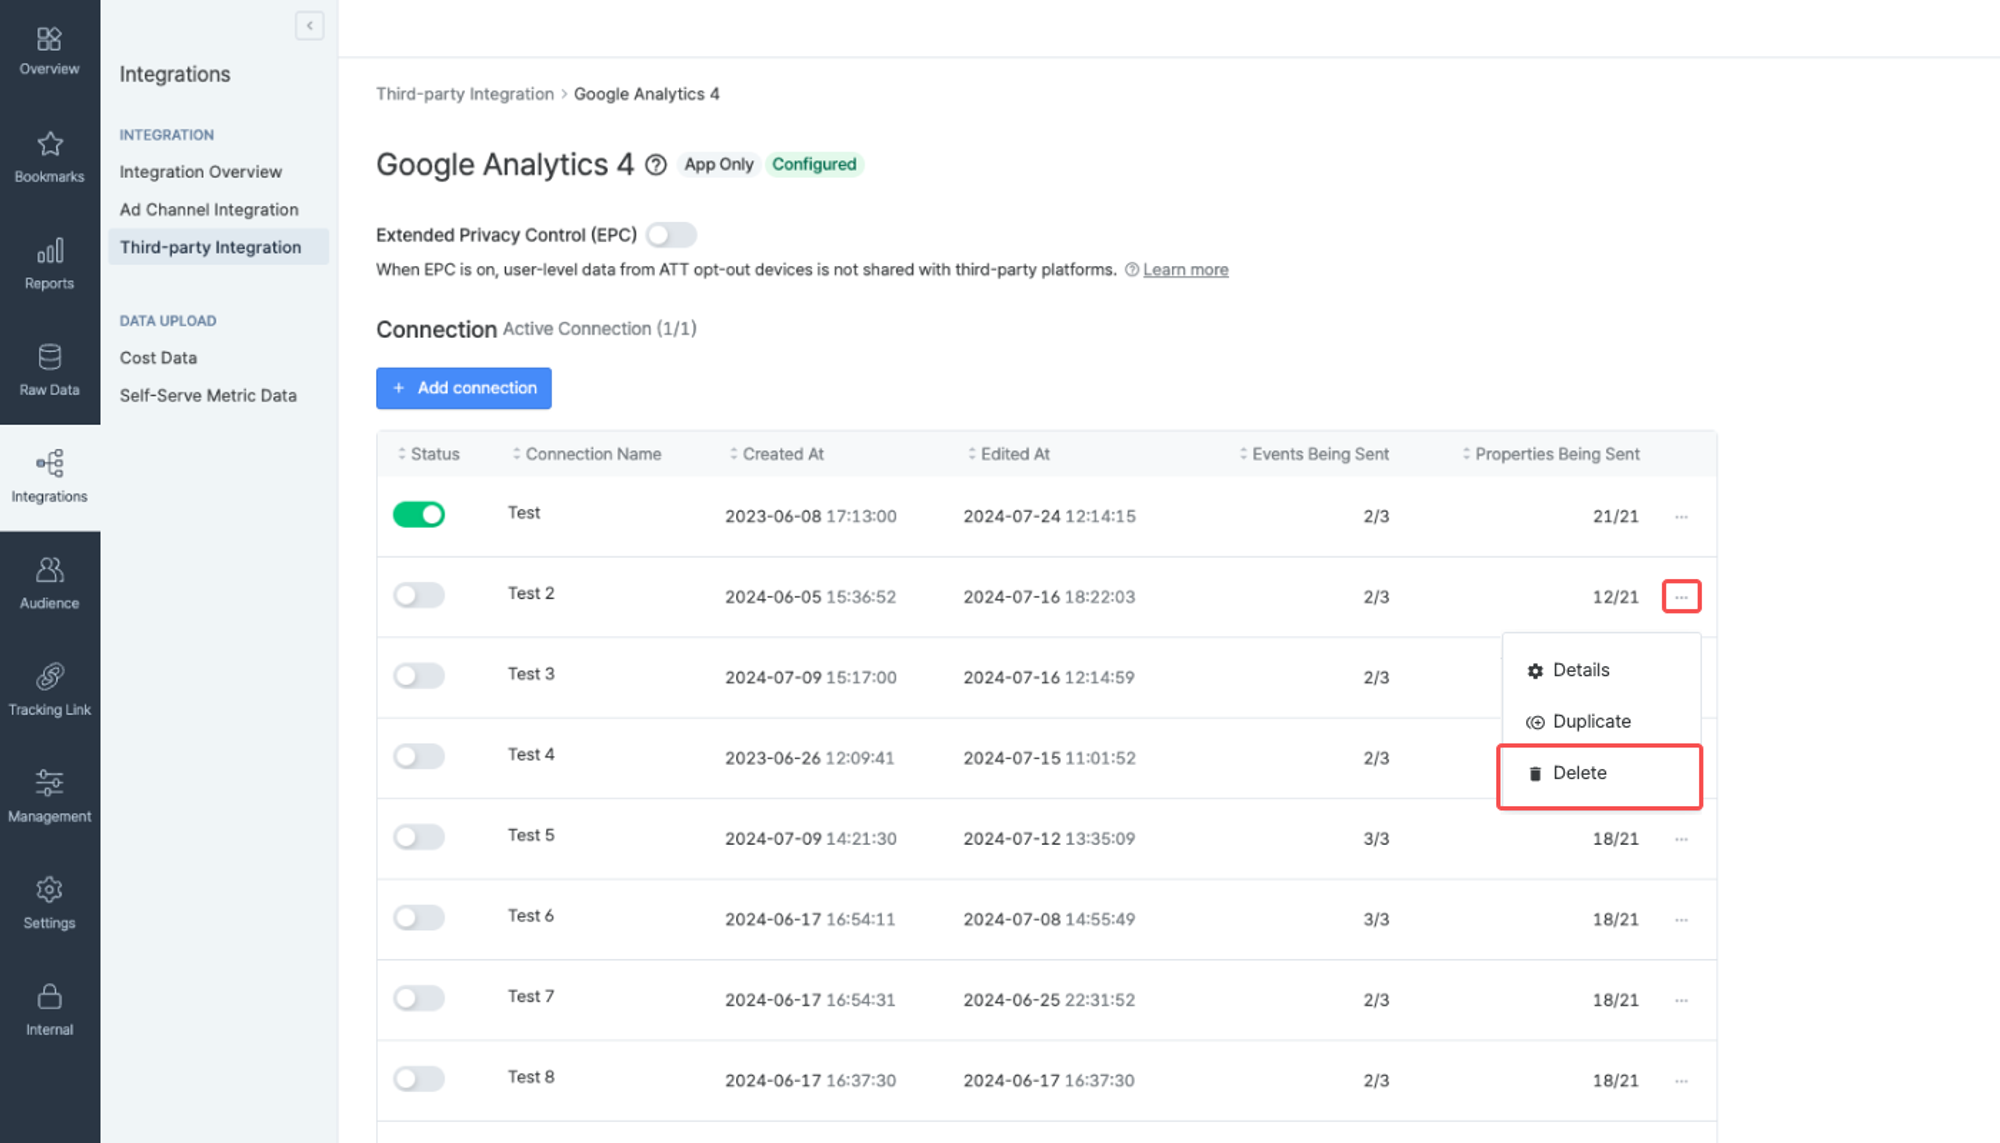
Click the [...] icon and select Delete to delete a connection. Active connections cannot be deleted. Deactivate the connection first to delete it.
Once the integration is successfully implemented, Airbridge data is made available in Mixpanel. Refer to the information below to learn how to use Airbridge data in Mixpanel.
In the Mixpanel dashboard, select [Boards] from the upper menu bar and click + Add or select [Reports] to create a report.
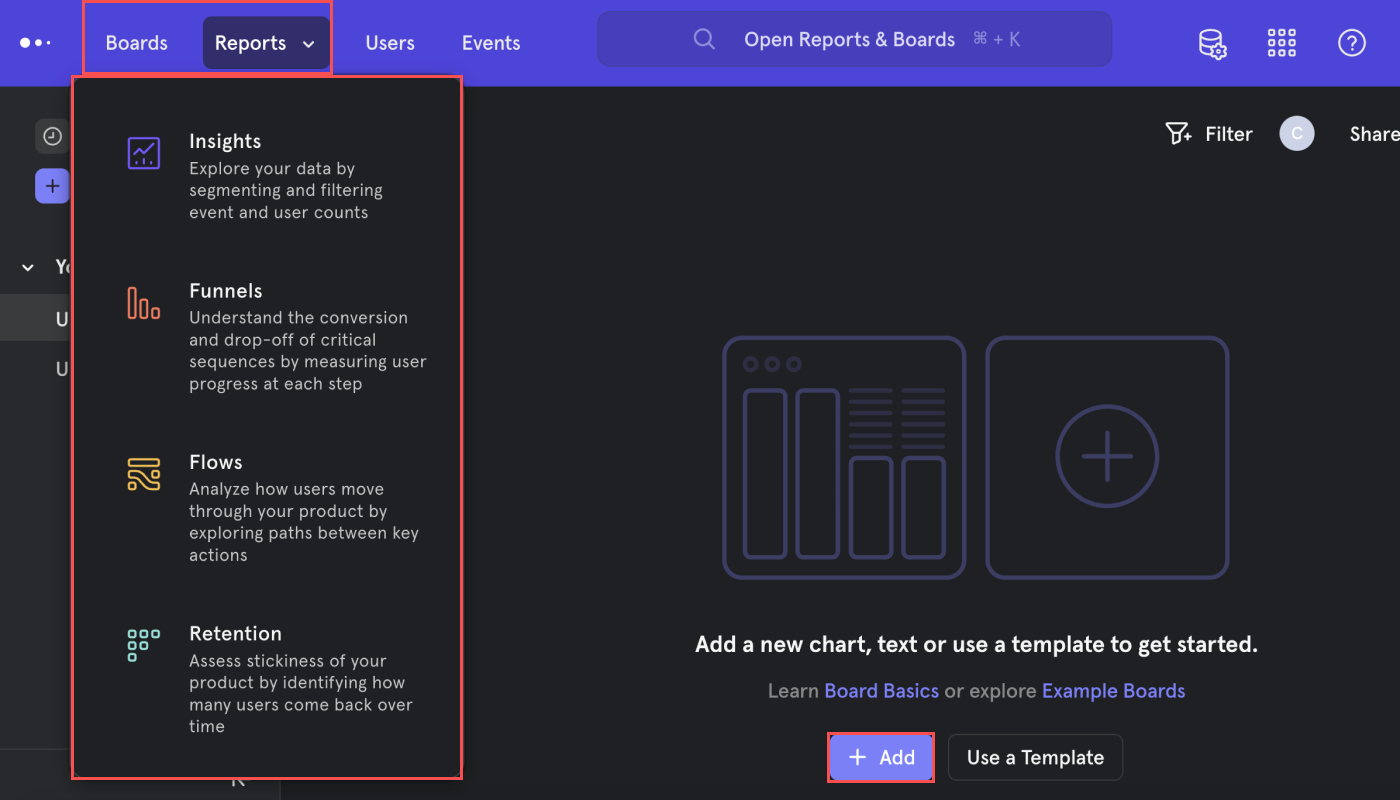
Then, click [Events & Cohorts] to select the events and click [Filter] or [Breakdown] to select the properties passed from Airbridge to Mixpanel.
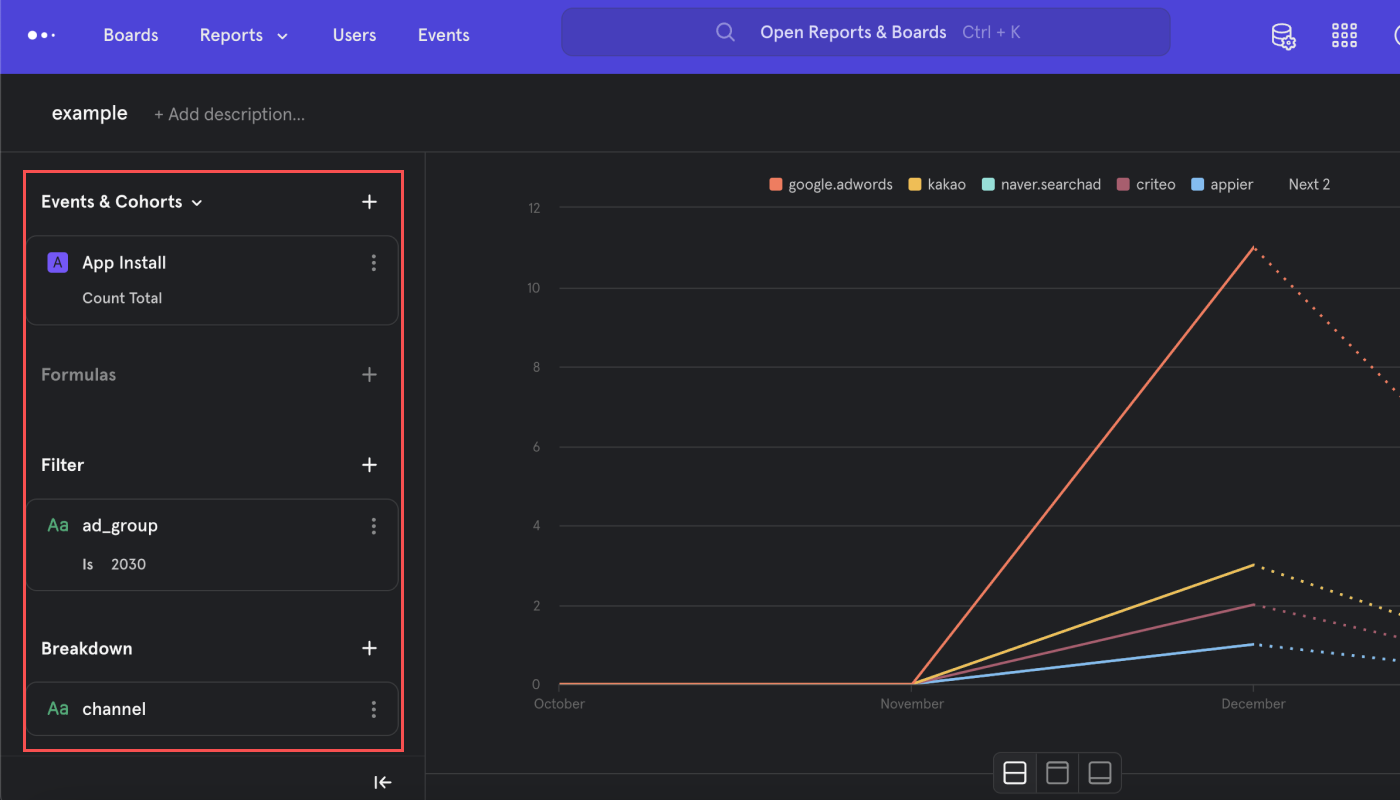
Once you complete the configuration, the selected data is visualized in charts and tables. For example, if you set the configuration as shown in the image below, you can view the number of install events performed by users in the ad group 2030 by channel.
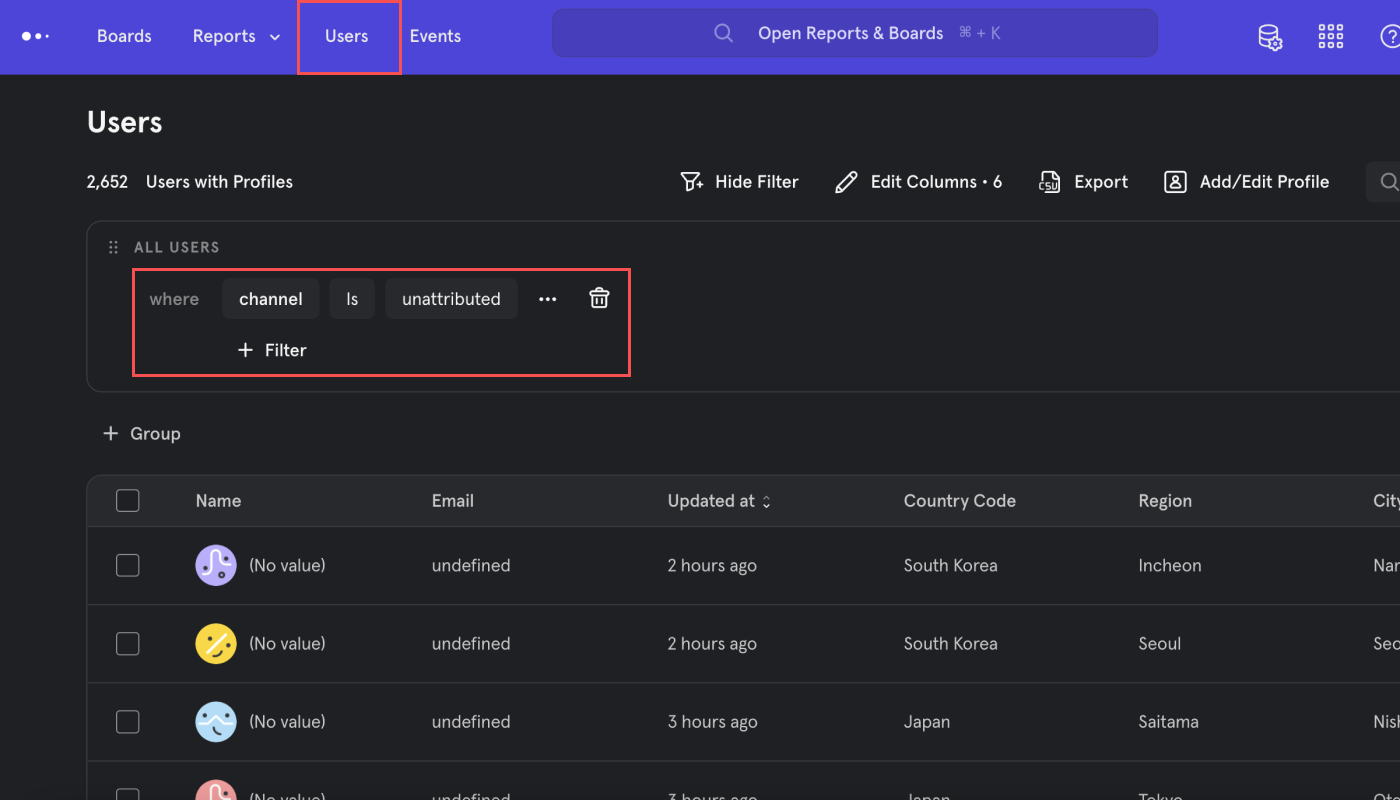
On the [Users] page, you can view data on user-level. If you set a filter as shown in the image below, you can collect and view only unattributed users.
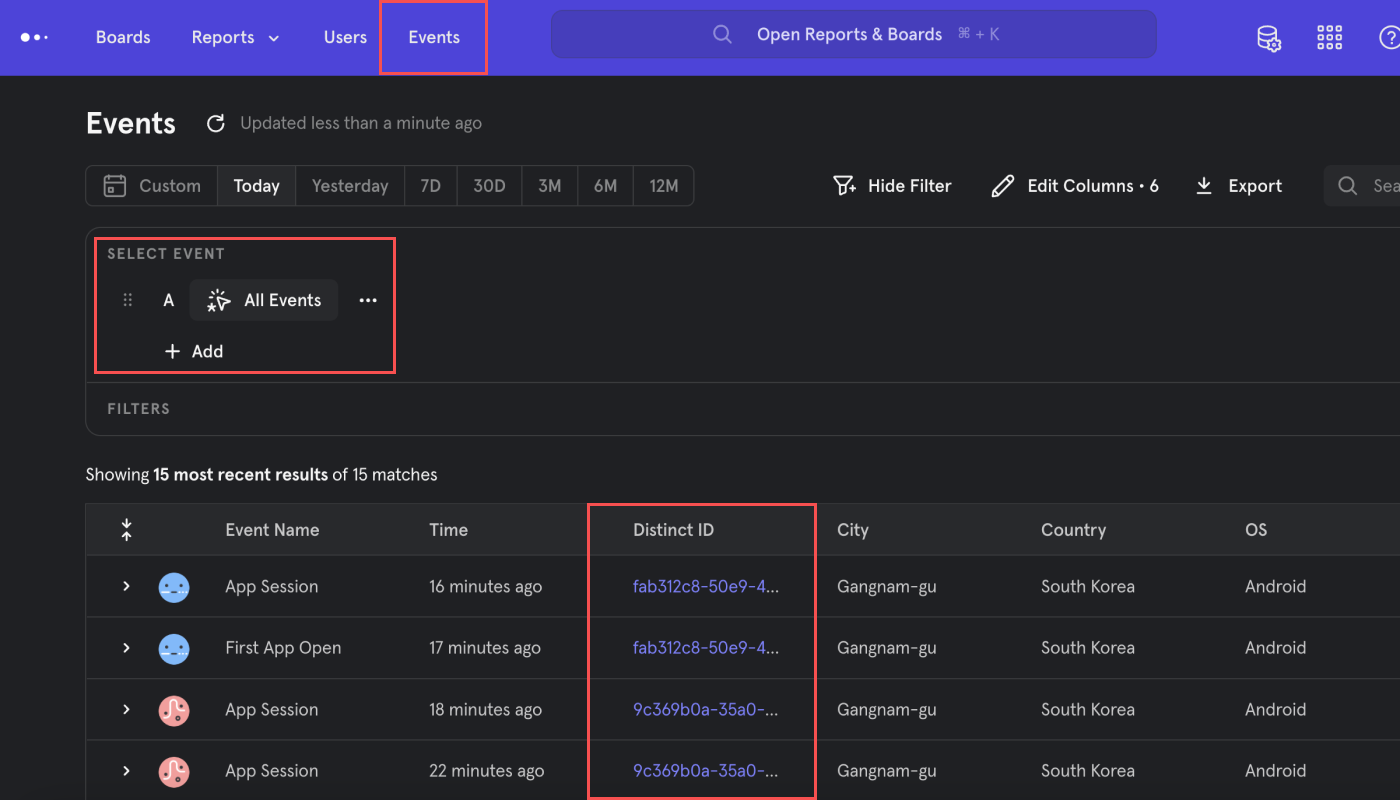
On the [Events] page, you can view data on event-level. You can set filters to collect and view specific events. If you click the Distinct ID that generated the event, the user data for that Distinct ID appears, just like when you click a user on the [Users] page.
When integrating Airbridge with Mixpanel, several identifiers are used for user matching in the order listed below. To perform user matching for app data, the identifiers below are used from 1 to 4, and for web data, 2 to 4.
1. Distinct ID (device.alias.mixpanel_device_id)
2. Distinct ID (user.alias.mixpanel_device_id)
3. Airbridge Device ID (device.deviceUUID)
4. Browser Client ID (browser.clientID)
If Airbridge can't get the Distinct ID, which is Mixpanel's device ID, Airbridge sends the Airbridge Device ID (for app data) and Browser Client ID (for web data) to Mixpanel. Sending data based on identifiers other than Distinct ID reduces the probability of successful user matching between Airbridge and Mixpanel.
If a user is not matched between Airbridge and Mixpanel, Mixpanel recognizes the user as a unique user apart from your existing user data. This can overstate your Monthly Tracked User (MTU) count at Mixpanel and cause you an unexpected rise in fees.
Therefore, to avoid unexpected hikes in MTU counts, please make sure to complete the Pre-setup for Integration.
Airbridge Device ID
Airbridge Device ID is a Universally Unique ID used to identify devices. As a default, GAID for Android and IDFA for iOS are used. If GAID or IDFA is unavailable due to LAT (Limited Ad Tracking) or ATT (App Tracking Transparency), IDFV or a randomly generated value is used instead.
Events attributed to Meta ads shall not be sent or shared with third parties in accordance with the Meta Privacy Policy. The data shall only be used internally by the entity that ran the ad for the purpose of analyzing the performance of the Meta ads campaign.
Accordingly, Airbridge sends the channel event property of events attributed to Meta ads as “Restricted” to any third parties.
However, Meta ads web campaign data collected through tracking links or campaign data collected through custom channel tracking links are not masked when sent to third parties.
If you want to run a cohort analysis in Mixpanel with Airbridge data, make sure your connection sends the Target Events, including Install (App), Deeplink Open (App), and Deeplink Pageview (App) events, and event properties that are updated to the user level to Mixpanel. The properties can be viewed under [user properties] when setting [Filter] and [Breakdown] in Mixpanel.

Below is the list of touchpoint-related event properties that are updated down to the user level.
Below is the list of user-related event properties that are updated down to the user level.
When it comes to events that involve individual product items defined by the Semantic Attributes, Airbridge logs events defined by actions regardless of how many products are involved in the action, whereas Amplitude and Mixpanel log events by individual product items. Therefore, Airbridge sends such events by individual product items following the Airbridge Event Taxonomy.
Semantic Attributes with products.$0 are attributes that involve product items.
Example case
Let’s say the Order Complete event has been defined with a Semantic Attribute, as shown below. When the event occurs, the product ID is logged per product item.
Based on this taxonomy design, if a user orders 5 different product items and then 1 Order Complete event occurs, 1 Order Complete event will be logged to Airbridge, whereas in Amplitude and Mixpanel, 5 Order Complete events will be logged.