iOS SDK (v4)

提示
本指南介绍如何安装和设置 iOS SDK(v4)。如需了解旧版本,请参阅 iOS SDK(旧版本)。
您可以通过以下方法安装 Airbridge iOS SDK。安装后,您可以通过 测试 iOS SDK 来检查 SDK 是否正确安装。
1. 在 Xcode 中导航至 [File]>[Add Packages...]。
2. 在搜索栏中输入以下地址,并点击 [Add Package]。
3. 再次点击 [Add Package]。
4. 在 Xcode 的 [Package Dependencies] 中确认 Airbridge iOS SDK 已成功添加。
5. 将 SDK 依赖的 Framework 添加到 Project 中。导航至 [Xcode]>[Project File]>[General]>[Frameworks, Libraries, and Embedded Content],并点击 “+”。
6. 添加所有以下 Framework,并将已添加 Framework 的 Embed(嵌入)设置为 Do Not Embed(不嵌入)。导航至 [Xcode]>[Project File]>[Build Phase]>[Link Binary With Libraries],将 Status(状态)设置为 “Optional(可选)”。
Framework | 说明 |
|---|---|
AdSupport.framework | 用于收集 IDFA |
CoreTelephony.framework | 用于收集移动通信运营商信息 |
StoreKit.framework | 用于收集 SKAN 信息 |
AppTrackingTransparency.framework | 用于收集 ATT 同意状态信息 |
AdServices.framework | 用于收集 Apple Ads 归因信息(iOS 14.3+) |
注意
在安装 iOS SDK 之前,请导航至 [Xcode]>[YOUR_PROJECT]>[Build Settings],并确保将 User Script Sandboxing 设置为 “No”。更多信息请参阅 CocoaPods 文档。
1. 使用 brew install cocoapods 安装 CocoaPods。
2. 使用 pod init 创建 Podfile。
3. 使用以下代码将 SDK 添加为 Podfile 的依赖项。
target '[Project Name]' do
    ...
    # Replace $HERE_LATEST_VERSION with latest version
    # - Versions: https://help.airbridge.io/developers/release-note-ios-sdk
    # - Example: pod 'airbridge-ios-sdk', '4.X.X'
    pod 'airbridge-ios-sdk', '$HERE_LATEST_VERSION'
    ...
end
4. 在输入 pod install --repo-update 时,安装将开始。
5. 运行 YOUR_PROJECT.xcworkspace 以确认 Airbridge iOS SDK 成功安装。
注意
您无法使用 Tuist 的 External Dependencies 安装 Airbridge iOS SDK。请确保按照以下步骤安装。
1. 运行 tuist edit 命令。
2. 将 remote 添加到 project.packages。将 package 添加到 project.targets[...].target.dependencies 中。参见以下代码:
import ProjectDescription

let project = Project(
    packages: [
        .remote(
            url: "https://github.com/ab180/airbridge-ios-sdk-deployment",
            // Replace $HERE_LATEST_VERSION with latest version
            // - Versions: https://help.airbridge.io/developers/release-note-ios-sdk
            // - Example: requirement: .exact(from: "4.X.X")
            requirement: .exact(from: "$HERE_LATEST_VERSION")
        ),
        ...
    ],
    targets: [
        .target(
            dependencies: [
                .package(product: "Airbridge", type: .runtime),
                .sdk(name: "AdSupport", type: .framework, status: .optional),
                .sdk(name: "AdServices", type: .framework, status: .optional),
                .sdk(name: "CoreTelephony", type: .framework, status: .optional),
                .sdk(name: "StoreKit", type: .framework, status: .optional),
                .sdk(name: "AppTrackingTransparency", type: .framework, status: .optional),
                .sdk(name: "WebKit", type: .framework, status: .optional),
                ...
            ]
        ),
        ...
    ],
    ...
)
3. 运行 tuist generate 命令。
4. Airbridge 将添加至 Xcode 的 Package Dependencies 中。
1. 从以下链接下载 Airbridge iOS SDK:
2. 将 Airbridge.xcframework 添加到 Project 中。导航至 [Xcode]>[Project File]>[General]>[Frameworks, Libraries, and Embedded Content],并点击 “+”。
3. 在 [Add Other...] 下点击 “Add Files...”,并选择 Airbridge.xcframework。
4. 将 Airbridge.xcframework 中的 Embed(嵌入)设置为 Embed & Sign(嵌入并签名)。
5. 将 SDK 依赖的 Framework 添加到 Project 中。导航至 [Xcode]>[Project File]>[General]>[Frameworks, Libraries, and Embedded Content],并点击 “+”。
6. 添加所有以下 Framework,并将已添加 Framework 的 Embed(嵌入)设置为 Do Not Embed(不嵌入)。导航至 [Xcode]>[Project File]>[Build Phase]>[Link Binary With Libraries],将 Status(状态)设置为 “Optional(可选)”。
Framework | 说明 |
|---|---|
AdSupport.framework | 用于收集 IDFA |
CoreTelephony.framework | 用于收集移动通信运营商信息 |
StoreKit.framework | 用于收集 SKAN 信息 |
AppTrackingTransparency.framework | 用于收集 ATT 同意状态信息 |
AdServices.framework | 用于收集 Apple Ads 归因信息(iOS 14.3+) |
提示
请根据需求选择一般 SDK 或 Restricted SDK, 只能安装其中一个。
根据政策或环境,可能需要对收集 设备 ID(例如 GAID 或 IDFA)进行限制。如果安装 Restricted SDK,Airbridge SDK 不会收集设备 ID。
请按照以下说明安装 Restricted SDK:
1. 在 Xcode 中导航至 [File]>[Add Packages...]。
2. 在搜索栏中输入以下地址,并点击 [Add Package]。
3. 再次点击 [Add Package]。
4. 在 Xcode 的 [Package Dependencies] 中确认 Airbridge iOS SDK 已成功添加。
5. 将 SDK 依赖的 Framework 添加到 Project 中。导航至 [Xcode]>[Project File]>[General]>[Frameworks, Libraries, and Embedded Content],并点击 “+”。
6. 添加所有以下 Framework,并将已添加 Framework 的 Embed(嵌入)设置为 Do Not Embed(不嵌入)。导航至 [Xcode]>[Project File]>[Build Phase]>[Link Binary With Libraries],将 Status(状态)设置为 “Optional(可选)”。
Framework | 说明 |
|---|---|
CoreTelephony.framework | 用于收集移动通信运营商信息 |
StoreKit.framework | 用于收集 SKAN 信息 |
AdServices.framework | 用于收集 Apple Ads 的归因信息(iOS 14.3+) |
注意
在安装 iOS SDK 之前,请导航至 [Xcode]>[YOUR_PROJECT]>[Build Settings],并确保将 User Script Sandboxing 设置为 “No”。更多信息请参阅 CocoaPods 文档。
1. 使用 brew install cocoapods 安装 CocoaPods。
2. 使用 pod init 创建 Podfile。
3. 使用以下代码将 SDK 添加为 Podfile 的依赖项。
target '[Project Name]' do
    ...
    # Replace $HERE_LATEST_VERSION with latest version
    # - Versions: https://help.airbridge.io/developers/release-note-ios-sdk
    # - Example: pod 'airbridge-ios-sdk-restricted', '4.X.X'
    pod 'airbridge-ios-sdk-restricted', '$HERE_LATEST_VERSION'
    ...
end
4. 在输入 pod install --repo-update 时,安装将开始。
5. 运行 YOUR_PROJECT.xcworkspace 以确认 Airbridge iOS SDK 成功安装。
注意
您无法使用 Tuist 的 External Dependencies 安装 Airbridge iOS SDK。请确保按照以下步骤安装。
1. 运行 tuist edit 命令。
2. 将 remote 添加到 project.packages。将 package 添加到 project.targets[...].target.dependencies 中。参见以下代码:
import ProjectDescription

let project = Project(
    packages: [
        .remote(
            url: "https://github.com/ab180/airbridge-ios-sdk-restricted-deployment",
            // Replace $HERE_LATEST_VERSION with latest version
            // - Versions: https://help.airbridge.io/developers/release-note-ios-sdk
            // - Example: requirement: .exact(from: "4.X.X")
            requirement: .exact(from: "$HERE_LATEST_VERSION")
        ),
        ...
    ],
    targets: [
        .target(
            dependencies: [
                .package(product: "Airbridge", type: .runtime),
                .sdk(name: "AdServices", type: .framework, status: .optional),
                .sdk(name: "CoreTelephony", type: .framework, status: .optional),
                .sdk(name: "StoreKit", type: .framework, status: .optional),
                .sdk(name: "WebKit", type: .framework, status: .optional),
                ...
            ]
        ),
        ...
    ],
    ...
)
3. 运行 tuist generate 命令。
4. Airbridge 将添加至 Xcode 的 Package Dependencies 中。
1. 从以下链接下载 Airbridge iOS SDK。
2. 将 Airbridge.xcframework 添加到 Project 中。导航至 [Xcode]>[Project File]>[General]>[Frameworks, Libraries, and Embedded Content],并点击 “+”。
3. 在 [Add Other...] 下点击 “Add Files...”,并选择 Airbridge.xcframework。
4.将 Airbridge.xcframework 中的 Embed(嵌入)设置为 Embed & Sign(嵌入并签名)。
5. 将 SDK 依赖的 Framework 添加到 Project 中。导航至 [Xcode]>[Project File]>[General]>[Frameworks, Libraries, and Embedded Content],并点击 “+”。
6. 添加所有以下 Framework,并将已添加 Framework 的 Embed(嵌入)设置为 Do Not Embed(不嵌入)。导航至 [Xcode]>[Project File]>[Build Phase]>[Link Binary With Libraries],将 Status(状态)设置为 “Optional(可选)”。
Framework | 说明 |
|---|---|
CoreTelephony.framework | 用于收集移动通信运营商信息 |
StoreKit.framework | 用于收集 SKAN 信息 |
AdServices.framework | 用于收集 Apple Ads 的归因信息(iOS 14.3+) |
SDK 初始化方法因系统方式而异。SceneDelegate Lifecycle 或 AppDelegate Lifecycle 请参考 AppDelegate,SwiftUI Lifecycle 请参考 SwiftUI。
YOUR_APP_NAME 和 YOUR_APP_SDK_TOKEN 可在 Airbridge 面板的 [设置]>[Token] 获取。
请在 AppDelegate 的 application(_:didFinishLaunchingWithOptions:) 函数顶部调用 Airbridge.initializeSDK 函数。
import UIKit
import Airbridge

@main
class AppDelegate: UIResponder, UIApplicationDelegate {
    func application(
        _ application: UIApplication,
        didFinishLaunchingWithOptions launchOptions: [UIApplication.LaunchOptionsKey: Any]?
    ) -> Bool {
        let option = AirbridgeOptionBuilder(name: "YOUR_APP_NAME", token: "YOUR_APP_SDK_TOKEN")
            .build()
        Airbridge.initializeSDK(option: option)
        return true
    }
}
注意
Airbridge.initializeSDK函数需在AppDelegate的application(_:didFinishLaunchingWithOptions:)阶段调用,以确保正常运行。
请在 AppDelegate 的 application:didFinishLaunchingWithOptions: 函数顶部调用 Airbridge.initializeSDK 函数。
#import "AppDelegate.h"
#import <Airbridge/Airbridge.h>

@interface AppDelegate ()

@end

@implementation AppDelegate

- (BOOL)application:(UIApplication *)application didFinishLaunchingWithOptions:(NSDictionary *)launchOptions {
    AirbridgeOptionBuilder* optionBuilder = [[AirbridgeOptionBuilder alloc] initWithName:@"YOUR_APP_NAME"
                                                                                   token:@"YOUR_APP_SDK_TOKEN"];
    AirbridgeOption* option = [optionBuilder build];
    [Airbridge initializeSDKWithOption:option];
    return YES;
}

@end
注意
Airbridge.initializeSDK函数需在AppDelegate的application(_:didFinishLaunchingWithOptions:)阶段调用,以确保正常运行。
请在 init 的顶部调用 Airbridge.initializeSDK 函数。
import SwiftUI
import Airbridge

@main
struct ExampleApp: App {
    init() {
        let option = AirbridgeOptionBuilder(name: "YOUR_APP_NAME", token: "YOUR_APP_SDK_TOKEN")
            .build()
        Airbridge.initializeSDK(option: option)
    }

    var body: some Scene {
        WindowGroup {
            ContentView()
        }
    }
}
注意
Airbridge.initializeSDK函数需在App的init阶段调用,以确保正常运行。
注意
SwiftUI Lifecycle 方法不提供 ReferrerURL,因此无法使用 Organic Referrer Attribution。即使使用 UIApplicationDelegateAdaptor,在 SwiftUI Lifecycle 方法中也无法使用 Organic Referrer Attribution。
提示
为确保遵守隐私政策所需的功能,应与法律顾问共同审查。
在 iOS 环境中,只有在通过 ATT(App Tracking Transparency,应用跟踪透明度)弹窗征得用户同意后,才能收集 IDFA。
收集安装事件应延迟到用户允许追踪后进行。IDFA 会与安装事件一同收集,因此如果在用户通过 ATT 弹窗允许追踪之前收集安装事件,IDFA 将缺失,影响绩效监测。建议设置足够的延迟时间,以确保 IDFA 被正确收集。
1. 准备好您将在 ATT 弹窗中使用的文本。
2. 在 Info.plist 文件的 NSUserTrackingUsageDescription 值中输入准备好的文本。
请导航至 [Xcode]>[YOUR_PROJECT]>[Info]>[Custom iOS Target Properties]。
请将鼠标悬停在 Key 的项目,点击出现的 “+”,并输入
Privacy - Tracking Usage Description。请将准备好的 ATT 弹窗文本作为值输入。
1. 请输入 tuist edit 命令。
2. 请在 project.targets[...].infoPlist 的 .extendingDefault 中,作为键输入 NSUserTrackingUsageDescription,作为值输入准备好的 ATT 弹窗文本。
import ProjectDescription

let project = Project(
    targets: [
        .target(
            infoPlist: .extendingDefault(
                with: [
                    "NSUserTrackingUsageDescription": "YOUR_DESCRIPTION",
                    ...
                ]
            ),
            ...
        ),
        ...
    ]
    ...
)
3. 设置 ATT 弹窗的弹出时间。
请在计划弹出 ATT 弹窗的时间调用 ATTrackingManager.requestTrackingAuthorization 函数。
import AppTrackingTransparency
...
ATTrackingManager.requestTrackingAuthorization { _ in }#import <AppTrackingTransparency/AppTrackingTransparency.h>
...
[ATTrackingManager requestTrackingAuthorizationWithCompletionHandler:^(ATTrackingManagerAuthorizationStatus status) {}];注意
当调用
ATTrackingManager.requestTrackingAuthorization函数时,如果 App 不处于 Active 状态,则不会弹出 ATT 弹窗。
App 启用后可立即弹出 ATT 弹窗。
import UIKit
import Airbridge
import AppTrackingTransparency

@main
class AppDelegate: UIResponder, UIApplicationDelegate {
    var observer: Any?

    func application(
        _ application: UIApplication,
        didFinishLaunchingWithOptions launchOptions: [UIApplication.LaunchOptionsKey: Any]?
    ) -> Bool {
        let option = AirbridgeOptionBuilder(name: "YOUR_APP_NAME", token: "YOUR_APP_SDK_TOKEN")
            .build()
        Airbridge.initializeSDK(option: option)

        observer = NotificationCenter.default.addObserver(
            forName: UIApplication.didBecomeActiveNotification,
            object: nil,
            queue: nil
        ) { [weak self] _ in
            if #available(iOS 14, *) {
                ATTrackingManager.requestTrackingAuthorization { _ in }
            }
            if let observer = self?.observer {
                NotificationCenter.default.removeObserver(observer)
            }
        }

        return true
    }
}#import "AppDelegate.h"
#import <Airbridge/Airbridge.h>
#import <AppTrackingTransparency/AppTrackingTransparency.h>
@interface AppDelegate ()
@end
@implementation AppDelegate {
id observer;
}
- (BOOL)application:(UIApplication *)application didFinishLaunchingWithOptions:(NSDictionary *)launchOptions {
AirbridgeOptionBuilder* optionBuilder = [[AirbridgeOptionBuilder alloc] initWithName:@"YOUR_APP_NAME"
token:@"YOUR_APP_SDK_TOKEN"];
AirbridgeOption* option = [optionBuilder build];
[Airbridge initializeSDKWithOption:option];
__weak typeof(self) weakSelf = self;
observer = [NSNotificationCenter.defaultCenter addObserverForName:UIApplicationDidBecomeActiveNotification
object:nil
queue:nil
usingBlock:^(NSNotification * _Nonnull notification) {
if (@available(iOS 14, *)) {
[ATTrackingManager requestTrackingAuthorizationWithCompletionHandler:^(ATTrackingManagerAuthorizationStatus status) {}];
}
if (weakSelf != nil && weakSelf->observer != nil) {
[NSNotificationCenter.defaultCenter removeObserver:observer];
}
}];
return YES;
}
@endimport SwiftUI
import Airbridge
import AppTrackingTransparency
@main
struct ExampleApp: App {
init() {
let option = AirbridgeOptionBuilder(name: "YOUR_APP_NAME", token: "YOUR_APP_SDK_TOKEN")
.build()
Airbridge.initializeSDK(option: option)
var observer: Any?
observer = NotificationCenter.default.addObserver(
forName: UIApplication.didBecomeActiveNotification,
object: nil,
queue: nil
) { _ in
if #available(iOS 14, *) {
ATTrackingManager.requestTrackingAuthorization { _ in }
}
if let observer {
NotificationCenter.default.removeObserver(observer)
}
}
}
var body: some Scene {
WindowGroup {
ContentView()
}
}
}4. 如果未收集到安装事件,Airbridge iOS SDK 会在每次 App 启用时延迟 30 秒尝试收集安装事件,直到用户允许追踪为止。如果用户在决定是否允许追踪之前关闭 App,SDK 将不会收集安装事件,并会在下次启用 App 时重试。
安装事件默认收集延迟时间为 30 秒。您可以使用 setAutoDetermineTrackingAuthorizationTimeout 函数修改此值,最长可达 3600 秒(1 小时)。
import Airbridge
...
let option = AirbridgeOptionBuilder(name: "YOUR_APP_NAME",
                                    token: "YOUR_APP_SDK_TOKEN")
    .setAutoDetermineTrackingAuthorizationTimeout(second: 30)
    .build()
Airbridge.initializeSDK(option: option)#import <Airbridge/Airbridge.h>
...
AirbridgeOptionBuilder* optionBuilder = [[AirbridgeOptionBuilder alloc] initWithName:@"YOUR_APP_NAME"
token:@"YOUR_APP_SDK_TOKEN"];
[optionBuilder setAutoDetermineTrackingAuthorizationTimeoutWithSecond:30];
AirbridgeOption* option = [optionBuilder build];
[Airbridge initializeSDKWithOption:option];注意
请确保为延迟收集安装事件预留足够时间。在用户通过 ATT 弹窗允许追踪之前,如果延迟时间到期,SDK 将会收集不包含 IDFA 的安装事件。
提示
此功能并非必需功能,请在设置前确认需求。
Opt-in 政策是指在用户同意之前不使用用户信息。
请将 setAutoStartTrackingEnabled 函数设置为 false 后,在可以收集事件时调用 startTracking 函数。从调用 startTracking 函数的时刻起,才开始收集事件。
import Airbridge
...
let option = AirbridgeOptionBuilder(name: "YOUR_APP_NAME", token: "YOUR_APP_SDK_TOKEN")
    .setAutoStartTrackingEnabled(false)
    .build()
Airbridge.initializeSDK(option: option)
...
Airbridge.startTracking()#import <Airbridge/Airbridge.h>
...
AirbridgeOptionBuilder* optionBuilder = [[AirbridgeOptionBuilder alloc] initWithName:@"YOUR_APP_NAME"
token:@"YOUR_APP_SDK_TOKEN"];
[optionBuilder setAutoStartTrackingEnabled:NO];
AirbridgeOption* option = [optionBuilder build];
[Airbridge initializeSDKWithOption:option];
...
[Airbridge startTracking];提示
此功能并非必需功能,请在设置前确认需求。
Opt-out 政策是指在用户拒绝之前使用用户信息。
将 setAutoStartTrackingEnabled 函数设置为 true 后,在无法再收集事件时调用 stopTracking 函数。从调用 stopTracking 函数的时刻起,将不再收集事件。
import Airbridge
...
let option = AirbridgeOptionBuilder(name: "YOUR_APP_NAME", token: "YOUR_APP_SDK_TOKEN")
    .setAutoStartTrackingEnabled(true)
    .build()
Airbridge.initializeSDK(option: option)
...
Airbridge.stopTracking()#import <Airbridge/Airbridge.h>
...
AirbridgeOptionBuilder* optionBuilder = [[AirbridgeOptionBuilder alloc] initWithName:@"YOUR_APP_NAME"
token:@"YOUR_APP_SDK_TOKEN"];
[optionBuilder setAutoStartTrackingEnabled:YES];
AirbridgeOption* option = [optionBuilder build];
[Airbridge initializeSDKWithOption:option];
...
[Airbridge stopTracking];提示
此功能并非必需功能,请在设置前确认需求。
您可以通过 SDK 签名防止 SDK 伪造 (SDK Spoofing)。
SDK 签名设置需要 SDK 签名凭证。SDK 签名凭证包括 Secret 和 Secret ID。您可以在 Airbridge 面板中获取所需的 SDK 签名凭证。SDK 签名凭证的更多信息,请参阅 本指南。
您可以通过在 SDK 初始化代码之前调用 setSDKSignature 函数来设置 SDK 签名。
import Airbridge
...
let option = AirbridgeOptionBuilder(name: "YOUR_APP_NAME", token: "YOUR_APP_SDK_TOKEN")
    .setSDKSignature(
        id: "YOUR_SDK_SIGNATURE_SECRET_ID",
        secret: "YOUR_SDK_SIGNATURE_SECRET"
    )
    .build()
Airbridge.initializeSDK(option: option)#import <Airbridge/Airbridge.h>
...
AirbridgeOptionBuilder* optionBuilder = [[AirbridgeOptionBuilder alloc] initWithName:@"YOUR_APP_NAME"
token:@"YOUR_APP_SDK_TOKEN"];
[optionBuilder setSDKSignatureWithId:@"YOUR_SDK_SIGNATURE_SECRET_ID"
secret:@"YOUR_SDK_SIGNATURE_SECRET"];
AirbridgeOption* option = [optionBuilder build];
[Airbridge initializeSDKWithOption:option];SDK 设置需要以下信息:
YOUR_APP_NAME:Airbridge App 名称,可以在 Airbridge 面板的 [设置]>[Token] 中获取。YOUR_APP_SDK_TOKEN:Android SDK Token,可以在 Airbridge 面板的 [设置]>[Token] 中获取。YOUR_SDK_SIGNATURE_SECRET:Secret,可以在 Airbridge 面板的 [规则管理]>[作弊验证规则]>[SDK 签名] 中获取。YOUR_SDK_SIGNATURE_SECRET_ID:Secret ID,可以在 Airbridge 面板的 [规则管理]>[作弊验证规则]>[SDK 签名] 中获取。
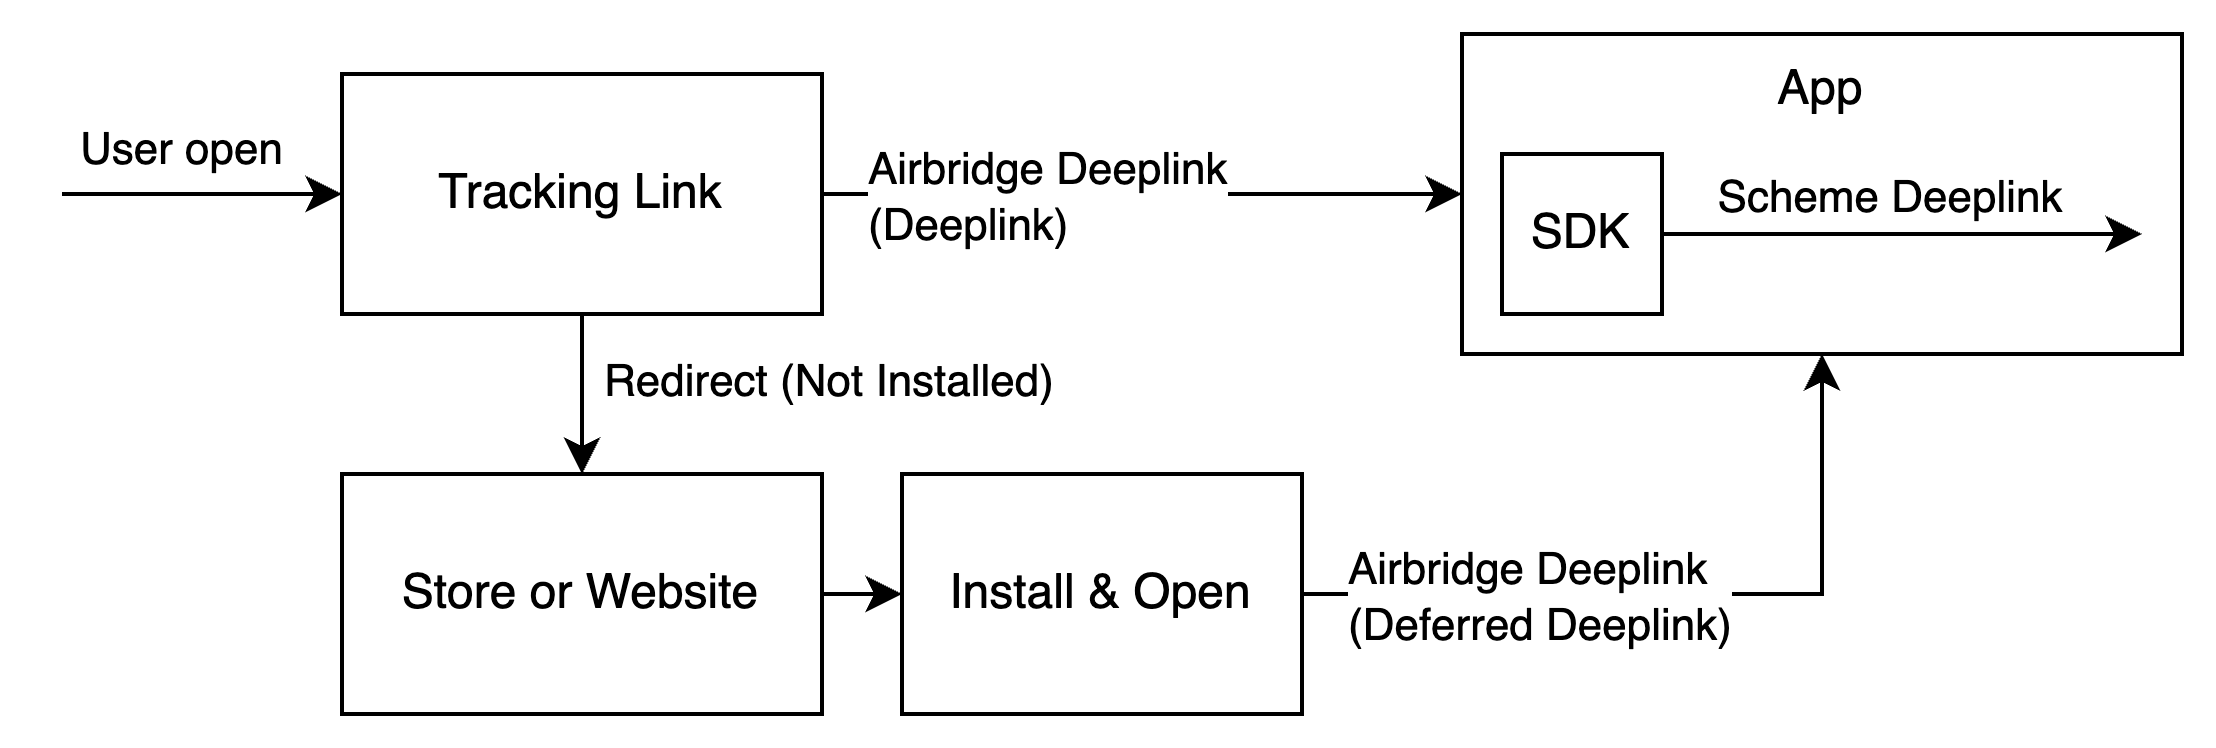
您可以通过设置深度链接,将点击包含追踪链接的广告的用户跳转至 App 的特定页面。此外,还可以基于追踪链接收集的信息,在 Airbridge 面板查看通过深度链接产生的绩效。
Airbridge 会根据环境自动选用最适合的 Airbridge 深度链接来实现用户跳转。用于实现用户跳转的链接被称为 URI Scheme 深度链接。
示例:
Airbridge 深度链接:
https://YOUR_APP_NAME.airbridge.io/~~~URI Scheme 深度链接:
YOUR_SCHEME://product/12345
当 App 已安装时,用户点击追踪链接后,App 将通过 Airbridge 深度链接打开。随后,Airbridge SDK 会将该 Airbridge 深度链接转换为追踪链接中配置的 URI Scheme 深度链接,并将转换后的 URI Scheme 深度链接传递给 App。
当 App 未安装时,用户点击追踪链接后,Airbridge 会保存深度链接信息。用户被发送至应用商店或网站安装并打开 App 后,Airbridge SDK 会将保存的 Airbridge 深度链接转换为 URI Scheme 深度链接,并将转换后的 URI Scheme 深度链接传递给 App。
按照以下步骤设置深度链接。准备在 Airbridge 面板中注册的深度链接信息和用户跳转目的地的 App 内页面地址。
首先,在 Airbridge 面板注册深度链接信息:
进入 Airbridge 面板 [追踪链接]>[深度链接] 页面,注册以下信息:
iOS URI Scheme
输入用于深度链接的 URI Scheme。只有使用已注册 URI Scheme 的深度链接才能配置至追踪链接中,且当 App 通过追踪链接打开时,该 URI Scheme 深度链接将传递至 App。
示例:scheme://
iOS App ID
从 Apple Developer 的 App [Identifier] 页面,获取 App ID Prefix 和 Bundle ID,并以 App ID Prefix+.+Bundle ID 格式输入 iOS App ID。
示例:9JA89QQLNQ.com.apple.wwdc
注意
为确保正确的用户跳转,请为正式版 App 和 开发用 App 注册不同的 iOS URI Scheme 和 iOS App ID。
在 Airbridge 面板注册深度链接信息后,需要在 App 中设置深度链接。需要的开发工作如下:
进行以下设置,以确保用户点击追踪链接后,App 能通过 Airbridge 深度链接启用。
URI Scheme 深度链接设置
1. 在 Xcode 中,进入 [YOUR_PROJECT]>[Info]>[URL Types]。
2. 点击 “+”,并在 URL Schemes 中输入已在 Airbridge 面板中注册的 iOS URI Scheme。
注意
必须输入不包括
://的 iOS URI Scheme。
Universal Link 设置
1. 在 Xcode 中,进入 [YOUR_PROJECT]>[Signing & Capabilities]。
2. 点击 “+ Capability” 以添加 Associated Domains。
3. 将 applinks:YOUR_APP_NAME.airbridge.io 和 applinks:YOUR_APP_NAME.abr.ge 添加至 Associated Domains。YOUR_APP_NAME 可在 Airbridge 面板 [设置]>[Token] 中获取。
注意
如果您正在使用或计划使用 Password AutoFill 功能,则必须添加 Webcredentials 域名。否则用户可能会看到通过 Password AutoFill 功能保存的密码域名显示为 airbridge.io 或 abr.ge。
更多信息请参阅 本指南。
当 App 通过深度链接打开时,调用 trackDeeplink 函数,以便 SDK 能收集深度链接打开事件。随后调用 handleDeeplink 函数,将 Airbridge 深度链接转换为原始追踪链接中配置的 URI Scheme 深度链接。最后,引导用户跳转至预设页面。
当 App 是通过 Airbridge 深度链接打开时,isAirbridgeDeeplink 将返回 true,且向回调中的 uri 传递所配置的 URI Scheme 深度链接。若 App 是通过其他深度链接打开,则 isAirbridgeDeeplink 为 false,且不会触发回调。可据此区分处理 Airbridge 深度链接。
import Airbridge
...
/** when app is opened with deeplink */

// track deeplink
Airbridge.trackDeeplink(url: url)
// handle deeplink
var isAirbridgeDeeplink = Airbridge.handleDeeplink(url: url) { url in
    // when app is opened with airbridge deeplink
    // show proper content using url (YOUR_SCHEME://...)
    handleAirbridgeDeeplink(url: url)
}
if isAirbridgeDeeplink { return }
// when app is opened with other deeplink
// use existing logic as it is#import <Airbridge/Airbridge.h>
...
/** when app is opened with deeplink */
// track deeplink
[Airbridge trackDeeplinkWithUrl:url];
// handle deeplink
BOOL isAirbridgeDeeplink = [Airbridge handleDeeplinkWithUrl:url onSuccess:^(NSURL* url) {
// when app is opened with airbridge deeplink
// show proper content using url (YOUR_SCHEME://...)
}];
if (isAirbridgeDeeplink) { return; }
// when app is opened with other deeplink
// use existing logic as it is根据 App 所采用的生命周期,在每次通过深度链接打开 App 时,调用 trackDeeplink 与 handleDeeplink 函数,以收集深度链接打开事件并实现用户跳转。
在不同生命周期中,当 App 通过深度链接打开时,将触发以下回调:
生命周期 | 回调 |
|---|---|
SceneDelegate | scene:willConnectTo:options: scene:openURLContexts: scene:continue: |
AppDelegate | application:open:options: application:continue:restorationHandler: |
SwiftUI | onOpenURL |
import UIKit
import Airbridge

@main
class SceneDelegate: UIResponder, UIWindowSceneDelegate {
    // when app is opened with airbridge deeplink
    func handleAirbridgeDeeplink(url: URL) {
        // show proper content using url (YOUR_SCHEME://...)
    }

    // when terminated app is opened with scheme deeplink or universal links
    func scene(
        _ scene: UIScene,
        willConnectTo session: UISceneSession,
        options connectionOptions: UIScene.ConnectionOptions
    ) {
        // when app is opened with scheme deeplink
        if let url = connectionOptions.urlContexts.first?.url {
            // track deeplink
            Airbridge.trackDeeplink(url: url)
            // handle deeplink
            var isAirbridgeDeeplink = Airbridge.handleDeeplink(url: url) { url in
                // when app is opened with airbridge deeplink
                // show proper content using url (YOUR_SCHEME://...)
                handleAirbridgeDeeplink(url: url)
            }
            if isAirbridgeDeeplink { return }
            // when app is opened with other deeplink
            // use existing logic as it is
        }
        // when app is opened with universal links
        else if let userActivity = connectionOptions.userActivities.first {
            // track deeplink
            Airbridge.trackDeeplink(userActivity: userActivity)
            // handle deeplink
            var isAirbridgeDeeplink = Airbridge.handleDeeplink(userActivity: userActivity) { url in
                // when app is opened with airbridge deeplink
                // show proper content using url (YOUR_SCHEME://...)
                handleAirbridgeDeeplink(url: url)
            }
            if isAirbridgeDeeplink { return }
            // when app is opened with other deeplink
            // use existing logic as it is
        }
    }

    // when backgrounded app is opened with scheme deeplink
    func scene(
        _ scene: UIScene,
        openURLContexts URLContexts: Set<UIOpenURLContext>
    ) {
        guard let url = URLContexts.first?.url else { return }
        // track deeplink
        Airbridge.trackDeeplink(url: url)
        // handle deeplink
        var isAirbridgeDeeplink = Airbridge.handleDeeplink(url: url) { url in
            // when app is opened with airbridge deeplink
            // show proper content using url (YOUR_SCHEME://...)
            handleAirbridgeDeeplink(url: url)
        }
        if isAirbridgeDeeplink { return }
        // when app is opened with other deeplink
        // use existing logic as it is
    }

    // when backgrounded app is opened with universal links
    func scene(
        _ scene: UIScene,
        continue userActivity: NSUserActivity
    ) {
        // track deeplink
        Airbridge.trackDeeplink(userActivity: userActivity)
        // handle deeplink
        var isAirbridgeDeeplink = Airbridge.handleDeeplink(userActivity: userActivity) { url in
            // when app is opened with airbridge deeplink
            // show proper content using url (YOUR_SCHEME://...)
            handleAirbridgeDeeplink(url: url)
        }
        if isAirbridgeDeeplink { return }
        // when app is opened with other deeplink
        // use existing logic as it is
    }
}import UIKit
import Airbridge
@main
class AppDelegate: UIResponder, UIApplicationDelegate {
// when app is opened with airbridge deeplink
func handleAirbridgeDeeplink(url: URL) {
// show proper content using url (YOUR_SCHEME://...)
}
// when app is opened with scheme deeplink
func application(
_ app: UIApplication,
open url: URL,
options: [UIApplication.OpenURLOptionsKey : Any] = [:]
) -> Bool {
// track deeplink
Airbridge.trackDeeplink(url: url)
// handle deeplink
var isAirbridgeDeeplink = Airbridge.handleDeeplink(url: url) { url in
// when app is opened with airbridge deeplink
// show proper content using url (YOUR_SCHEME://...)
handleAirbridgeDeeplink(url: url)
}
if isAirbridgeDeeplink { return true }
// when app is opened with other deeplink
// use existing logic as it is
return isAirbridgeDeeplink
}
// when app is opened with universal links
func application(
_ application: UIApplication,
continue userActivity: NSUserActivity,
restorationHandler: @escaping ([UIUserActivityRestoring]?) -> Void
) -> Bool {
// track deeplink
Airbridge.trackDeeplink(userActivity: userActivity)
// handle deeplink
var isAirbridgeDeeplink = Airbridge.handleDeeplink(userActivity: userActivity) { url in
// when app is opened with airbridge deeplink
// show proper content using url (YOUR_SCHEME://...)
handleAirbridgeDeeplink(url: url)
}
if isAirbridgeDeeplink { return true }
// when app is opened with other deeplink
// use existing logic as it is
return isAirbridgeDeeplink
}
}import SwiftUI
import Airbridge
@main
struct ActualApp: App {
var body: some Scene {
WindowGroup {
ContentView()
// when app is opened with scheme deeplink or universal links
.onOpenURL { url in
// track deeplink
Airbridge.trackDeeplink(url: url)
// handle deeplink
var isAirbridgeDeeplink = Airbridge.handleDeeplink(url: url) { url in
// when app is opened with airbridge deeplink
// show proper content using url (YOUR_SCHEME://...)
}
if isAirbridgeDeeplink { return }
// when app is opened with other deeplink
// use existing logic as it is
}
}
}
}#import "AppDelegate.h"
#import <Airbridge/Airbridge.h>
@interface SceneDelegate ()
@end
@implementation SceneDelegate
// when app is opened with airbridge deeplink
- (void)handleAirbridgeDeeplink:(NSURL *)url {
// show proper content using url (YOUR_SCHEME://...)
}
// when terminated app is opened with scheme deeplink or universal links
- (void)scene:(UIScene *)scene willConnectToSession:(UISceneSession *)session options:(UISceneConnectionOptions *)connectionOptions {
// when app is opened with scheme deeplink
NSURL* url = connectionOptions.URLContexts.allObjects.firstObject.URL;
NSUserActivity* userActivity = connectionOptions.userActivities.allObjects.firstObject;
if (url != nil) {
// track deeplink
[Airbridge trackDeeplinkWithUrl:url];
// handle deeplink
BOOL isAirbridgeDeeplink = [Airbridge handleDeeplinkWithUrl:url onSuccess:^(NSURL* url) {
// when app is opened with airbridge deeplink
// show proper content using url (YOUR_SCHEME://...)
[self handleAirbridgeDeeplink:url];
}];
if (isAirbridgeDeeplink) { return; }
// when app is opened with other deeplink
// use existing logic as it is
}
else if (userActivity != nil) {
// track deeplink
[Airbridge trackDeeplinkWithUserActivity:userActivity];
// handle deeplink
BOOL isAirbridgeDeeplink = [Airbridge handleDeeplinkWithUserActivity:userActivity onSuccess:^(NSURL* url) {
// when app is opened with airbridge deeplink
// show proper content using url (YOUR_SCHEME://...)
[self handleAirbridgeDeeplink:url];
}];
if (isAirbridgeDeeplink) { return; }
// when app is opened with other deeplink
// use existing logic as it is
}
}
// when backgrounded app is opened with scheme deeplink
- (void)scene:(UIScene *)scene openURLContexts:(NSSet<UIOpenURLContext *> *)URLContexts {
NSURL* url = URLContexts.allObjects.firstObject.URL;
if (url == nil) { return; }
// track deeplink
[Airbridge trackDeeplinkWithUrl:url];
// handle deeplink
BOOL isAirbridgeDeeplink = [Airbridge handleDeeplinkWithUrl:url onSuccess:^(NSURL* url) {
// when app is opened with airbridge deeplink
// show proper content using url (YOUR_SCHEME://...)
[self handleAirbridgeDeeplink:url];
}];
if (isAirbridgeDeeplink) { return; }
// when app is opened with other deeplink
// use existing logic as it is
}
// when backgrounded app is opened with universal links
- (void)scene:(UIScene *)scene continueUserActivity:(NSUserActivity *)userActivity {
// track deeplink
[Airbridge trackDeeplinkWithUserActivity:userActivity];
// handle deeplink
BOOL isAirbridgeDeeplink = [Airbridge handleDeeplinkWithUserActivity:userActivity onSuccess:^(NSURL* url) {
// when app is opened with airbridge deeplink
// show proper content using url (YOUR_SCHEME://...)
[self handleAirbridgeDeeplink:url];
}];
if (isAirbridgeDeeplink) { return; }
// when app is opened with other deeplink
// use existing logic as it is
}
@end#import "AppDelegate.h"
#import <Airbridge/Airbridge.h>
@interface AppDelegate ()
@end
@implementation AppDelegate
// when app is opened with airbridge deeplink
- (void)handleAirbridgeDeeplink:(NSURL *)url {
// show proper content using url (YOUR_SCHEME://...)
}
// when app is opened with scheme deeplink
- (BOOL)application:(UIApplication *)app openURL:(NSURL *)url options:(NSDictionary<UIApplicationOpenURLOptionsKey,id> *)options {
// track deeplink
[Airbridge trackDeeplinkWithUrl:url];
// handle deeplink
BOOL isAirbridgeDeeplink = [Airbridge handleDeeplinkWithUrl:url onSuccess:^(NSURL* url) {
// when app is opened with airbridge deeplink
// show proper content using url (YOUR_SCHEME://...)
[self handleAirbridgeDeeplink:url];
}];
if (isAirbridgeDeeplink) { return YES; }
// when app is opened with other deeplink
// use existing logic as it is
return isAirbridgeDeeplink;
}
// when app is opened with universal links
- (BOOL)application:(UIApplication *)application continueUserActivity:(NSUserActivity *)userActivity restorationHandler:(void (^)(NSArray<id<UIUserActivityRestoring>> * _Nullable))restorationHandler {
// track deeplink
[Airbridge trackDeeplinkWithUserActivity:userActivity];
// handle deeplink
BOOL isAirbridgeDeeplink = [Airbridge handleDeeplinkWithUserActivity:userActivity onSuccess:^(NSURL* url) {
// when app is opened with airbridge deeplink
// show proper content using url (YOUR_SCHEME://...)
[self handleAirbridgeDeeplink:url];
}];
if (isAirbridgeDeeplink) { return YES; }
// when app is opened with other deeplink
// use existing logic as it is
return isAirbridgeDeeplink;
}
@end当 App 未安装时,如果用户点击了设置了延迟深度链接的追踪链接,Airbridge 会保存深度链接信息。Airbridge SDK 会通过以下方法来获取保存的深度链接:
Airbridge SDK 在初始化以后,如果满足以下所有条件,会尝试获取深度链接。如果在获取深度链接的过程中 App 被关闭,Airbridge SDK 会将视为没有保存的深度链接。
已设置 Opt-in 时调用
Airbridge.startTracking函数;或未设置 Opt-in。用户在 ATT 弹窗中做出选择,或 ATT 弹窗中设置的事件收集延迟时间已到期。
Airbridge.handleDeferredDeeplink 函数在获取已保存的 Airbridge 深度链接后,会将 Airbridge 深度链接转换为 URI Scheme 深度链接,并将转换后的 URI Scheme 深度链接传递给 App。转换后的 URI Scheme 深度链接将用户发送至设置的目的页面。
import Airbridge
...
let option = AirbridgeOptionBuilder(name: "YOUR_APP_NAME", token: "YOUR_APP_SDK_TOKEN")
    .build()
Airbridge.initializeSDK(option: option)
...
let isFirstCalled = Airbridge.handleDeferredDeeplink() { url in
    // when handleDeferredDeeplink is called firstly after install
    if let url {
        // show proper content using url (YOUR_SCHEME://...)
    }
}#import <Airbridge/Airbridge.h>
...
AirbridgeOptionBuilder* optionBuilder = [[AirbridgeOptionBuilder alloc] initWithName:@"YOUR_APP_NAME"
token:@"YOUR_APP_SDK_TOKEN"];
AirbridgeOption* option = [optionBuilder build];
[Airbridge initializeSDKWithOption:option];
...
BOOL isFirstCalled = [Airbridge handleDeferredDeeplinkOnSuccess:^(NSURL* url) {
// when handleDeferredDeeplink is called firstly after install
if (url != nil) {
// show proper content using url (YOUR_SCHEME://...)
}
}];Airbridge.handleDeferredDeeplink 函数在 App 安装后首次被调用时会返回 true,并等待获取 Airbridge 深度链接,将其转换为 URI Scheme 深度链接后传递给 onSuccess。您可以使用该 URI Scheme 深度链接将用户发送至预设目标页面。
如果没有保存的 Airbridge 深度链接,则会向 onSuccess 传递 nil。如果 SDK 尚未初始化,或 Airbridge.handleDeferredDeeplink 函数并非首次被调用,则会返回 false。
传递的 URI Scheme 深度链接通常是 YOUR_SCHEME://... 格式的 URL。如果使用 Meta Deferred App Link 等服务,则可能会传递其他格式的 URL。
Airbridge SDK 会根据设置从您的服务中收集特定用户行为,并将其作为应用内事件发送。
Hybrid App 设置
在 Hybrid App 中,无需更改网站代码,即可通过设置使 iOS SDK 处理应用内网站上出现的与 Airbridge 相关的操作。
为了发送事件,需要调用 Airbridge.trackEvent 函数。Airbridge.trackEvent 函数构成要素及其必需性如下。
static func trackEvent(
    category: String
)

static func trackEvent(
    category: String,
    semanticAttributes: [String : Any]
)

static func trackEvent(
    category: String,
    semanticAttributes: [String : Any],
    customAttributes: [String : Any]
)+ (void)trackEventWithCategory:(NSString*)category
+ (void)trackEventWithCategory:(NSString*)category
semanticAttributes:(NSDictionary*)semanticAttributes
+ (void)trackEventWithCategory:(NSString*)category
semanticAttributes:(NSDictionary*)semanticAttributes
customAttributes:(NSDictionary*)customAttributes构成要素 | 是否必需 | 类型 | 说明 |
|---|---|---|---|
category | 必需 | String | 事件名称 |
semanticAttributes | 可选 | [String: Any] | 事件标准属性 |
customAttributes | 可选 | [String: Any] | 事件自定义属性 |
各构成要素的定义和可用数据类型请参阅下文:
Airbridge SDK 提供的标准事件的 Category 可在 AirbridgeCategory 中查看。您也可以输入从标准事件列表中获取的 Category。
自定义事件可以通过输入在 事件结构(Event Taxonomy)中定义的事件名称发送。
请参阅以下的示例。
import Airbridge
...
// track standard event (provided by sdk)
Airbridge.trackEvent(category: AirbridgeCategory.ORDER_COMPLETED)
// track standard event (not provided by sdk)
Airbridge.trackEvent(category: "airbridge.ecommerce.order.canceled")
// track custom event
Airbridge.trackEvent(category: "eventViewed")#import <Airbridge/Airbridge.h>
...
// track standard event (provided by sdk)
[Airbridge trackEventWithCategory:AirbridgeCategory.ORDER_COMPLETED];
// track standard event (not provided by sdk)
[Airbridge trackEventWithCategory:@"airbridge.ecommerce.order.canceled"];
// track custom event
[Airbridge trackEventWithCategory:@"eventViewed"];注意
Airbridge SDK v4 的 Attribute 与旧版本不同。旧版本的 Attribute 不包含 Action、Label 和 Value。
您可以通过 Attribute 收集有关事件的详细信息。
Action、Label:收集可在 Airbridge 报告中用作分组的信息。
Value:收集用于分析收入的信息。通过 Value 收集的数据可用于计算。
Semantic Attribute:Airbridge 预定义的属性。
Custom Attribute:由 Airbridge 客户自定义的属性。
您可以通过 Airbridge.trackEvent 函数的 semanticAttributes 参数输入 Action、Label、Value 和 Semantic Attribute,并通过 customAttributes 参数输入 Custom Attribute。
Airbridge 提供的 Semantic Attribute 如下:
请参阅以下的示例。
import Airbridge
...
Airbridge.trackEvent(
    category: AirbridgeCategory.ORDER_COMPLETED,
    semanticAttributes: [
        // action
        AirbridgeAttribute.ACTION: "Tool",
        // label
        AirbridgeAttribute.LABEL: "Hammer",
        // value
        AirbridgeAttribute.VALUE: 10,
        // semantic attribute (provided by sdk)
        AirbridgeAttribute.CURRENCY: "USD",
        AirbridgeAttribute.PRODUCTS: [
            [
                // semantic attribute value (provided by sdk)
                AirbridgeAttribute.PRODUCT_ID: "12345",
                // semantic attribute value (not provided by sdk)
                "name": "PlasticHammer",
            ],
        ],
        // semantic attribute (not provided by sdk)
        "totalQuantity": 1,
    ],
    customAttributes: [
        // custom attribute
        "promotion": "FirstPurchasePromotion",
    ]
)#import <Airbridge/Airbridge.h>
...
[Airbridge trackEventWithCategory:@"event" semanticAttributes:@{
// action
AirbridgeAttribute.ACTION: @"Tool",
// label
AirbridgeAttribute.LABEL: @"Hammer",
// value
AirbridgeAttribute.VALUE: @(10),
// semantic attribute (provided by sdk)
AirbridgeAttribute.CURRENCY: @"USD",
AirbridgeAttribute.PRODUCTS: @[
@{
// semantic attribute value (provided by sdk)
AirbridgeAttribute.PRODUCT_ID: @"12345",
// semantic attribute value (not provided by sdk)
@"name": @"PlasticHammer",
},
],
// semantic attribute (not provided by sdk)
@"totalQuantity": @(1),
}, customAttributes:@{
// custom attribute
@"promotion": @"FirstPurchasePromotion",
}];注意
Semantic Attribute 和 Custom Attribute 仅支持 JSON 数据类型。
JSON 类型:String、Number、Boolean、Object<String, JSON>、Array<JSON>
Semantic Attribute 和 Custom Attribute 不支持的类型:Struct、Class 等
SDK 提供的标准事件 Category 和 Semantic Attribute 如下:
键 | 类型 | 值 |
|---|---|---|
SIGN_UP | String | airbridge.user.signup |
SIGN_IN | String | airbridge.user.signin |
SIGN_OUT | String | airbridge.user.signout |
HOME_VIEWED | String | airbridge.ecommerce.home.viewed |
PRODUCT_LIST_VIEWED | String | airbridge.ecommerce.productList.viewed |
SEARCH_RESULTS_VIEWED | String | airbridge.ecommerce.searchResults.viewed |
PRODUCT_VIEWED | String | airbridge.ecommerce.product.viewed |
ADD_PAYMENT_INFO | String | airbridge.addPaymentInfo |
ADD_TO_WISHLIST | String | airbridge.addToWishlist |
ADDED_TO_CART | String | airbridge.ecommerce.product.addedToCart |
INITIATE_CHECKOUT | String | airbridge.initiateCheckout |
ORDER_COMPLETED | String | airbridge.ecommerce.order.completed |
ORDER_CANCELED | String | airbridge.ecommerce.order.canceled |
START_TRIAL | String | airbridge.startTrial |
SUBSCRIBE | String | airbridge.subscribe |
UNSUBSCRIBE | String | airbridge.unsubscribe |
AD_IMPRESSION | String | airbridge.adImpression |
AD_CLICK | String | airbridge.adClick |
COMPLETE_TUTORIAL | String | airbridge.completeTutorial |
ACHIEVE_LEVEL | String | airbridge.achieveLevel |
UNLOCK_ACHIEVEMENT | String | airbridge.unlockAchievement |
RATE | String | airbridge.rate |
SHARE | String | airbridge.share |
SCHEDULE | String | airbridge.schedule |
SPEND_CREDITS | String | airbridge.spendCredits |
键 | 类型 | 值 |
|---|---|---|
ACTION | String | action |
LABEL | String | label |
VALUE | String | value |
CURRENCY | String | currency |
ORIGINAL_CURRENCY | String | originalCurrency |
PRODUCTS | String | products |
PRODUCT_ID | String | productID |
PRODUCT_NAME | String | name |
PRODUCT_PRICE | String | price |
PRODUCT_QUANTITY | String | quantity |
PRODUCT_CURRENCY | String | currency |
PRODUCT_POSITION | String | position |
PRODUCT_CATEGORY_ID | String | categoryID |
PRODUCT_CATEGORY_NAME | String | categoryName |
PRODUCT_BRAND_ID | String | brandID |
PRODUCT_BRAND_NAME | String | brandName |
PERIOD | String | period |
IS_RENEWAL | String | isRenewal |
RENEWAL_COUNT | String | renewalCount |
PRODUCT_LIST_ID | String | productListID |
CART_ID | String | cartID |
TRANSACTION_ID | String | transactionID |
TRANSACTION_TYPE | String | transactionType |
TRANSACTION_PAIRED_EVENT_CATEGORY | String | transactionPairedEventCategory |
TRANSACTION_PAIRED_EVENT_TIMESTAMP | String | transactionPairedEventTimestamp |
TOTAL_QUANTITY | String | totalQuantity |
QUERY | String | query |
IN_APP_PURCHASED | String | inAppPurchased |
CONTRIBUTION_MARGIN | String | contributionMargin |
ORIGINAL_CONTRIBUTION_MARGIN | String | originalContributionMargin |
LIST_ID | String | listID |
RATE_ID | String | rateID |
RATE | String | rate |
MAX_RATE | String | maxRate |
ACHIEVEMENT_ID | String | achievementID |
SHARED_CHANNEL | String | sharedChannel |
DATE_TIME | String | datetime |
DESCRIPTION | String | description |
IS_REVENUE | String | isRevenue |
PLACE | String | place |
SCHEDULE_ID | String | scheduleID |
TYPE | String | type |
LEVEL | String | level |
SCORE | String | score |
AD_PARTNERS | String | adPartners |
IS_FIRST_PER_USER | String | isFirstPerUser |
各数据类型的示例代码如下:
import Airbridge
...
Airbridge.trackEvent(
    category: "event",
    semanticAttributes: [
        AirbridgeAttribute.VALUE: 10,
    ],
    customAttributes: [
        "string": "string",
        "number": 1000,
        "boolean": true,
        "object": ["key": "value"],
        "array": ["value"],
    ]
)#import <Airbridge/Airbridge.h>
...
[Airbridge trackEventWithCategory:@"event" semanticAttributes:@{
AirbridgeAttribute.VALUE: @(10),
} customAttributes:@{
@"string": "string",
@"number": @(1000),
@"boolean": @(YES),
@"object": @{@"key": @"value"},
@"array": @[@"value"],
@"key": @"value",
}];提示
如果未配置其他设置,则将应用默认设置。请查看是否需要其他设置后再继续。
Airbridge SDK 按会话支持用户触发的事件。当满足以下任一条件时,会话将结束:
App 移至后台或关闭
App 处于前台时会话过期
如果会话结束后启用 App 或触发事件,则会开启新的会话。
默认会话超时设置为 300 秒。您可以使用 setSessionTimeout 函数修改此值,最长可达 604,800 秒(7 天)。
import Airbridge
...
let option = AirbridgeOptionBuilder(name: "YOUR_APP_NAME", token: "YOUR_APP_SDK_TOKEN")
    .setSessionTimeout(second: 300)
    .build()
Airbridge.initializeSDK(option: option)#import <Airbridge/Airbridge.h>
...
AirbridgeOptionBuilder* optionBuilder = [[AirbridgeOptionBuilder alloc] initWithName:@"YOUR_APP_NAME"
token:@"YOUR_APP_SDK_TOKEN"];
[optionBuilder setSessionTimeoutWithSecond:300];
AirbridgeOption* option = [optionBuilder build];
[Airbridge initializeSDKWithOption:option];注意
Airbridge SDK 会收集开启新会话的 Open 事件和 Foreground 事件。但在会话持续期间,这些事件不会被收集。如果希望在会话持续期间收集这些事件,则需要进行 额外设置。
默认事件发送周期为 0 秒。可以使用 setEventTransmitInterval 函数修改此值,最长可达 86,400 秒(1 天)。
请参阅以下示例:
import Airbridge
...
let option = AirbridgeOptionBuilder(name: "YOUR_APP_NAME", token: "YOUR_APP_SDK_TOKEN")
    .setEventTransmitInterval(second: 0)
    .build()
Airbridge.initializeSDK(option: option)#import <Airbridge/Airbridge.h>
...
AirbridgeOptionBuilder* optionBuilder = [[AirbridgeOptionBuilder alloc] initWithName:@"YOUR_APP_NAME"
token:@"YOUR_APP_SDK_TOKEN"];
[optionBuilder setEventTransmitIntervalWithSecond:0];
AirbridgeOption* option = [optionBuilder build];
[Airbridge initializeSDKWithOption:option];SDK 可保存的事件数量及存储容量的默认值与最大值如下所示:
事件数量 | 事件存储容量 | |
|---|---|---|
默认值 | INT_MAX | 1024 GiB |
最大值 | INT_MAX | 1024 GiB |
若需限制事件数量,使用 setEventBufferCountLimit 函数;若需限制事件存储容量,使用 setEventBufferSizeLimit 函数进行分别设置。
请参阅以下示例:
import Airbridge
...
let option = AirbridgeOptionBuilder(name: "YOUR_APP_NAME", token: "YOUR_APP_TOKEN")
    .setEventBufferCountLimit(Int.max)
    .setEventBufferSizeLimit(gibibyte: 1024)
    .build()
Airbridge.initializeSDK(option: option)#import <Airbridge/Airbridge.h>
...
AirbridgeOptionBuilder* optionBuilder = [[AirbridgeOptionBuilder alloc] initWithName:@"YOUR_APP_NAME"
token:@"YOUR_APP_TOKEN"];
[optionBuilder setEventBufferCountLimit:INT_MAX];
[optionBuilder setEventBufferSizeLimitWithGibibyte:1024];
AirbridgeOption* option = [optionBuilder build];
[Airbridge initializeSDKWithOption:option];如果启用未发送事件删除选项,在 Airbridge SDK 初始化过程中未发送的所有已保存应用内事件将被删除。未发送事件删除选项默认为禁用。
您可以将 setClearEventBufferOnInitializeEnabled 函数设置为 true,以启用未发送事件删除选项。
import Airbridge
...
let option = AirbridgeOptionBuilder(name: "YOUR_APP_NAME", token: "YOUR_APP_TOKEN")
    .setClearEventBufferOnInitializeEnabled(true)
    .build()
Airbridge.initializeSDK(option: option)#import <Airbridge/Airbridge.h>
...
AirbridgeOptionBuilder* optionBuilder = [[AirbridgeOptionBuilder alloc] initWithName:@"YOUR_APP_NAME"
token:@"YOUR_APP_TOKEN"];
[optionBuilder setClearEventBufferOnInitializeEnabled:YES];
AirbridgeOption* option = [optionBuilder build];
[Airbridge initializeSDKWithOption:option];Airbridge SDK 支持在所有事件中包含设备标识符进行发送。
函数 |
说明 |
|---|---|
| 输入其他设备标识符,最多可输入 10 个 - key:最多 128 个字符,必须符合正则表达式 - value:最多 128 个字符 |
| 从设备标识符中删除指定的设备标识符 |
| 删除所有设备标识符 |
请参阅以下的示例。
import Airbridge
...
Airbridge.setDeviceAlias(key: "string", value: "string")
Airbridge.removeDeviceAlias(key: "string")
Airbridge.clearDeviceAlias()#import <Airbridge/Airbridge.h>
...
[Airbridge setDeviceAliasWithKey:@"string" value:@"string"];
[Airbridge removeDeviceAliasWithKey:@"string"];
[Airbridge clearDeviceAlias];Airbridge 收集的主要应用内事件是标准事件和自定义事件。标准事件是 Airbridge 预定义的事件,请参阅以下的示例代码:
import Airbridge
...
Airbridge.setUserID("string")
Airbridge.setUserAlias(key: "string", value: "string")
Airbridge.setUserEmail("string")
Airbridge.setUserPhone("string")
Airbridge.setUserAttribute(key: "string", value: "string")

Airbridge.trackEvent(
    category: AirbridgeCategory.SIGN_UP
)#import <Airbridge/Airbridge.h>
...
[Airbridge setUserID:@"string"];
[Airbridge setUserAliasWithKey:@"string" value:@"string"];
[Airbridge setUserEmail:@"string"];
[Airbridge setUserPhone:@"string"];
[Airbridge setUserAttributeWithKey:@"string" value:@"string"];
[Airbridge trackEventWithCategory:AirbridgeCategory.SIGN_UP];import Airbridge
...
Airbridge.setUserID("string")
Airbridge.setUserAlias(key: "string", value: "string")
Airbridge.setUserEmail("string")
Airbridge.setUserPhone("string")
Airbridge.setUserAttribute(key: "string", value: "string")
Airbridge.trackEvent(
category: AirbridgeCategory.SIGN_IN
)#import <Airbridge/Airbridge.h>
...
[Airbridge setUserID:@"string"];
[Airbridge setUserAliasWithKey:@"string" value:@"string"];
[Airbridge setUserEmail:@"string"];
[Airbridge setUserPhone:@"string"];
[Airbridge setUserAttributeWithKey:@"string" value:@"string"];
[Airbridge trackEventWithCategory:AirbridgeCategory.SIGN_IN];import Airbridge
...
Airbridge.trackEvent(
category: AirbridgeCategory.SIGN_OUT
)
Airbridge.clearUser()#import <Airbridge/Airbridge.h>
...
[Airbridge trackEventWithCategory:AirbridgeCategory.SIGN_OUT];
[Airbridge clearUser];import Airbridge
...
Airbridge.trackEvent(
category: AirbridgeCategory.HOME_VIEWED
)#import <Airbridge/Airbridge.h>
...
[Airbridge trackEventWithCategory:AirbridgeCategory.HOME_VIEWED];import Airbridge
...
Airbridge.trackEvent(
category: AirbridgeCategory.PRODUCT_LIST_VIEWED,
semanticAttributes: [
AirbridgeAttribute.LIST_ID: "84e6e236-38c4-48db-9b49-16e4cc064386",
AirbridgeAttribute.PRODUCT_CURRENCY: "USD",
AirbridgeAttribute.PRODUCTS: [
[
AirbridgeAttribute.PRODUCT_ID: "0117b32a-5a6c-4d4c-b64c-7858e07dba78",
AirbridgeAttribute.PRODUCT_NAME: "PlasticHammer",
AirbridgeAttribute.PRODUCT_PRICE: 10,
AirbridgeAttribute.PRODUCT_QUANTITY: 1,
AirbridgeAttribute.PRODUCT_CURRENCY: "USD"
],
[
AirbridgeAttribute.PRODUCT_ID: "d6ab2fbe-decc-4362-b719-d257a131e91e",
AirbridgeAttribute.PRODUCT_NAME: "PlasticFork",
AirbridgeAttribute.PRODUCT_PRICE: 1,
AirbridgeAttribute.PRODUCT_QUANTITY: 1,
AirbridgeAttribute.PRODUCT_CURRENCY: "USD"
],
],
]
)#import <Airbridge/Airbridge.h>
...
[Airbridge trackEventWithCategory:AirbridgeCategory.PRODUCT_LIST_VIEWED semanticAttributes:@{
AirbridgeAttribute.LIST_ID: @"84e6e236-38c4-48db-9b49-16e4cc064386",
AirbridgeAttribute.PRODUCT_CURRENCY: @"USD",
AirbridgeAttribute.PRODUCTS: @[
@{
AirbridgeAttribute.PRODUCT_ID: @"0117b32a-5a6c-4d4c-b64c-7858e07dba78",
AirbridgeAttribute.PRODUCT_NAME: @"PlasticHammer",
AirbridgeAttribute.PRODUCT_PRICE: @(10),
AirbridgeAttribute.PRODUCT_QUANTITY: @(1),
AirbridgeAttribute.PRODUCT_CURRENCY: @"USD",
},
@{
AirbridgeAttribute.PRODUCT_ID: @"d6ab2fbe-decc-4362-b719-d257a131e91e",
AirbridgeAttribute.PRODUCT_NAME: @"PlasticFork",
AirbridgeAttribute.PRODUCT_PRICE: @(1),
AirbridgeAttribute.PRODUCT_QUANTITY: @(1),
AirbridgeAttribute.PRODUCT_CURRENCY: @"USD",
},
],
}];import Airbridge
...
Airbridge.trackEvent(
category: AirbridgeCategory.SEARCH_RESULTS_VIEWED,
semanticAttributes: [
AirbridgeAttribute.QUERY: "Plastic",
AirbridgeAttribute.PRODUCT_CURRENCY: "USD",
AirbridgeAttribute.PRODUCTS: [
[
AirbridgeAttribute.PRODUCT_ID: "0117b32a-5a6c-4d4c-b64c-7858e07dba78",
AirbridgeAttribute.PRODUCT_NAME: "PlasticHammer",
AirbridgeAttribute.PRODUCT_PRICE: 10,
AirbridgeAttribute.PRODUCT_QUANTITY: 1,
AirbridgeAttribute.PRODUCT_CURRENCY: "USD"
],
[
AirbridgeAttribute.PRODUCT_ID: "d6ab2fbe-decc-4362-b719-d257a131e91e",
AirbridgeAttribute.PRODUCT_NAME: "PlasticFork",
AirbridgeAttribute.PRODUCT_PRICE: 1,
AirbridgeAttribute.PRODUCT_QUANTITY: 1,
AirbridgeAttribute.PRODUCT_CURRENCY: "USD"
],
],
]
)#import <Airbridge/Airbridge.h>
...
[Airbridge trackEventWithCategory:AirbridgeCategory.SEARCH_RESULTS_VIEWED semanticAttributes:@{
AirbridgeAttribute.QUERY: @"Plastic",
AirbridgeAttribute.PRODUCT_CURRENCY: @"USD",
AirbridgeAttribute.PRODUCTS: @[
@{
AirbridgeAttribute.PRODUCT_ID: @"0117b32a-5a6c-4d4c-b64c-7858e07dba78",
AirbridgeAttribute.PRODUCT_NAME: @"PlasticHammer",
AirbridgeAttribute.PRODUCT_PRICE: @(10),
AirbridgeAttribute.PRODUCT_QUANTITY: @(1),
AirbridgeAttribute.PRODUCT_CURRENCY: @"USD"
},
@{
AirbridgeAttribute.PRODUCT_ID: @"d6ab2fbe-decc-4362-b719-d257a131e91e",
AirbridgeAttribute.PRODUCT_NAME: @"PlasticFork",
AirbridgeAttribute.PRODUCT_PRICE: @(1),
AirbridgeAttribute.PRODUCT_QUANTITY: @(1),
AirbridgeAttribute.PRODUCT_CURRENCY: @"USD"
},
],
}];import Airbridge
...
Airbridge.trackEvent(
category: AirbridgeCategory.PRODUCT_VIEWED,
semanticAttributes: [
AirbridgeAttribute.PRODUCTS: [
[
AirbridgeAttribute.PRODUCT_ID: "0117b32a-5a6c-4d4c-b64c-7858e07dba78",
AirbridgeAttribute.PRODUCT_NAME: "PlasticHammer",
AirbridgeAttribute.PRODUCT_PRICE: 10,
AirbridgeAttribute.PRODUCT_QUANTITY: 1,
AirbridgeAttribute.PRODUCT_CURRENCY: "USD",
],
],
]
)#import <Airbridge/Airbridge.h>
...
[Airbridge trackEventWithCategory:AirbridgeCategory.PRODUCT_VIEWED semanticAttributes:@{
AirbridgeAttribute.PRODUCT_CURRENCY: @"USD",
AirbridgeAttribute.PRODUCTS: @[
@{
AirbridgeAttribute.PRODUCT_ID: @"0117b32a-5a6c-4d4c-b64c-7858e07dba78",
AirbridgeAttribute.PRODUCT_NAME: @"PlasticHammer",
AirbridgeAttribute.PRODUCT_PRICE: @(10),
AirbridgeAttribute.PRODUCT_QUANTITY: @(1),
AirbridgeAttribute.PRODUCT_CURRENCY: @"USD"
},
],
}];import Airbridge
...
Airbridge.trackEvent(
category: AirbridgeCategory.ADD_PAYMENT_INFO,
semanticAttributes: [
AirbridgeAttribute.TYPE: "CreditCard",
]
)#import <Airbridge/Airbridge.h>
...
[Airbridge trackEventWithCategory:AirbridgeCategory.ADD_PAYMENT_INFO semanticAttributes:@{
AirbridgeAttribute.TYPE: @"CreditCard",
}];import Airbridge
...
Airbridge.trackEvent(
category: AirbridgeCategory.ADD_TO_WISHLIST,
semanticAttributes: [
AirbridgeAttribute.LIST_ID: "189a2f8b-83ee-4074-8158-726be54e57d4",
AirbridgeAttribute.CURRENCY: "USD",
AirbridgeAttribute.PRODUCTS: [
[
AirbridgeAttribute.PRODUCT_ID: "0117b32a-5a6c-4d4c-b64c-7858e07dba78",
AirbridgeAttribute.PRODUCT_NAME: "PlasticHammer",
AirbridgeAttribute.PRODUCT_PRICE: 10,
AirbridgeAttribute.PRODUCT_QUANTITY: 1,
AirbridgeAttribute.PRODUCT_CURRENCY: "USD"
],
],
]
)#import <Airbridge/Airbridge.h>
...
[Airbridge trackEventWithCategory:AirbridgeCategory.ADD_TO_WISHLIST semanticAttributes:@{
AirbridgeAttribute.LIST_ID: @"189a2f8b-83ee-4074-8158-726be54e57d4",
AirbridgeAttribute.CURRENCY: @"USD",
AirbridgeAttribute.PRODUCTS: @[
@{
AirbridgeAttribute.PRODUCT_ID: @"0117b32a-5a6c-4d4c-b64c-7858e07dba78",
AirbridgeAttribute.PRODUCT_NAME: @"PlasticHammer",
AirbridgeAttribute.PRODUCT_PRICE: @(10),
AirbridgeAttribute.PRODUCT_QUANTITY: @(1),
AirbridgeAttribute.PRODUCT_CURRENCY: @"USD"
},
],
}];import Airbridge
...
Airbridge.trackEvent(
category: AirbridgeCategory.ADDED_TO_CART,
semanticAttributes: [
AirbridgeAttribute.CART_ID: "421eaeb7-6e80-4694-933e-f2e1a55e9cbd",
AirbridgeAttribute.CURRENCY: "USD",
AirbridgeAttribute.PRODUCTS: [
[
AirbridgeAttribute.PRODUCT_ID: "0117b32a-5a6c-4d4c-b64c-7858e07dba78",
AirbridgeAttribute.PRODUCT_NAME: "PlasticHammer",
AirbridgeAttribute.PRODUCT_PRICE: 10,
AirbridgeAttribute.PRODUCT_QUANTITY: 1,
AirbridgeAttribute.PRODUCT_CURRENCY: "USD"
],
],
]
)#import <Airbridge/Airbridge.h>
...
[Airbridge trackEventWithCategory:AirbridgeCategory.ADDED_TO_CART semanticAttributes:@{
AirbridgeAttribute.CART_ID: @"421eaeb7-6e80-4694-933e-f2e1a55e9cbd",
AirbridgeAttribute.CURRENCY: @"USD",
AirbridgeAttribute.PRODUCTS: @[
@{
AirbridgeAttribute.PRODUCT_ID: @"0117b32a-5a6c-4d4c-b64c-7858e07dba78",
AirbridgeAttribute.PRODUCT_NAME: @"PlasticHammer",
AirbridgeAttribute.PRODUCT_PRICE: @(10),
AirbridgeAttribute.PRODUCT_QUANTITY: @(1),
AirbridgeAttribute.PRODUCT_CURRENCY: @"USD"
},
],
}];import Airbridge
...
Airbridge.trackEvent(
category: AirbridgeCategory.INITIATE_CHECKOUT,
semanticAttributes: [
AirbridgeAttribute.TRANSACTION_ID: "0a7ee1ec-33da-4ffb-b775-89e80e75978a",
AirbridgeAttribute.CURRENCY: "USD",
AirbridgeAttribute.PRODUCTS: [
[
AirbridgeAttribute.PRODUCT_ID: "0117b32a-5a6c-4d4c-b64c-7858e07dba78",
AirbridgeAttribute.PRODUCT_NAME: "PlasticHammer",
AirbridgeAttribute.PRODUCT_PRICE: 10,
AirbridgeAttribute.PRODUCT_QUANTITY: 1,
AirbridgeAttribute.PRODUCT_CURRENCY: "USD"
],
[
AirbridgeAttribute.PRODUCT_ID: "d6ab2fbe-decc-4362-b719-d257a131e91e",
AirbridgeAttribute.PRODUCT_NAME: "PlasticFork",
AirbridgeAttribute.PRODUCT_PRICE: 1,
AirbridgeAttribute.PRODUCT_QUANTITY: 1,
AirbridgeAttribute.PRODUCT_CURRENCY: "USD"
],
],
]
)#import <Airbridge/Airbridge.h>
...
[Airbridge trackEventWithCategory:AirbridgeCategory.INITIATE_CHECKOUT semanticAttributes:@{
AirbridgeAttribute.TRANSACTION_ID: @"0a7ee1ec-33da-4ffb-b775-89e80e75978a",
AirbridgeAttribute.CURRENCY: @"USD",
AirbridgeAttribute.PRODUCTS: @[
@{
AirbridgeAttribute.PRODUCT_ID: @"0117b32a-5a6c-4d4c-b64c-7858e07dba78",
AirbridgeAttribute.PRODUCT_NAME: @"PlasticHammer",
AirbridgeAttribute.PRODUCT_PRICE: @(10),
AirbridgeAttribute.PRODUCT_QUANTITY: @(1),
AirbridgeAttribute.PRODUCT_CURRENCY: @"USD",
},
@{
AirbridgeAttribute.PRODUCT_ID: @"d6ab2fbe-decc-4362-b719-d257a131e91e",
AirbridgeAttribute.PRODUCT_NAME: @"PlasticFork",
AirbridgeAttribute.PRODUCT_PRICE: @(1),
AirbridgeAttribute.PRODUCT_QUANTITY: @(1),
AirbridgeAttribute.PRODUCT_CURRENCY: @"USD",
},
],
}];import Airbridge
...
Airbridge.trackEvent(
category: AirbridgeCategory.ORDER_COMPLETED,
semanticAttributes: [
AirbridgeAttribute.VALUE: 11,
AirbridgeAttribute.TRANSACTION_ID: "8065ef16-162b-4a82-b683-e51aefdda7d5",
AirbridgeAttribute.CURRENCY: "USD",
AirbridgeAttribute.IN_APP_PURCHASED: true,
AirbridgeAttribute.PRODUCTS: [
[
AirbridgeAttribute.PRODUCT_ID: "0117b32a-5a6c-4d4c-b64c-7858e07dba78",
AirbridgeAttribute.PRODUCT_NAME: "PlasticHammer",
AirbridgeAttribute.PRODUCT_PRICE: 10,
AirbridgeAttribute.PRODUCT_QUANTITY: 1,
AirbridgeAttribute.PRODUCT_CURRENCY: "USD"
],
[
AirbridgeAttribute.PRODUCT_ID: "d6ab2fbe-decc-4362-b719-d257a131e91e",
AirbridgeAttribute.PRODUCT_NAME: "PlasticFork",
AirbridgeAttribute.PRODUCT_PRICE: 1,
AirbridgeAttribute.PRODUCT_QUANTITY: 1,
AirbridgeAttribute.PRODUCT_CURRENCY: "USD"
],
],
]
)#import <Airbridge/Airbridge.h>
...
[Airbridge trackEventWithCategory:AirbridgeCategory.ORDER_COMPLETED semanticAttributes:@{
AirbridgeAttribute.VALUE: @(11),
AirbridgeAttribute.TRANSACTION_ID: @"8065ef16-162b-4a82-b683-e51aefdda7d5",
AirbridgeAttribute.CURRENCY: @"USD",
AirbridgeAttribute.IN_APP_PURCHASED: @(YES),
AirbridgeAttribute.PRODUCTS: @[
@{
AirbridgeAttribute.PRODUCT_ID: @"0117b32a-5a6c-4d4c-b64c-7858e07dba78",
AirbridgeAttribute.PRODUCT_NAME: @"PlasticHammer",
AirbridgeAttribute.PRODUCT_PRICE: @(10),
AirbridgeAttribute.PRODUCT_QUANTITY: @(1),
AirbridgeAttribute.PRODUCT_CURRENCY: @"USD"
},
@{
AirbridgeAttribute.PRODUCT_ID: @"d6ab2fbe-decc-4362-b719-d257a131e91e",
AirbridgeAttribute.PRODUCT_NAME: @"PlasticFork",
AirbridgeAttribute.PRODUCT_PRICE: @(1),
AirbridgeAttribute.PRODUCT_QUANTITY: @(1),
AirbridgeAttribute.PRODUCT_CURRENCY: @"USD"
},
],
}];import Airbridge
...
Airbridge.trackEvent(
category: AirbridgeCategory.ORDER_CANCELED,
semanticAttributes: [
AirbridgeAttribute.VALUE: 11,
AirbridgeAttribute.TRANSACTION_ID: "8065ef16-162b-4a82-b683-e51aefdda7d5",
AirbridgeAttribute.CURRENCY: "USD",
AirbridgeAttribute.IN_APP_PURCHASED: true,
AirbridgeAttribute.PRODUCTS: [
[
AirbridgeAttribute.PRODUCT_ID: "0117b32a-5a6c-4d4c-b64c-7858e07dba78",
AirbridgeAttribute.PRODUCT_NAME: "PlasticHammer",
AirbridgeAttribute.PRODUCT_PRICE: 10,
AirbridgeAttribute.PRODUCT_QUANTITY: 1,
AirbridgeAttribute.PRODUCT_CURRENCY: "USD"
],
[
AirbridgeAttribute.PRODUCT_ID: "d6ab2fbe-decc-4362-b719-d257a131e91e",
AirbridgeAttribute.PRODUCT_NAME: "PlasticFork",
AirbridgeAttribute.PRODUCT_PRICE: 1,
AirbridgeAttribute.PRODUCT_QUANTITY: 1,
AirbridgeAttribute.PRODUCT_CURRENCY: "USD"
],
],
]
)#import <Airbridge/Airbridge.h>
...
[Airbridge trackEventWithCategory:AirbridgeCategory.ORDER_CANCELED semanticAttributes:@{
AirbridgeAttribute.VALUE: @(11),
AirbridgeAttribute.TRANSACTION_ID: @"8065ef16-162b-4a82-b683-e51aefdda7d5",
AirbridgeAttribute.CURRENCY: @"USD",
AirbridgeAttribute.IN_APP_PURCHASED: @(YES),
AirbridgeAttribute.PRODUCTS: @[
@{
AirbridgeAttribute.PRODUCT_ID: @"0117b32a-5a6c-4d4c-b64c-7858e07dba78",
AirbridgeAttribute.PRODUCT_NAME: @"PlasticHammer",
AirbridgeAttribute.PRODUCT_PRICE: @(10),
AirbridgeAttribute.PRODUCT_QUANTITY: @(1),
AirbridgeAttribute.PRODUCT_CURRENCY: @"USD"
},
@{
AirbridgeAttribute.PRODUCT_ID: @"d6ab2fbe-decc-4362-b719-d257a131e91e",
AirbridgeAttribute.PRODUCT_NAME: @"PlasticFork",
AirbridgeAttribute.PRODUCT_PRICE: @(1),
AirbridgeAttribute.PRODUCT_QUANTITY: @(1),
AirbridgeAttribute.PRODUCT_CURRENCY: @"USD"
},
],
}];import Airbridge
...
Airbridge.trackEvent(
category: AirbridgeCategory.START_TRIAL,
semanticAttributes: [
AirbridgeAttribute.TRANSACTION_ID: "ef1e5271-0370-407c-b1e9-669a8df1dc2c",
AirbridgeAttribute.CURRENCY: "USD",
AirbridgeAttribute.PERIOD: "P1M",
AirbridgeAttribute.PRODUCTS: [
[
AirbridgeAttribute.PRODUCT_ID: "306a57cb-f653-4220-a208-8405d8e4d506",
AirbridgeAttribute.PRODUCT_NAME: "MusicStreamingMemebership",
AirbridgeAttribute.PRODUCT_PRICE: 15,
AirbridgeAttribute.PRODUCT_CURRENCY: "USD"
],
],
]
)#import <Airbridge/Airbridge.h>
...
[Airbridge trackEventWithCategory:AirbridgeCategory.START_TRIAL semanticAttributes:@{
AirbridgeAttribute.TRANSACTION_ID: @"ef1e5271-0370-407c-b1e9-669a8df1dc2c",
AirbridgeAttribute.CURRENCY: @"USD",
AirbridgeAttribute.PERIOD: @"P1M",
AirbridgeAttribute.PRODUCTS: @[
@{
AirbridgeAttribute.PRODUCT_ID: @"306a57cb-f653-4220-a208-8405d8e4d506",
AirbridgeAttribute.PRODUCT_NAME: @"MusicStreamingMemebership",
AirbridgeAttribute.PRODUCT_PRICE: @(15),
AirbridgeAttribute.PRODUCT_CURRENCY: @"USD"
},
],
}];import Airbridge
...
Airbridge.trackEvent(
category: AirbridgeCategory.SUBSCRIBE,
semanticAttributes: [
AirbridgeAttribute.VALUE: 15,
AirbridgeAttribute.CURRENCY: "USD",
AirbridgeAttribute.TRANSACTION_ID: "cbe718c7-e44e-4707-b5cd-4a6a29f29649",
AirbridgeAttribute.PERIOD: "P1M",
AirbridgeAttribute.IS_RENEWAL: true,
AirbridgeAttribute.PRODUCTS: [
[
AirbridgeAttribute.PRODUCT_ID: "306a57cb-f653-4220-a208-8405d8e4d506",
AirbridgeAttribute.PRODUCT_NAME: "MusicStreamingMemebership",
AirbridgeAttribute.PRODUCT_PRICE: 15,
AirbridgeAttribute.PRODUCT_CURRENCY: "USD"
],
]
]
)#import <Airbridge/Airbridge.h>
...
[Airbridge trackEventWithCategory:AirbridgeCategory.SUBSCRIBE semanticAttributes:@{
AirbridgeAttribute.VALUE: @(15),
AirbridgeAttribute.CURRENCY: @"USD",
AirbridgeAttribute.TRANSACTION_ID: @"cbe718c7-e44e-4707-b5cd-4a6a29f29649",
AirbridgeAttribute.PERIOD: @"P1M",
AirbridgeAttribute.IS_RENEWAL: @(YES),
AirbridgeAttribute.PRODUCTS: @[
@{
AirbridgeAttribute.PRODUCT_ID: @"306a57cb-f653-4220-a208-8405d8e4d506",
AirbridgeAttribute.PRODUCT_NAME: @"MusicStreamingMemebership",
AirbridgeAttribute.PRODUCT_PRICE: @(15),
AirbridgeAttribute.PRODUCT_CURRENCY: @"USD",
},
],
}];import Airbridge
...
Airbridge.trackEvent(
category: AirbridgeCategory.UNSUBSCRIBE,
semanticAttributes: [
AirbridgeAttribute.VALUE: 15,
AirbridgeAttribute.CURRENCY: "USD",
AirbridgeAttribute.TRANSACTION_ID: "cbe718c7-e44e-4707-b5cd-4a6a29f29649",
AirbridgeAttribute.IS_RENEWAL: true,
AirbridgeAttribute.PRODUCTS: [
[
AirbridgeAttribute.PRODUCT_ID: "306a57cb-f653-4220-a208-8405d8e4d506",
AirbridgeAttribute.PRODUCT_NAME: "MusicStreamingMemebership",
AirbridgeAttribute.PRODUCT_PRICE: 15,
AirbridgeAttribute.PRODUCT_CURRENCY: "USD"
]
]
]
)#import <Airbridge/Airbridge.h>
...
[Airbridge trackEventWithCategory:AirbridgeCategory.UNSUBSCRIBE semanticAttributes:@{
AirbridgeAttribute.VALUE: @(15),
AirbridgeAttribute.CURRENCY: @"USD",
AirbridgeAttribute.TRANSACTION_ID: @"cbe718c7-e44e-4707-b5cd-4a6a29f29649",
AirbridgeAttribute.IS_RENEWAL: @(YES),
AirbridgeAttribute.PRODUCTS: @[
@{
AirbridgeAttribute.PRODUCT_ID: @"306a57cb-f653-4220-a208-8405d8e4d506",
AirbridgeAttribute.PRODUCT_NAME: @"MusicStreamingMemebership",
AirbridgeAttribute.PRODUCT_PRICE: @(15),
AirbridgeAttribute.PRODUCT_CURRENCY: @"USD"
}
]
}];import Airbridge
...
Airbridge.trackEvent(
category: AirbridgeCategory.AD_IMPRESSION,
semanticAttributes: [
AirbridgeAttribute.VALUE: 0.01,
AirbridgeAttribute.AD_PARTNERS: [
"mopub": [
"app_version": "5.18.0",
"adunit_id": "12345",
"adunit_name": "12345",
"adunit_format": "Banner",
"id": "12345",
"currency": "USD",
"publisher_revenue": 12345.123,
"adgroup_id": "12345",
"adgroup_name": "12345",
"adgroup_type": "12345",
"adgroup_priority": "12345",
"country": "kr",
"precision": "publisher_defined",
"network_name": "12345",
"network_placement_id": "12345",
"demand_partner_data": "12345",
]
]
]
)#import <Airbridge/Airbridge.h>
...
[Airbridge trackEventWithCategory:AirbridgeCategory.AD_IMPRESSION semanticAttributes:@{
AirbridgeAttribute.VALUE: @(0.01),
AirbridgeAttribute.AD_PARTNERS: @{
@"mopub": @{
@"app_version": @"5.18.0",
@"adunit_id": @"12345",
@"adunit_name": @"12345",
@"adunit_format": @"Banner",
@"id": @"12345",
@"currency": @"USD",
@"publisher_revenue": @(12345.123),
@"adgroup_id": @"12345",
@"adgroup_name": @"12345",
@"adgroup_type": @"12345",
@"adgroup_priority": @"12345",
@"country": @"kr",
@"precision": @"publisher_defined",
@"network_name": @"12345",
@"network_placement_id": @"12345",
@"demand_partner_data": @"12345",
}
}
}];import Airbridge
...
Airbridge.trackEvent(
category: AirbridgeCategory.AD_CLICK,
semanticAttributes: [
AirbridgeAttribute.VALUE: 0.1,
AirbridgeAttribute.AD_PARTNERS: [
"mopub": [
"app_version": "5.18.0",
"adunit_id": "12345",
"adunit_name": "12345",
"adunit_format": "Banner",
"id": "12345",
"currency": "USD",
"publisher_revenue": 12345.123,
"adgroup_id": "12345",
"adgroup_name": "12345",
"adgroup_type": "12345",
"adgroup_priority": "12345",
"country": "kr",
"precision": "publisher_defined",
"network_name": "12345",
"network_placement_id": "12345",
"demand_partner_data": "12345",
]
]
]
)#import <Airbridge/Airbridge.h>
...
[Airbridge trackEventWithCategory:AirbridgeCategory.AD_CLICK semanticAttributes:@{
AirbridgeAttribute.VALUE: @(0.1),
AirbridgeAttribute.AD_PARTNERS: @{
@"mopub": @{
@"app_version": @"5.18.0",
@"adunit_id": @"12345",
@"adunit_name": @"12345",
@"adunit_format": @"Banner",
@"id": @"12345",
@"currency": @"USD",
@"publisher_revenue": @(12345.123),
@"adgroup_id": @"12345",
@"adgroup_name": @"12345",
@"adgroup_type": @"12345",
@"adgroup_priority": @"12345",
@"country": @"kr",
@"precision": @"publisher_defined",
@"network_name": @"12345",
@"network_placement_id": @"12345",
@"demand_partner_data": @"12345",
}
}
}];import Airbridge
...
Airbridge.trackEvent(
category: AirbridgeCategory.COMPLETE_TUTORIAL,
semanticAttributes: [
AirbridgeAttribute.DESCRIPTION: "Finish Initial Tutorial",
]
)#import <Airbridge/Airbridge.h>
...
[Airbridge trackEventWithCategory:AirbridgeCategory.COMPLETE_TUTORIAL semanticAttributes:@{
AirbridgeAttribute.DESCRIPTION: @"Finish Initial Tutorial",
}];import Airbridge
...
Airbridge.trackEvent(
category: AirbridgeCategory.ACHIEVE_LEVEL,
semanticAttributes: [
AirbridgeAttribute.LEVEL: 13,
]
)#import <Airbridge/Airbridge.h>
...
[Airbridge trackEventWithCategory:AirbridgeCategory.ACHIEVE_LEVEL semanticAttributes:@{
AirbridgeAttribute.LEVEL: @(13),
}];import Airbridge
...
Airbridge.trackEvent(
category: AirbridgeCategory.UNLOCK_ACHIEVEMENT,
semanticAttributes: [
AirbridgeAttribute.ACHIEVEMENT_ID: "36a0f0bb-b153-4be1-a3e0-3cb5b2b076c1",
AirbridgeAttribute.DESCRIPTION: "Get Score Over 50",
AirbridgeAttribute.SCORE: 80,
]
)#import <Airbridge/Airbridge.h>
...
[Airbridge trackEventWithCategory:AirbridgeCategory.UNLOCK_ACHIEVEMENT semanticAttributes:@{
AirbridgeAttribute.ACHIEVEMENT_ID: @"36a0f0bb-b153-4be1-a3e0-3cb5b2b076c1",
AirbridgeAttribute.DESCRIPTION: @"Get Score Over 50",
AirbridgeAttribute.SCORE: @(80),
}];import Airbridge
...
Airbridge.trackEvent(
category: AirbridgeCategory.RATE,
semanticAttributes: [
AirbridgeAttribute.RATE_ID: "531c64b3-4704-4780-a306-89014ec18daf",
AirbridgeAttribute.RATE: 4.5,
AirbridgeAttribute.MAX_RATE: 5,
AirbridgeAttribute.PRODUCTS: [
[
AirbridgeAttribute.PRODUCT_ID: "0117b32a-5a6c-4d4c-b64c-7858e07dba78",
AirbridgeAttribute.PRODUCT_NAME: "PlasticHammer",
AirbridgeAttribute.PRODUCT_PRICE: 10,
AirbridgeAttribute.PRODUCT_CURRENCY: "USD",
],
],
]
)#import <Airbridge/Airbridge.h>
...
[Airbridge trackEventWithCategory:AirbridgeCategory.RATE semanticAttributes:@{
AirbridgeAttribute.RATE_ID: @"531c64b3-4704-4780-a306-89014ec18daf",
AirbridgeAttribute.RATE: @(4.5),
AirbridgeAttribute.MAX_RATE: @(5),
AirbridgeAttribute.PRODUCTS: @[
@{
AirbridgeAttribute.PRODUCT_ID: @"0117b32a-5a6c-4d4c-b64c-7858e07dba78",
AirbridgeAttribute.PRODUCT_NAME: @"PlasticHammer",
AirbridgeAttribute.PRODUCT_PRICE: @(10),
AirbridgeAttribute.PRODUCT_CURRENCY: @"USD",
},
],
}];import Airbridge
...
Airbridge.trackEvent(
category: AirbridgeCategory.SHARE,
semanticAttributes: [
AirbridgeAttribute.DESCRIPTION: "Share Promotion",
AirbridgeAttribute.SHARED_CHANNEL: "CopyLink",
]
)#import <Airbridge/Airbridge.h>
...
[Airbridge trackEventWithCategory:AirbridgeCategory.SHARE semanticAttributes:@{
AirbridgeAttribute.DESCRIPTION: @"Share Promotion",
AirbridgeAttribute.SHARED_CHANNEL: @"CopyLink",
}];import Airbridge
...
Airbridge.trackEvent(
category: AirbridgeCategory.SCHEDULE,
semanticAttributes: [
AirbridgeAttribute.SCHEDULE_ID: "75712915-2cd9-4e42-a85e-8d42f356f4c6",
AirbridgeAttribute.DATE_TIME: "2024-01-01T00:00:00+00:00",
AirbridgeAttribute.PLACE: "ConferenceRoom",
AirbridgeAttribute.PRODUCTS: [
[
AirbridgeAttribute.PRODUCT_ID: "abb3e65d-17bc-4b28-89e3-5e356c0ea697",
AirbridgeAttribute.PRODUCT_NAME: "ConferenceRoom",
],
],
]
)#import <Airbridge/Airbridge.h>
...
[Airbridge trackEventWithCategory:AirbridgeCategory.SCHEDULE semanticAttributes:@{
AirbridgeAttribute.SCHEDULE_ID: @"75712915-2cd9-4e42-a85e-8d42f356f4c6",
AirbridgeAttribute.DATE_TIME: @"2024-01-01T00:00:00+00:00",
AirbridgeAttribute.PLACE: @"ConferenceRoom",
AirbridgeAttribute.PRODUCTS: @[
@{
AirbridgeAttribute.PRODUCT_ID: @"abb3e65d-17bc-4b28-89e3-5e356c0ea697",
AirbridgeAttribute.PRODUCT_NAME: @"ConferenceRoom",
},
],
}];import Airbridge
...
Airbridge.trackEvent(
category: AirbridgeCategory.SPEND_CREDITS,
semanticAttributes: [
AirbridgeAttribute.TRANSACTION_ID: "22eb193d-be11-4fe4-95da-c91a196faf1c",
AirbridgeAttribute.PRODUCT_CURRENCY: "USD",
AirbridgeAttribute.PRODUCTS: [
[
AirbridgeAttribute.PRODUCT_ID: "0117b32a-5a6c-4d4c-b64c-7858e07dba78",
AirbridgeAttribute.PRODUCT_NAME: "PlasticHammer",
AirbridgeAttribute.PRODUCT_PRICE: 10,
AirbridgeAttribute.PRODUCT_CURRENCY: "USD"
]
]
]
)#import <Airbridge/Airbridge.h>
...
[Airbridge trackEventWithCategory:AirbridgeCategory.SPEND_CREDITS semanticAttributes:@{
AirbridgeAttribute.TRANSACTION_ID: @"22eb193d-be11-4fe4-95da-c91a196faf1c",
AirbridgeAttribute.PRODUCT_CURRENCY: @"USD",
AirbridgeAttribute.PRODUCTS: @[
@{
AirbridgeAttribute.PRODUCT_ID: @"0117b32a-5a6c-4d4c-b64c-7858e07dba78",
AirbridgeAttribute.PRODUCT_NAME: @"PlasticHammer",
AirbridgeAttribute.PRODUCT_PRICE: @(10),
AirbridgeAttribute.PRODUCT_CURRENCY: @"USD"
}
]
}];自定义事件是 Airbridge 客户自定义的事件,用于追踪无法通过标准事件满足的、针对 Airbridge 客户服务定制的用户行为。请参阅以下的示例代码。
import Airbridge
...
Airbridge.trackEvent(
    category: "event",
    semanticAttributes: [
        AirbridgeAttribute.VALUE: 10,
    ],
    customAttributes: [
        "string": "string",
        "number": 1000,
        "boolean": true,
        "object": ["key": "value"],
        "array": ["value"],
    ]
)#import <Airbridge/Airbridge.h>
...
[Airbridge trackEventWithCategory:@"event" semanticAttributes:@{
AirbridgeAttribute.VALUE: @(10),
} customAttributes:@{
@"string": "string",
@"number": @(1000),
@"boolean": @(YES),
@"object": @{@"key": @"value"},
@"array": @[@"value"],
@"key": @"value",
}];您可以将用户信息随事件一同发送至 Airbridge,以基于这些信息更精确地监测跨 Web 和 App 的广告绩效。
用户 ID 是您服务中使用的用户标识符。用户 ID 必须唯一,能够在 Web 和 App 中将同一用户识别为一个用户。
函数 |
说明 |
|---|---|
| 输入用户 ID |
| 删除用户 ID |
| 输入其他用户标识符,最多可输入 10 个 - key:最多 128 个字符,必须符合正则表达式 - value:最多 1024 个字符 |
| 从输入的其他用户标识符中删除指定的标识符 |
| 删除所有输入的其他用户标识符 |
请参阅以下的示例。
import Airbridge
...
// identifier
Airbridge.setUserID("string")
Airbridge.clearUserID()
// addtional identifier
Airbridge.setUserAlias(key: "string", value: "string")
Airbridge.removeUserAlias(key: "string")
Airbridge.clearUserAlias()#import <Airbridge/Airbridge.h>
...
// identifier
[Airbridge setUserID:@"string"];
[Airbridge clearUserID];
// additional identifier
[Airbridge setUserAliasWithKey:@"string" value:@"string"];
[Airbridge removeUserAliasWithKey:@"string"];
[Airbridge clearUserAlias];注意
可能包含敏感的用户信息。发送前请咨询法律顾问。
您可以通过设置用户属性发送其他用户信息。
函数 |
说明 |
|---|---|
| 输入用户邮箱,自动进行 SHA256 哈希处理 |
| 删除用户邮箱 |
| 输入用户电话号码,自动进行 SHA256 哈希处理 |
| 删除用户电话号码 |
| 输入其他用户属性,最多可输入 100 个 - key:最多 128 个字符,必须符合正则表达式 - value:仅支持 String、Number、Boolean 类型,最多 1024 个字符 |
| 从输入的其他用户属性中删除指定属性 |
| 删除所有输入的其他用户属性 |
请参阅以下的示例。
import Airbridge
...
// email, phone
Airbridge.setUserEmail("string")
Airbridge.clearUserEmail()
Airbridge.setUserPhone("string")
Airbridge.clearUserPhone()
// addtional attribute
Airbridge.setUserAttribute(key: "string", value: "string")
Airbridge.setUserAttribute(key: "number", value: 1000)
Airbridge.removeUserAttribute(key: "string")
Airbridge.clearUserAttributes()#import <Airbridge/Airbridge.h>
...
// email, phone
[Airbridge setUserEmail:@"string"];
[Airbridge clearUserEmail];
[Airbridge setUserPhone:@"string"];
[Airbridge clearUserPhone];
// addtional attribute
[Airbridge setUserAttributeWithKey:@"string" value:@"string"];
[Airbridge setUserAttributeWithKey:@"number" value:@(1000)];
[Airbridge removeUserAttributeWithKey:@"string"];
[Airbridge clearUserAttributes];如果将 Airbridge.setHashUserInformationEnabled 函数设置为 false,则发送用户邮箱和电话号码时不会进行 SHA256 哈希处理。默认设置为 true。
import Airbridge
...
let option = AirbridgeOptionBuilder(name: "YOUR_APP_NAME", token: "YOUR_APP_SDK_TOKEN")
    .setHashUserInformationEnabled(false)
    .build()
Airbridge.initializeSDK(option: option)#import <Airbridge/Airbridge.h>
...
AirbridgeOptionBuilder* optionBuilder = [[AirbridgeOptionBuilder alloc] initWithName:@"YOUR_APP_NAME"
token:@"YOUR_APP_SDK_TOKEN"];
[optionBuilder setHashUserInformationEnabled:NO];
AirbridgeOption* option = [optionBuilder build];
[Airbridge initializeSDKWithOption:option];您可以使用 Airbridge.clearUser 函数重置用户信息。
import Airbridge
...
Airbridge.clearUser()#import <Airbridge/Airbridge.h>
...
[Airbridge clearUser];提示
此功能并非必需功能,请在设置前确认需求。
根据链接的打开方式,在 App 内正确使用追踪链接可能会有一定困难。
通过使用 Airbridge.click 函数或 Airbridge.impression 函数,您可以使用户在 App 中跳转到同一 App 的另一个页面,无需通过外部浏览器。
当用户点击 App 内的追踪链接时,会调用 Airbridge.click 函数,该函数用于根据追踪链接设置将传递 URI Scheme 深度链接,或将用户跳转到应用商店或网站。
import Airbridge
...
let isHandled = Airbridge.click(trackingLink: url) {
    // when url is tracking link and succeed
} onFailure: { error in
    // when url is tracking link and failed
    // example: url is another app's tracking link, internet is not connected
}
if !isHandled {
    // when url is not tracking link
}#import <Airbridge/Airbridge.h>
...
BOOL isHandled = [Airbridge clickWithTrackingLink:url onSuccess:^{
// when url is tracking link and succeed
} onFailure:^(NSError * _Nonnull) {
// when url is tracking link and failed
// example: url is another app's tracking link, internet is not connected
}];
if (!isHandled) {
// when url is not tracking link
}追踪链接被展示在用户界面(UI)时,将调用 Airbridge.impression 函数,该函数用于收集展示事件。
import Airbridge
...
let isHandled = Airbridge.impression(trackingLink: url) {
    // when url is tracking link and succeed
} onFailure: { error in
    // when url is tracking link and failed
}
if !isHandled {
    // when url is not tracking link
}#import <Airbridge/Airbridge.h>
...
BOOL isHandled = [Airbridge impressionWithTrackingLink:url onSuccess:^{
// when url is tracking link and succeed
} onFailure:^(NSError * _Nonnull) {
// when url is tracking link and failed
}];
if (!isHandled) {
// when url is not tracking link
}注意
如果在 Airbridge iOS SDK 1.24.0 及以上版本设置 “在 App 中使用追踪链接” 功能,每次在 App 内使用追踪链接时会记录 “深度链接页面浏览(Deeplink Pageview)” 作为 目标事件(Target Event)。如果深度链接页面浏览频繁随深度链接打开(Deeplink Open)发生,可能会影响深度链接打开的绩效。
深度链接页面浏览的的默认归因窗口为 3 天。如果希望更改此归因窗口,请联系您的 CSM。如果没有指定的 CSM,请通过 [帮助] 提交请求。
注意
Airbridge SDK 收集归因结果需要时间,因此不建议将归因结果用于需要实时处理的功能。
您可以使用 setOnAttributionReceived 函数收取归因结果数据。
import Airbridge
...
let option = AirbridgeOptionBuilder(name: "YOUR_APP_NAME", token: "YOUR_APP_SDK_TOKEN")
    .setOnAttributionReceived({ attribution in
        // when attribution is received
    })
    .build()
Airbridge.initializeSDK(option: option)#import <Airbridge/Airbridge.h>
...
AirbridgeOptionBuilder* optionBuilder = [[AirbridgeOptionBuilder alloc] initWithName:@"YOUR_APP_NAME"
token:@"YOUR_APP_SDK_TOKEN"];
[optionBuilder setOnAttributionReceived:^(NSDictionary<NSString *,NSString *> * attribution) {
// when attribution is received
}];
AirbridgeOption* option = [optionBuilder build];
[Airbridge initializeSDKWithOption:option];根据归因结果的存在与否,数据传递如下:
有归因结果时,包含以下数据的 Dictionary 将通过回调传递。所有 Key 都提供归因相关信息。例如,attributedChannel 提供归因的广告渠道信息。
归因结果会在 SDK 初始化后 1 分钟内通过回调传递。如因 App 关闭未传递归因结果,则会在下次 App 启用后 1 分钟内通过回调传递。受网络状态等因素影响,传递时间可能延迟最多 5 分钟。
Key | 类型 | 说明 |
|---|---|---|
attributedChannel | String | 渠道 |
attributedCampaign | String | 广告系列 |
attributedAdGroup | String | 广告组 |
attributedAdCreative | String | 广告素材 |
attributedContent | String | 内容 |
attributedTerm | String | 关键词 |
attributedSubPublisher | String | 子渠道 |
attributedSubSubPublisher1 | String | 二级子渠道 1 |
attributedSubSubPublisher2 | String | 二级子渠道 2 |
attributedSubSubPublisher3 | String | 二级子渠道 3 |
如果没有归因结果,则通过回调传递以下 Dictionary。从 SDK 初始化起至少需要经过 3 小时,并重新启用 App 后,才会传递无归因结果的信息。
{
    "attributedChannel": "unattributed"
}点击推送通知后,需要将 Payload 中的深度链接信息传递给 Airbridge SDK,才能收集深度链接事件。请使用 Airbridge.trackDeeplink 函数进行设置。
import Airbridge

func application(
    _ application: UIApplication,
    didReceiveRemoteNotification userInfo: [AnyHashable : Any],
    fetchCompletionHandler completionHandler: @escaping (UIBackgroundFetchResult) -> Void
) {
    if UIApplication.shared.applicationState == .inactive {
        let url = // 푸시 알림 페이로드의 딥링크

        Airbridge.trackDeeplink(url)
    }
}

func userNotificationCenter(
    _ center: UNUserNotificationCenter,
    didReceive response: UNNotificationResponse,
    withCompletionHandlercompletionHandler: @escaping () -> Void
) {
    if
        UIApplication.shared.applicationState == .inactive || UIApplication.shared.applicationState == .background,
        response.actionIdentifier == UNNotificationDefaultActionIdentifier
    {
        let url = // 푸시 알림 페이로드의 딥링크

        Airbridge.trackDeeplink(url)
    }
}#import <Airbridge/Airbridge.h>
- (void)application:(UIApplication *)application didReceiveRemoteNotification:(NSDictionary *)userInfo fetchCompletionHandler:(void (^)(UIBackgroundFetchResult))completionHandler {
if (UIApplication.sharedApplication.applicationState == UIApplicationStateInactive) {
NSURL* url = // 푸시 알림 페이로드의 딥링크
[Airbridge trackDeeplinkWithUrl:url];
}
}
- (void)userNotificationCenter:(UNUserNotificationCenter *)center didReceiveNotificationResponse:(UNNotificationResponse *)response withCompletionHandler:(void (^)(void))completionHandler {
if ((UIApplication.sharedApplication.applicationState == UIApplicationStateInactive || UIApplication.sharedApplication.applicationState == UIApplicationStateBackground)
&& [response.actionIdentifier isEqual:UNNotificationDefaultActionIdentifier])
{
NSURL* url = // 푸시 알림 페이로드의 딥링크
[Airbridge trackDeeplinkWithUrl:url];
}
}无论深度链接由何种服务生成,只要通过深度链接启用 App,Airbridge SDK 即会收集深度链接事件。如果深度链接事件收集过多,您可以将 setTrackAirbridgeDeeplinkOnlyEnabled 函数设置为 true,仅收集 Airbridge 深度链接触发的事件。
import Airbridge
...
let option = AirbridgeOptionBuilder(name: "YOUR_APP_NAME", token: "YOUR_APP_SDK_TOKEN")
    .setTrackAirbridgeDeeplinkOnlyEnabled(true)
    .build()
Airbridge.initializeSDK(option: option)#import <Airbridge/Airbridge.h>
...
AirbridgeOptionBuilder* optionBuilder = [[AirbridgeOptionBuilder alloc] initWithName:@"YOUR_APP_NAME"
token:@"YOUR_APP_SDK_TOKEN"];
[optionBuilder setTrackAirbridgeDeeplinkOnlyEnabled:YES];
AirbridgeOption* option = [optionBuilder build];
[Airbridge initializeSDKWithOption:option];Airbridge SDK 会收集开启新会话的 Open 事件和 Foreground 事件,但在会话持续期间,这些事件不会被收集。
您可以通过 setTrackInSessionLifecycleEventEnabled 函数设置为 true,以在会话持续期间也收集 Open 事件和 Foreground 事件。
所有收集到的 Foreground 事件都将被记录为 Open 事件。
import Airbridge
...
let option = AirbridgeOptionBuilder(name: "YOUR_APP_NAME", token: "YOUR_APP_SDK_TOKEN")
    .setTrackInSessionLifecycleEventEnabled(true)
    .build()
Airbridge.initializeSDK(option: option)#import <Airbridge/Airbridge.h>
...
AirbridgeOptionBuilder* optionBuilder = [[AirbridgeOptionBuilder alloc] initWithName:@"YOUR_APP_NAME"
token:@"YOUR_APP_SDK_TOKEN"];
[optionBuilder setTrackInSessionLifecycleEventEnabled:YES];
AirbridgeOption* option = [optionBuilder build];
[Airbridge initializeSDKWithOption:option];需要使用 Airbridge iOS SDK 4.0.0 及以上版本。
Airbridge SDK 支持在 Action Extension 收集事件。您可以通过以下方法在 Action Extension 使用 trackEvent 函数 收集事件。
1. 请添加 App Group。
2. 请在 Xcode 导航至 [YOUR_PROJECT]>[Signing & Capabilities]。请点击 “+ Capability” 并添加 App Groups。请在 App Groups 输入以下值。
group.YOUR_DOMAIN.YOUR_DOMAIN.YOUR_PRODUCT.airbridge
group.YOUR_DOMAIN.YOUR_DOMAIN.YOUR_PRODUCT.airbridge 不是固定值,您可以使用自定义的值。
3. 请在 App Extension 的 viewDidLoad 函数初始化 SDK。
import Airbridge
...
override func viewDidLoad() {
    super.viewDidLoad()
    let option = AirbridgeOptionBuilder(name: "YOUR_APP_NAME", token: "YOUR_APP_SDK_TOKEN")
        .setAppGroup("group.YOUR_DOMAIN.YOUR_DOMAIN.YOUR_PRODUCT.airbridge")
        .build()
    Airbridge.initializeSDK(option: option)
}#import <Airbridge/Airbridge.h>
...
- (void)viewDidLoad {
[super viewDidLoad];
AirbridgeOptionBuilder* optionBuilder = [[AirbridgeOptionBuilder alloc] initWithName:@"YOUR_APP_NAME"
token:@"YOUR_APP_SDK_TOKEN"];
[optionBuilder setAppGroup:@"group.YOUR_DOMAIN.YOUR_DOMAIN.YOUR_PRODUCT.airbridge"];
AirbridgeOption* option = [optionBuilder build];
[Airbridge initializeSDKWithOption:option];
}注意
应谨慎决定是否设置
setAppGroup。在移除或更改setAppGroup设置前,需要清除所有现有的 Airbridge SDK 数据,这可能导致意外情况,例如已收集的安装事件被重复收集。
为遵守 《数字市场法案》(Digital Markets Act,简称 DMA),用户的同意信息(User Consent)必须共享给 Airbridge。请注意,如果用户位于欧洲经济区(European Economic Area,简称 EEA),则必须始终向 Airbridge 共享用户是否位于 EEA 以及用户的同意信息。DMA 的更多信息,请参阅 本指南。
1. 请检查启用 App 的用户所在地。如果用户在 EEA(eea=1)启用了 App,则检查是否已取得该用户的同意信息。如果已取得,请继续步骤 3。
提示
Airbridge 无法提供有关存储用户同意信息或实现同意弹窗的指导。请咨询法律顾问。
2. 如果尚未取得用户的同意信息,请通过同意弹窗等方法取得用户的同意信息。必须收集 adPersonalization 和 adUserData。
注意
从 2024-03-06 起,必须对 EEA 的现有用户和新用户至少收集一次同意信息。
必须共享给 Airbridge 的用户同意信息如下。eea 值不是用户的直接响应,也不是 Airbridge 自动收集的信息。请根据用户所在地确定 eea 值并将其共享给 Airbridge。
Airbridge 字段 |
Google 字段 |
说明 |
|---|---|---|
<string> |
| 表示用户是否在 EEA,或 DMA 适用地区。该值不是用户的直接响应,也不是 Airbridge 自动收集的信息。请根据用户所在地确定 不处理除 - - |
<string> |
| 对于收集信息以提供个性化广告(Personalized Ads) 的用户同意情况。不处理除 - - |
<string> |
| 对于向 Google 发送用于广告目的用户数据的同意情况。不处理除 - - |
3. 请初始化 Airbridge SDK,并在收集用户信息之前将用户同意信息共享给 Airbridge。
注意
必须为
eea、adPersonalization和adUserData使用相同的名称。请根据收集的信息正确输入
0或1。
import Airbridge
...
let option = AirbridgeOptionBuilder(name: "YOUR_APP_NAME", token: "YOUR_APP_SDK_TOKEN")
    // make sdk require start tracking explicitly
    .setAutoStartTrackingEnabled(false)
    .build()
// initialize sdk
Airbridge.initializeSDK(option: option)
...
// deliver informations to sdk using device alias
// based on actual region
Airbridge.setDeviceAlias("eea", "0" or "1")
// based on actual user consent
Airbridge.setDeviceAlias("adPersonalization", "0" or "1")
Airbridge.setDeviceAlias("adUserData", "0" or "1")
// start tracking explicitly
Airbridge.startTracking()#import <Airbridge/Airbridge.h>
...
AirbridgeOptionBuilder* optionBuilder = [[AirbridgeOptionBuilder alloc] initWithName:@"YOUR_APP_NAME"
token:@"YOUR_APP_SDK_TOKEN"];
// make sdk require start tracking explicitly
[optionBuilder setAutoStartTrackingEnabled:NO];
AirbridgeOption* option = [optionBuilder build];
// initialize sdk
[Airbridge initializeSDKWithOption:option];
...
// deliver informations to sdk using device alias
// based on actual region
[Airbridge setDeviceAliasWithKey:@"eea" value:"0" or "1"];
// based on actual user consent
[Airbridge setDeviceAliasWithKey:@"adPersonalization" value:"0" or "1"];
[Airbridge setDeviceAliasWithKey:@"adUserData" value:"0" or "1"];
// start tracking explicitly
[Airbridge startTracking];注意
如果已设置 Meta Deferred App Link,则不得使用 Facebook SDK 的
fetchDeferredAppLink函数。
请按以下步骤在 Meta ads 中设置 延迟深度链接。Airbridge SDK 优先收集 Meta Deferred App Link,若无 Meta Deferred App Link 则收集 Airbridge 延迟深度链接。
Meta ads 中的 SKAN 广告系列不支持 Meta Deferred App Link。
1. 请安装 Facebook SDK。请参阅 Meta ads 文档。
2. 请将 Airbridge SDK 中的 setTrackMetaDeferredAppLinkEnabled 函数设置为 true。
import Airbridge
...
let option = AirbridgeOptionBuilder(name: "YOUR_APP_NAME", token: "YOUR_APP_SDK_TOKEN")
    .setTrackMetaDeferredAppLinkEnabled(true)
    .build()
Airbridge.initializeSDK(option: option)#import <Airbridge/Airbridge.h>
...
AirbridgeOptionBuilder* optionBuilder = [[AirbridgeOptionBuilder alloc] initWithName:@"YOUR_APP_NAME"
token:@"YOUR_APP_SDK_TOKEN"];
[optionBuilder setTrackMetaDeferredAppLinkEnabled:YES];
AirbridgeOption* option = [optionBuilder build];
[Airbridge initializeSDKWithOption:option];注意
如果 Airbridge SDK 在初始化后未立即启用,则可能无法收集安装(Install)、打开(Open)、深度链接(Deeplink)事件。
初始化 SDK 时,所有功能将默认启用。您可以通过将 setSDKEnabled 函数设置为 false,在禁用所有功能的状态下初始化 Airbridge SDK。
import Airbridge
...
let option = AirbridgeOptionBuilder(name: "YOUR_APP_NAME", token: "YOUR_APP_SDK_TOKEN")
    .setSDKEnabled(false)
    .build()
Airbridge.initializeSDK(option: option)#import <Airbridge/Airbridge.h>
...
AirbridgeOptionBuilder* optionBuilder = [[AirbridgeOptionBuilder alloc] initWithName:@"YOUR_APP_NAME"
token:@"YOUR_APP_SDK_TOKEN"];
[optionBuilder setSDKEnabled:NO];
AirbridgeOption* option = [optionBuilder build];
[Airbridge initializeSDKWithOption:option];或者,可以通过以下方法检查 Airbridge SDK 的启用状态,并启用或禁用所有功能。
import Airbridge
...
Airbridge.isSDKEnabled
Airbridge.enableSDK()
Airbridge.disableSDK()#import <Airbridge/Airbridge.h>
...
Airbridge.isSDKEnabled;
[Airbridge enableSDK];
[Airbridge disableSDK];Airbridge 会向过去 6 个月内执行过至少 1 次 App 事件的用户发送静默推送通知,以检查用户是否已卸载 App。此静默推送通知在每天 UTC 15:00 至 16:00 之间发送。App 卸载事件可在 Airbridge 报告和通过导出原始数据查看。
详细设置方法和说明,请参阅以下指南:
部分第三方解决方案的集成需要进行 SDK 设置。建议在通过 Airbridge SDK 收集数据之前,完成所需设置。
各第三方解决方案的集成设置,请参阅以下指南:
Airbridge SDK 提供的日志分为以下 5 个级别:Debug、Info、Warning、Error 和 Fault。 Debug 为严重性最低的日志级别,Fault 为最严重的日志级别。
Airbridge SDK 默认提供 Warning、Error 和 Fault 级别日志。通过将日志级别输入 setLogLevel 函数,可以查看从该日志级别到 Fault 级别的所有日志。
import Airbridge
...
let option = AirbridgeOptionBuilder(name: "YOUR_APP_NAME", token: "YOUR_APP_SDK_TOKEN")
    .setLogLevel(.debug)
    .build()
Airbridge.initializeSDK(option: option)#import <Airbridge/Airbridge.h>
...
AirbridgeOptionBuilder* optionBuilder = [[AirbridgeOptionBuilder alloc] initWithName:@"YOUR_APP_NAME"
token:@"YOUR_APP_SDK_TOKEN"];
[optionBuilder setLogLevel:AirbridgeLogLevelDebug];
AirbridgeOption* option = [optionBuilder build];
[Airbridge initializeSDKWithOption:option];仅查看 Airbridge SDK 日志
您可以通过在 Xcode 右下角的筛选器中输入
Subsystem: co.ab180.airbridge来仅查看 Airbridge SDK 的日志。
Was this helpful?