
Install SDK
The Airbridge React Native SDK can be installed using the method below. After installation, you can verify whether the SDK has been properly installed through testing.- Use npm to install the airbridge-react-native-sdk.
- Use CocoaPods to install the iOS dependency. The Android dependency is installed automatically.
Install Restricted SDK
NoteInstall only one version of the SDK, either the general SDK or the restricted SDK.
- Use npm to install airbridge-react-native-sdk-restricted.
- Use CocoaPods to install the iOS dependency. The Android dependency is installed automatically.
Initialize SDK
The initialization methods for iOS and Android are different. Refer to the methods described below. Note that the YOUR_APP_NAME and YOUR_APP_SDK_TOKEN can be found on the [Settings]>[Tokens] page in the Airbridge dashboard.iOS
Add the following code to theios/YOUR_PROJECT_NAME/AppDelegate.m file.
Android
Add the following code to theandroid/app/src/main/java/.../MainApplication.kt file.
AttentionWhen issues arise due to Airbridge SDK backup rule merge conflicts, please refer to the backup rule configuration in the troubleshooting guide.
Configure SDK settings
Configure the SDK settings to use the Airbridge React Native SDK.- Create an airbridge.json file at the top level of the React Native project folder, input the JSON as above, and configure the SDK settings.
- Don’t input values for keys that are not necessary for your service.
References for configuring the SDK settings
References for configuring the SDK settings
Configure ATT prompt
NoteThe functions necessary to ensure compliance with privacy policies should be reviewed with legal counsel.
- Prepare the text you will use in the ATT prompt.
- Provide the ATT prompt following this guide provided by Apple.
- If the install event is not collected, the Airbridge React Native SDK delays collecting install events for 30 seconds until the user allows tracking each time the app is launched. If the user exits the app before deciding whether to allow tracking, the SDK will not collect the install event and will try again at the next app launch.
autoDetermineTrackingAuthorizationTimeoutInSecond to set a sufficient delay time for collecting install events. The default value is 30 seconds, and it can be set to up to 3600 seconds (1 hour).
Recommended time setting for “setAutoDetermineTrackingAuthorizationTimeout” functionWhen using the DeepLink Plan, it is recommended that the
setAutoDetermineTrackingAuthorizationTimeout parameter be set to 0 seconds when configuring the ATT prompt.As the DeepLink Plan does not support attribution using identifiers, the setAutoDetermineTrackingAuthorizationTimeout parameter should be set to 0 seconds to seamlessly redirect users who have already installed the app to the intended in-app location as configured in the deferred deep link.Deep Linking
Deep linking allows you to redirect users from ads to specific locations within your app. The data collected from the tracking link enables you to monitor the performance of the deep link in Airbridge.How Airbridge Deep Links work
Airbridge deep linking works in the following 3 steps.- A scheme deep link is embedded in the tracking link.
- When the user opens the tracking link, the app opens through an Airbridge Deep Link.
- The Airbridge SDK converts the Airbridge Deep Link back to the scheme deep link and passes it to the app.
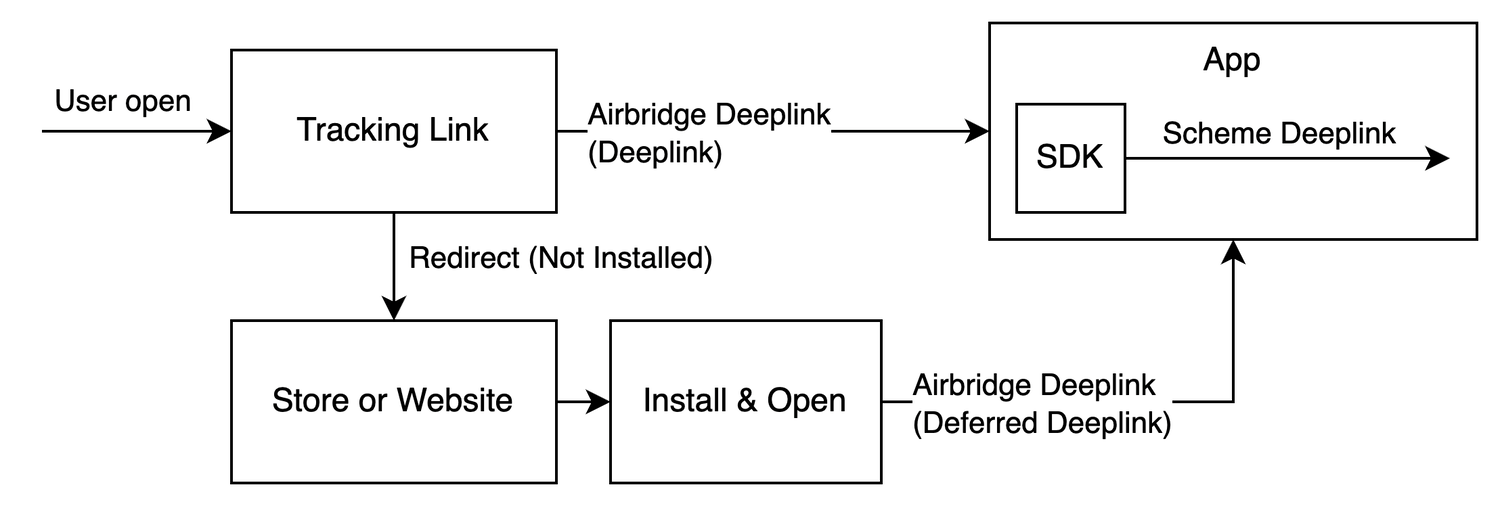
- Example scheme deep link embedded in the tracking link:
YOUR_SCHEME://product/12345
- HTTP deep link format 1:
https://YOUR_APP_NAME.airbridge.io/~~~ - HTTP deep link format 2:
https://YOUR_APP_NAME.abr.ge/~~~ - Scheme deep link format:
YOUR_SCHEME://product/12345?airbridge_referrer=~~~
- It determines whether the given deep link is an Airbridge Deep Link.
- It collects the information contained in the deep link and sends a deep link event.
- It converts the Airbridge Deep Link back to the scheme deep link embedded in the tracking link (
YOUR_SCHEME://product/12345) and passes it to the app.
Set up deep linking
For the deep linking setup, the deep link information entered to the Airbridge dashboard and the in-app location address for user redirection is required. First, enter the deep link information into the Airbridge dashboard.How to enter the deep link information into Airbridge dashboard
How to enter the deep link information into Airbridge dashboard
For the deep linking setup, the following information must be entered into the Airbridge dashboard.Follow the steps below to submit the necessary information to the Airbridge dashboard.
iOS
- iOS URI scheme: The Airbridge Deep Link is converted to a scheme deep link using the iOS URI scheme.
- iOS App ID: The universal link domain of the Airbridge Deep Link is set using the iOS App ID.
Android
- Android URI scheme: The Airbridge deep link is converted to a scheme deep link using the Android URI scheme. This information is necessary for the App Link and URI scheme.
- Package name: This is the Android app identifier necessary for the App Link and URI scheme.
- Android sha256_cert_fingerprints: This is used for setting the App Link domain. This information is necessary for the App Link.
AttentionTo properly redirect users as intended, submit different information for the production app and the development app.
iOS
- Navigate to [Tracking Link]>[Deep Links] in the Airbridge dashboard.
- Enter the iOS URI scheme in the iOS URI Scheme field. Include
://. For example, if the iOS URI scheme isdemo, enterdemo://. - In the Apple Developer Dashboard, navigate to [Identifier] of the app you want to set up the deep link. Find the App ID Prefix and Bundle ID.
- The iOS App ID is in the format of
App ID Prefix+ . + Bundle ID. Enter the iOS App ID into the iOS App ID field. For example, if the App ID Prefix isprefixand the Bundle ID isexample, the iOS App ID isprefix.example.
Android
For apps that use Google Play’s Play App Signing, Google’s servers re-sign the APK after the developer uploads it. This changes the Android sha256_cert_fingerprints, so you must register the final signing value from the Google Play Console—not from your local keystore—for App Links to work correctly. Register the Android URI scheme, package name, and Android sha256_cert_fingerprints in Airbridge according to your signing method.- Play App signing
- using original key
- Naviagate to [Tracking Link]>[Deep Links] in the Airbridge dashboard.
- Enter the Android URI scheme into the Android URI Scheme field. Include
://. For example, if the URI scheme isdemo, you must enterdemo://. - Enter the package name in the Package name field.
- Go to the Google Play Console and select your app.
- Navigate to [App integrity].
- Copy the SHA-256 certificate fingerprint from the App signing key certificate section.
AttentionMake sure to copy from the correct section. This page contains two certificate entries:
- App signing key certificate ← Use this value
- Upload key certificate ← Do NOT use this value
- Enter the SHA256 value into the sha256_cert_fingerprints field.
- App launch with Airbridge deep links
- Airbridge deep link event collection
- User redirection with Airbridge deep links
Enable app launch with Airbridge Deep Links
Enable app launch with Airbridge Deep Links
Perform the following setup to enable app launch with Airbridge Deep Links after the user clicks on a tracking link.
iOS
- For the scheme deep link setup, navigate to [YOUR_PROJECT]>[Info]>[URL Types] in Xcode.
- Click + and enter the iOS URI scheme you submitted to the Airbridge dashboard into the URL Schemes field.
AttentionWhen entering the iOS URL scheme, exclude
://.- For the Universal Link setup, navigate to [YOUR_PROJECT]>[Signing & Capabilities] in Xcode.
- Click + Capability to add Associated Domains.
- Add
applinks:YOUR_APP_NAME.airbridge.ioandapplinks:YOUR_APP_NAME.abr.geto Associated Domains.
AttentionIf you are using or plan to use the Password AutoFill feature, you must add the Webcredentials domain. A situation may arise where the domain of the password saved through the Password AutoFill feature appears as
airbridge.io or abr.ge to your app users.Refer to this article for more details.Android
- For the scheme deep link setup, add an intent filter to the Activity that handles deep links in the
AndroidManifest.xml.
AttentionAlways use separate
<intent-filter> tags. If you add all <data> tags to a single <intent-filter> tag, deep links may not open your app properly.- For the App Links setup, add an intent filter under the Activity that handles the deep link in the
AndroidManifest.xml.
YOUR_APP_NAME is the App Name.AttentionAlways use separate
<intent-filter> tags. If you add all <data> tags to a single <intent-filter> tag, deep links may not open your app properly.Enable Airbridge Deep Link event collection
Enable Airbridge Deep Link event collection
To pass the deep link events to the Airbridge SDK, call the
Airbridge.trackDeeplink function at the top of the OS callback that is called when the app is opened through a deep link.iOS
To pass the deep link events to the Airbridge SDK, the Airbridge.trackDeeplink function should be called at the top of the OS callback triggered when the app is opened through a deep link.AttentionStarting with the iOS 27 SDK (Xcode 27), apps that do not adopt the UIScene (Scene) lifecycle via UIApplicationSceneManifest will fail to launch entirely. In addition, once the Scene lifecycle is adopted, deeplink callbacks that were previously collected automatically through the AppDelegate method will no longer be called.
You can collect deeplinks in SceneDelegate using the code below.
Android
Add the following code to theandroid/app/src/main/java/.../MainActivity.kt file.Enable user redirection with Airbridge Deep Links
Enable user redirection with Airbridge Deep Links
When an Airbridge Deep Link is executed, it is converted into a scheme deep link and passed to the
OnDeeplinkReceived callback. If a deep link that is not an Airbridge Deep Link is executed, the deep link is passed directly to the callback without any conversion.Use the deep link passed to the callback to redirect the user to the intended destination.Set up deferred deep linking
When a user clicks on a tracking link with deferred deep linking capabilities and your app is not installed on the device, the Airbridge SDK retrieves the deep link as follows.How the Airbridge SDK collects deferred deep links
How the Airbridge SDK collects deferred deep links
The Airbridge SDK attempts to collect a deep link after initializing the SDK when all the following conditions are met. If the app is closed during collection, the Airbridge SDK treats it as if there is no stored Airbridge deep link.
- The
Airbridge.startTrackingfunction is called with the opt-in settings in place. Or, opt-in has not been set. - The ATT tracking response has been determined. Or, the event collection delay time set in the ATT prompt has expired.
OnDeeplinkReceived, so no additional setup is required.
Testing
The SDK functionality test and deep link test allow you to check whether the SDK and deep linking work as intended.Additional SDK Settings
Follow the instructions below for additional setup.AttentionOptional settings. Configure only if necessary.
Receive Airbridge Deep Links only
NoteThe Airbridge React Native SDK must be v4.1.2 or later.
setOnDeeplinkReceived method of the Airbridge React Native SDK include not only Airbridge Deep Links but also deep links from other solutions.
isHandleAirbridgeDeeplinkOnly to true in the SDK settings, only Airbridge Deep Links will be passed to the setOnDeeplinkReceived callback. In this way, you can handle the deep links from other solutions separately from the Airbridge Deep Links.
Create tracking links within the app
AttentionReact Native SDK v.4.3.0 or later is required.
createTrackingLink function to create tracking links. Refer to the code examples and the parameter details below.
Use the
option parameter in the createTrackingLink function to configure tracking link options.
Create trackingLink option
Create trackingLink option
onSuccess callback in the createTrackingLink function to pass the AirbridgeTrackingLink.
Refer to the example codes below.
Create tracking links that launch the app or redirect users to the app store
Create tracking links that launch the app or redirect users to the app store
Create tracking links that launch the app or redirect users to a webpage
Create tracking links that launch the app or redirect users to a webpage
Create tracking links that redirect users to the app store only
Create tracking links that redirect users to the app store only
Create tracking links that redirect users to a webpage only
Create tracking links that redirect users to a webpage only