DeepLink - iOS SDK
Install the Airbridge iOS SDK and implement the necessary settings following the steps below.
The Airbridge iOS SDK can be installed using the method below. After installation, you can verify whether the SDK has been properly installed through the iOS SDK Test.
1. 在 Xcode 中导航至 [File]>[Add Packages...]。
2. 在搜索栏中输入以下地址,并点击 [Add Package]。
3. 再次点击 [Add Package]。
4. 在 Xcode 的 [Package Dependencies] 中确认 Airbridge iOS SDK 已成功添加。
5. 将 SDK 依赖的 Framework 添加到 Project 中。导航至 [Xcode]>[Project File]>[General]>[Frameworks, Libraries, and Embedded Content],并点击 “+”。
6. 添加所有以下 Framework,并将已添加 Framework 的 Embed(嵌入)设置为 Do Not Embed(不嵌入)。导航至 [Xcode]>[Project File]>[Build Phase]>[Link Binary With Libraries],将 Status(状态)设置为 “Optional(可选)”。
Framework | 说明 |
|---|---|
AdSupport.framework | 用于收集 IDFA |
CoreTelephony.framework | 用于收集移动通信运营商信息 |
StoreKit.framework | 用于收集 SKAN 信息 |
AppTrackingTransparency.framework | 用于收集 ATT 同意状态信息 |
AdServices.framework | 用于收集 Apple Ads 归因信息(iOS 14.3+) |
注意
在安装 iOS SDK 之前,请导航至 [Xcode]>[YOUR_PROJECT]>[Build Settings],并确保将 User Script Sandboxing 设置为 “No”。更多信息请参阅 CocoaPods 文档。
1. 使用 brew install cocoapods 安装 CocoaPods。
2. 使用 pod init 创建 Podfile。
3. 使用以下代码将 SDK 添加为 Podfile 的依赖项。
target '[Project Name]' do
    ...
    # Replace $HERE_LATEST_VERSION with latest version
    # - Versions: https://help.airbridge.io/developers/release-note-ios-sdk
    # - Example: pod 'airbridge-ios-sdk', '4.X.X'
    pod 'airbridge-ios-sdk', '$HERE_LATEST_VERSION'
    ...
end
4. 在输入 pod install --repo-update 时,安装将开始。
5. 运行 YOUR_PROJECT.xcworkspace 以确认 Airbridge iOS SDK 成功安装。
注意
您无法使用 Tuist 的 External Dependencies 安装 Airbridge iOS SDK。请确保按照以下步骤安装。
1. 运行 tuist edit 命令。
2. 将 remote 添加到 project.packages。将 package 添加到 project.targets[...].target.dependencies 中。参见以下代码:
import ProjectDescription

let project = Project(
    packages: [
        .remote(
            url: "https://github.com/ab180/airbridge-ios-sdk-deployment",
            // Replace $HERE_LATEST_VERSION with latest version
            // - Versions: https://help.airbridge.io/developers/release-note-ios-sdk
            // - Example: requirement: .exact(from: "4.X.X")
            requirement: .exact(from: "$HERE_LATEST_VERSION")
        ),
        ...
    ],
    targets: [
        .target(
            dependencies: [
                .package(product: "Airbridge", type: .runtime),
                .sdk(name: "AdSupport", type: .framework, status: .optional),
                .sdk(name: "AdServices", type: .framework, status: .optional),
                .sdk(name: "CoreTelephony", type: .framework, status: .optional),
                .sdk(name: "StoreKit", type: .framework, status: .optional),
                .sdk(name: "AppTrackingTransparency", type: .framework, status: .optional),
                .sdk(name: "WebKit", type: .framework, status: .optional),
                ...
            ]
        ),
        ...
    ],
    ...
)
3. 运行 tuist generate 命令。
4. Airbridge 将添加至 Xcode 的 Package Dependencies 中。
1. 从以下链接下载 Airbridge iOS SDK:
2. 将 Airbridge.xcframework 添加到 Project 中。导航至 [Xcode]>[Project File]>[General]>[Frameworks, Libraries, and Embedded Content],并点击 “+”。
3. 在 [Add Other...] 下点击 “Add Files...”,并选择 Airbridge.xcframework。
4. 将 Airbridge.xcframework 中的 Embed(嵌入)设置为 Embed & Sign(嵌入并签名)。
5. 将 SDK 依赖的 Framework 添加到 Project 中。导航至 [Xcode]>[Project File]>[General]>[Frameworks, Libraries, and Embedded Content],并点击 “+”。
6. 添加所有以下 Framework,并将已添加 Framework 的 Embed(嵌入)设置为 Do Not Embed(不嵌入)。导航至 [Xcode]>[Project File]>[Build Phase]>[Link Binary With Libraries],将 Status(状态)设置为 “Optional(可选)”。
Framework | 说明 |
|---|---|
AdSupport.framework | 用于收集 IDFA |
CoreTelephony.framework | 用于收集移动通信运营商信息 |
StoreKit.framework | 用于收集 SKAN 信息 |
AppTrackingTransparency.framework | 用于收集 ATT 同意状态信息 |
AdServices.framework | 用于收集 Apple Ads 归因信息(iOS 14.3+) |
提示
请根据需求选择一般 SDK 或 Restricted SDK, 只能安装其中一个。
Depending on policies and environments, restrictions on collecting device IDs like GAID and IDFA may be required. When installing the Restricted SDK version, the device IDs are not collected.
Install the Restricted SDK using the method below.
1. 在 Xcode 中导航至 [File]>[Add Packages...]。
2. 在搜索栏中输入以下地址,并点击 [Add Package]。
3. 再次点击 [Add Package]。
4. 在 Xcode 的 [Package Dependencies] 中确认 Airbridge iOS SDK 已成功添加。
5. 将 SDK 依赖的 Framework 添加到 Project 中。导航至 [Xcode]>[Project File]>[General]>[Frameworks, Libraries, and Embedded Content],并点击 “+”。
6. 添加所有以下 Framework,并将已添加 Framework 的 Embed(嵌入)设置为 Do Not Embed(不嵌入)。导航至 [Xcode]>[Project File]>[Build Phase]>[Link Binary With Libraries],将 Status(状态)设置为 “Optional(可选)”。
Framework | 说明 |
|---|---|
CoreTelephony.framework | 用于收集移动通信运营商信息 |
StoreKit.framework | 用于收集 SKAN 信息 |
AdServices.framework | 用于收集 Apple Ads 的归因信息(iOS 14.3+) |
注意
在安装 iOS SDK 之前,请导航至 [Xcode]>[YOUR_PROJECT]>[Build Settings],并确保将 User Script Sandboxing 设置为 “No”。更多信息请参阅 CocoaPods 文档。
1. 使用 brew install cocoapods 安装 CocoaPods。
2. 使用 pod init 创建 Podfile。
3. 使用以下代码将 SDK 添加为 Podfile 的依赖项。
target '[Project Name]' do
    ...
    # Replace $HERE_LATEST_VERSION with latest version
    # - Versions: https://help.airbridge.io/developers/release-note-ios-sdk
    # - Example: pod 'airbridge-ios-sdk-restricted', '4.X.X'
    pod 'airbridge-ios-sdk-restricted', '$HERE_LATEST_VERSION'
    ...
end
4. 在输入 pod install --repo-update 时,安装将开始。
5. 运行 YOUR_PROJECT.xcworkspace 以确认 Airbridge iOS SDK 成功安装。
注意
您无法使用 Tuist 的 External Dependencies 安装 Airbridge iOS SDK。请确保按照以下步骤安装。
1. 运行 tuist edit 命令。
2. 将 remote 添加到 project.packages。将 package 添加到 project.targets[...].target.dependencies 中。参见以下代码:
import ProjectDescription

let project = Project(
    packages: [
        .remote(
            url: "https://github.com/ab180/airbridge-ios-sdk-restricted-deployment",
            // Replace $HERE_LATEST_VERSION with latest version
            // - Versions: https://help.airbridge.io/developers/release-note-ios-sdk
            // - Example: requirement: .exact(from: "4.X.X")
            requirement: .exact(from: "$HERE_LATEST_VERSION")
        ),
        ...
    ],
    targets: [
        .target(
            dependencies: [
                .package(product: "Airbridge", type: .runtime),
                .sdk(name: "AdServices", type: .framework, status: .optional),
                .sdk(name: "CoreTelephony", type: .framework, status: .optional),
                .sdk(name: "StoreKit", type: .framework, status: .optional),
                .sdk(name: "WebKit", type: .framework, status: .optional),
                ...
            ]
        ),
        ...
    ],
    ...
)
3. 运行 tuist generate 命令。
4. Airbridge 将添加至 Xcode 的 Package Dependencies 中。
1. 从以下链接下载 Airbridge iOS SDK。
2. 将 Airbridge.xcframework 添加到 Project 中。导航至 [Xcode]>[Project File]>[General]>[Frameworks, Libraries, and Embedded Content],并点击 “+”。
3. 在 [Add Other...] 下点击 “Add Files...”,并选择 Airbridge.xcframework。
4.将 Airbridge.xcframework 中的 Embed(嵌入)设置为 Embed & Sign(嵌入并签名)。
5. 将 SDK 依赖的 Framework 添加到 Project 中。导航至 [Xcode]>[Project File]>[General]>[Frameworks, Libraries, and Embedded Content],并点击 “+”。
6. 添加所有以下 Framework,并将已添加 Framework 的 Embed(嵌入)设置为 Do Not Embed(不嵌入)。导航至 [Xcode]>[Project File]>[Build Phase]>[Link Binary With Libraries],将 Status(状态)设置为 “Optional(可选)”。
Framework | 说明 |
|---|---|
CoreTelephony.framework | 用于收集移动通信运营商信息 |
StoreKit.framework | 用于收集 SKAN 信息 |
AdServices.framework | 用于收集 Apple Ads 的归因信息(iOS 14.3+) |
SDK initialization methods vary depending on the system architecture. For SceneDelegate Lifecycle or AppDelegate Lifecycle, refer to the method for AppDelegate. For SwiftUI Lifecycle, refer to the method for SwiftUI.
The YOUR_APP_NAME and YOUR_APP_SDK_TOKEN can be found on the [Settings]>[Tokens] page in the Airbridge dashboard.
请在 AppDelegate 的 application(_:didFinishLaunchingWithOptions:) 函数顶部调用 Airbridge.initializeSDK 函数。
import UIKit
import Airbridge

@main
class AppDelegate: UIResponder, UIApplicationDelegate {
    func application(
        _ application: UIApplication,
        didFinishLaunchingWithOptions launchOptions: [UIApplication.LaunchOptionsKey: Any]?
    ) -> Bool {
        let option = AirbridgeOptionBuilder(name: "YOUR_APP_NAME", token: "YOUR_APP_SDK_TOKEN")
            .build()
        Airbridge.initializeSDK(option: option)
        return true
    }
}
注意
Airbridge.initializeSDK函数需在AppDelegate的application(_:didFinishLaunchingWithOptions:)阶段调用,以确保正常运行。
请在 AppDelegate 的 application:didFinishLaunchingWithOptions: 函数顶部调用 Airbridge.initializeSDK 函数。
#import "AppDelegate.h"
#import <Airbridge/Airbridge.h>

@interface AppDelegate ()

@end

@implementation AppDelegate

- (BOOL)application:(UIApplication *)application didFinishLaunchingWithOptions:(NSDictionary *)launchOptions {
    AirbridgeOptionBuilder* optionBuilder = [[AirbridgeOptionBuilder alloc] initWithName:@"YOUR_APP_NAME"
                                                                                   token:@"YOUR_APP_SDK_TOKEN"];
    AirbridgeOption* option = [optionBuilder build];
    [Airbridge initializeSDKWithOption:option];
    return YES;
}

@end
注意
Airbridge.initializeSDK函数需在AppDelegate的application(_:didFinishLaunchingWithOptions:)阶段调用,以确保正常运行。
请在 init 的顶部调用 Airbridge.initializeSDK 函数。
import SwiftUI
import Airbridge

@main
struct ExampleApp: App {
    init() {
        let option = AirbridgeOptionBuilder(name: "YOUR_APP_NAME", token: "YOUR_APP_SDK_TOKEN")
            .build()
        Airbridge.initializeSDK(option: option)
    }

    var body: some Scene {
        WindowGroup {
            ContentView()
        }
    }
}
注意
Airbridge.initializeSDK函数需在App的init阶段调用,以确保正常运行。
注意
SwiftUI Lifecycle 方法不提供 ReferrerURL,因此无法使用 Organic Referrer Attribution。即使使用 UIApplicationDelegateAdaptor,在 SwiftUI Lifecycle 方法中也无法使用 Organic Referrer Attribution。
提示
为确保遵守隐私政策所需的功能,应与法律顾问共同审查。
The IDFA can only be collected if users consent to data tracking via the App Tracking Transparency (ATT) prompt.
Event collection should be delayed until the user allows tracking. If the install event is collected before the user allows tracking on the ATT prompt, the install event data will lack an identifier, making performance measurement difficult. We recommend setting a sufficient delay time for event collection to collect identifiers.
1. Prepare the text you will use in the ATT prompt.
2. Enter the prepared text in the NSUserTrackingUsageDescription key of the Info.plist file.
请导航至 [Xcode]>[YOUR_PROJECT]>[Info]>[Custom iOS Target Properties]。
请将鼠标悬停在 Key 的项目,点击出现的 “+”,并输入
Privacy - Tracking Usage Description。请将准备好的 ATT 弹窗文本作为值输入。
1. 请输入 tuist edit 命令。
2. 请在 project.targets[...].infoPlist 的 .extendingDefault 中,作为键输入 NSUserTrackingUsageDescription,作为值输入准备好的 ATT 弹窗文本。
import ProjectDescription

let project = Project(
    targets: [
        .target(
            infoPlist: .extendingDefault(
                with: [
                    "NSUserTrackingUsageDescription": "YOUR_DESCRIPTION",
                    ...
                ]
            ),
            ...
        ),
        ...
    ]
    ...
)
3. Set the point of time for displaying the ATT prompt on the app.
请在计划弹出 ATT 弹窗的时间调用 ATTrackingManager.requestTrackingAuthorization 函数。
import AppTrackingTransparency
...
ATTrackingManager.requestTrackingAuthorization { _ in }#import <AppTrackingTransparency/AppTrackingTransparency.h>
...
[ATTrackingManager requestTrackingAuthorizationWithCompletionHandler:^(ATTrackingManagerAuthorizationStatus status) {}];注意
当调用
ATTrackingManager.requestTrackingAuthorization函数时,如果 App 不处于 Active 状态,则不会弹出 ATT 弹窗。
App 启用后可立即弹出 ATT 弹窗。
import UIKit
import Airbridge
import AppTrackingTransparency

@main
class AppDelegate: UIResponder, UIApplicationDelegate {
    var observer: Any?

    func application(
        _ application: UIApplication,
        didFinishLaunchingWithOptions launchOptions: [UIApplication.LaunchOptionsKey: Any]?
    ) -> Bool {
        let option = AirbridgeOptionBuilder(name: "YOUR_APP_NAME", token: "YOUR_APP_SDK_TOKEN")
            .build()
        Airbridge.initializeSDK(option: option)

        observer = NotificationCenter.default.addObserver(
            forName: UIApplication.didBecomeActiveNotification,
            object: nil,
            queue: nil
        ) { [weak self] _ in
            if #available(iOS 14, *) {
                ATTrackingManager.requestTrackingAuthorization { _ in }
            }
            if let observer = self?.observer {
                NotificationCenter.default.removeObserver(observer)
            }
        }

        return true
    }
}#import "AppDelegate.h"
#import <Airbridge/Airbridge.h>
#import <AppTrackingTransparency/AppTrackingTransparency.h>
@interface AppDelegate ()
@end
@implementation AppDelegate {
id observer;
}
- (BOOL)application:(UIApplication *)application didFinishLaunchingWithOptions:(NSDictionary *)launchOptions {
AirbridgeOptionBuilder* optionBuilder = [[AirbridgeOptionBuilder alloc] initWithName:@"YOUR_APP_NAME"
token:@"YOUR_APP_SDK_TOKEN"];
AirbridgeOption* option = [optionBuilder build];
[Airbridge initializeSDKWithOption:option];
__weak typeof(self) weakSelf = self;
observer = [NSNotificationCenter.defaultCenter addObserverForName:UIApplicationDidBecomeActiveNotification
object:nil
queue:nil
usingBlock:^(NSNotification * _Nonnull notification) {
if (@available(iOS 14, *)) {
[ATTrackingManager requestTrackingAuthorizationWithCompletionHandler:^(ATTrackingManagerAuthorizationStatus status) {}];
}
if (weakSelf != nil && weakSelf->observer != nil) {
[NSNotificationCenter.defaultCenter removeObserver:observer];
}
}];
return YES;
}
@endimport SwiftUI
import Airbridge
import AppTrackingTransparency
@main
struct ExampleApp: App {
init() {
let option = AirbridgeOptionBuilder(name: "YOUR_APP_NAME", token: "YOUR_APP_SDK_TOKEN")
.build()
Airbridge.initializeSDK(option: option)
var observer: Any?
observer = NotificationCenter.default.addObserver(
forName: UIApplication.didBecomeActiveNotification,
object: nil,
queue: nil
) { _ in
if #available(iOS 14, *) {
ATTrackingManager.requestTrackingAuthorization { _ in }
}
if let observer {
NotificationCenter.default.removeObserver(observer)
}
}
}
var body: some Scene {
WindowGroup {
ContentView()
}
}
}4. If the install event is not collected, the Airbridge iOS SDK delays collecting install events for 30 seconds until the user allows tracking each time the app is launched. If the user exits the app before deciding whether to allow tracking, the SDK will not collect the install event and will try again at the next app launch.
提示
在 DeepLink Plan 中,建议将
setAutoDetermineTrackingAuthorizationTimeout函数设为 0 秒。DeepLink Plan 不支持基于标识符的归因。为了使安装 App 的用户能立即通过 延迟深度链接 跳转至预设目标页面,建议将该函数设为 0 秒。
The autoDetermineTrackingAuthorizationTimeoutfunction can be used to set a sufficient delay before event collection. The default setting is 30 seconds and can be set to up to 3600 seconds (1 hour).
import Airbridge
...
let option = AirbridgeOptionBuilder(name: "YOUR_APP_NAME",
                                    token: "YOUR_APP_SDK_TOKEN")
    .setAutoDetermineTrackingAuthorizationTimeout(second: 30)
    .build()
Airbridge.initializeSDK(option: option)#import <Airbridge/Airbridge.h>
...
AirbridgeOptionBuilder* optionBuilder = [[AirbridgeOptionBuilder alloc] initWithName:@"YOUR_APP_NAME"
token:@"YOUR_APP_SDK_TOKEN"];
[optionBuilder setAutoDetermineTrackingAuthorizationTimeoutWithSecond:30];
AirbridgeOption* option = [optionBuilder build];
[Airbridge initializeSDKWithOption:option];注意
请确保为延迟收集安装事件预留足够时间。在用户通过 ATT 弹窗允许追踪之前,如果延迟时间到期,SDK 将会收集不包含 IDFA 的安装事件。
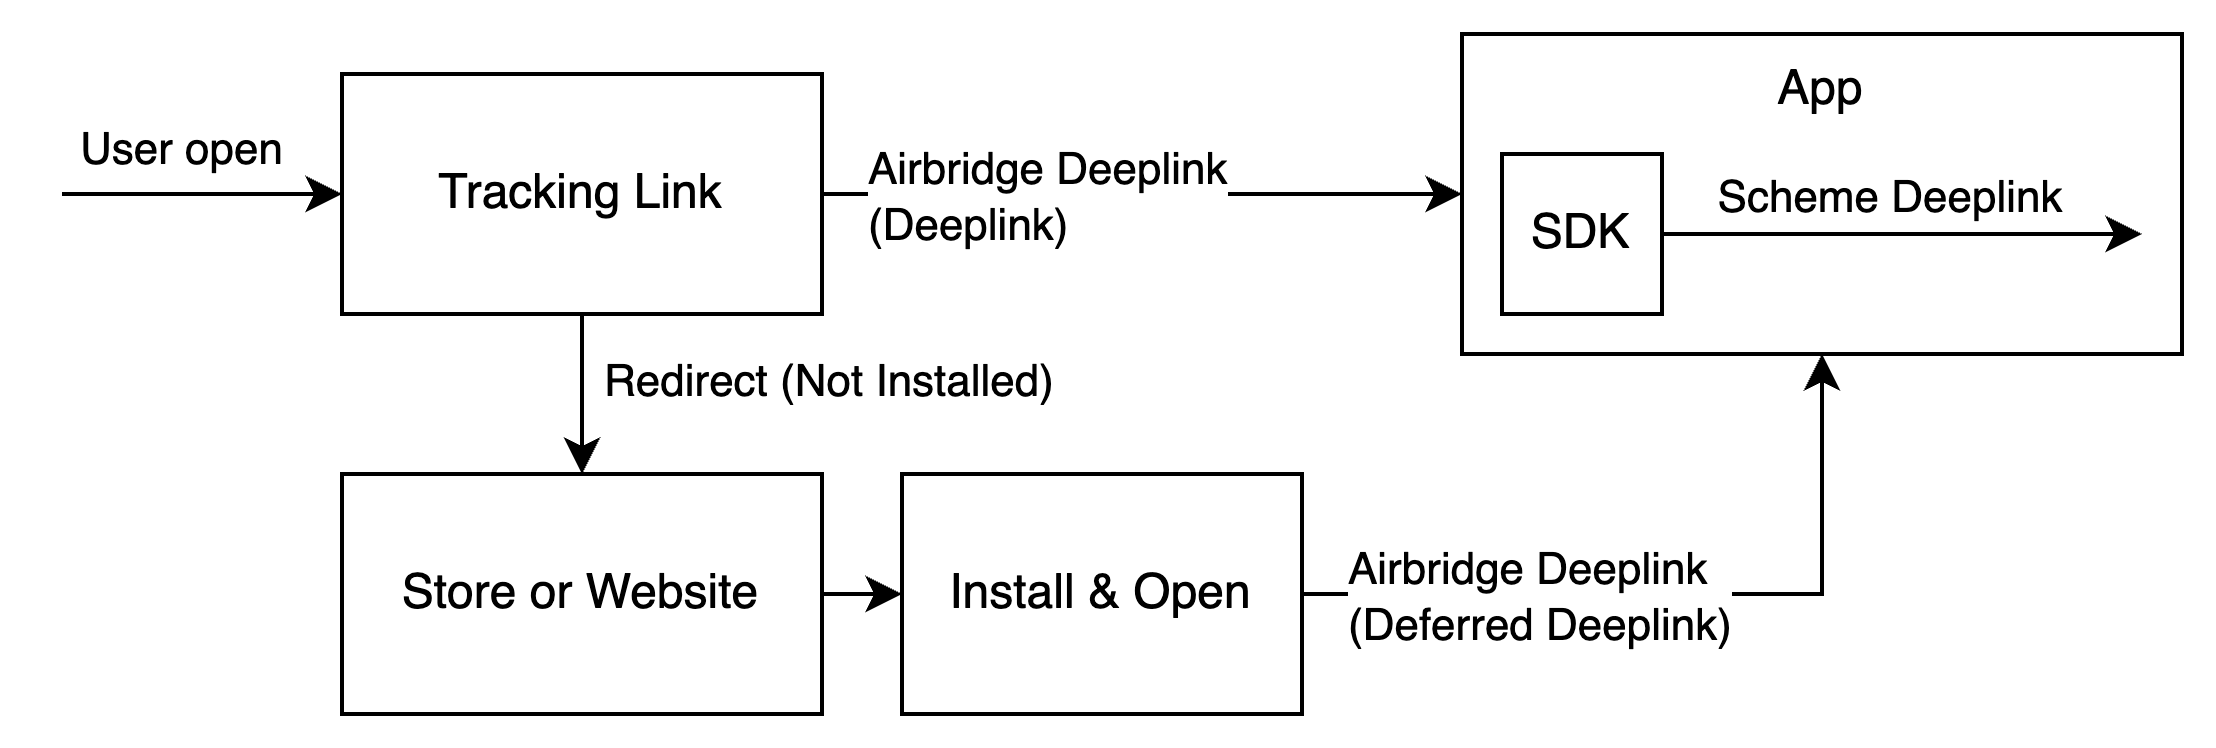
Deep linking allows you to redirect users from ads to specific locations within your app. The data collected from the tracking link enables you to monitor the performance of the deep link in Airbridge.
When a user clicks on the Airbridge tracking link, the scheme deep link embedded in the tracking link is converted into an Airbridge Deep Link, which can be either an HTTP deep link or a scheme deep link. This Airbridge Deep Link redirects the user to the desired app location. Then, the Airbridge SDK converts the Airbridge Deep Link back to the original scheme deep link embedded in the tracking link and passes it to the app.
Example scheme deep link embedded in the tracking link: YOUR_SCHEME://product/12345
Examples of Airbridge Deep Links
HTTP deep link format 1: https://YOUR_APP_NAME.airbridge.io/~~~
HTTP deep link format 2: https://YOUR_APP_NAME.abr.ge/~~~
Scheme deep link format: YOUR_SCHEME://product/12345?airbridge_referrer=~~~
When the app is installed on the device and the tracking link is clicked, the app opens through the Airbridge Deep Link. The Airbridge SDK converts the Airbridge Deep Link into the scheme deep embedded in the tracking link and passes it to the app.
When the app is not installed on the device and the tracking link is clicked, the Airbridge SDK saves the Airbridge Deep Link. After the user is redirected to the app store or website and the app is installed and launched, the Airbridge SDK converts the saved Airbridge Deep Link into the scheme deep link embedded in the tracking link and passes it to the app.
For the deep linking setup, the following information is required.
Deep link information submitted in the Airbridge dashboard
In-app location address for user redirection
First, enter the deep link information into the Airbridge dashboard.
进入 Airbridge 面板 [追踪链接]>[深度链接] 页面,注册以下信息:
iOS URI Scheme
输入用于深度链接的 URI Scheme。只有使用已注册 URI Scheme 的深度链接才能配置至追踪链接中,且当 App 通过追踪链接打开时,该 URI Scheme 深度链接将传递至 App。
示例:scheme://
iOS App ID
从 Apple Developer 的 App [Identifier] 页面,获取 App ID Prefix 和 Bundle ID,并以 App ID Prefix+.+Bundle ID 格式输入 iOS App ID。
示例:9JA89QQLNQ.com.apple.wwdc
注意
为确保正确的用户跳转,请为正式版 App 和 开发用 App 注册不同的 iOS URI Scheme 和 iOS App ID。
After entering the deep link information into the Airbridge dashboard, an additional setup is required to enable the following.
App launch with Airbridge Deep Links
User redirection with Airbridge Deep Links
For detailed instructions, refer to the information below.
进行以下设置,以确保用户点击追踪链接后,App 能通过 Airbridge 深度链接启用。
URI Scheme 深度链接设置
1. 在 Xcode 中,进入 [YOUR_PROJECT]>[Info]>[URL Types]。
2. 点击 “+”,并在 URL Schemes 中输入已在 Airbridge 面板中注册的 iOS URI Scheme。
注意
必须输入不包括
://的 iOS URI Scheme。
Universal Link 设置
1. 在 Xcode 中,进入 [YOUR_PROJECT]>[Signing & Capabilities]。
2. 点击 “+ Capability” 以添加 Associated Domains。
3. 将 applinks:YOUR_APP_NAME.airbridge.io 和 applinks:YOUR_APP_NAME.abr.ge 添加至 Associated Domains。YOUR_APP_NAME 可在 Airbridge 面板 [设置]>[Token] 中获取。
注意
如果您正在使用或计划使用 Password AutoFill 功能,则必须添加 Webcredentials 域名。否则用户可能会看到通过 Password AutoFill 功能保存的密码域名显示为 airbridge.io 或 abr.ge。
更多信息请参阅 本指南。
当 App 通过深度链接打开时,调用 trackDeeplink 函数,以便 SDK 能收集深度链接打开事件。随后调用 handleDeeplink 函数,将 Airbridge 深度链接转换为原始追踪链接中配置的 URI Scheme 深度链接。最后,引导用户跳转至预设页面。
当 App 是通过 Airbridge 深度链接打开时,isAirbridgeDeeplink 将返回 true,且向回调中的 uri 传递所配置的 URI Scheme 深度链接。若 App 是通过其他深度链接打开,则 isAirbridgeDeeplink 为 false,且不会触发回调。可据此区分处理 Airbridge 深度链接。
import Airbridge
...
/** when app is opened with deeplink */

// track deeplink
Airbridge.trackDeeplink(url: url)
// handle deeplink
var isAirbridgeDeeplink = Airbridge.handleDeeplink(url: url) { url in
    // when app is opened with airbridge deeplink
    // show proper content using url (YOUR_SCHEME://...)
    handleAirbridgeDeeplink(url: url)
}
if isAirbridgeDeeplink { return }
// when app is opened with other deeplink
// use existing logic as it is#import <Airbridge/Airbridge.h>
...
/** when app is opened with deeplink */
// track deeplink
[Airbridge trackDeeplinkWithUrl:url];
// handle deeplink
BOOL isAirbridgeDeeplink = [Airbridge handleDeeplinkWithUrl:url onSuccess:^(NSURL* url) {
// when app is opened with airbridge deeplink
// show proper content using url (YOUR_SCHEME://...)
}];
if (isAirbridgeDeeplink) { return; }
// when app is opened with other deeplink
// use existing logic as it is根据 App 所采用的生命周期,在每次通过深度链接打开 App 时,调用 trackDeeplink 与 handleDeeplink 函数,以收集深度链接打开事件并实现用户跳转。
在不同生命周期中,当 App 通过深度链接打开时,将触发以下回调:
生命周期 | 回调 |
|---|---|
SceneDelegate | scene:willConnectTo:options: scene:openURLContexts: scene:continue: |
AppDelegate | application:open:options: application:continue:restorationHandler: |
SwiftUI | onOpenURL |
import UIKit
import Airbridge

@main
class SceneDelegate: UIResponder, UIWindowSceneDelegate {
    // when app is opened with airbridge deeplink
    func handleAirbridgeDeeplink(url: URL) {
        // show proper content using url (YOUR_SCHEME://...)
    }

    // when terminated app is opened with scheme deeplink or universal links
    func scene(
        _ scene: UIScene,
        willConnectTo session: UISceneSession,
        options connectionOptions: UIScene.ConnectionOptions
    ) {
        // when app is opened with scheme deeplink
        if let url = connectionOptions.urlContexts.first?.url {
            // track deeplink
            Airbridge.trackDeeplink(url: url)
            // handle deeplink
            var isAirbridgeDeeplink = Airbridge.handleDeeplink(url: url) { url in
                // when app is opened with airbridge deeplink
                // show proper content using url (YOUR_SCHEME://...)
                handleAirbridgeDeeplink(url: url)
            }
            if isAirbridgeDeeplink { return }
            // when app is opened with other deeplink
            // use existing logic as it is
        }
        // when app is opened with universal links
        else if let userActivity = connectionOptions.userActivities.first {
            // track deeplink
            Airbridge.trackDeeplink(userActivity: userActivity)
            // handle deeplink
            var isAirbridgeDeeplink = Airbridge.handleDeeplink(userActivity: userActivity) { url in
                // when app is opened with airbridge deeplink
                // show proper content using url (YOUR_SCHEME://...)
                handleAirbridgeDeeplink(url: url)
            }
            if isAirbridgeDeeplink { return }
            // when app is opened with other deeplink
            // use existing logic as it is
        }
    }

    // when backgrounded app is opened with scheme deeplink
    func scene(
        _ scene: UIScene,
        openURLContexts URLContexts: Set<UIOpenURLContext>
    ) {
        guard let url = URLContexts.first?.url else { return }
        // track deeplink
        Airbridge.trackDeeplink(url: url)
        // handle deeplink
        var isAirbridgeDeeplink = Airbridge.handleDeeplink(url: url) { url in
            // when app is opened with airbridge deeplink
            // show proper content using url (YOUR_SCHEME://...)
            handleAirbridgeDeeplink(url: url)
        }
        if isAirbridgeDeeplink { return }
        // when app is opened with other deeplink
        // use existing logic as it is
    }

    // when backgrounded app is opened with universal links
    func scene(
        _ scene: UIScene,
        continue userActivity: NSUserActivity
    ) {
        // track deeplink
        Airbridge.trackDeeplink(userActivity: userActivity)
        // handle deeplink
        var isAirbridgeDeeplink = Airbridge.handleDeeplink(userActivity: userActivity) { url in
            // when app is opened with airbridge deeplink
            // show proper content using url (YOUR_SCHEME://...)
            handleAirbridgeDeeplink(url: url)
        }
        if isAirbridgeDeeplink { return }
        // when app is opened with other deeplink
        // use existing logic as it is
    }
}import UIKit
import Airbridge
@main
class AppDelegate: UIResponder, UIApplicationDelegate {
// when app is opened with airbridge deeplink
func handleAirbridgeDeeplink(url: URL) {
// show proper content using url (YOUR_SCHEME://...)
}
// when app is opened with scheme deeplink
func application(
_ app: UIApplication,
open url: URL,
options: [UIApplication.OpenURLOptionsKey : Any] = [:]
) -> Bool {
// track deeplink
Airbridge.trackDeeplink(url: url)
// handle deeplink
var isAirbridgeDeeplink = Airbridge.handleDeeplink(url: url) { url in
// when app is opened with airbridge deeplink
// show proper content using url (YOUR_SCHEME://...)
handleAirbridgeDeeplink(url: url)
}
if isAirbridgeDeeplink { return true }
// when app is opened with other deeplink
// use existing logic as it is
return isAirbridgeDeeplink
}
// when app is opened with universal links
func application(
_ application: UIApplication,
continue userActivity: NSUserActivity,
restorationHandler: @escaping ([UIUserActivityRestoring]?) -> Void
) -> Bool {
// track deeplink
Airbridge.trackDeeplink(userActivity: userActivity)
// handle deeplink
var isAirbridgeDeeplink = Airbridge.handleDeeplink(userActivity: userActivity) { url in
// when app is opened with airbridge deeplink
// show proper content using url (YOUR_SCHEME://...)
handleAirbridgeDeeplink(url: url)
}
if isAirbridgeDeeplink { return true }
// when app is opened with other deeplink
// use existing logic as it is
return isAirbridgeDeeplink
}
}import SwiftUI
import Airbridge
@main
struct ActualApp: App {
var body: some Scene {
WindowGroup {
ContentView()
// when app is opened with scheme deeplink or universal links
.onOpenURL { url in
// track deeplink
Airbridge.trackDeeplink(url: url)
// handle deeplink
var isAirbridgeDeeplink = Airbridge.handleDeeplink(url: url) { url in
// when app is opened with airbridge deeplink
// show proper content using url (YOUR_SCHEME://...)
}
if isAirbridgeDeeplink { return }
// when app is opened with other deeplink
// use existing logic as it is
}
}
}
}#import "AppDelegate.h"
#import <Airbridge/Airbridge.h>
@interface SceneDelegate ()
@end
@implementation SceneDelegate
// when app is opened with airbridge deeplink
- (void)handleAirbridgeDeeplink:(NSURL *)url {
// show proper content using url (YOUR_SCHEME://...)
}
// when terminated app is opened with scheme deeplink or universal links
- (void)scene:(UIScene *)scene willConnectToSession:(UISceneSession *)session options:(UISceneConnectionOptions *)connectionOptions {
// when app is opened with scheme deeplink
NSURL* url = connectionOptions.URLContexts.allObjects.firstObject.URL;
NSUserActivity* userActivity = connectionOptions.userActivities.allObjects.firstObject;
if (url != nil) {
// track deeplink
[Airbridge trackDeeplinkWithUrl:url];
// handle deeplink
BOOL isAirbridgeDeeplink = [Airbridge handleDeeplinkWithUrl:url onSuccess:^(NSURL* url) {
// when app is opened with airbridge deeplink
// show proper content using url (YOUR_SCHEME://...)
[self handleAirbridgeDeeplink:url];
}];
if (isAirbridgeDeeplink) { return; }
// when app is opened with other deeplink
// use existing logic as it is
}
else if (userActivity != nil) {
// track deeplink
[Airbridge trackDeeplinkWithUserActivity:userActivity];
// handle deeplink
BOOL isAirbridgeDeeplink = [Airbridge handleDeeplinkWithUserActivity:userActivity onSuccess:^(NSURL* url) {
// when app is opened with airbridge deeplink
// show proper content using url (YOUR_SCHEME://...)
[self handleAirbridgeDeeplink:url];
}];
if (isAirbridgeDeeplink) { return; }
// when app is opened with other deeplink
// use existing logic as it is
}
}
// when backgrounded app is opened with scheme deeplink
- (void)scene:(UIScene *)scene openURLContexts:(NSSet<UIOpenURLContext *> *)URLContexts {
NSURL* url = URLContexts.allObjects.firstObject.URL;
if (url == nil) { return; }
// track deeplink
[Airbridge trackDeeplinkWithUrl:url];
// handle deeplink
BOOL isAirbridgeDeeplink = [Airbridge handleDeeplinkWithUrl:url onSuccess:^(NSURL* url) {
// when app is opened with airbridge deeplink
// show proper content using url (YOUR_SCHEME://...)
[self handleAirbridgeDeeplink:url];
}];
if (isAirbridgeDeeplink) { return; }
// when app is opened with other deeplink
// use existing logic as it is
}
// when backgrounded app is opened with universal links
- (void)scene:(UIScene *)scene continueUserActivity:(NSUserActivity *)userActivity {
// track deeplink
[Airbridge trackDeeplinkWithUserActivity:userActivity];
// handle deeplink
BOOL isAirbridgeDeeplink = [Airbridge handleDeeplinkWithUserActivity:userActivity onSuccess:^(NSURL* url) {
// when app is opened with airbridge deeplink
// show proper content using url (YOUR_SCHEME://...)
[self handleAirbridgeDeeplink:url];
}];
if (isAirbridgeDeeplink) { return; }
// when app is opened with other deeplink
// use existing logic as it is
}
@end#import "AppDelegate.h"
#import <Airbridge/Airbridge.h>
@interface AppDelegate ()
@end
@implementation AppDelegate
// when app is opened with airbridge deeplink
- (void)handleAirbridgeDeeplink:(NSURL *)url {
// show proper content using url (YOUR_SCHEME://...)
}
// when app is opened with scheme deeplink
- (BOOL)application:(UIApplication *)app openURL:(NSURL *)url options:(NSDictionary<UIApplicationOpenURLOptionsKey,id> *)options {
// track deeplink
[Airbridge trackDeeplinkWithUrl:url];
// handle deeplink
BOOL isAirbridgeDeeplink = [Airbridge handleDeeplinkWithUrl:url onSuccess:^(NSURL* url) {
// when app is opened with airbridge deeplink
// show proper content using url (YOUR_SCHEME://...)
[self handleAirbridgeDeeplink:url];
}];
if (isAirbridgeDeeplink) { return YES; }
// when app is opened with other deeplink
// use existing logic as it is
return isAirbridgeDeeplink;
}
// when app is opened with universal links
- (BOOL)application:(UIApplication *)application continueUserActivity:(NSUserActivity *)userActivity restorationHandler:(void (^)(NSArray<id<UIUserActivityRestoring>> * _Nullable))restorationHandler {
// track deeplink
[Airbridge trackDeeplinkWithUserActivity:userActivity];
// handle deeplink
BOOL isAirbridgeDeeplink = [Airbridge handleDeeplinkWithUserActivity:userActivity onSuccess:^(NSURL* url) {
// when app is opened with airbridge deeplink
// show proper content using url (YOUR_SCHEME://...)
[self handleAirbridgeDeeplink:url];
}];
if (isAirbridgeDeeplink) { return YES; }
// when app is opened with other deeplink
// use existing logic as it is
return isAirbridgeDeeplink;
}
@endWhen a user clicks on a tracking link with deferred deep linking capabilities and your app is not installed on the device, the Airbridge SDK collects the deep link as follows.
Airbridge SDK 在初始化以后,如果满足以下所有条件,会尝试获取深度链接。如果在获取深度链接的过程中 App 被关闭,Airbridge SDK 会将视为没有保存的深度链接。
已设置 Opt-in 时调用
Airbridge.startTracking函数;或未设置 Opt-in。用户在 ATT 弹窗中做出选择,或 ATT 弹窗中设置的事件收集延迟时间已到期。
The Airbridge.handleDeferredDeeplink function retrieves the saved Airbridge deep link and converts it into a scheme deep link to pass it to the app. Users are redirected to the intended destination using the converted scheme deep link.
import Airbridge
...
let option = AirbridgeOptionBuilder(name: "YOUR_APP_NAME", token: "YOUR_APP_SDK_TOKEN")
    .build()
Airbridge.initializeSDK(option: option)
...
let isFirstCalled = Airbridge.handleDeferredDeeplink() { url in
    // when handleDeferredDeeplink is called firstly after install
    if let url {
        // show proper content using url (YOUR_SCHEME://...)
    }
}#import <Airbridge/Airbridge.h>
...
AirbridgeOptionBuilder* optionBuilder = [[AirbridgeOptionBuilder alloc] initWithName:@"YOUR_APP_NAME"
token:@"YOUR_APP_SDK_TOKEN"];
AirbridgeOption* option = [optionBuilder build];
[Airbridge initializeSDKWithOption:option];
...
BOOL isFirstCalled = [Airbridge handleDeferredDeeplinkOnSuccess:^(NSURL* url) {
// when handleDeferredDeeplink is called firstly after install
if (url != nil) {
// show proper content using url (YOUR_SCHEME://...)
}
}];The Airbridge.handleDeferredDeeplink function returns true if the app is installed and called for the first time, waits for the Airbridge deep link acquisition, and converts it to a scheme deep link to pass it to onSuccess. You can use this scheme deep link to send users to the set destination.
If there is no stored Airbridge deep link, it will deliver nil to onSuccess. If the SDK is not initialized or if the Airbridge.handleDeferredDeeplink function has not been called for the first time, it will return false.
The scheme deep link delivered is generally in the format of YOUR_SCHEME://... URL. If you use services like Meta Deferred App Links, it may be delivers in a different format.
The SDK functionality test and deep link test allow you to check whether the SDK and deep linking work as intended.
Check whether the Airbridge iOS SDK is operating properly. The Install events are collected by the Android SDK regardless of whether the additional configurations have been completed or not.
Follow the steps below to check whether the Install events are being collected by the iOS SDK.
1. Prepare a test device where the app is not installed, or if the app is already installed, delete it before testing.
2. Set the SDK log level to Log_ALL.
let option = AirbridgeOptionBuilder(name: "YOUR_APP_NAME", token: "YOUR_APP_SDK_TOKEN")
    .build()
Airbridge.initializeSDK(option: option)
3. Install the app on the test device. After installing the app, launch it so that the Install event is collected.
The first Open event collected by Airbridge is recorded as an Install event. Therefore, the Open may not be recorded when the app install event is collected.
4. In the Xcode Console, check whether the event performed on the test device with a specific IDFA is logged properly. In the Console Filter, enter Library:Airbridge. If the Install events are being collected properly, you should see logs such as the following.
Send event packets to Airbridge: categories=9161Send event packets to Airbridge: categories=9163
For the Xcode Console messages and their meaning, refer to the following.
Event packet is stored in storage: categories={event_category}:该 Event category 已存储在设备。Send event packets to Airbridge: categories={event_category}:发送该 Event category。Client receive response: method=post url=https://event-track.airbridge.io/v1/apps/{app_name}:该 Event category 已成功通过网络发送至 Airbridge。
5. If you can't see the logs in the Xcode Console even after a sufficient amount of time has passed, check whether the SDK has been initialized, the SDK configurations are completed as instructed, and the network status is stable.
If the problem persists, contact your Airbridge CSM and share your SDK logs. If you don't have a designated Airbridge CSM, contact the Airbridge Help Center.
Check whether the deep linking feature configured in the Airbridge iOS SDK works as intended.
Before testing the deep link, make sure the following items have been set up.
Item |
Description |
|---|---|
HTTP Deep Link (App links) | Setup is required |
Scheme Deep Link | Setup is required |
Deferred Deep Link | The setup is completed automatically. No additional setup is required. |
Custom Domain | Setup is optional |
App Install | - If you don't need to test the deferred deep link, install the app on your test device in advance. - If you need to test the deferred deep link, the app should not be installed on the test device. If the app is installed, delete the app from the test device. |
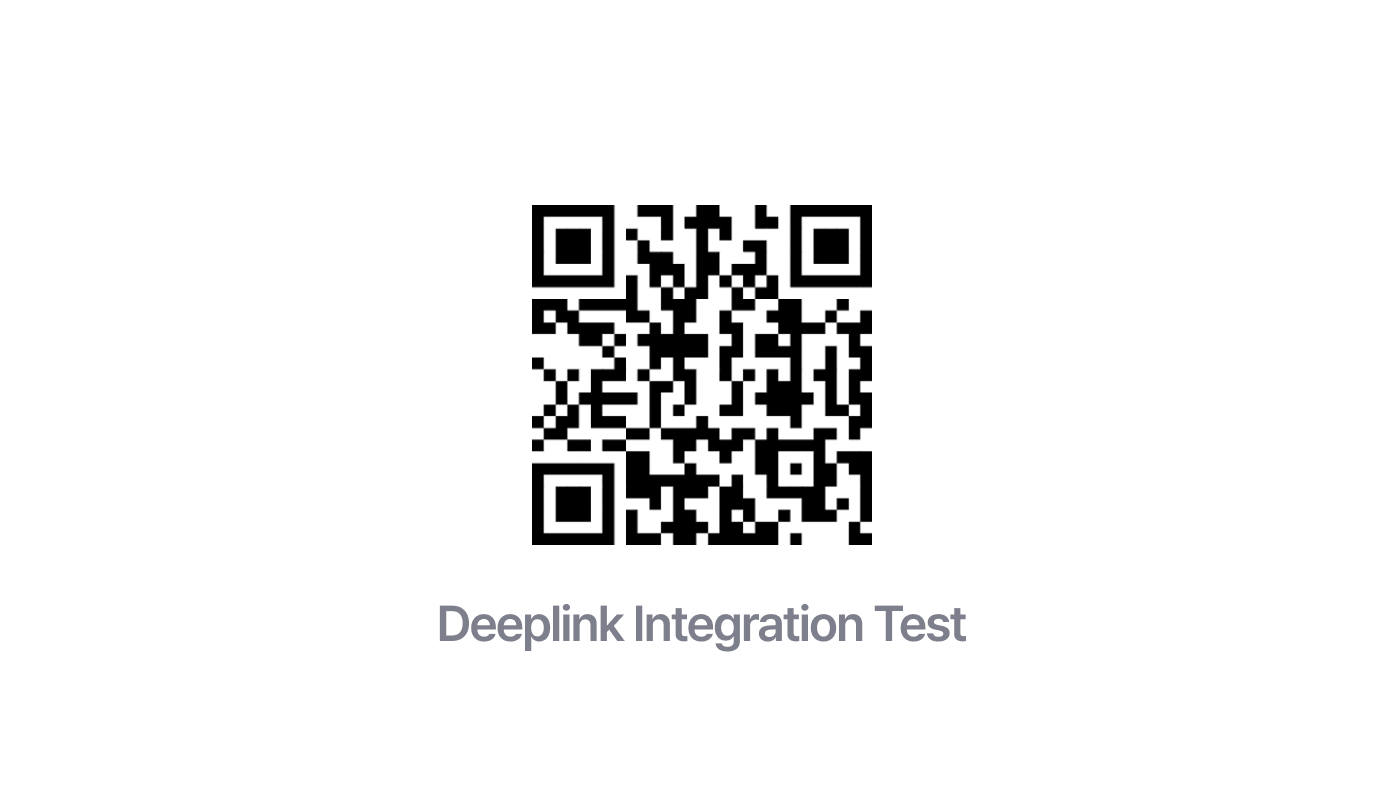
Airbridge provides a website for testing deep links. If you want to test deferred deep links, you need to uninstall the app from your test device.
1. Visit the deep link testing site from your test device. You can access the website directly by using the QR code below.
2. Enter the App Name you registered with Airbridge. You can find it on the [Settings]>[Tokens] page in the Airbridge dashboard. If you want to test a specific deep link address, enter the scheme deep link into the Deeplink URL field. The scheme deep link format is {YOUR_SCHEME}://...If you're using a custom domain, make sure to enter your custom domain.
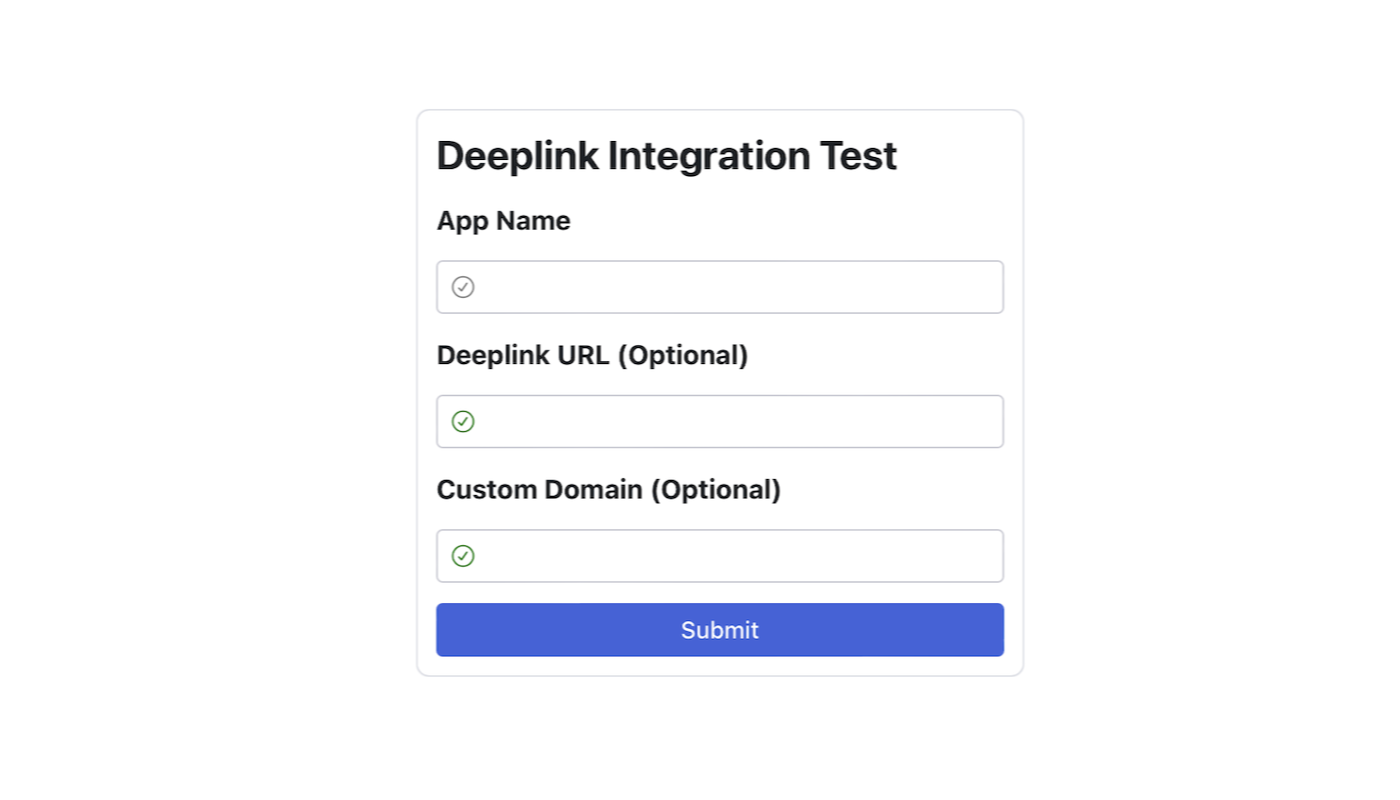
3. Click one of the buttons listed below. Click the button depending on the deep link type you are testing.
Note that you can only test deferred deep links if the app is not installed on your test device.
Button |
Description |
Example |
|---|---|---|
Test HTTP Deeplink Type-1 | Test the HTTP deep link in the format of |
|
Test HTTP Deeplink Type-2 | Test the HTTP deep link in the format of |
|
Test Scheme Deeplink | Test the scheme deep link. |
|
Test Deferred Deeplink | Test the deferred deep link. |
|
Test Custom Domain Deeplink | Test the custom domain. This button is only available when the custom domain is entered. |
|
4. Check whether the event performed on the test device with a specific IDFA is logged properly in the Xcode Console. Enter [Airbridge][Debug] in the Console filter. If the Install events are being collected properly, you should see logs as follows.
[Airbridge] [Debug] - success network to url: https://core.airbridge.io/api/v4/apps/{app_name}/events/mobile-app/9162[Airbridge] [Debug] - success network to url : https://core.airbridge.io/api/v4/apps/{app_name}/events/mobile-app/9163[Airbridge] [Debug] - success network to url : https://core.airbridge.io/api/v4/apps/{app_name}/events/mobile-app/9168
If the SDK log level has been set to DEBUG in the Airbridge SDK initialization process, you can check the value sent through the network.
5. The client request: method={...} message transmits the header and body values. Check the following items based on the button clicked on the deep link test site. If the deep link is working properly, all items should be confirmed.
如果点击了 Test HTTP Deeplink Type-1,请在 SDK 日志检查:
eventData.deeplink应为https://{YOUR_APP_NAME}.abr.ge...。{YOUR_SCHEME}://main...被传递给深度链接回调函数。如果在深度链接测试网站输入了 Deeplink URL,传递给深度链接回调函数的信息将被更改。例如,输入
{YOUR_SCHEME}://path时,传递的是${YOUR_SCHEME}://path...。
如果点击了 Test HTTP Deeplink Type-2,请在 SDK 日志检查:
eventData.deeplink应为https://{YOUR_APP_NAME}.airbridge.io...。{YOUR_SCHEME}://main...被传递给深度链接回调函数。如果在深度链接测试网站输入了 Deeplink URL,传递给深度链接回调函数的信息将被更改。例如,输入
{YOUR_SCHEME}://path时,传递的是${YOUR_SCHEME}://path...。
如果点击了 Test Scheme Deeplink,请在 SDK 日志检查:
eventData.deeplink应为{YOUR_SCHEME}://main...。{YOUR_SCHEME}://main...被传递给深度链接回调函数。如果在深度链接测试网站输入了 Deeplink URL,传递给深度链接回调函数的信息将被更改。例如,输入
{YOUR_SCHEME}://path时,传递的是${YOUR_SCHEME}://path...。
如果点击了 Test Deferred Deeplink,请在 SDK 检查:
eventData.deeplink应为{YOUR_SCHEME}://main...。{YOUR_SCHEME}://main...被传递给深度链接回调函数。如果在深度链接测试网站输入了 Deeplink URL,传递给深度链接回调函数的信息将被更改。例如,输入
{YOUR_SCHEME}://path时,传递的是${YOUR_SCHEME}://path...。
如果点击了 Test Custom Domain Deeplink,请在 SDK 日志检查:
eventData.deeplink应为https://{YOUR_CUSTOM_DOMAIN}...。{YOUR_SCHEME}://main...被传递给深度链接回调函数。如果在深度链接测试网站输入了 Deeplink URL,传递给深度链接回调函数的信息将被更改。例如,输入
{YOUR_SCHEME}://path时,传递的是${YOUR_SCHEME}://path...。
Refer to the information below for troubleshooting regarding deep links.
Problem | Solution |
|---|---|
You clicked a deep link, but the app was not launched. Or the SDK logs show information that is not intended as per setting. | Check whether the deep link is set up correctly. |
You clicked a deep link, and the app was launched, but you didn't land on the intended app page. | You need to write code that redirects the user to the deep link path that is passed by the |
Follow the instructions below for additional setup.
提示
此功能并非必需功能,请在设置前确认需求。
Attention
需要使用 Airbridge iOS SDK 4.0.0 及以上版本。
Tracking links are links that are embedded to ads for data collection. When users click on the ad, the tracking link is used to pass the touchpoint data to Airbridge, allowing for ad attribution.
Also, users who click on the ad with a tracking link can be redirected to a specific destination.
Use the createTrackingLink function to create tracking links. Refer to the code examples and the parameter details below.
public static func createTrackingLink(
    channel: String,
    option: [String: Any],
    onSuccess: @escaping (AirbridgeTrackingLink) -> Void
)

public static func createTrackingLink(
    channel: String,
    option: [String: Any],
    onSuccess: @escaping (AirbridgeTrackingLink) -> Void,
    onFailure: @escaping (Error) -> Void
)+ (void)createTrackingLinkWithChannel:(NSString*)channel
option:(NSDictionary<NSString*, id>*)option
onSuccess:(void (^)(AirbridgeTrackingLink*))onSuccess;
+ (void)createTrackingLinkWithChannel:(NSString*)channel
option:(NSDictionary<NSString*, id>*)option
onSuccess:(void (^)(AirbridgeTrackingLink*))onSuccess
onFailure:(void (^)(NSError*))onFailure;Name | Required or Optional | Type | Description |
|---|---|---|---|
channel | Required | String | The ad channel the tracking link is used |
option | Required | [String: Any] | Options for creating tracking links |
onSuccess | Required | (AirbridgeTrackingLink) -> Void | Success callback |
onFailure | Optional | (Error) -> Void | Fail callback |
Use the option parameter in the createTrackingLink function to configure tracking link options.
Key | Type | Description |
|---|---|---|
AirbridgeTrackingLinkOption.CAMPAIGN | String | The campaign credited with the winning touchpoint or conversion. |
AirbridgeTrackingLinkOption.AD_GROUP | String | The ad group credited with the winning touchpoint or conversion. |
AirbridgeTrackingLinkOption.AD_CREATIVE | String | The ad creative credited with the winning touchpoint or conversion. |
AirbridgeTrackingLinkOption.CONTENT | String | The content credited with the winning touchpoint or conversion. |
AirbridgeTrackingLinkOption.TERM | String | The search term credited with the winning touchpoint or conversion. |
AirbridgeTrackingLinkOption.SUB_ID | String | The sub publisher that generated the touchpoint. |
AirbridgeTrackingLinkOption.SUB_ID_1 | String | The 1st level sub-sub publisher that generated the touchpoint. |
AirbridgeTrackingLinkOption.SUB_ID_2 | String | The 2nd level sub-sub publisher that generated the touchpoint. |
AirbridgeTrackingLinkOption.SUB_ID_3 | String | The 3rd level sub-sub publisher that generated the touchpoint. |
AirbridgeTrackingLinkOption.DEEPLINK_URL | (Custom Scheme URL String) | Configure the Deeplink URL for redirect. |
AirbridgeTrackingLinkOption.DEEPLINK_STOPOVER | Boolean | Stopover Airpage feature of the Deep Link
|
AirbridgeTrackingLinkOption.FALLBACK_IOS | ("store" | Web URL String) | ios fallback when app is not installed |
AirbridgeTrackingLinkOption.FALLBACK_ANDROID | ("store" | Web URL String) | android fallback when app is not installed |
AirbridgeTrackingLinkOption.FALLBACK_DESKTOP | (Web URL String) | desktop fallback when app is not installed |
AirbridgeTrackingLinkOption.FALLBACK_IOS_STORE_PPID | String | he ppid for the Custom Product Page in the Apple App Store. Enable the custom product page to be shown when landing in the App Store. |
AirbridgeTrackingLinkOption.FALLBACK_ANDROID_STORE_LISTING | String | The Custom Store Listing listing value for the Google Play Store. Enables the display of your custom store listing when landing on the Google Play Store. |
AirbridgeTrackingLinkOption.OGTAG_TITLE | String |
|
AirbridgeTrackingLinkOption.OGTAG_DESCRIPTION | String |
|
AirbridgeTrackingLinkOption.OGTAG_IMAGE_URL | (Web URL String) |
|
AirbridgeTrackingLinkOption.OGTAG_WEBSITE_CRAWL | ("desktop") | A customization of link-preview.. Airbridge crawl og-tag from response of FALLBACK_DESKTOP. |
AirbridgeTrackingLinkOption.CUSTOM_SHORT_ID | String | Configure the short ID of tracking links depending on your campaign or contents. |
AirbridgeTrackingLinkOption.IS_REENGAGEMENT | ("off" | "on_true" | "on_false") | Configure the Re-engagement parameter. The Re-engagement parameter has three options. |
Use the onSuccess callback in the createTrackingLink function to pass the AirbridgeTrackingLink.
public final class AirbridgeTrackingLink: NSObject {
    public let shortURL: URL
    public let qrcodeURL: URL
}@interface AirbridgeTrackingLink : NSObject
+ (NSURL*)shortURL;
+ (NSURL*)qrcodeURL;
@endName | Type | Description |
|---|---|---|
shortURL | URL | The short URL of the tracking link |
qrcodeURL | URL | The QR code URL of the tracking link |
Refer to the example codes below.
Airbridge.createTrackingLink(
    channel: "test_channel",
    option: [
        AirbridgeTrackingLinkOption.CAMPAIGN: "test_campaign",
        AirbridgeTrackingLinkOption.DEEPLINK_URL: "YOUR_SCHEME://...",
        AirbridgeTrackingLinkOption.FALLBACK_IOS: "store",
        AirbridgeTrackingLinkOption.FALLBACK_ANDROID: "store",
        AirbridgeTrackingLinkOption.FALLBACK_DESKTOP: "https://example.com/"
    ],
    onSuccess: { trackingLink in
        // Handling created tracking-link
    },
    onFailure: { error in
        // Handling error
    }
)[Airbridge createTrackingLinkWithChannel:@"test_channel" option:@{
AirbridgeTrackingLinkOption.CAMPAIGN: @"test_campaign",
AirbridgeTrackingLinkOption.DEEPLINK_URL: @"YOUR_SCHEME://...",
AirbridgeTrackingLinkOption.FALLBACK_IOS: @"store",
AirbridgeTrackingLinkOption.FALLBACK_ANDROID: @"store",
AirbridgeTrackingLinkOption.FALLBACK_DESKTOP: @"https://example.com/"
} onSuccess:^(AirbridgeTrackingLink* trackingLink) {
// Handling created tracking-link
} onFailure:^(NSError* error) {
// Handling error
}];Airbridge.createTrackingLink(
channel: "test_channel",
option: [
AirbridgeTrackingLinkOption.CAMPAIGN: "test_campaign",
AirbridgeTrackingLinkOption.DEEPLINK_URL: "YOUR_SCHEME://...",
AirbridgeTrackingLinkOption.FALLBACK_IOS: "https://example.com/",
AirbridgeTrackingLinkOption.FALLBACK_ANDROID: "https://example.com/",
AirbridgeTrackingLinkOption.FALLBACK_DESKTOP: "https://example.com/"
],
onSuccess: { trackingLink in
// Handling created tracking-link
},
onFailure: { error in
// Handling error
}
)[Airbridge createTrackingLinkWithChannel:@"test_channel" option:@{
AirbridgeTrackingLinkOption.CAMPAIGN: @"test_campaign",
AirbridgeTrackingLinkOption.DEEPLINK_URL: @"YOUR_SCHEME://...",
AirbridgeTrackingLinkOption.FALLBACK_IOS: @"https://example.com/",
AirbridgeTrackingLinkOption.FALLBACK_ANDROID: @"https://example.com/",
AirbridgeTrackingLinkOption.FALLBACK_DESKTOP: @"https://example.com/"
} onSuccess:^(AirbridgeTrackingLink* trackingLink) {
// Handling created tracking-link
} onFailure:^(NSError* error) {
// Handling error
}];Airbridge.createTrackingLink(
channel: "test_channel",
option: [
AirbridgeTrackingLinkOption.CAMPAIGN: "test_campaign",
AirbridgeTrackingLinkOption.FALLBACK_IOS: "store",
AirbridgeTrackingLinkOption.FALLBACK_ANDROID: "store",
AirbridgeTrackingLinkOption.FALLBACK_DESKTOP: "https://example.com/"
],
onSuccess: { trackingLink in
// Handling created tracking-link
},
onFailure: { error in
// Handling error
}
)[Airbridge createTrackingLinkWithChannel:@"test_channel" option:@{
AirbridgeTrackingLinkOption.CAMPAIGN: @"test_campaign",
AirbridgeTrackingLinkOption.FALLBACK_IOS: @"store",
AirbridgeTrackingLinkOption.FALLBACK_ANDROID: @"store",
AirbridgeTrackingLinkOption.FALLBACK_DESKTOP: @"https://example.com/"
} onSuccess:^(AirbridgeTrackingLink* trackingLink) {
// Handling created tracking-link
} onFailure:^(NSError* error) {
// Handling error
}];Airbridge.createTrackingLink(
channel: "test_channel",
option: [
AirbridgeTrackingLinkOption.CAMPAIGN: "test_campaign",
AirbridgeTrackingLinkOption.FALLBACK_IOS: "https://example.com/",
AirbridgeTrackingLinkOption.FALLBACK_ANDROID: "https://example.com/",
AirbridgeTrackingLinkOption.FALLBACK_DESKTOP: "https://example.com/"
],
onSuccess: { trackingLink in
// Handling created tracking-link
},
onFailure: { error in
// Handling error
}
)[Airbridge createTrackingLinkWithChannel:@"test_channel" option:@{
AirbridgeTrackingLinkOption.CAMPAIGN: @"test_campaign",
AirbridgeTrackingLinkOption.FALLBACK_IOS: @"https://example.com/",
AirbridgeTrackingLinkOption.FALLBACK_ANDROID: @"https://example.com/",
AirbridgeTrackingLinkOption.FALLBACK_DESKTOP: @"https://example.com/"
} onSuccess:^(AirbridgeTrackingLink* trackingLink) {
// Handling created tracking-link
} onFailure:^(NSError* error) {
// Handling error
}];Was this helpful?