Sending Audiences to Ad Channels
Create audiences in Airbridge and send them to ad channels. Audiences are automatically updated and sent to ad channels once a day, enabling effective targeting and campaign optimization.
Airbridge can send audiences to the following ad channels.
Meta ads
Google Ads
TikTok For Business
Criteo
RTB House
Appier
Remerge
Cauly
Persona.ly
Adison Offerwall
Kakao
Daangn
Adikteev
Naver
The estimated audience size of each audience created in Airbridge can be found on the [Audience]>[Audience Manager] page in the [Audience] tab. The estimated audience size is calculated by sampling 10% of users who meet the audience criteria. The actual number of users may differ from the estimated number.
If you want to re-estimate the audience size with fresh data, click the […] icon and select Re-estimate.
Some ad channels provide guidelines on the recommended audience size. The audience may not be sent successfully to the ad channel if the size is smaller than the recommended size. For more details, refer to the table below.
Ad Channel | Recommended Size | Reference Material |
|---|---|---|
Facebook Business | 1,000 or more | |
Google Ads | 5,000 or more | |
TikTok | 1000 or more | |
Criteo | 100,000 or more | - |
Daangn | 1,000 or more | - |
To send an audience to an ad channel, you must add a connection. Select the ad channel and ad account to receive the audience and configure the details. Once the connection is successfully added, the audience is immediately sent to the ad channel, followed by daily updates. You can add multiple connections as necessary.
Follow the steps below to add connections and send audiences to ad channels.
When is the audience sent?
As soon as a connection is added to an audience, Airbridge sends the audience through the connection. After that, Airbridge updates audience data and sends it through the connection daily at 4:00 PM (UTC).
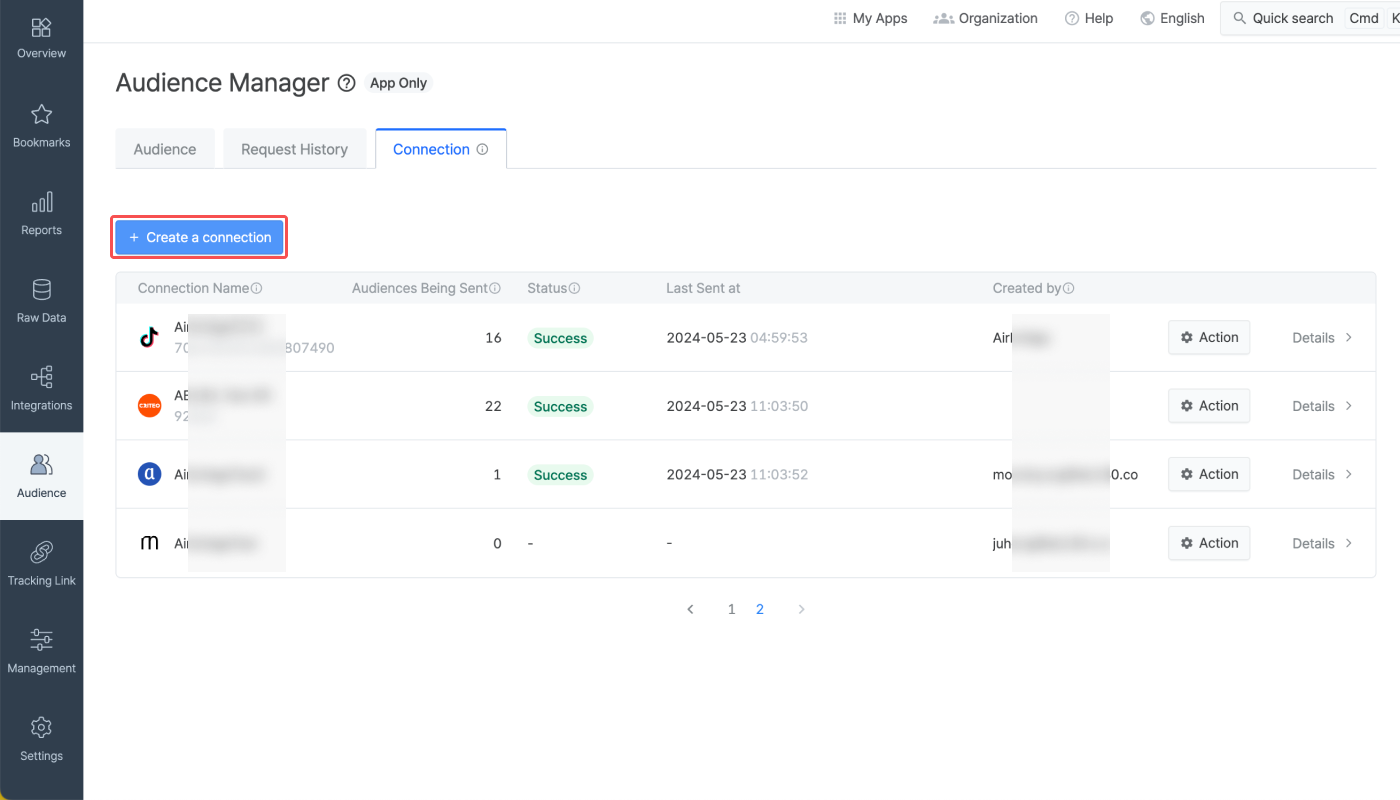
1. Navigate to [Audience]>[Audience Manager], select the [Connection] tab and click Create a connection.
2. Select the ad channel you want to create the connection for. Refer to this section of the article to find the list of supported ad channels.
3. Authenticate ad accounts. Depending on the ad channel you’ve selected, you need to log in to your ad account of the ad channel, or you need to enter the necessary credentials provided by the ad channel. Refer to the information below to learn more.
Ad accounts refer to the accounts used to run current ad campaigns in ad channels. Authentication accounts refer to the accounts that have access to the ad accounts. A one-time login to the authentication account is required to create a connection for some ad channels.
After selecting the ad channel, log in to the authentication account. Once logged in, select the ad account you want to configure as the receiving end of the audience sent by Airbridge.
For more details on how to create connections for each ad channel, refer to the information below.
1. After selecting Meta ads, log in to your authentication account in the pop-up window. The authentication account must have access to the ad account you want to configure as the receiving end of the connection.
2. Click Continue as your_account.
3. Select Opt in to current Business only and Airbridge. Click Continue.
5. Select Opt in to all current and future Pages. Click Continue.
6. Click Save to grant access to Airbridge.
7. Click Got it to connect your Facebook account with Airbridge.
8. Select the ad account to send audiences. Click Submit.
1. After selecting Google Ads from the modal window, log in to your authentication account in the pop-up window. The authentication account must have access to the ad account you want to configure as the receiving end of the audience sent by Airbridge. Note that the authentication account must have a Standard or Admin access level.
2. Click Allow to grant access to Airbridge.
3. Select the ad account to send audiences. Click Submit.
1. After selecting TikTok for Business, log in to your authentication account in the pop-up window. The authentication account must have access to the ad account you want to configure as the receiving end of the audience sent by Airbridge.
2. Click Confirm to grant access to Airbridge.
3. Select the ad account to send audiences. Click Submit.
1. After selecting Criteo, log in to your authentication account in the pop-up window. The authentication account must have been assigned the administrator role in the Commerce Growth dashboard.
2. Scroll down in the popup window and click Approve to grant access to Airbridge.
3. Select the ad account to send audiences. Click Submit.
1. After selecting Kakao, log in to your authentication account in the pop-up window. If you cannot access the ad account used to run your Kakao campaigns, the connection cannot be created.
2. Scroll down in the popup window and click Approve to grant access to Airbridge.
3. Select the ad account to send audiences. Click Confirm to create the connection.
4. Once the connection is created, it may take up to 6 hours for the audience to be added to the Kakao Moment dashboard. Then, after 48 hours, the audience data will be available in the Kakao Moment dashboard.
1. After selecting Adikteev, enter the email and password used for the Adikteev login into the respective fields and click Submit.
2. Select the ad account to send audiences and click Submit.
After selecting the ad channel, enter the credentials into the modal window. For more details on the required credentials for each ad channel, refer to the information below.
Request the following credentials to your RTB House account manager and enter them into the modal window.
Account ID
API Key
Request the following credentials to your Appier account manager and enter them into the modal window.
API Key
Request the following credentials to your Adison Offerwall account manager and enter them into the modal window.
API Key
Attention
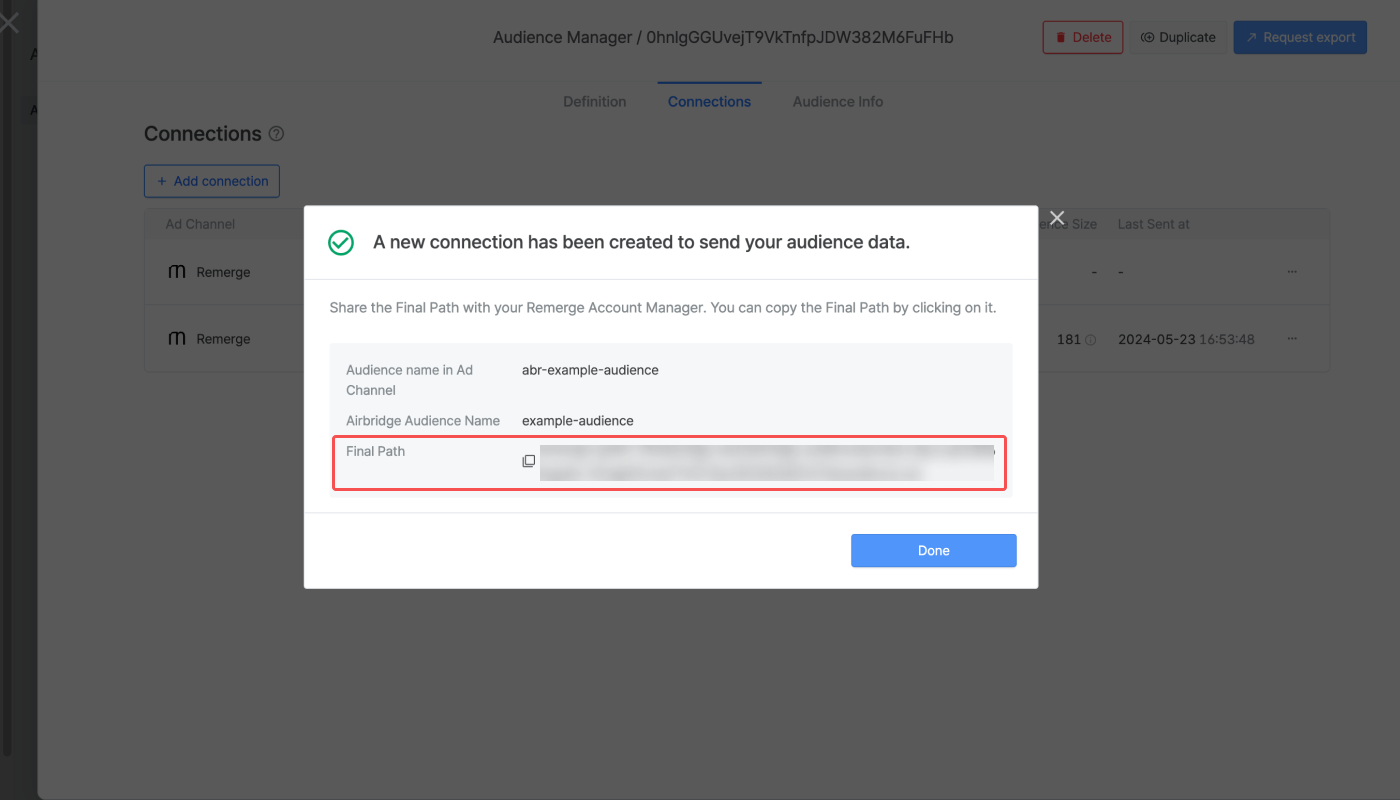
The final path that appears after entering the credentials must be shared with your Remerge account manager. The final path can also be found when clicking Details of the connection in the [Connection] tab.
Request the following credentials to your Remerge account manager and enter them into the modal window.
Client Path
S3 Access Key ID
S3 Secret Access Key
The following credentials are required to create a connection to send audience data to Cauly. Request the credentials from Cauly.
Android dutCd
iOS dutCd
Attention
A dutCd can be used for sending only 1 audience. To send multiple audiences to Cauly, you need multiple dutCds from Cauly.
The following credentials are required to create a connection to send audience data to Persona.ly. Request the credentials from Persona.ly. The API Keys are different by platform. You may enter the API Key for only 1 platform or for both to create a connection.
Android API Key
iOS API Key
The following credentials are required to create a connection to send audience data to Daangn. Request the credentials from Daangn.
Account ID
API Key
The following credentials are required to send your Airbridge audience to Naver.
Credentials | How to find it |
|---|---|
Account ID | Navigate to the [Ad account info] menu in the Naver Performance Display Ad platform |
API Key | Navigate to [Tools]>[Audience Management]>[My Target]>[External Audience] in the Naver Performance Display Ad platform |
If you want to send an audience to an ad channel, you need to add a connection to the audience. Follow the steps below.
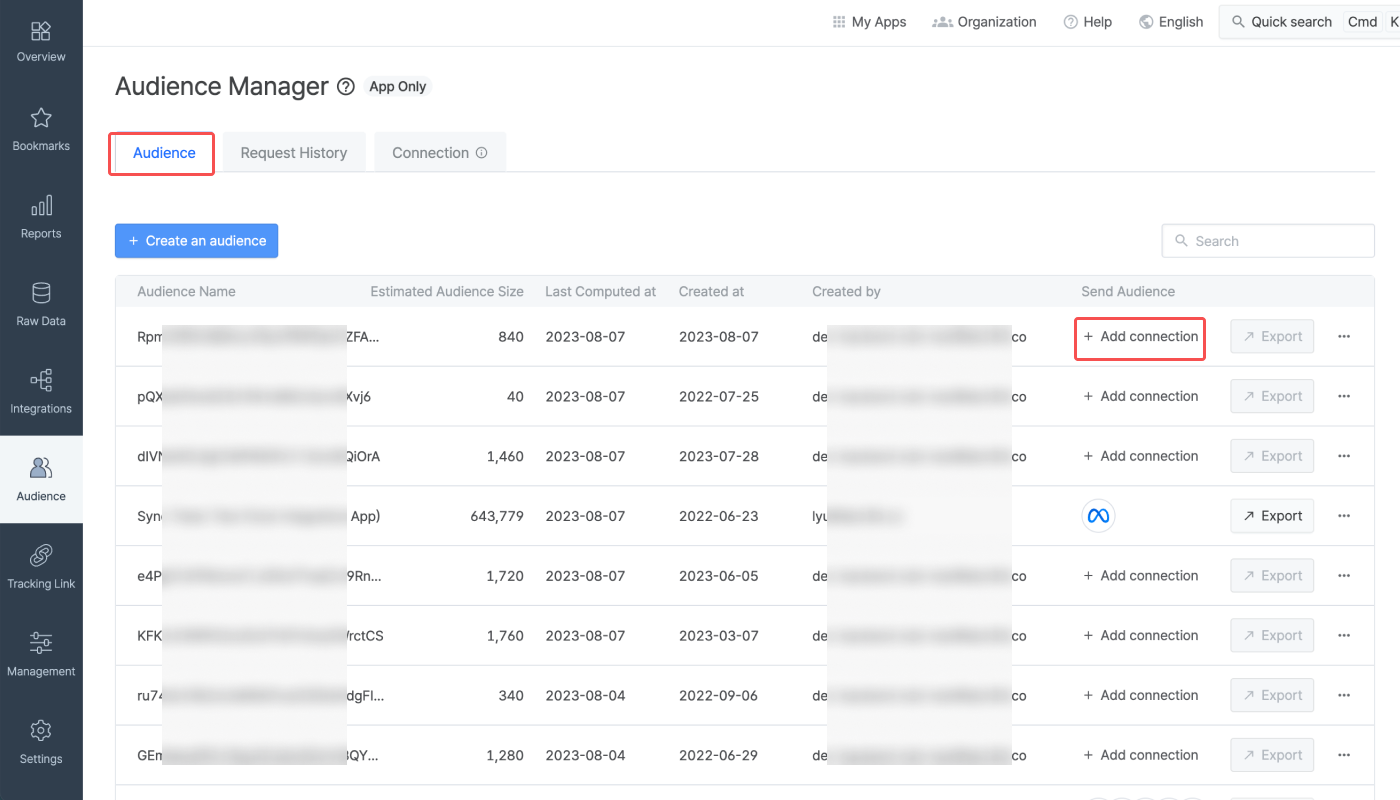
1. Navigate to [Audience]>[Audience Manager], select the [Audience] tab, and click Add connection of the audience you want to send to an ad channel.
If you want to create a new audience, refer to this article.
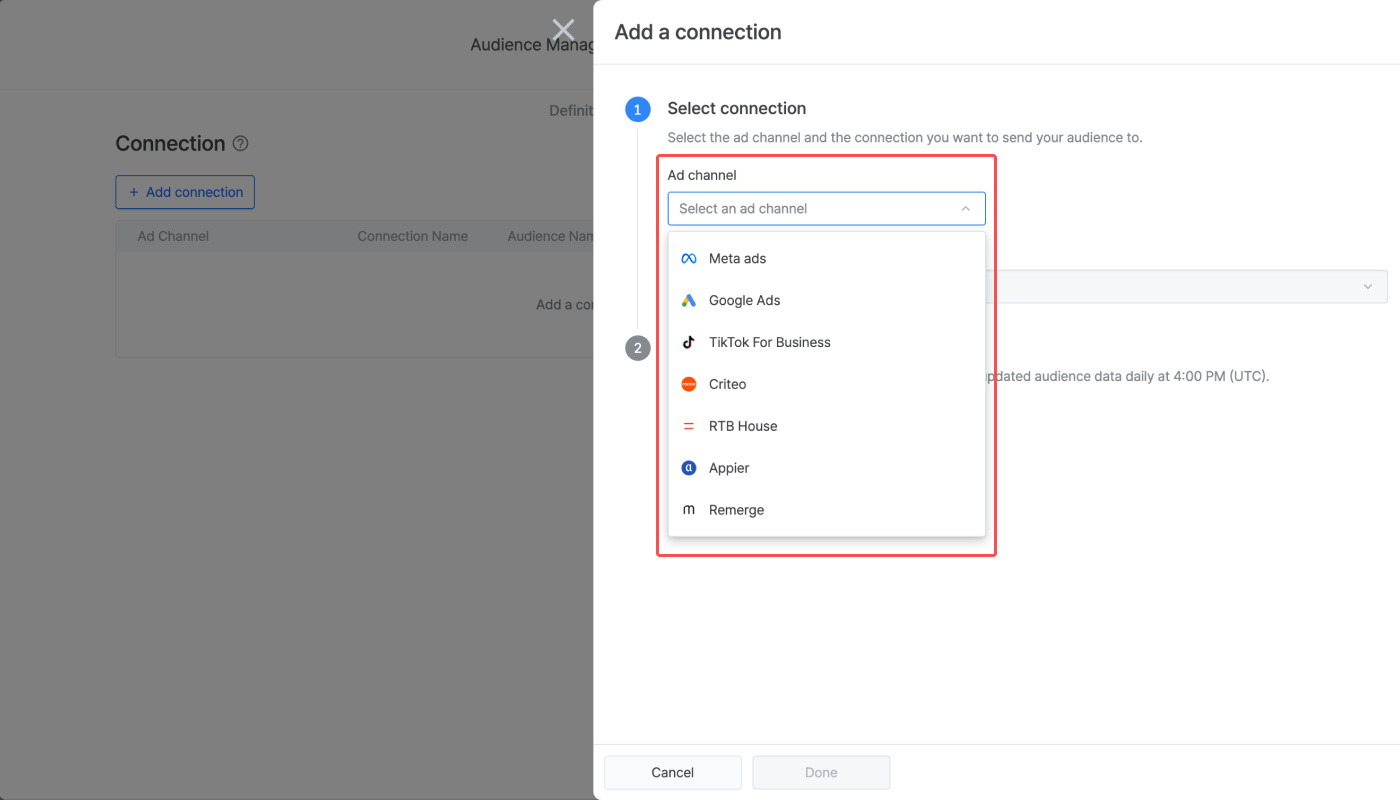
2. Select the ad channel you want to send the audience to.
3. Select the connection. If there is no connection you want to select, create a new connection. Depending on the ad channel, the ways to create a new connection differ.
Logging in to the authentication account: Click the Login button below the connection drop-down menu.
Entering credentials: Click Create a connection from the connection drop-down menu.
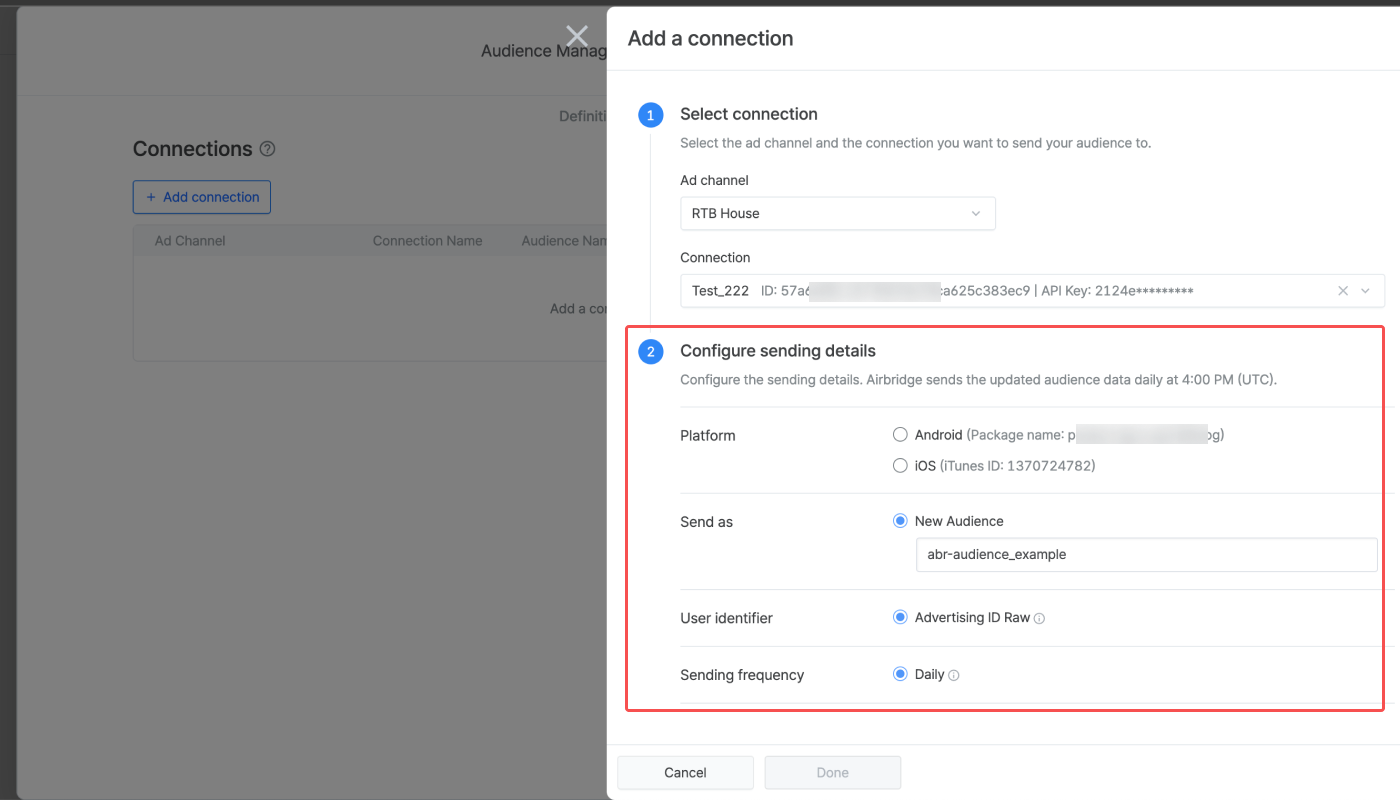
4. Configure sending details and click Done. The details include:
For Platform, which is only required for certain ad channels, select between Android and iOS to send only either GAIDs or IDFAs.
For Send as, enter the audience name you want to see in the ad channel. The name you have set in Airbridge is automatically entered for your convenience with the
abr-as prefix.User identifier shows the type of identifiers sent to the ad channel. GAID and IDFA are selected by default.
Sending frequency shows the frequency of audience updates to the ad channel. The audience is sent daily at 4:00 PM (UTC).
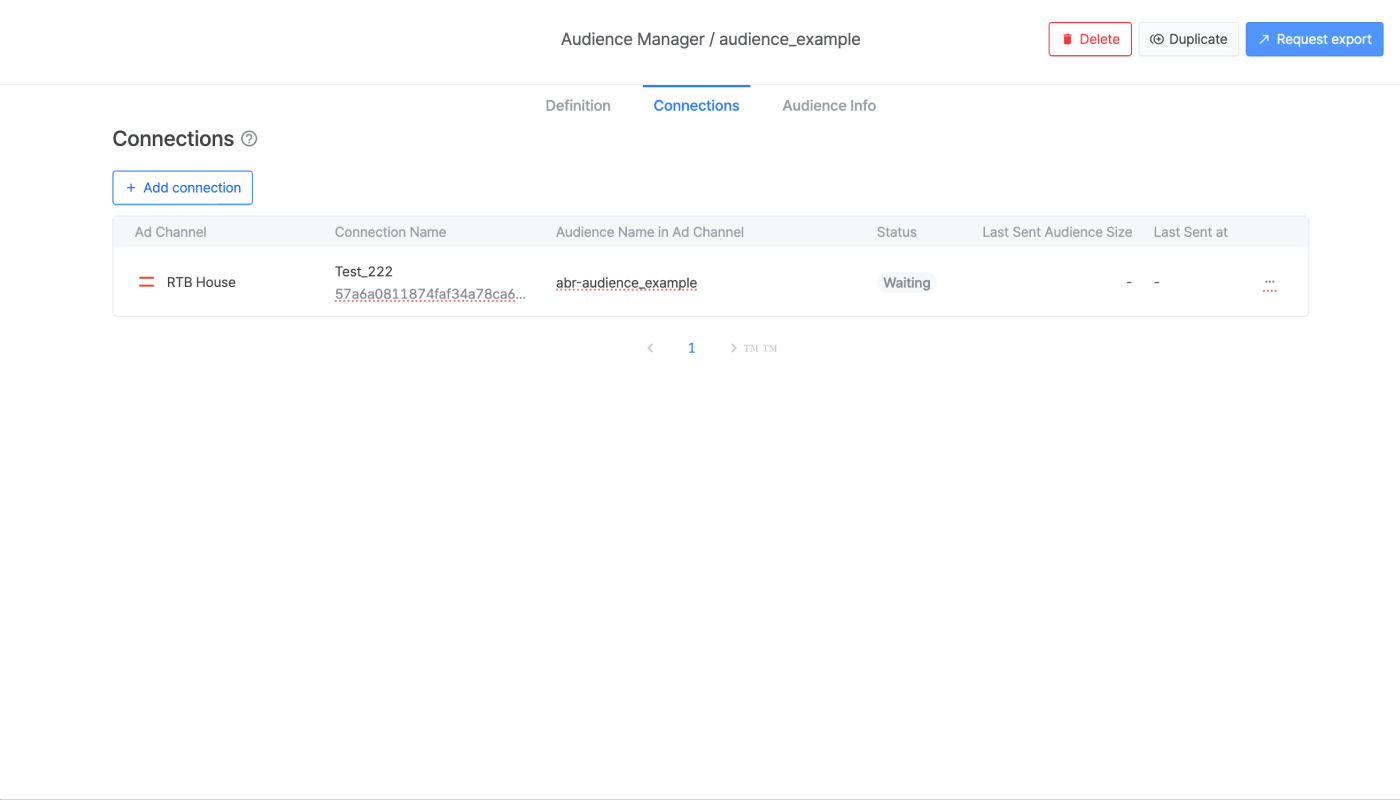
5. Confirm that the connection is added to the list. The status will change from “Waiting” to “Success” when the audience is sent to the ad channel for the first time. The status update may be subject to a delay of up to 30 minutes, depending on the ad channel.
The audience delivery status can be monitored by audiences and by connections.
Attention
Even though Airbridge successfully sends audiences to ad channels daily at 4:00 PM (UTC), you may have to wait before utilizing the audiences for targeting. This delay occurs because ad channels may require additional time to identify users suitable for targeting from the received audiences.
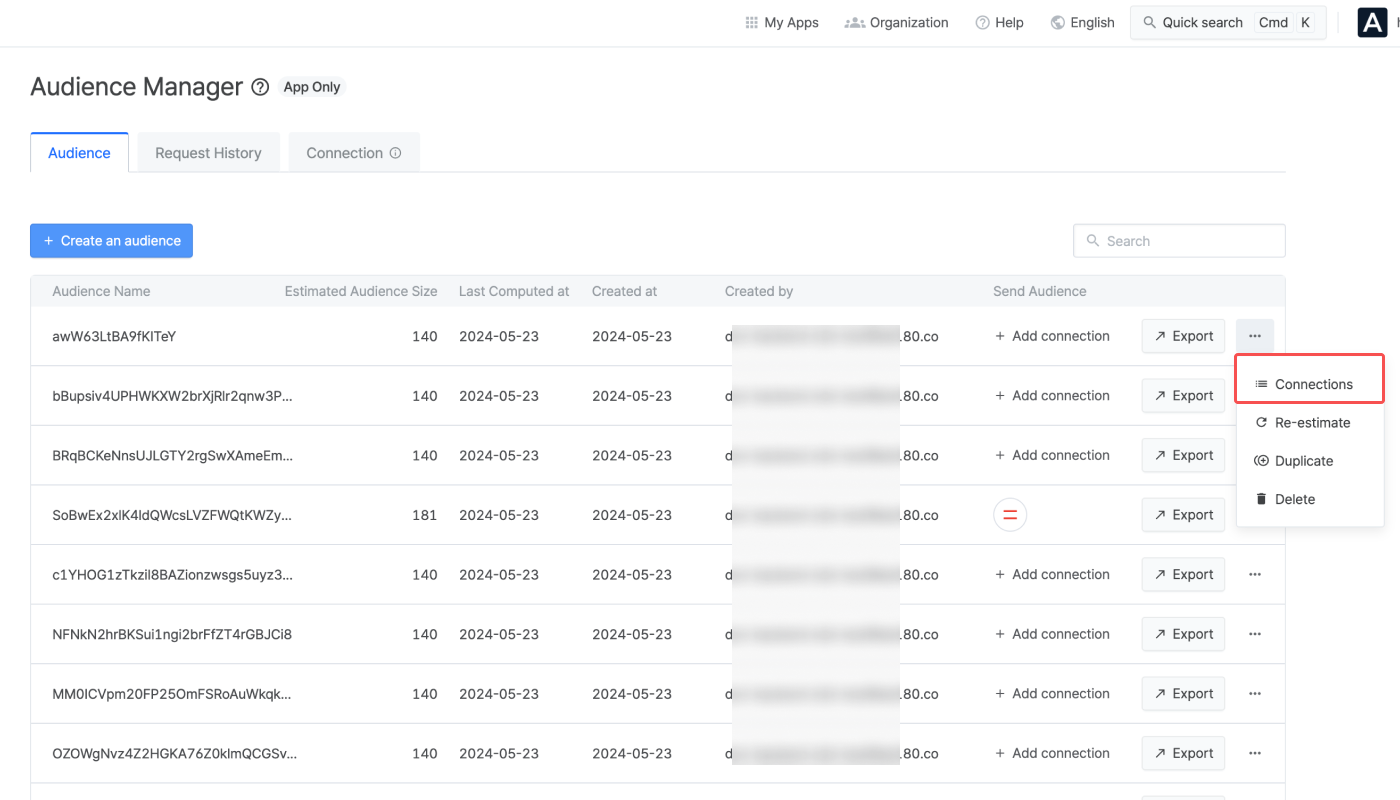
Select the [Audience] tab and click an audience, or click the […] icon and select Connection to open the side panel.
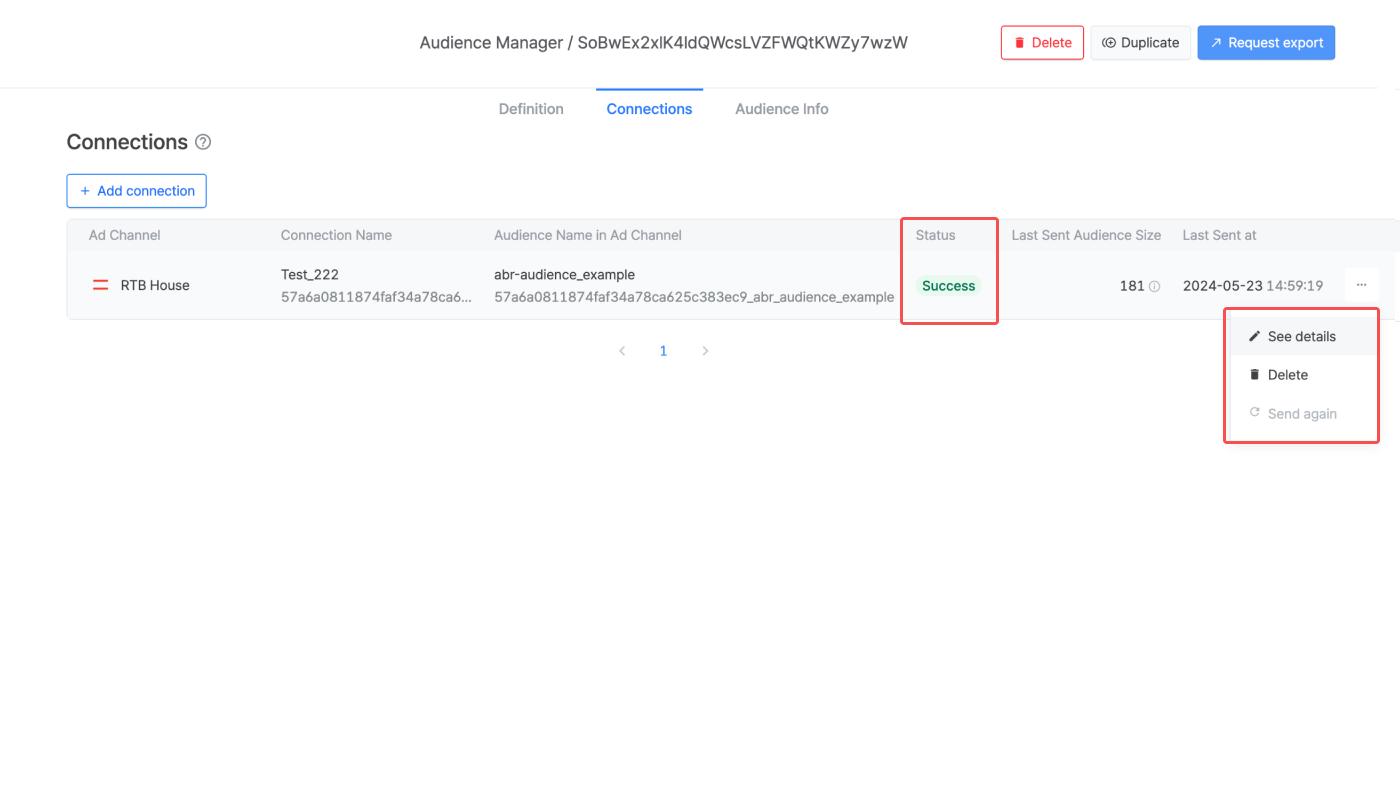
From the connection list, you can monitor the audience delivery status by the connections the audience is sent. Click […] and select See details to view the connection details. When selecting Delete, Airbridge will no longer send the audience to the ad channel through the connection.
Read on to learn more about the connection status by audience.
Status | API Response | Description |
|---|---|---|
Waiting | WAITING | Airbridge is preparing to deliver the audience. |
Success | SUCCESS | The delivery is being successfully made, daily at 4:00 PM (UTC). |
Incomplete delivery | ERROR_PARTIAL | The size of the audience received by the ad channel is smaller than the size of the audience sent by Airbridge. Click the […] icon and select Send again to push the audience manually. |
Re-authenticate | ERROR_AUTH | The delivery failed due to an authentication error with the ad account or the credentials used for creating a connection. Navigate to [Connection]>[Action]>[Re-authenticate] and update the credentials. |
Reconnect | USER_ACTION_REQUIRED | The audience information cannot be found in the ad channel, or the audience name is duplicated. Delete the existing audience and the connection, and create a new audience and connection to reconnect with the ad channel. |
Send again | ERROR | The delivery failed due to an error, possibly from the ad channel's side. Delivery will resume within 24 hours. You may click the […] icon and select Send again to push the audience manually. |
Action required | ERROR_DESTINATION | The delivery failed because the ad channel settings were incomplete. To learn about the required settings by ad channel, refer to the user guide. |
In the [Connection] tab, you can see the audience delivery status of all connections. The table also shows the number of audiences being sent through each connection.
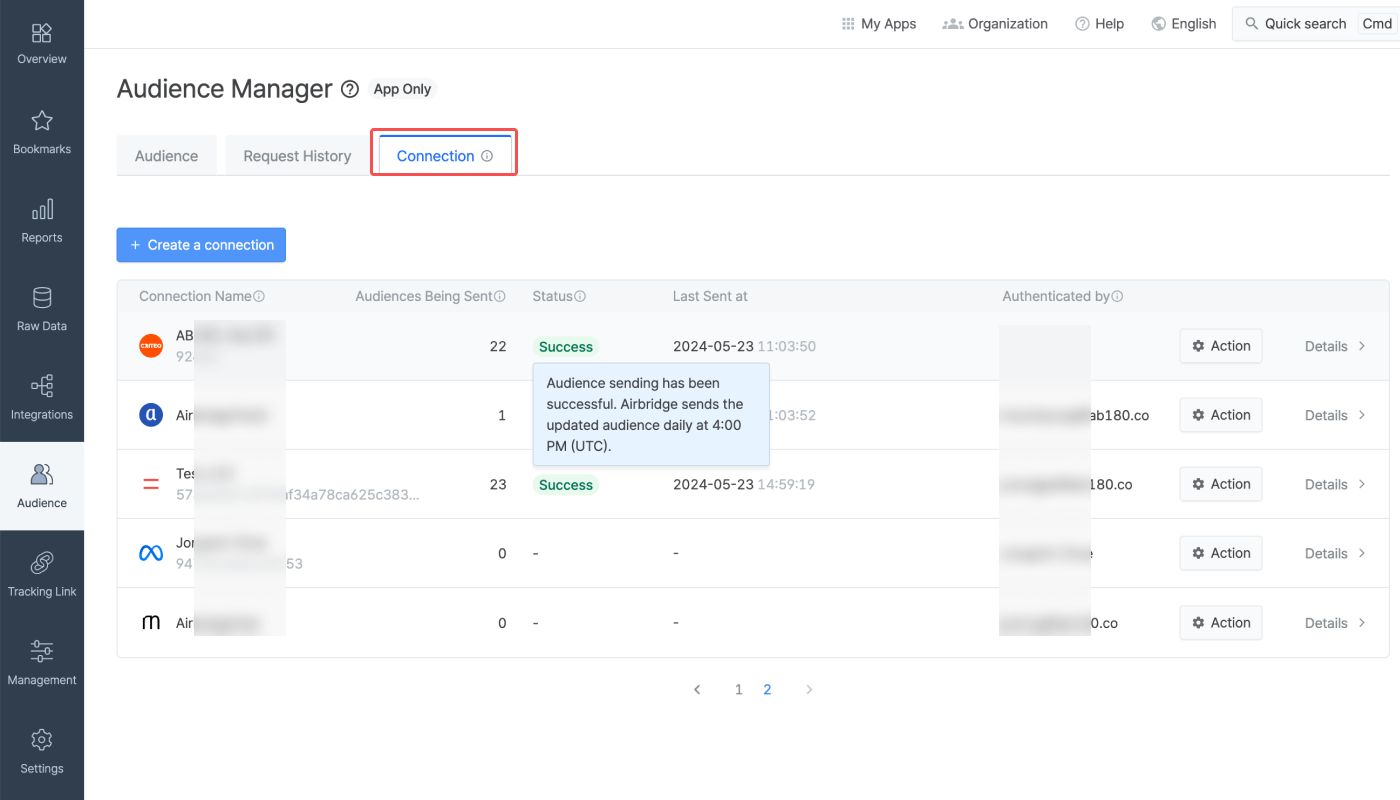
If you have configured to send multiple audiences to a single ad account, the connection status of the ad account will show “Failed” even when only one of the audiences fails to be sent. Hover over the status tag to see the description.
Read on to learn more about the connection status by ad account.
Status | Description |
|---|---|
Waiting | Airbridge is preparing to deliver one or more audiences. |
Success | All deliveries are being successfully made, daily at 4:00 PM (UTC). |
Incomplete delivery | The size of one or more audiences received by the ad channels is smaller than the size of the audiences sent by Airbridge. |
Failed | One or more audiences couldn’t be delivered due to an authentication error with the ad account or the credentials used for creating a connection. Or, one or more audiences couldn’t be delivered due to an error that requires re-authentication, resending, or action in the ad channel’s dashboard. |
Click the connection to see the list of all audiences sent through the connection and their audience delivery status. To get additional details about each connection, click the […] icon and select See details. If you select Delete, Airbridge will no longer send the audience through the connection.
Note that the status shown in the connection list is the same as the connection status by audience found in the [Connection] tab.
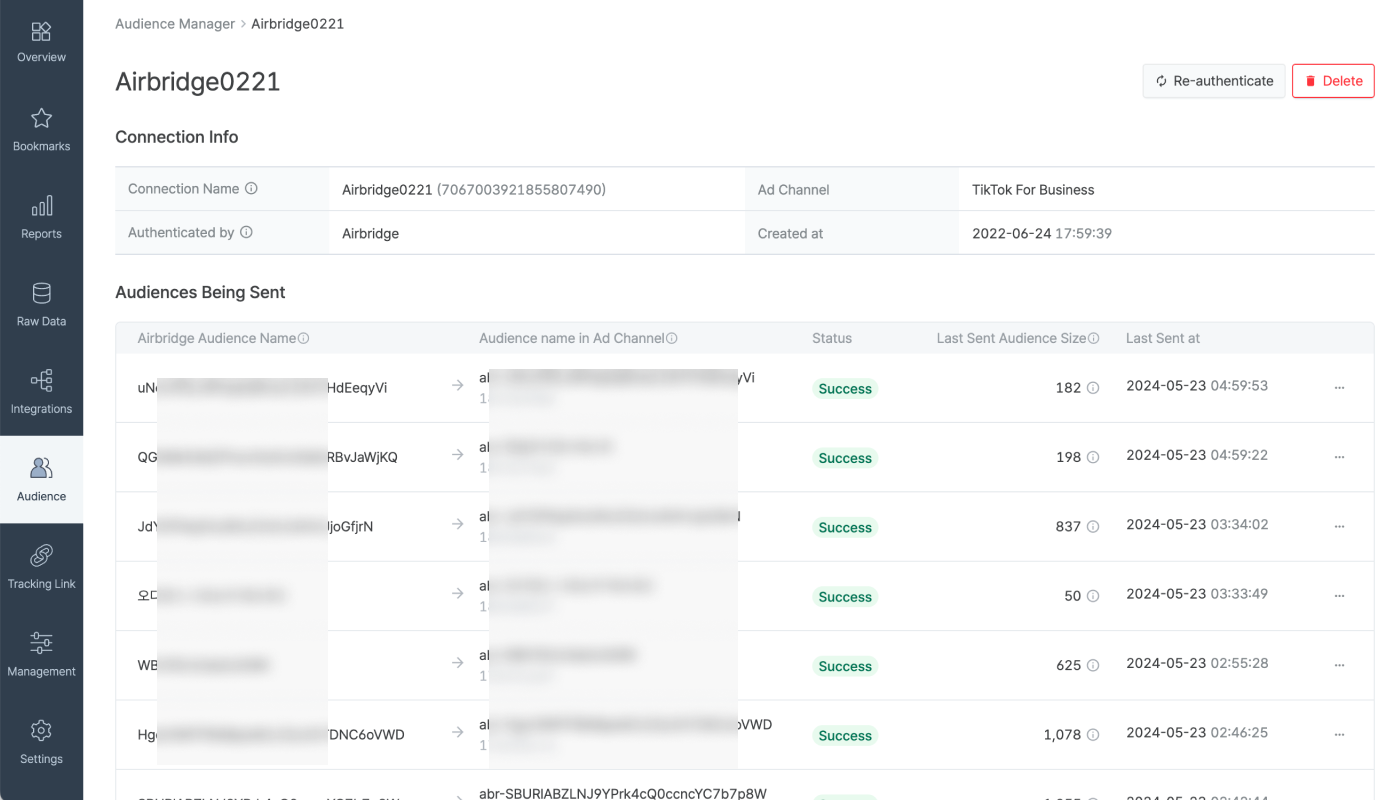
Note
Airbridge sends a notification email if the audience delivery fails. The email is sent to the following Airbridge users:
The Airbridge user that created the audience's connection or authenticated the connection through ad channel logins, etc.
The Airbridge user that added the audience to the connection
App Owner
If you encounter issues while sending audiences, follow the instructions below depending on the status tag.
The audience delivery status tag may show “Success,” but the number of users actually sent to the ad channel could be 0. This is because, at the time of audience delivery, no users meet the conditions defining the audience, so the count could be 0.
To resolve the issue, navigate to the [Audience] tab and check the estimated audience size. If the estimated audience size is 0, modify the conditions.
If the estimated audience size is larger than 0, check whether the when clause has been configured as during last 1 day, and the “Include Today” option is checked. With today included, Airbridge may have to sort out users within a very short period of time, from limited data. Note that Airbridge sen audiences daily at 4:00 PM (UTC).
Let’s say the when clause for an audience is set to “during the last 1 day, including today,” and your app time zone is set to “Asia/Seoul,” which is UTC +09:00. In this case, every day, Airbridge has to sort out users who have meet all the set conditions only within the 1 hour-window, between 3:00 PM (UTC) and 4:00 PM (UTC). This increases the likelihood of having no users meeting the set conditions, resulting in an audience with 0 user count even if the connection status shows “Success.”
If the status tag shows “Re-authenticate,” navigate to the [Connection] tab, click the [Action] icon, and select Re-authenticate. Once the authentication credentials are updated, audiences that could not be sent due to invalid credentials will be sent to the ad channel again.
The re-authentication method varies depending on your initial authentication method:
Log in to the authentication account: Log in to a new authentication account that has access to ad accounts.
Enter credentials: Check the credentials and enter them correctly again.
Make sure that the audience complies with the Meta Advertising Standards.
To view audiences in Meta Ads Manager, select the [Audiences] tab from the left menu bar.
Make sure you have enabled 2-step verification in your Google Ads account, under [Admin]>[Access and security]>[Security].
Make sure that the ad account has a Standard or Admin access level in your Google Ads account, under [Admin]>[Access and security]>[Users].
To view audiences in your Google Ads dashboard, navigate to [Tools]>[Shared library]>[Audience manager].
If the status tag shows “Reconnect,” it means that the audience information has been deleted from the ad channel or an error occurred with the ad channel. In such cases, you need to delete the audience and connection both in the Airbridge and the ad channel’s dashboard. Then, create the audience and connection again to reconnect.
If “Reconnect” appears for Kakao and Criteo connections, you need to delete the audience and connection both in the Airbridge and the ad channel’s dashboard. Then, create the audience and connection again with unique names to reconnect.
If the status tag shows "Action required," it means that a particular action is required in the ad channel’s dashboard. See below for the required action details.
Meta ads
Make sure you have accepted Meta’s Customer List Custom Audiences Terms in Meta Ads Business Manager.
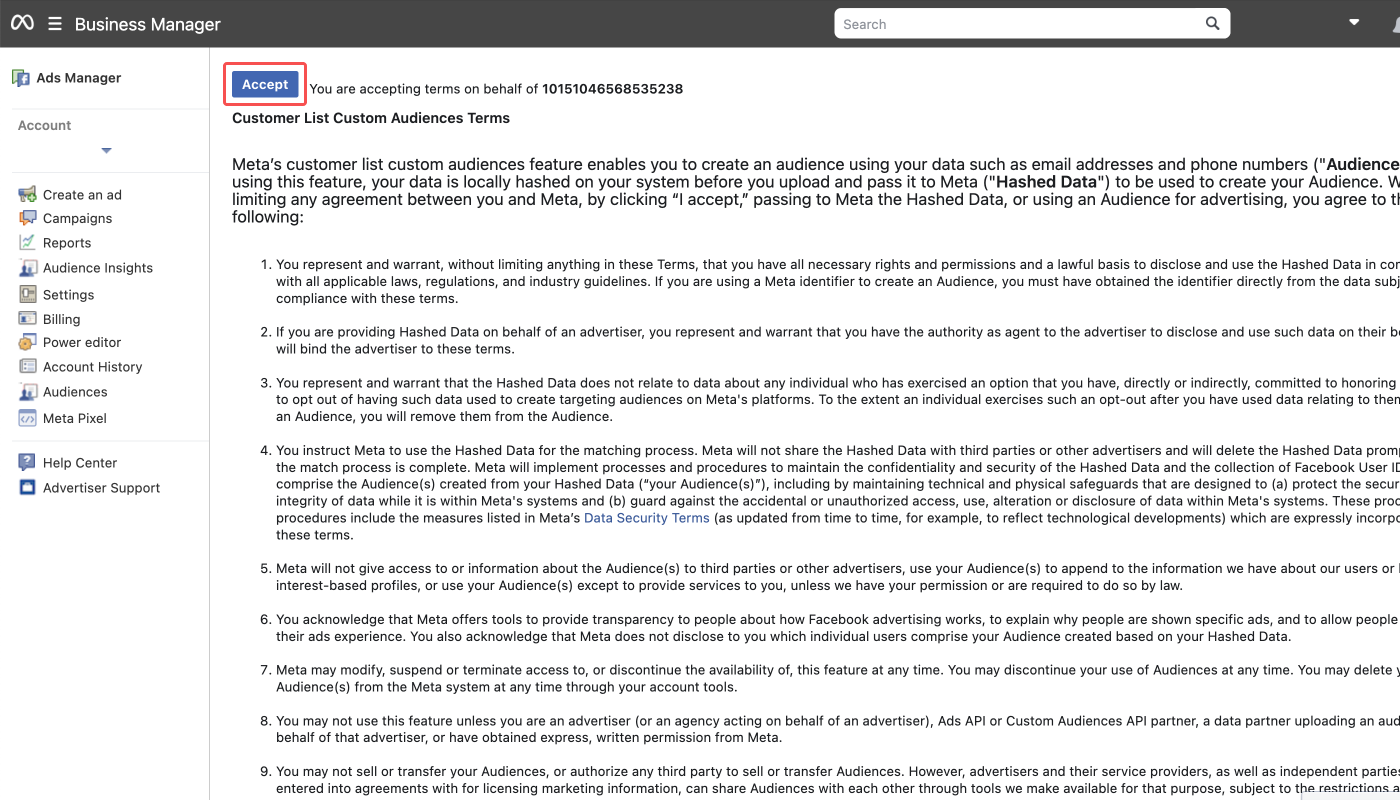
Delete unnecessary customer files from the Naver Performance Display Ad platform. The maximum number of customer files allowed is 30. To delete a customer file, navigate to [Tools]>[Audience Management]>[My Target]>[Customer Files], click the customer file you want to delete, and click Delete.
If a customer file you want to delete is part of an Airbridge audience that is being sent from Airbridge, delete it from the Naver Performance Display Ad platform and delete it from Airbridge as well.
To delete an Airbridge audience, navigate to [Audience]>[Audience Manager]>[Connection]. Click Details of a connection and delete unnecessary audiences.
Kakao
Delete unnecessary audiences and customer files from Kakao Moment. The maximum number allowed is 50 for each. For more details, refer to the Kakao developers documentation.
If an audience or a customer file you want to delete is part of an Airbridge audience that is being sent from Airbridge, delete it from Kakao Moment and delete it from Airbridge as well.
To delete an Airbridge audience, navigate to [Audience]>[Audience Manager]>[Connection]. Click Details of a connection and delete unnecessary audiences.
If the connection status shows “Incomplete delivery” or "Send again," it means an error on the ad channel’s side or an unknown error occurred. The audience is automatically resent within the next 24 hours.
Alternatively, you can manually send the audience again: navigate to the [Connection] tab, click Details, click [...], and select “Send again.” When the transmission starts, the connection status will show “Waiting” and change to “Success” when it ends.
For Google Ads and TikTok For Business, check the information below before sending the audience again.
Check if the audience complies with Google Ads’ policy. If not, consult Google Ads directly. To view audiences in your Google Ads dashboard, navigate to [Tools]>[Shared library]>[Audience manager].
TikTok For Business
Once the audience is sent to TikTok For Business, it may take up to 48 hours until TikTok For Business shows the updated audience data. Until then, the status will show “Send again.” For more details, refer to the TikTok For Business documentation.
Was this helpful?
