Organization-level User Management
Airbridge users have different user management capabilities depending on the organization role they are assigned.
Understanding Airbridge user roles
For effective user management, understanding the capabilities of different user roles is essential. For details about user roles in Airbridge, refer to this article.
Admins and Managers can invite users to the organization and manage them. Members can only view the user list.
创建组织的用户将被自动分配为管理员。
管理员具备管理整个组织的权限,并且是唯一可以修改组织名称的角色。
管理员的主要权限如下:
邀请或删除用户:在邀请用户时,可分配其组织角色与 App 角色。
更改现有用户的角色:可更改组织内现有用户的组织角色与 App 角色。
注册新 App:可在组织下注册新的 App。
经理是可以管理组织内其他用户的组织角色,但无法修改组织名称。
经理的主要权限如下:
邀请或删除用户:可与管理员一样邀请或删除其他用户。在邀请用户时,可分配的组织角色仅限于经理或成员。App 角色则可自由分配。
更改现有用户的角色:可更改组织内现有用户的组织角色与 App 角色。
注册新 App:可在组织下注册新的 App。
You need to navigate to the [Organization Settings] page to manage users on the organization level. Follow the below instructions to find the [Organization Settings] page.
From the [My Apps] page, select the [Organization] menu.

From the app dashboard, select the [Organization] menu in the top menu bar, or select Organization Settings from the drop-down menu when clicking the account name on the top right.

Note
Agency users can be managed in the [Organization Info]>[Agency] menu.
Media Partner users can be managed in the [Settings]>[User Management] menu. For app-level user management, refer to this article.
On the [Organization Settings] page, select the [Internal Users] menu to manage internal users of the organization.

Admins and Managers have access to the following capabilities in the [Internal Users] menu:
Invite users to the organization and grant organization roles at once. Select apps to grant access to new users and assign app roles.
Change the organization roles and app roles of existing users. Grant users access to new apps.
Remove access to certain apps from users or remove users from the organization.
On the [Internal Users] page, click Invite a new user.

In the modal window, enter the email of the user you want to invite and select the organization role, app, and app role you want to assign to the new user.

Read on to learn how to invite users using the modal window.
Enter the email addresses of the users you want to invite to the organization. You can enter multiple emails at once by separating them with an enter, tab, or space. An email will be sent out with an invitation link. Those who are new to Airbridge will be guided to sign up via the invitation link.
Once signed up, they can accept the invitation to the organization. You can also copy the list of email addresses from a spreadsheet and paste them into the field.
Select the organization role you want to assign the new users. This is a required field. Managers can select only “Manager” or “Member.” Refer to this article for more details on organization roles.
Select apps you want to grant access to the new users. If you can’t find the app you want to grant access, register the app to Airbridge first. This is not a required field - you can invite the user to your organization first and grant app access later.
Select app role, which will apply to all selected apps. Refer to this article for more details on app roles.
Click Send invitation once you entered all fields. Users will receive an email with the invitation link, which is valid for 72 hours from when the email is sent. Users can accept the invitation by clicking the invitation link in the email.

Refer to the following table to learn about the invitation status.
Status | Description |
|---|---|
Pending | The user has not accepted the invitation yet. |
Joined | The user accepted the invitation. The user is now part of the organization. |
Expired | The invitation link sent to the user has expired. |
Read on to learn how to manage internal users.
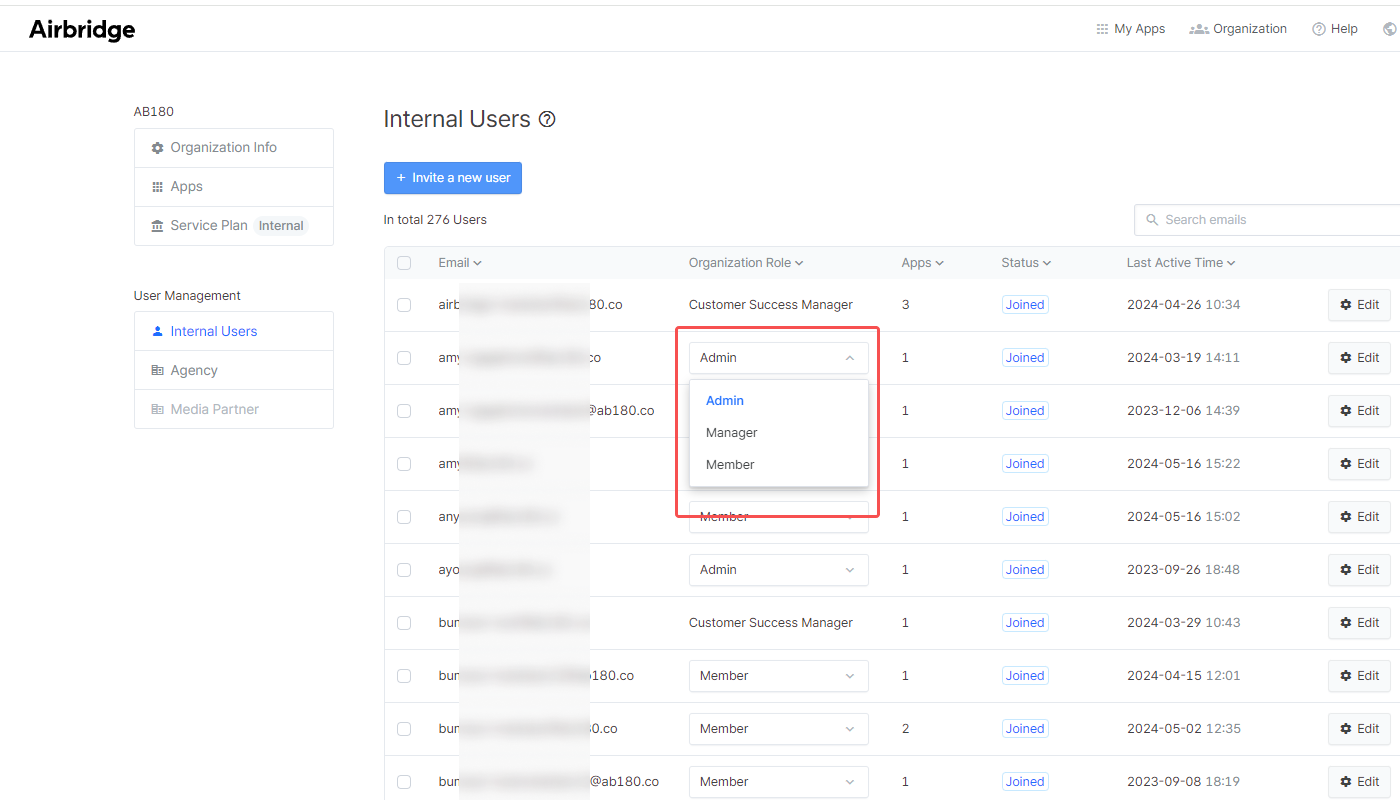
From the [Internal Users] tab, select the new role you want to assign to the individual user.
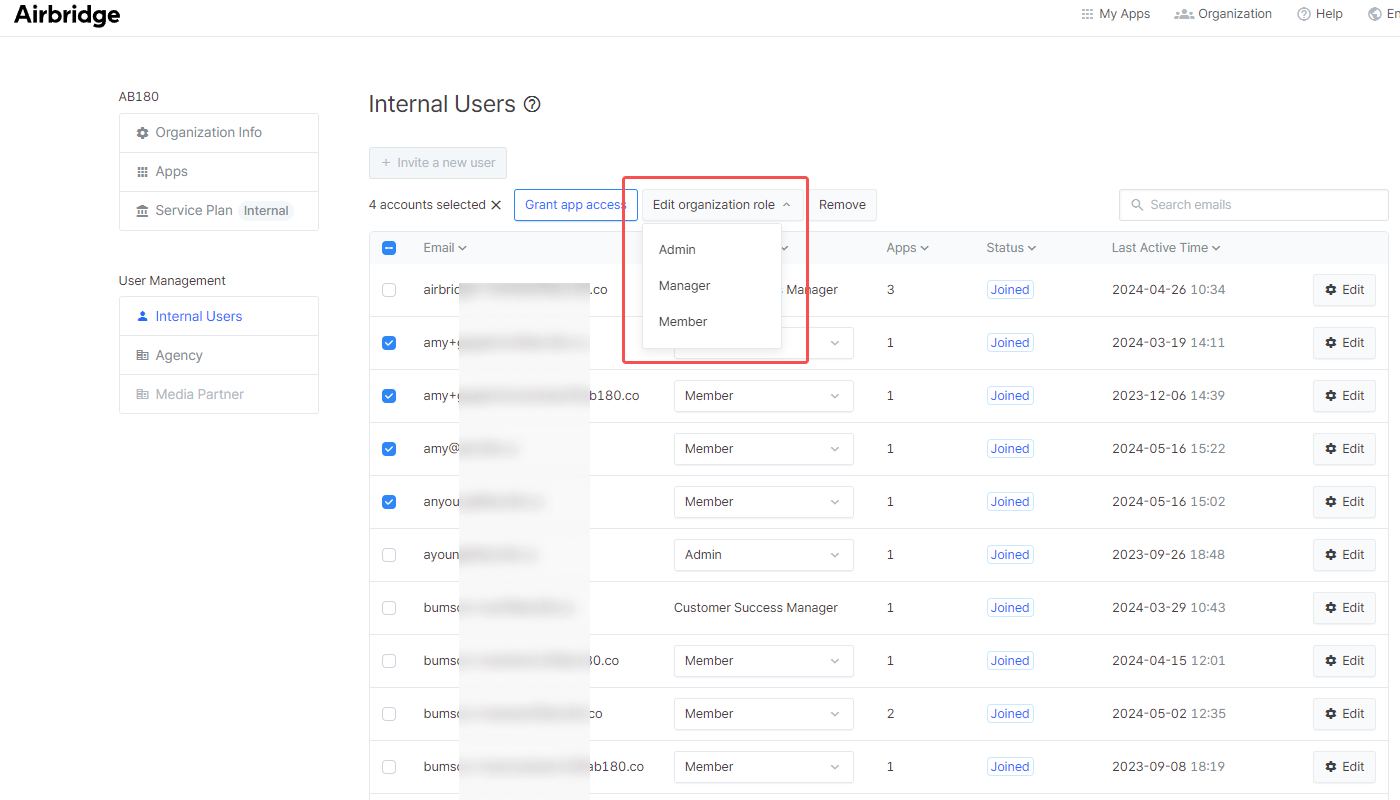
You can use the checkboxes to select multiple users, click [Edit organization role], and select the new role you want to assign to all selected users at once.
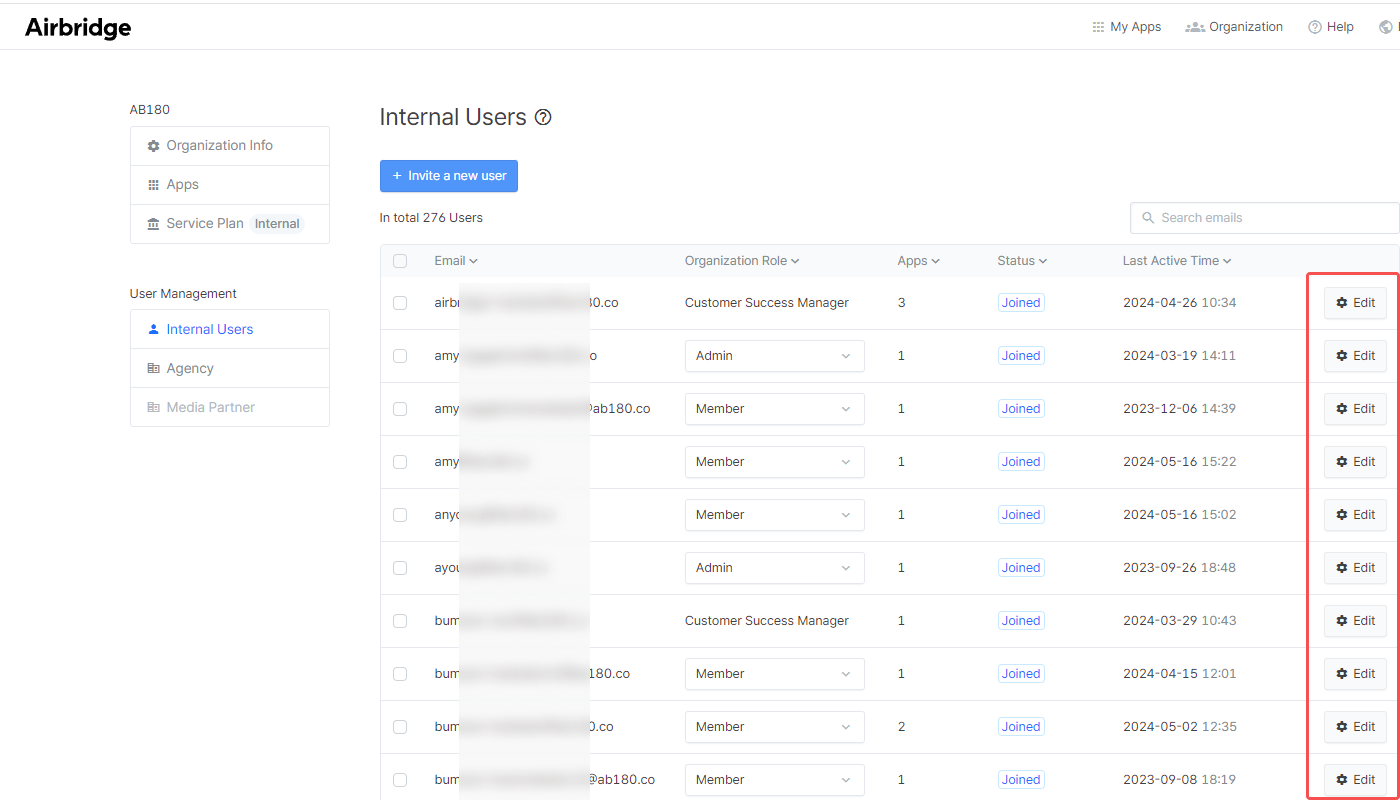
To change the app roles of individual users, click Edit and open the side panel.
In the side panel, click App role and select the new app role you want to assign to the user.

You can use the checkboxes to select multiple apps, click Edit app role, and select the new app role you want to assign for all selected apps.

To grant app access to individual users in the organization, click Edit and open the side panel.

Click Grant app access.

In the modal window, select the app you want to grant access to and select the app role to define the app access capabilities for the user.

You can use the checkboxes to select multiple users and click Grant app access to grant app access to all selected users at once.
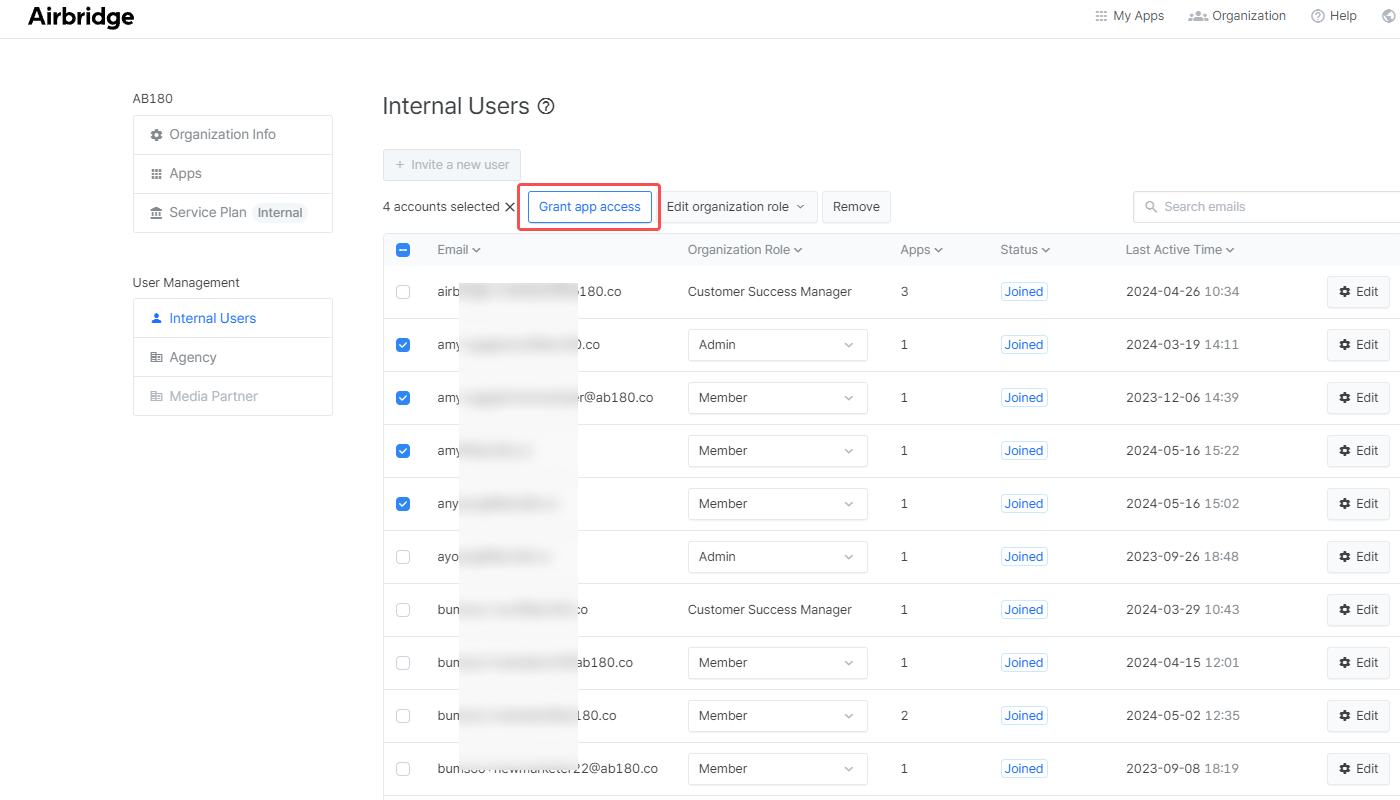
The app and app role you select in the modal window will be applied to all selected users. If the selected user already has access to the selected app, only the app role will change.

To revoke app access from individual users, click Edit and open the side panel.

In the side panel, click Revoke access to revoke access to individual apps.
You can use the checkboxes to select multiple apps and click Revoke access to remove access permission to all selected apps at once.

Once the app access is revoked, the user can no longer access the app, and the API token and tracking link API token assigned to the user will expire. Data collected via the tracking links created by the user will remain.

To remove users from the organization, click Edit and open the side panel.

In the side panel, click Remove user from the organization to remove the user. Once the access permission to the selected app is removed, the user can no longer access the app, and the API token and tracking link API token assigned to the user will expire. Data collected via the tracking links created by the user will remain.

You can use the checkboxes to select multiple users and click Remove to remove all selected users at once.

There are some exceptions in user management. Refer to the following.
This user’s app role CAN’T be changed.
This user’s app access CAN’T be removed.
This user CAN’T be removed from the organization.
This user’s organization role CAN’T be changed.
This user CAN’T be removed from the organization.
The user’s organization role CAN’T be changed.
The user CAN’T be removed from the organization.
This exception applies to a single scenario where a Manager user tries to edit the organization role of an Admin user or remove the Admin user from the organization.
You CAN’T change your own organization role.
You CAN’T remove your own account from the organization.
Attention
Admins and managers can access the [Agency] tab on the [Organization Settings] page, whereas Agency users have limited access.
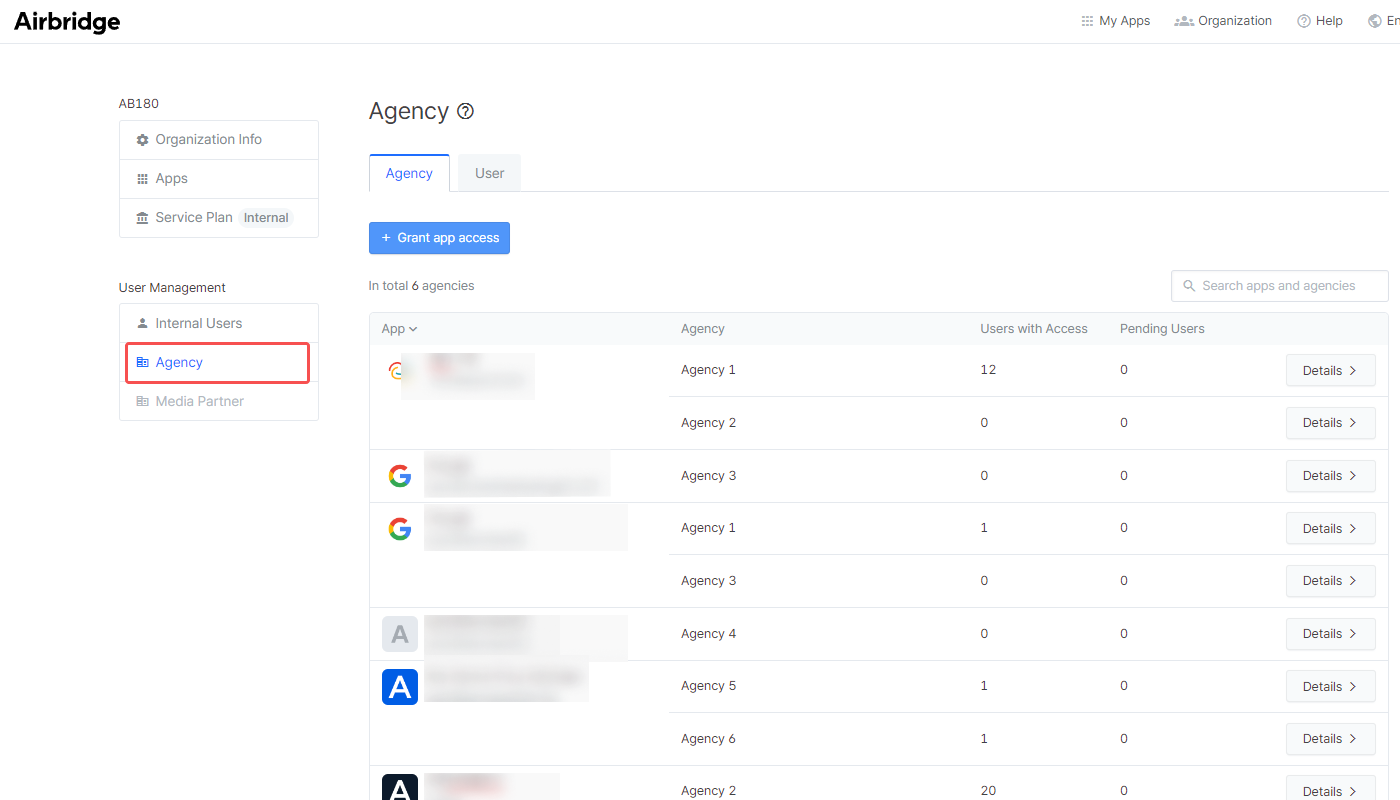
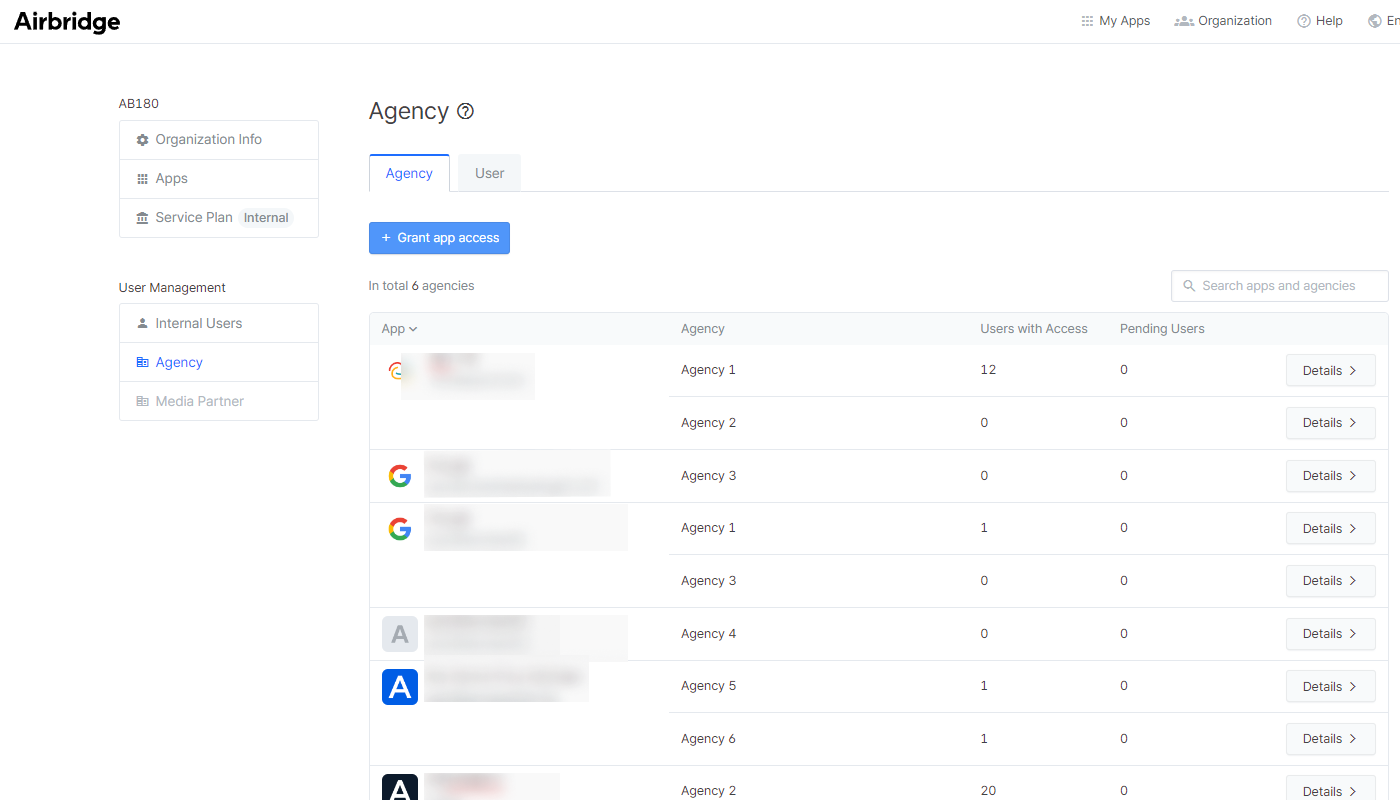
On the [Organization Settings] page, select the [Agency] menu to manage Agency users.
Can Agency users grant app access to other users?
Agency users can only grant access to the app that they already have access to other Agency users who belong to the same Agency.
On the [Agency] page, Agency users can be granted access to additional apps by clicking Grant app access, which opens the following modal window.

If you want to grant access to a specific app to which some users from a specific Agency have already given app access, click Details of the Agency from the list to land on the Agency page and then click Grant app access.
If the Agency user you want to grant app access to is already a member of your organization, the Agency user will have app access once access is granted via the modal window. Non-members receive an email invite valid for 72 hours and will have app access once they accept the invitation.
Read on to learn how to grant app access using the modal window.
Select the app to grant access to from the drop-down menu. Multiple apps can be selected.
Select the agency the Agency user is registered with. Only 1 agency can be selected. If you can’t find the agency name you are looking for, click here to submit a request for a new agency registration.
Enter the email of the Agency user you want to grant app access to.
Members of the organization will have app access once access is granted.
Non-members receive an email invite valid for 72 hours and will have app access once they accept the invitation.
You can invite or grant app access to multiple users at once by separating the emails with an enter, tab, or space.
Limited capabilities for Agency users
Agency users can only view the list of users who belong to the same Agency. Agency users cannot view the list of apps other users have access to.
Read on to learn how to manage the Agency users' app access.
On the [Agency] page, click Details to view the list of specific Agency users with access to a specific app.

You can view the list of Agency users who have access to a specific app. You can also see the invitation status of individual Agency users here.

From the [Users] tab, find the email of the Agency user you want to view the list of apps granted access to and click Edit.
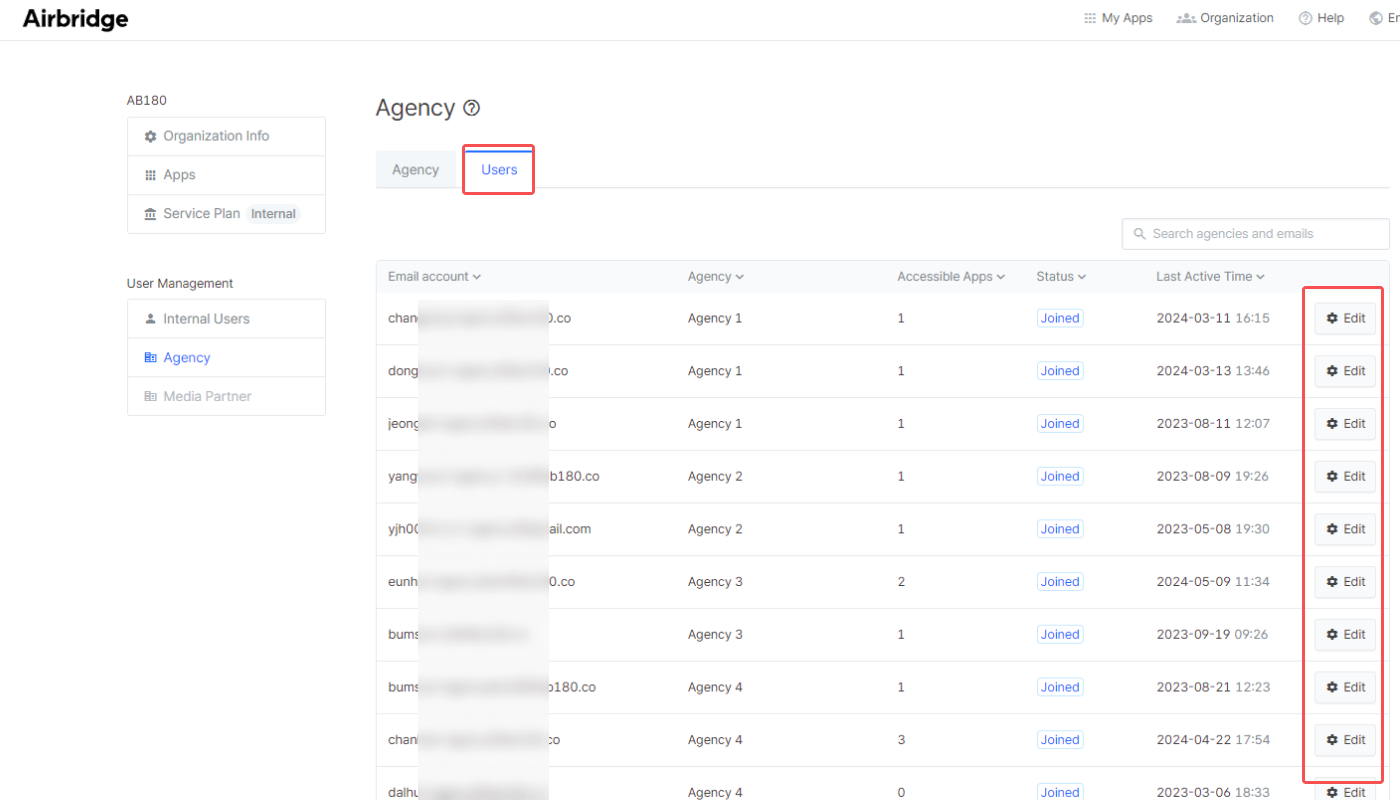
You can view the list of apps granted access to the specific Agency user.

Once an Agency user's app access is revoked, the API token and tracking link API token assigned to the Agency user will expire. Data collected via the tracking links created by the Agency user will remain.
Revoking app access from the [Agency] tab
Click Details to view the list of Agency users with access to a specific app.

Click Delete and select Revoke access to revoke app access of specific Agency users. The user won't be removed from the organization.
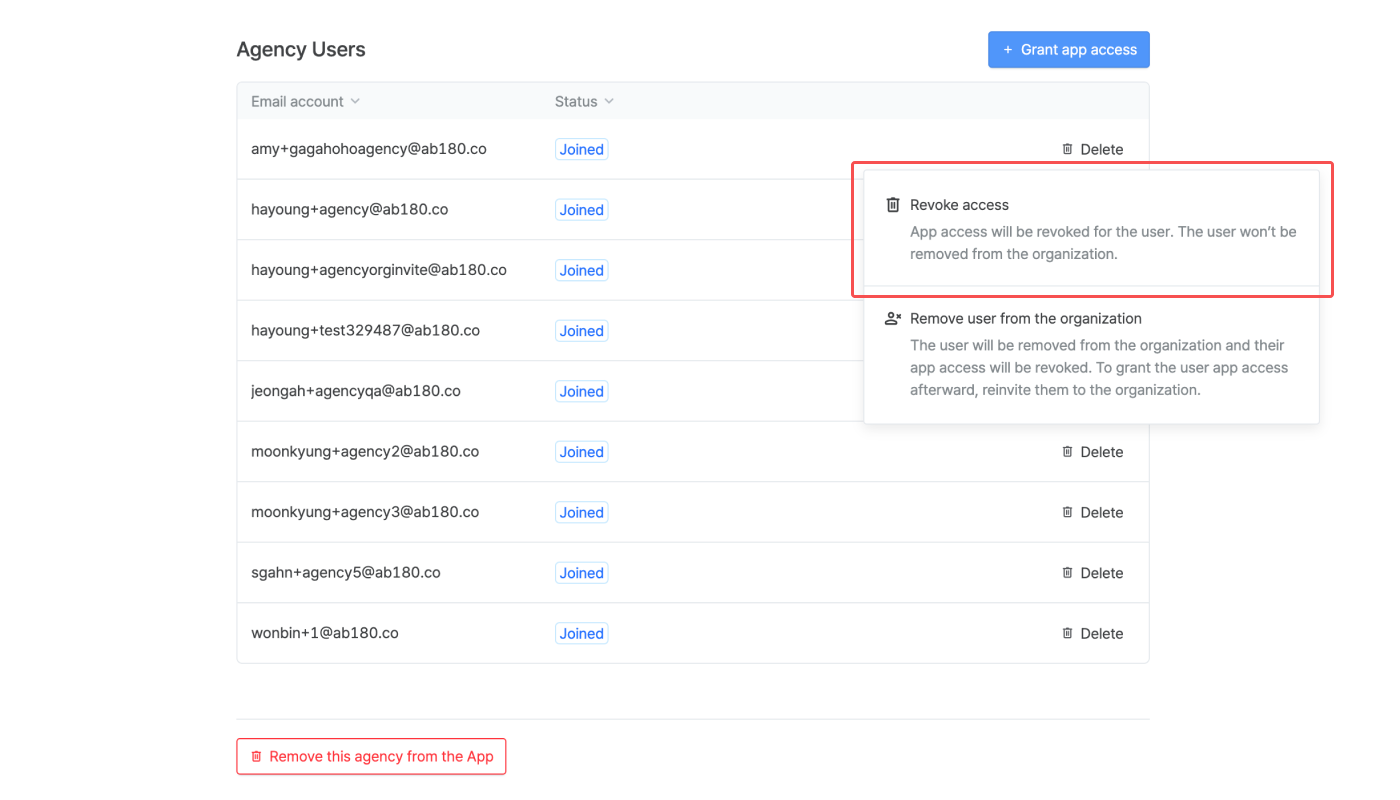
Revoking app access from the [Users] tab
Find the email of the Agency user you want to revoke access from and click Edit.

Click Revoke access.
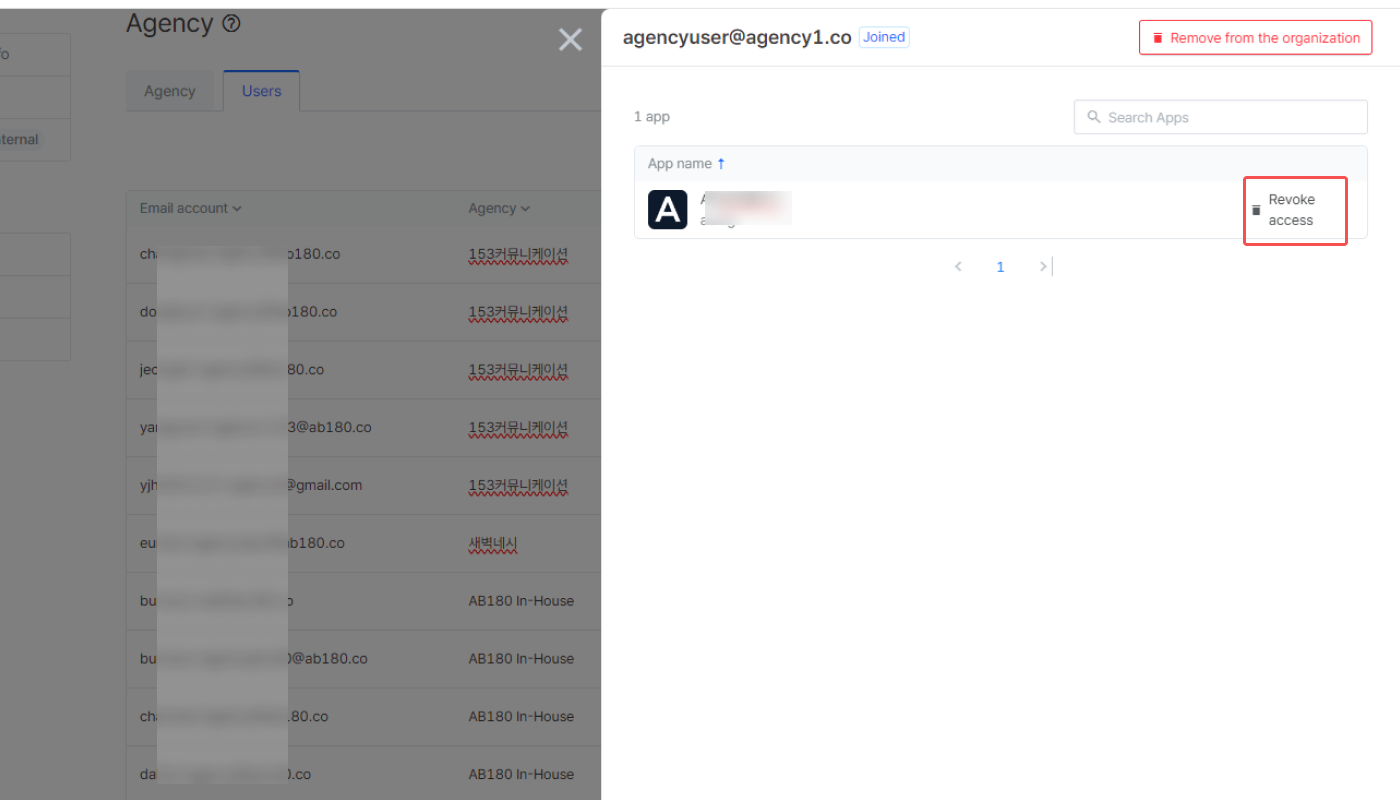
Removing from the [Agency] tab
Click Details to view the list of Agency users with access to a specific app.

Click Delete and select Remove user from the organization. The user will be removed from the organization, and their app access to all apps that are registered with the organization will be revoked. To grant the user app access afterward, reinvite them to the organization.
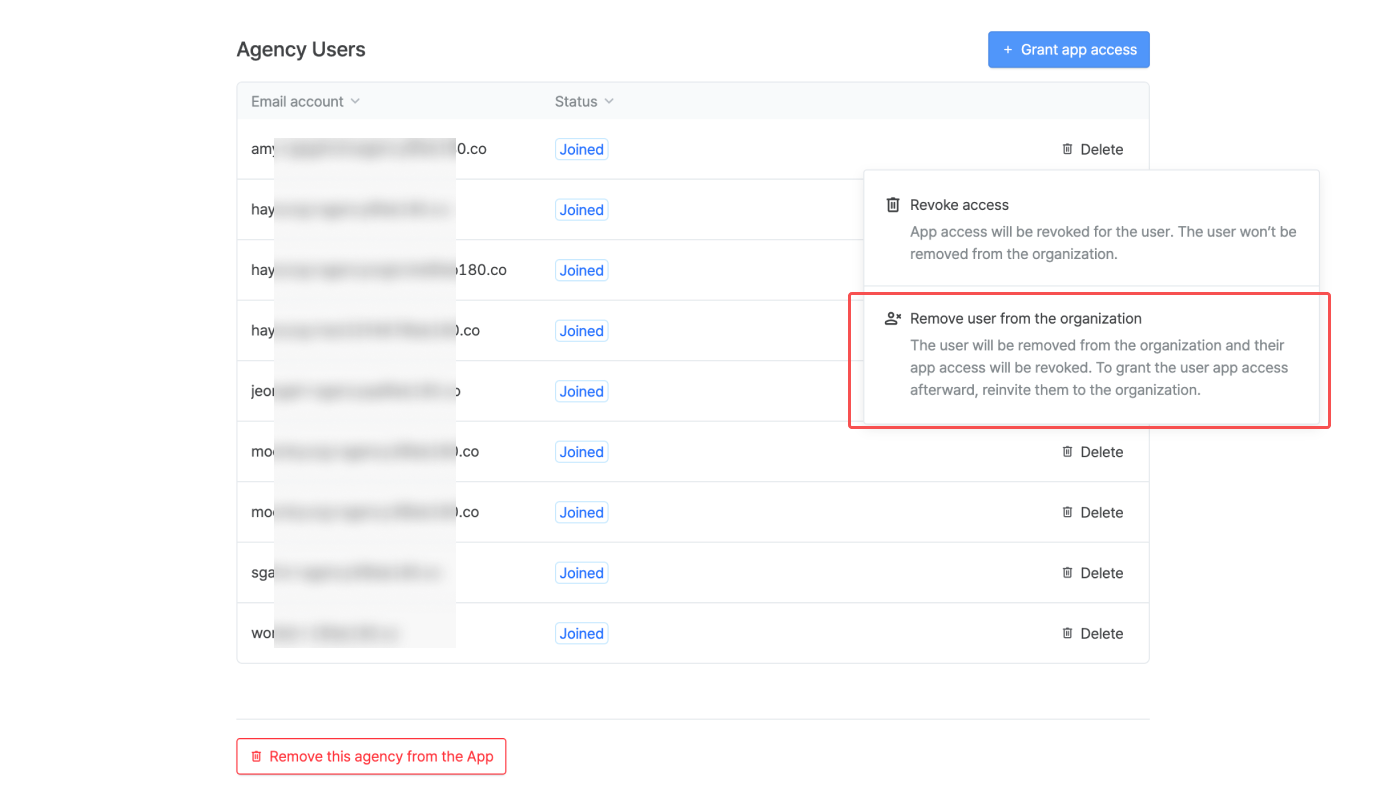
Removing from the [Users] tab
From the [Users] tab, find the email of the Agency user you want to delete and click Edit.

Click Remove from the organization. Once removed, the Agency user can no longer access all apps that are registered with the organization.

Features | Description |
|---|---|
Search | Search for users within the organization. |
Copy | Copy the user accounts. |
Sort | Sort users by account name, number of apps, and last active time. |
Filter | Filter users by organization roles or invitation status. |
Resend invitation | Resend email with the invitation link to a user who was already invited before. |
In the [Organization Info] menu, you can view the organization ID and the display name of your organization.

Organization ID: This is the unique ID assigned by Airbridge to each organization. Regardless of the organization's role, all users can view the organization ID of their organization. The organization ID can’t be changed.
Display name: The display name of the organization is set by the Admin user who created the organization. Any Admin can change it afterward.
Was this helpful?