> ## Documentation Index
> Fetch the complete documentation index at: https://help.airbridge.io/llms.txt
> Use this file to discover all available pages before exploring further.
# Testing Postback Sending
**Note**
This guide is for media partners (ad channels). If you’re an Airbridge user who would like to integrate an ad channel you’re currently using with Airbridge, you can submit a request by navigating to **\[Integrations]>\[Ad Channel Integration]** and clicking **Request integration** in the top right corner.
The postback sending test allows integrated ad channels (media partners) to confirm that Airbridge data is being transmitted properly to the ad channel server through postbacks.
This test is conducted during the initial integration phase with the Airbridge integration team. For ad channels that have not yet integrated with Airbridge, complete the registration form first.
* [Media Partner Registration Form](https://partner.airbridge.io/en/supports/integrations)
## Prerequisites
Before conducting a postback sending test, the following items shall be prepared for a smooth testing experience:
* **Test tracking link:** The Airbridge integration team will provide you with a test tracking link. This link will contain macros, such as \{value}, which you can replace with real values when you run the ad.
* **Test app:** The app that users will download through the ad. The Airbridge integration team will provide the test app, which is named Ablog.
* **Test device:** Only mobile devices can be used for the test. The test device must allow you to verify its device ID.
* **Device ID of the test device:** Prepare the device ID of the mobile device you'll use for the test.
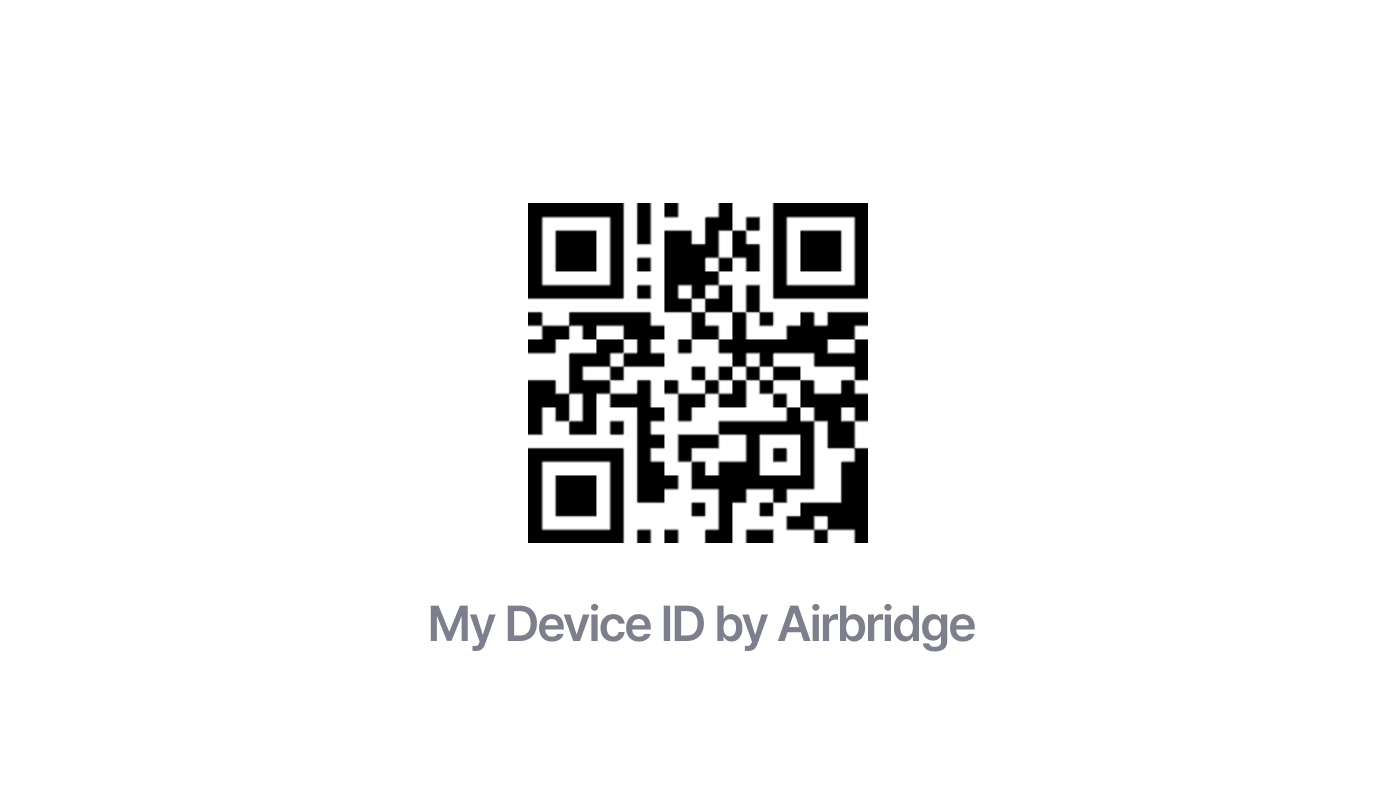
You can easily find the device ID by using the My Device ID app provided by Airbridge.
Download the My Device ID by Airbridge app using the QR code below to find your device ID. The app also shows device information such as the device model and operating system version. The available device ID types vary by operating system, so see the [Identifiers](/en/guides/identifiers) guide.
## Testing Postback Sending
Once the preparation is done, follow the steps below for testing postback sending.
### Input the test tracking link macro
**Note**
If the actual values for device ID and click ID macros are not present, the data transmission may fail for some ad channels. If the postback sending test continues to fail, make sure to input the actual values for the device ID and click ID macro in the test tracking link.
Before conducting the test, input actual values in to the the following parameter macros for a smooth testing experience.
* Click ID: Input the click ID in the supported format.
* Device ID: Input GAID or IDFA depending on the OS of the test device.
Refer to the example below.
Input actual values in the test tracking link macros.
* Input the actual click ID in the supported format in the `click_id={clickid}.`
* Input the actual GAID or IDFA in the `gaid_raw={device_id}` or `ida_raw={device_id}.`
For example, on iOS devices, the test is conducted using tracking links with `click_id`and `ifa_raw.`
* Test Tracking link example: `https://abr.ge/@app_name/channel_name?campaign=test&click_id=12345&gaid_raw={device_id}&ifa_raw=A123B4CD-56E7-8910-1AB2-34567CDEFG89&ip={ip}&routing_short_id=09xgjk&sub_id={sub1}&tracking_template_id=9fe7aa0bd1568df0720c6d3f00341786&user_agent={ua}&ad_type=click`
### Install the test app through the test tracking link
On the test device, click the test tracking link to move to the app store where you can install the test app. The test app name is Ablog and are available on [Google Play Store](https://play.google.com/store/apps/details?id=product.dp.io.ab180blog) and [App Store](https://apps.apple.com/us/app/id1370724782).
### Send in-app events from the test app
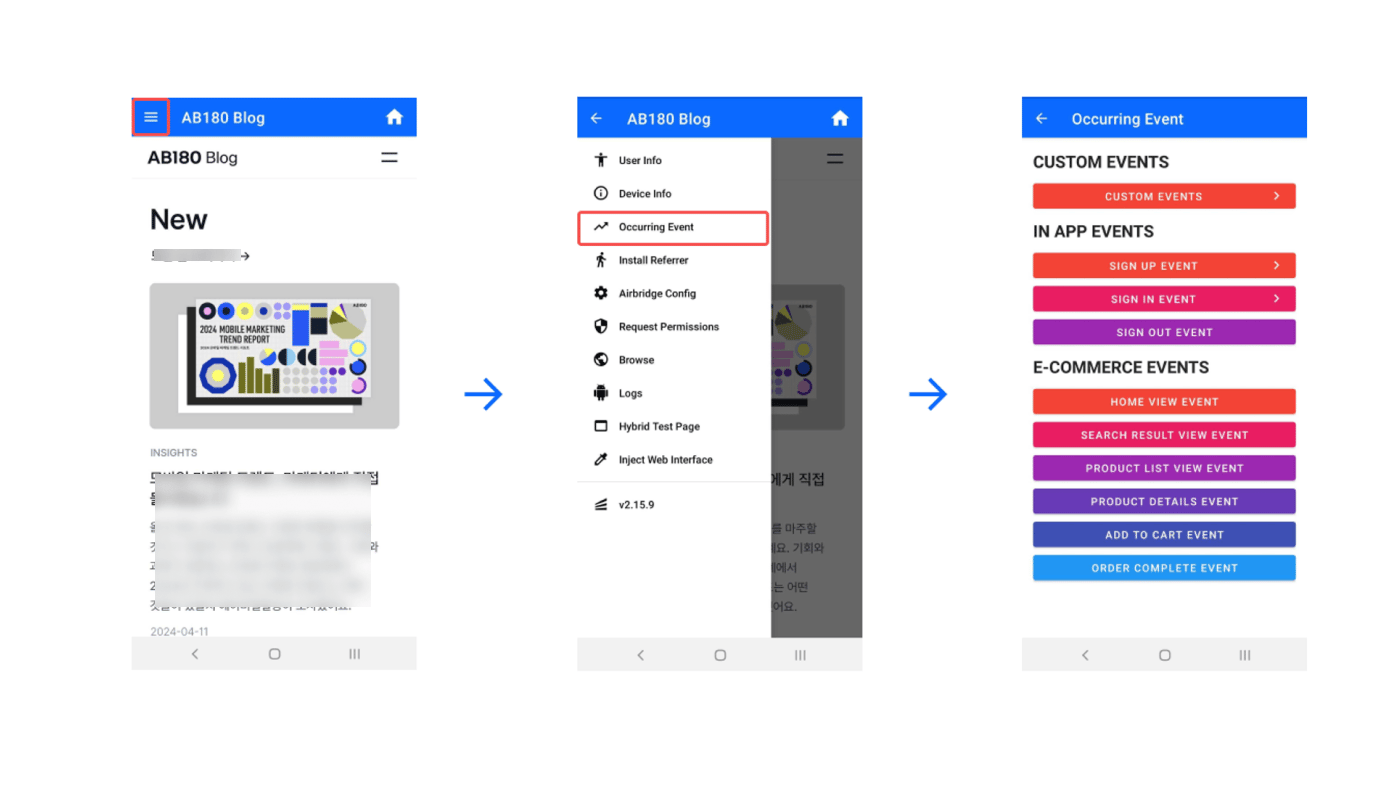
Send in-app events from the Ablog app by following the instructions below.
1. Open the test app.
2. Click the **\[menu]** icon on the top left. If you don't see it, tab multiple times on the top left corner to activate the **\[menu]** icon.
3. Select **Occuring Event** to view the events list.
4. Tab on the events on the list to send them as in-app events.
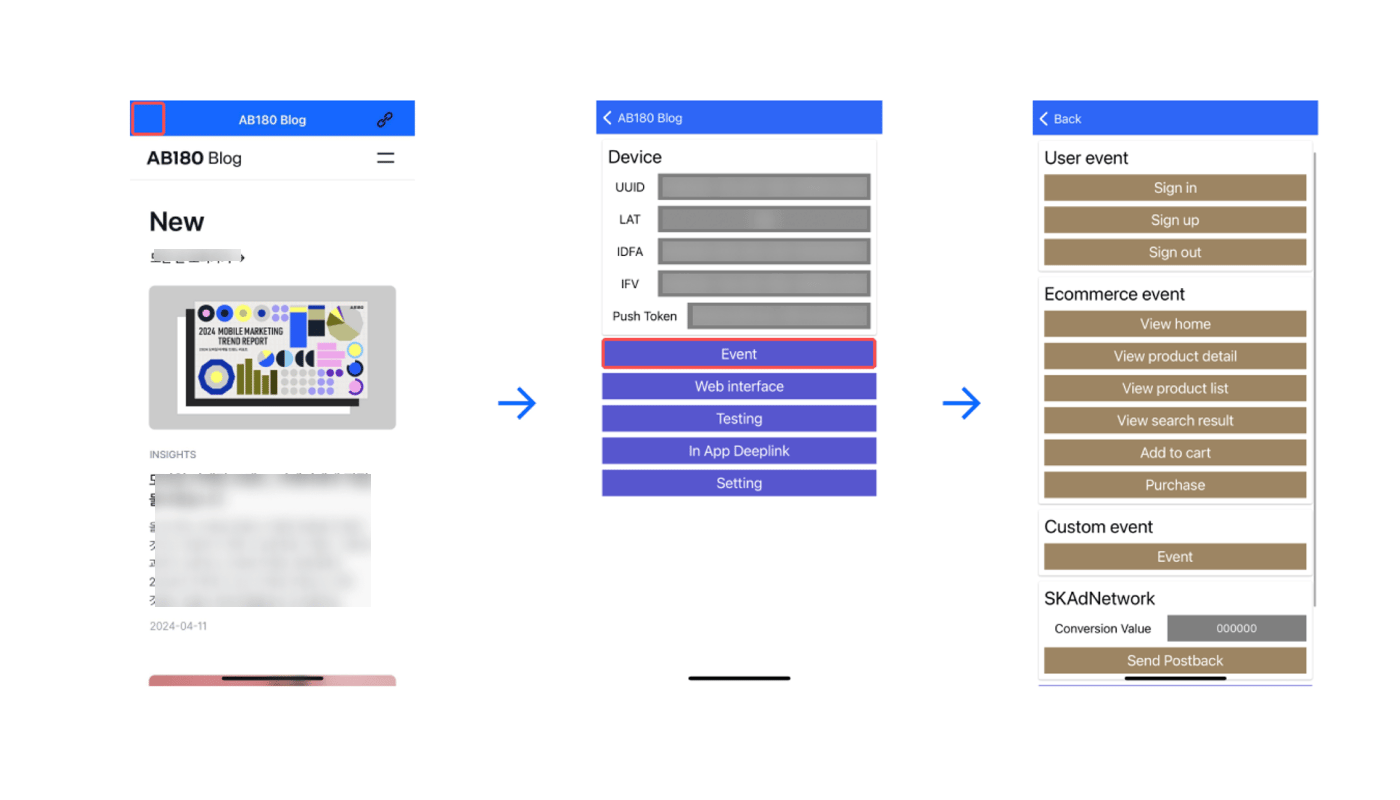
1. Open the test app.
2. Tab muplitple times on the top left to move to the Device page.
3. Tab **Event** to move to the events list.
4. Tab on the events to send them as in-app events.
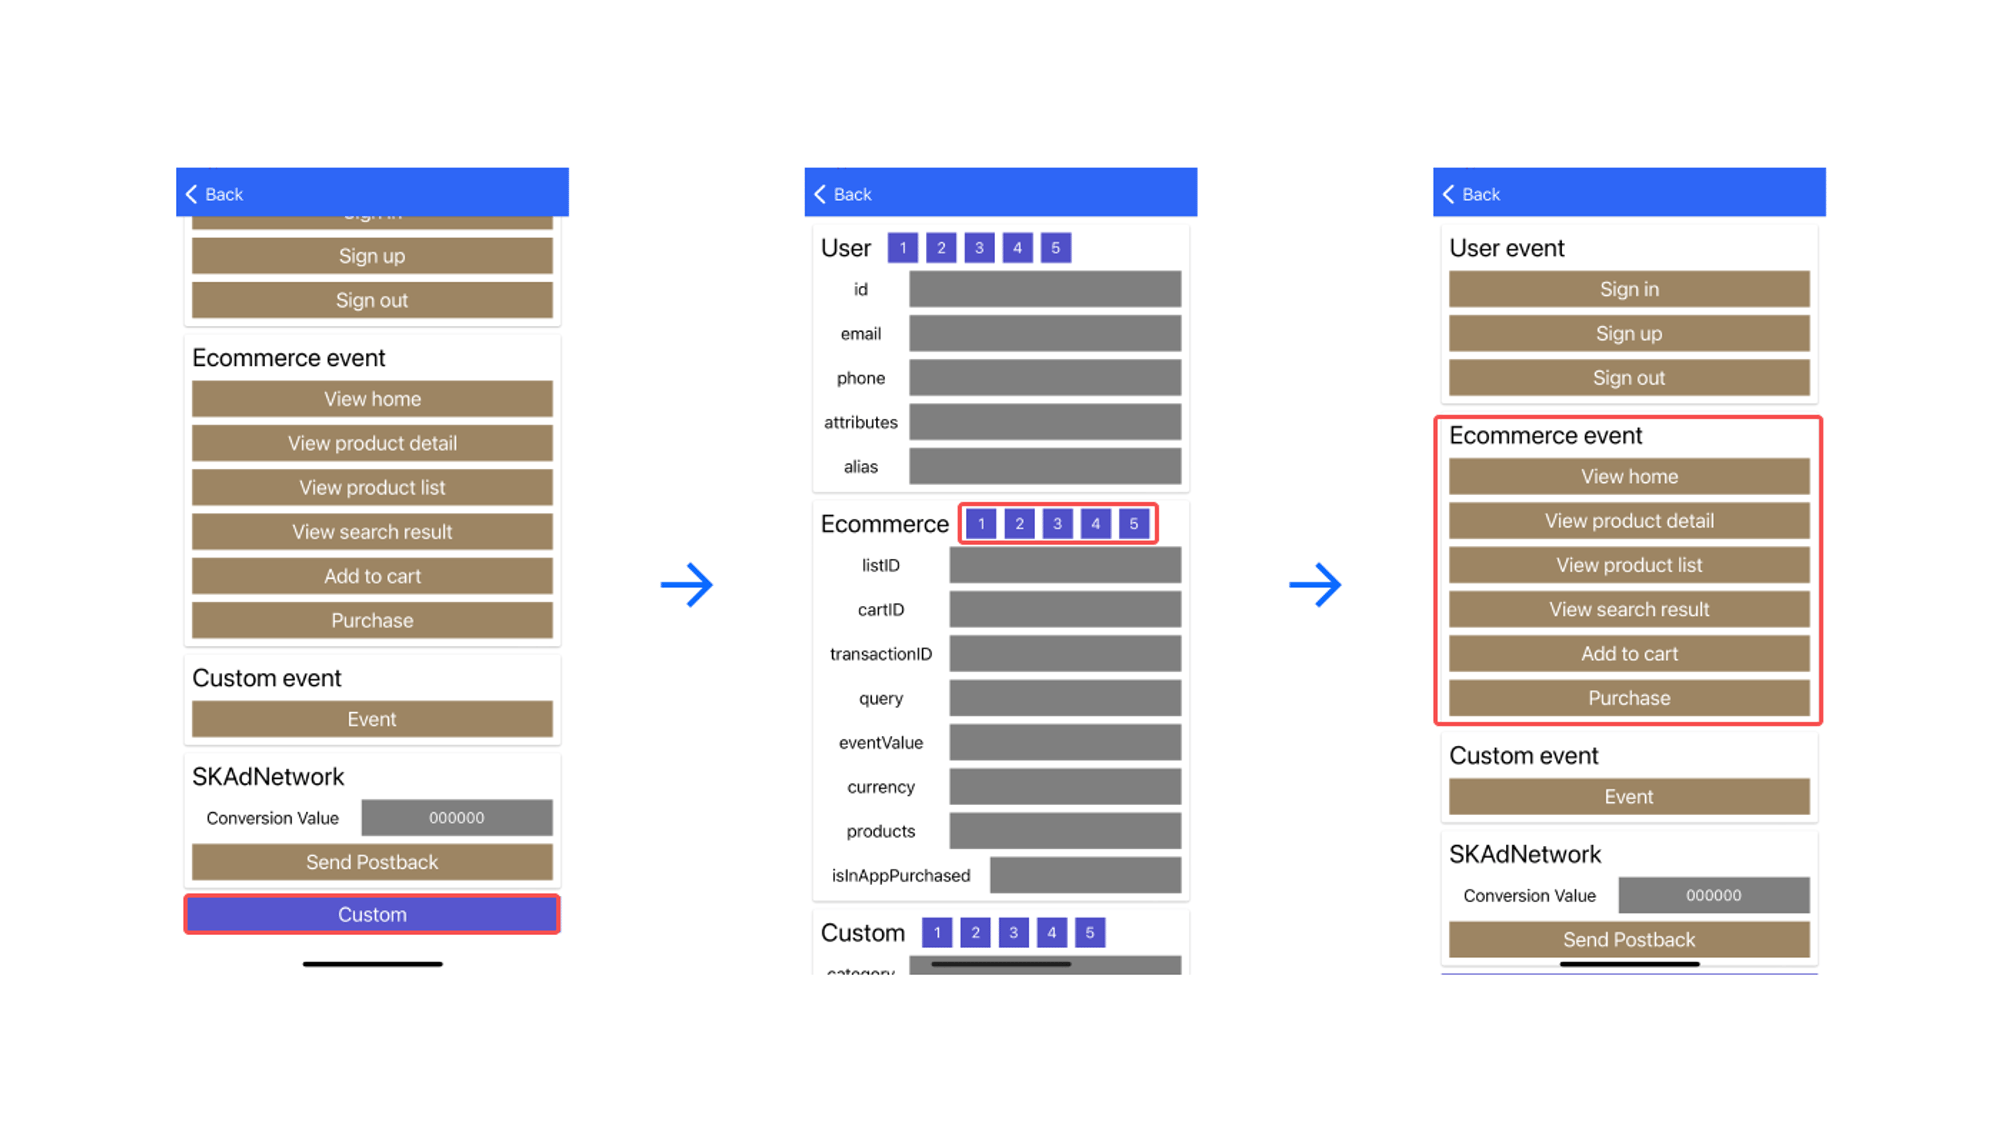
In-app event properties of an e-commerce app can be sent by following the steps below.
1. Tab **Custom** which is at the bottom of the events list.
2. Tab a number from 1 to 5 next to **Ecommerce** and an event property will be input automatically. Tab **Back** to go back to the events list.
3. Tab an event from the **Ecommerce event** list and the event will be sent with the event property input in Step 2.
The following in-app events can be sent for testing postback sending.
* Install (App)
* Open (App)
* Deeplink Open (App)
* Sign-up (App)
* Sign-in (App)
* Sign-out (App)
* Home Screen (App)
* Product Catalog (App)
* Search Results (App)
* Product View (App)
* Add To Cart (App)
* Order Complete (App)
### Check data
**Attention**
The in-app event confirmed in the ad channel may not have been collected by Airbridge. Make sure to check whether the events have been collected in the ad channel and in Airbridge.
After completing in-app event sending, check whether postbacks have been sucessfully sent to the ad channel. Postbacks are sent in real-time, but delays due to network conditions may occur. Check the postback sending status after waiting up to 10 minutes.
* Confirm that the postbacks sent from Airbridge have been successfully received by the ad channel.
* Also confirm that the in-app events sent through postbacks have been successfully collected by Airbridge. Provide the device ID of the test device, along with the date and time of the test, to the Airbridge integration team ([integration@ab180.co](mailto:integration@ab180.co)).
### Reset the device ID
Resetting the device ID is required to conduct postback tests under different conditions.
1. Go to **\[Settings]>\[Google]>\[Ads]**.
2. Tab **Reset advertising ID**.
###### For iOS versions earlier than 14.0
1. Go to **\[Settings]>\[Privacy]**. Tab **Advertising**.
2. Tab **Reset advertising identifier**.
###### For iOS 14.0 and later
1. Go to **\[Settings]>\[Privacy]>\[Tracking].**
2. Switch off the **\[Allow Apps to Request to Track]** toggle and switch on again.
###### For iOS 14.5 and later
1. Go to **\[Settings]>\[Privacy]>\[Tracking].**
2. Switch off the **\[Allow Apps to Request to Track]** toggle and the test app toggle.
3. Tab **Allow** on the modal.
4. Switch on the **\[Allow Apps to Request to Track]** toggle and the test app toggle again.
###### For iOS 17 and later
1. Go to **\[Settings]>\[Privacy]>\[Tracking].**
2. Switch off the **\[Allow Apps to Request to Track]** toggle and the test app toggle.
3. Switch on the **\[Allow Apps to Request to Track]** toggle and the test app toggle again.
 In-app event properties of an e-commerce app can be sent by following the steps below.
1. Tab **Custom** which is at the bottom of the events list.
2. Tab a number from 1 to 5 next to **Ecommerce** and an event property will be input automatically. Tab **Back** to go back to the events list.
3. Tab an event from the **Ecommerce event** list and the event will be sent with the event property input in Step 2.
In-app event properties of an e-commerce app can be sent by following the steps below.
1. Tab **Custom** which is at the bottom of the events list.
2. Tab a number from 1 to 5 next to **Ecommerce** and an event property will be input automatically. Tab **Back** to go back to the events list.
3. Tab an event from the **Ecommerce event** list and the event will be sent with the event property input in Step 2.