> ## Documentation Index
> Fetch the complete documentation index at: https://help.airbridge.io/llms.txt
> Use this file to discover all available pages before exploring further.
# Troubleshooting - Unity SDK (Deprecated)
## Android
The Airbridge Unity SDK for Android initializes automatically through [Content Provider](https://developer.android.com/guide/topics/providers/content-provider-basics). For proper initialization, the following XML tag must be correctly placed in "Project → Plugins → Android → AndroidManifest.xml".
```xml lines theme={"theme":{"light":"github-dark-dimmed","dark":"github-dark-dimmed"}}
```
The Airbridge Unity SDK uses custom activities in "UnityPlayerActivity" to get deep link data. If you are using your own custom activity class, please override the following codes inside your custom activity class.
```java lines theme={"theme":{"light":"github-dark-dimmed","dark":"github-dark-dimmed"}}
@Override
protected void onNewIntent(Intent intent) {
super.onNewIntent(intent);
setIntent(intent);
}
@Override
protected void onResume() {
super.onResume();
AirbridgeUnity.processDeeplinkData(getIntent());
}
```
The "AndroidManifest Merger" that the Airbridge Unity SDK provides is a simple component that merges "Project → Plugins → Android → AndroidManifest.xml" and "Project → Plugins → Airbridge → Android → AndroidManifest.xml". The merge may not satisfy all cases, and you will have to separately merge your "AndroidManifest.xml" file with reference to "Project → Plugins → Airbridge → Android → AndroidManifest.xml".
Due to the addition of Android 11's [`Package Visibility`](https://developer.android.com/training/package-visibility) policy, applications should be properly informed by `` inside the `manifest` file about which packages are used in order to properly interact with another applications.
The Airbridge SDK is compliant with the policy and requires Gradle `v5.6.4+` and Android Gradle Plugin `v3.6.0+` to support the `` tag.
Please refer to this [page](https://docs.unity3d.com/Manual/android-gradle-overview.html) for information on which version of Gradle is used by Unity.
No further action is required because the necessary Gradle and Android Gradle plugin exists.
The following customization is supported only on Unity 2019.3 patch 7 and later.
1. Go to the [Gradle Build Tool](https://gradle.org/releases) page and download Gradle v5.6.4 or higher
2. Go to "Preferences → External Tools" to uncheck "Gradle Installed with Unity (recommended)" and set the path to the downloaded Gradle file as below.
 3. Go to "Project Settings → Player → Android Tab → Publishing Settings → Build" and select the following options:
1. Custom Main Gradle Template
2. Custom Launcher Gradle Template
3. Go to "Project Settings → Player → Android Tab → Publishing Settings → Build" and select the following options:
1. Custom Main Gradle Template
2. Custom Launcher Gradle Template
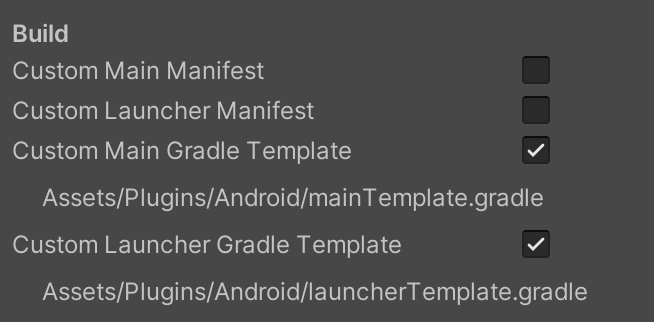 4. Please change both of the following auto-generated files as follows
1. `Assets/Plugins/Android/mainTemplate.gradle`
2. `Assets/Plugins/Android/launcherTemplate.gradle`
```groovy lines theme={"theme":{"light":"github-dark-dimmed","dark":"github-dark-dimmed"}}
buildscript {
repositories {
google()
jcenter()
}
dependencies {
// Must be Android Gradle Plugin 3.6.0 or later. For a list of
// compatible Gradle versions refer to:
// https://developer.android.com/studio/releases/gradle-plugin
classpath 'com.android.tools.build:gradle:3.6.0'
}
}
allprojects {
repositories {
google()
jcenter()
flatDir {
dirs 'libs'
}
}
}
```
1. Go to the [Gradle Build Tool](https://gradle.org/releases) page and download Gradle v5.6.4 or higher.
2. Go to "Preferences → External Tools" to uncheck "Gradle Installed with Unity (recommended)" and set the path to the downloaded Gradle file as below.
3. Go to "Project Settings → Player → Android Tab → Publishing Settings → Build" and select "Custom Gradle Template".
4. Please change both of the following auto-generated files as follows
1. `Assets/Plugins/Android/mainTemplate.gradle`
2. `Assets/Plugins/Android/launcherTemplate.gradle`
```groovy lines theme={"theme":{"light":"github-dark-dimmed","dark":"github-dark-dimmed"}}
buildscript {
repositories {
google()
jcenter()
}
dependencies {
// Must be Android Gradle Plugin 3.6.0 or later. For a list of
// compatible Gradle versions refer to:
// https://developer.android.com/studio/releases/gradle-plugin
classpath 'com.android.tools.build:gradle:3.6.0'
}
}
allprojects {
repositories {
google()
jcenter()
flatDir {
dirs 'libs'
}
}
}
```
1. Go to the [Gradle Build Tool](https://gradle.org/releases) page and download Gradle v5.6.4 or higher.
2. Go to "Preferences → External Tools" to uncheck "Gradle Installed with Unity (recommended)" and set the path to the downloaded Gradle file as below.
3. Go to "Project Settings → Player → Android Tab → Publishing Settings → Build" and select "Custom Gradle Template".
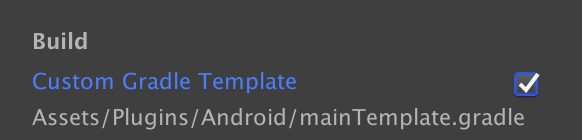 4. Go to the auto generated "Assets/Plugins/Android/MainTemplate.gradle" file and make the following changes.
```groovy lines theme={"theme":{"light":"github-dark-dimmed","dark":"github-dark-dimmed"}}
buildscript {
dependencies {
// Must be Android Gradle Plugin 3.6.0 or later. For a list of
// compatible Gradle versions refer to:
// https://developer.android.com/studio/releases/gradle-plugin
classpath 'com.android.tools.build:gradle:3.6.0'
}
}
```
The following customization is supported only on Unity `2018.4 patch 24` and later
1. Go to the [Gradle Build Tool](https://gradle.org/releases) page and download Gradle v5.6.4 or higher.
2. Go to "Build Settings → Android" and set "Build System" to "Gradle" to use a custom version of Gradle.
4. Go to the auto generated "Assets/Plugins/Android/MainTemplate.gradle" file and make the following changes.
```groovy lines theme={"theme":{"light":"github-dark-dimmed","dark":"github-dark-dimmed"}}
buildscript {
dependencies {
// Must be Android Gradle Plugin 3.6.0 or later. For a list of
// compatible Gradle versions refer to:
// https://developer.android.com/studio/releases/gradle-plugin
classpath 'com.android.tools.build:gradle:3.6.0'
}
}
```
The following customization is supported only on Unity `2018.4 patch 24` and later
1. Go to the [Gradle Build Tool](https://gradle.org/releases) page and download Gradle v5.6.4 or higher.
2. Go to "Build Settings → Android" and set "Build System" to "Gradle" to use a custom version of Gradle.
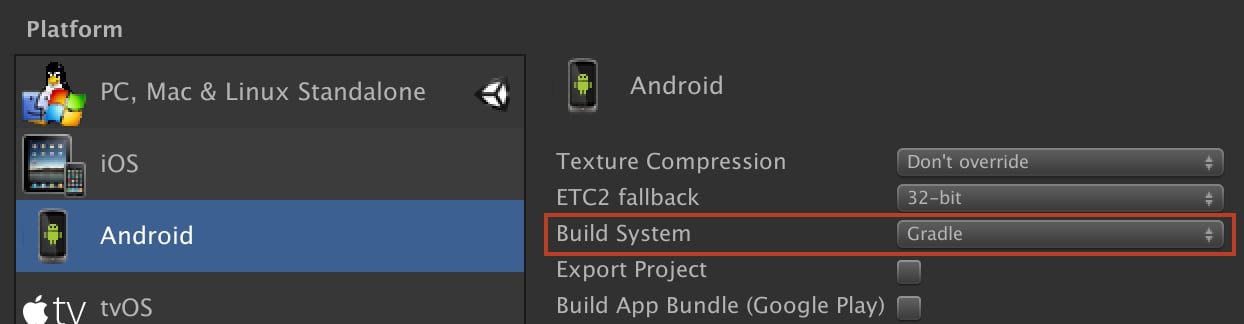 3. Go to "Preferences → External Tools", uncheck "Gradle Installed with Unity (recommended)" and set the path to the downloaded "Gradle" file.
4. Go to "Project Settings → Player → Android Tab → Publishing Settings → Build" and select the "Custom Gradle Template" option.
5. Go to the auto generated "Assets/Plugins/Android/MainTemplate.gradle" file and make the following changes.
```groovy lines theme={"theme":{"light":"github-dark-dimmed","dark":"github-dark-dimmed"}}
buildscript {
dependencies {
// Must be Android Gradle Plugin 3.6.0 or later. For a list of
// compatible Gradle versions refer to:
// https://developer.android.com/studio/releases/gradle-plugin
classpath 'com.android.tools.build:gradle:3.6.0'
}
}
```
Gradle customizations are not supported on these versions of Unity and are not compatible with the necessary changes to support Android 11 (API level 30).
* Reference : [Android SDK Auto Backup](/en/developers/troubleshooting-deprecated-android-sdk-v2#auto-backup)
If you are experiencing build errors caused by overlapping of the Airbridge SDK backup rules and third-party SDK backup rules, please refer to the workaround below.
e.g) If you have an Airbridge SDK backup rule and an Appsflyer SDK backup rule that overlap, you will see the build error below.
```html lines theme={"theme":{"light":"github-dark-dimmed","dark":"github-dark-dimmed"}}
Attribute application@fullBackupContent value=(@xml/appsflyer_backup_rules) from [com.appsflyer:af-android-sdk:6.6.1] AndroidManifest.xml:14:18-73
is also present at [io.airbridge:sdk-android:2.14.0] AndroidManifest.xml:27:18-78 value=(@xml/airbridge_auto_backup_rules).
Suggestion: add 'tools:replace="android:fullBackupContent"' to element at AndroidManifest.xml:7:5-13:19 to override.
```
To resolve this issue, please set up as follows.
1. Create an Android Library project (`Assets/Plugins/Android/res.androidlib`) to store your resource files.
2. Add an `AndroidManifest.xml` file in the created Android Library Project as follows.
```xml lines theme={"theme":{"light":"github-dark-dimmed","dark":"github-dark-dimmed"}}
```
3. Create a `res/xml` folder inside the created Android Library Project.
4. Create a file (e.g. `custom_backup_rules.xml`) within the created xml folder.
5. Add the data backup rules defined by the Airbridge SDK as follows.
```xml lines theme={"theme":{"light":"github-dark-dimmed","dark":"github-dark-dimmed"}}
```
Apply the data backup rules to the Android App Manifest file (`Assets/Plugins/Android/AndroidManifest.xml`) as follows.
```xml lines theme={"theme":{"light":"github-dark-dimmed","dark":"github-dark-dimmed"}}
```
For more guidance, refer to the articles below.
* [Import an Android Library Project](https://docs.unity3d.com/2022.3/Documentation/Manual/android-library-project-import.html)
* [Override the Android App Manifest](https://docs.unity3d.com/2022.3/Documentation/Manual/overriding-android-manifest.html)
## iOS
**Attention**
This troubleshooting guide is for customers who need to migrate an existing AppDelegate-based app to UIScene(SceneDelegate) lifecycle.
##### Symptoms
* When an app built with Xcode 27 is launched, the app may not run properly.
* Airbridge deep link events are not collected even when the app is opened through a scheme deep link or Universal Link.
* The app does not work even though the code was added to `AppDelegate`as shown in the [Initialize SDK](/en/developers/react-native-sdk-v4) and [Collect deep link events in your app](/en/developers/react-native-sdk-v4) developer guide examples.
##### Cause
Apple is moving the app lifecycle from the `UIApplicationDelegate`-only AppDelegate model to the `UIScene`-based SceneDelegate model, and adopting the Scene lifecycle has effectively become required in the latest Xcode and iOS environments.
When an app adopts the Scene lifecycle through `UIApplicationSceneManifest`, the following `AppDelegate` deep link callbacks are **no longer called.**
##### Solution
The required steps depend on the Unity Engine and Airbridge SDK versions. Starting with the Unity Engine versions listed below, Unity generates `UnityScene` when creating an Xcode project.
###### Unity versions that support UnityScene
| **2022.3 LTS** | **`2022.3.72f1`** |
| - | - |
| **6000.0.x (LTS)** | **`6000.0.75f1`** |
| **6000.1.x \~ 6000.3.x** | **Not supported** |
| **6000.4.x** | **`6000.4.0f1`** |
| **6000.5.x** | **`6000.5.0f1`** |
Use one of the listed versions or later. If you are using a version that does not support `UnityScene`, you need to add a separate `UIScene`.
###### Versions that do not support UnityScene
In the SceneDelegate file where a UIScene has been added in Unity, call the public deep link interface in `AirbridgeUnity.h`.
```c# lines theme={"theme":{"light":"github-dark-dimmed","dark":"github-dark-dimmed"}}
#import "AirbridgeUnity.h"
@implementation MyUnityScene
- (void)scene:(UIScene *)scene willConnectToSession:(UISceneSession *)session options:(UISceneConnectionOptions *)connectionOptions {
for (UIOpenURLContext *context in connectionOptions.URLContexts) {
if (context.URL == nil) {
continue;
}
[AirbridgeUnity.deeplink handleURLSchemeDeeplink:context.URL];
}
for (NSUserActivity *userActivity in connectionOptions.userActivities) {
[AirbridgeUnity.deeplink handleUniversalLink:userActivity.webpageURL];
}
}
- (void)scene:(UIScene *)scene openURLContexts:(NSSet *)URLContexts {
for (UIOpenURLContext *context in URLContexts) {
if (context.URL == nil) {
continue;
}
[AirbridgeUnity.deeplink handleURLSchemeDeeplink:context.URL];
}
}
- (void)scene:(UIScene *)scene continueUserActivity:(NSUserActivity *)userActivity {
[AirbridgeUnity.deeplink handleUniversalLink:userActivity.webpageURL];
}
@end
```
###### Versions that support UnityScene
In the `UnityScene` file of the Xcode project generated by Unity, call the public deep link interface in `AirbridgeUnity.h`.
```c# lines theme={"theme":{"light":"github-dark-dimmed","dark":"github-dark-dimmed"}}
#import "UnityScene.h"
#import "UnityAppController.h"
#import "AirbridgeUnity.h"
@implementation UnityScene
- (void)scene:(UIScene *)scene willConnectToSession:(UISceneSession *)session options:(UISceneConnectionOptions *)connectionOptions {
for (UIOpenURLContext *context in connectionOptions.URLContexts) {
if (context.URL == nil) {
continue;
}
[AirbridgeUnity.deeplink handleURLSchemeDeeplink:context.URL];
}
for (NSUserActivity *userActivity in connectionOptions.userActivities) {
[AirbridgeUnity.deeplink handleUniversalLink:userActivity.webpageURL];
}
}
- (void)scene:(UIScene *)scene openURLContexts:(NSSet *)URLContexts {
for (UIOpenURLContext *context in URLContexts) {
if (context.URL == nil) {
continue;
}
[AirbridgeUnity.deeplink handleURLSchemeDeeplink:context.URL];
}
}
- (void)scene:(UIScene *)scene continueUserActivity:(NSUserActivity *)userActivity {
[AirbridgeUnity.deeplink handleUniversalLink:userActivity.webpageURL];
}
@end
```
Airbridge Unity SDK uses `IMPL_APP_CONTROLLER_SUBCLASS` to create a custom AppController. If you are using your own custom AppController, add the following code to your custom AppController.
```objective-c lines theme={"theme":{"light":"github-dark-dimmed","dark":"github-dark-dimmed"}}
- (BOOL) application:(UIApplication*)application
continueUserActivity:(NSUserActivity*)userActivity
restorationHandler:(void (^)(NSArray>* _Nullable))restorationHandler
{
[AUAppDelegate.instance application:application
continueUserActivity:userActivity
restorationHandler:restorationHandler];
return YES;
}
```
* Please remove the "Assets → Plugins → Airbridge → iOS → Delegate → AUAppController.mm" file once the above change has been made.
```html Text lines theme={"theme":{"light":"github-dark-dimmed","dark":"github-dark-dimmed"}}
Error loading /var/containers/Bundle/Application/…/Frameworks/UnityFramework.framework/UnityFramework (…)
: dlopen(/var/containers/Bundle/Application/…/Frameworks/UnityFramework.framework/UnityFramework, …)
: Library not loaded: @rpath/AirBridge.framework/AirBridge
```
If you are using Airbridge Unity SDK version 1.14.1 or 1.16.2, Please update to version 1.16.3.
```html Text lines theme={"theme":{"light":"github-dark-dimmed","dark":"github-dark-dimmed"}}
[!] CocoaPods could not find compatible versions for pod "AirBridge":
In Podfile:
AirBridge (= {MISSING_VERSION})
```
If you can't find a compatible [AirBridge](https://cocoapods.org/pods/AirBridge) version on iOS, execute the command below to update the source repository.
```bash lines theme={"theme":{"light":"github-dark-dimmed","dark":"github-dark-dimmed"}}
pod repo update
pod install --repo-update
```
After updating your source repository, run the `pod search AirBrdige` command to verify that the correct AirBridge version exists in your repository, and then proceed with the iOS build.
3. Go to "Preferences → External Tools", uncheck "Gradle Installed with Unity (recommended)" and set the path to the downloaded "Gradle" file.
4. Go to "Project Settings → Player → Android Tab → Publishing Settings → Build" and select the "Custom Gradle Template" option.
5. Go to the auto generated "Assets/Plugins/Android/MainTemplate.gradle" file and make the following changes.
```groovy lines theme={"theme":{"light":"github-dark-dimmed","dark":"github-dark-dimmed"}}
buildscript {
dependencies {
// Must be Android Gradle Plugin 3.6.0 or later. For a list of
// compatible Gradle versions refer to:
// https://developer.android.com/studio/releases/gradle-plugin
classpath 'com.android.tools.build:gradle:3.6.0'
}
}
```
Gradle customizations are not supported on these versions of Unity and are not compatible with the necessary changes to support Android 11 (API level 30).
* Reference : [Android SDK Auto Backup](/en/developers/troubleshooting-deprecated-android-sdk-v2#auto-backup)
If you are experiencing build errors caused by overlapping of the Airbridge SDK backup rules and third-party SDK backup rules, please refer to the workaround below.
e.g) If you have an Airbridge SDK backup rule and an Appsflyer SDK backup rule that overlap, you will see the build error below.
```html lines theme={"theme":{"light":"github-dark-dimmed","dark":"github-dark-dimmed"}}
Attribute application@fullBackupContent value=(@xml/appsflyer_backup_rules) from [com.appsflyer:af-android-sdk:6.6.1] AndroidManifest.xml:14:18-73
is also present at [io.airbridge:sdk-android:2.14.0] AndroidManifest.xml:27:18-78 value=(@xml/airbridge_auto_backup_rules).
Suggestion: add 'tools:replace="android:fullBackupContent"' to element at AndroidManifest.xml:7:5-13:19 to override.
```
To resolve this issue, please set up as follows.
1. Create an Android Library project (`Assets/Plugins/Android/res.androidlib`) to store your resource files.
2. Add an `AndroidManifest.xml` file in the created Android Library Project as follows.
```xml lines theme={"theme":{"light":"github-dark-dimmed","dark":"github-dark-dimmed"}}
```
3. Create a `res/xml` folder inside the created Android Library Project.
4. Create a file (e.g. `custom_backup_rules.xml`) within the created xml folder.
5. Add the data backup rules defined by the Airbridge SDK as follows.
```xml lines theme={"theme":{"light":"github-dark-dimmed","dark":"github-dark-dimmed"}}
```
Apply the data backup rules to the Android App Manifest file (`Assets/Plugins/Android/AndroidManifest.xml`) as follows.
```xml lines theme={"theme":{"light":"github-dark-dimmed","dark":"github-dark-dimmed"}}
```
For more guidance, refer to the articles below.
* [Import an Android Library Project](https://docs.unity3d.com/2022.3/Documentation/Manual/android-library-project-import.html)
* [Override the Android App Manifest](https://docs.unity3d.com/2022.3/Documentation/Manual/overriding-android-manifest.html)
## iOS
**Attention**
This troubleshooting guide is for customers who need to migrate an existing AppDelegate-based app to UIScene(SceneDelegate) lifecycle.
##### Symptoms
* When an app built with Xcode 27 is launched, the app may not run properly.
* Airbridge deep link events are not collected even when the app is opened through a scheme deep link or Universal Link.
* The app does not work even though the code was added to `AppDelegate`as shown in the [Initialize SDK](/en/developers/react-native-sdk-v4) and [Collect deep link events in your app](/en/developers/react-native-sdk-v4) developer guide examples.
##### Cause
Apple is moving the app lifecycle from the `UIApplicationDelegate`-only AppDelegate model to the `UIScene`-based SceneDelegate model, and adopting the Scene lifecycle has effectively become required in the latest Xcode and iOS environments.
When an app adopts the Scene lifecycle through `UIApplicationSceneManifest`, the following `AppDelegate` deep link callbacks are **no longer called.**
##### Solution
The required steps depend on the Unity Engine and Airbridge SDK versions. Starting with the Unity Engine versions listed below, Unity generates `UnityScene` when creating an Xcode project.
###### Unity versions that support UnityScene
| **2022.3 LTS** | **`2022.3.72f1`** |
| - | - |
| **6000.0.x (LTS)** | **`6000.0.75f1`** |
| **6000.1.x \~ 6000.3.x** | **Not supported** |
| **6000.4.x** | **`6000.4.0f1`** |
| **6000.5.x** | **`6000.5.0f1`** |
Use one of the listed versions or later. If you are using a version that does not support `UnityScene`, you need to add a separate `UIScene`.
###### Versions that do not support UnityScene
In the SceneDelegate file where a UIScene has been added in Unity, call the public deep link interface in `AirbridgeUnity.h`.
```c# lines theme={"theme":{"light":"github-dark-dimmed","dark":"github-dark-dimmed"}}
#import "AirbridgeUnity.h"
@implementation MyUnityScene
- (void)scene:(UIScene *)scene willConnectToSession:(UISceneSession *)session options:(UISceneConnectionOptions *)connectionOptions {
for (UIOpenURLContext *context in connectionOptions.URLContexts) {
if (context.URL == nil) {
continue;
}
[AirbridgeUnity.deeplink handleURLSchemeDeeplink:context.URL];
}
for (NSUserActivity *userActivity in connectionOptions.userActivities) {
[AirbridgeUnity.deeplink handleUniversalLink:userActivity.webpageURL];
}
}
- (void)scene:(UIScene *)scene openURLContexts:(NSSet *)URLContexts {
for (UIOpenURLContext *context in URLContexts) {
if (context.URL == nil) {
continue;
}
[AirbridgeUnity.deeplink handleURLSchemeDeeplink:context.URL];
}
}
- (void)scene:(UIScene *)scene continueUserActivity:(NSUserActivity *)userActivity {
[AirbridgeUnity.deeplink handleUniversalLink:userActivity.webpageURL];
}
@end
```
###### Versions that support UnityScene
In the `UnityScene` file of the Xcode project generated by Unity, call the public deep link interface in `AirbridgeUnity.h`.
```c# lines theme={"theme":{"light":"github-dark-dimmed","dark":"github-dark-dimmed"}}
#import "UnityScene.h"
#import "UnityAppController.h"
#import "AirbridgeUnity.h"
@implementation UnityScene
- (void)scene:(UIScene *)scene willConnectToSession:(UISceneSession *)session options:(UISceneConnectionOptions *)connectionOptions {
for (UIOpenURLContext *context in connectionOptions.URLContexts) {
if (context.URL == nil) {
continue;
}
[AirbridgeUnity.deeplink handleURLSchemeDeeplink:context.URL];
}
for (NSUserActivity *userActivity in connectionOptions.userActivities) {
[AirbridgeUnity.deeplink handleUniversalLink:userActivity.webpageURL];
}
}
- (void)scene:(UIScene *)scene openURLContexts:(NSSet *)URLContexts {
for (UIOpenURLContext *context in URLContexts) {
if (context.URL == nil) {
continue;
}
[AirbridgeUnity.deeplink handleURLSchemeDeeplink:context.URL];
}
}
- (void)scene:(UIScene *)scene continueUserActivity:(NSUserActivity *)userActivity {
[AirbridgeUnity.deeplink handleUniversalLink:userActivity.webpageURL];
}
@end
```
Airbridge Unity SDK uses `IMPL_APP_CONTROLLER_SUBCLASS` to create a custom AppController. If you are using your own custom AppController, add the following code to your custom AppController.
```objective-c lines theme={"theme":{"light":"github-dark-dimmed","dark":"github-dark-dimmed"}}
- (BOOL) application:(UIApplication*)application
continueUserActivity:(NSUserActivity*)userActivity
restorationHandler:(void (^)(NSArray>* _Nullable))restorationHandler
{
[AUAppDelegate.instance application:application
continueUserActivity:userActivity
restorationHandler:restorationHandler];
return YES;
}
```
* Please remove the "Assets → Plugins → Airbridge → iOS → Delegate → AUAppController.mm" file once the above change has been made.
```html Text lines theme={"theme":{"light":"github-dark-dimmed","dark":"github-dark-dimmed"}}
Error loading /var/containers/Bundle/Application/…/Frameworks/UnityFramework.framework/UnityFramework (…)
: dlopen(/var/containers/Bundle/Application/…/Frameworks/UnityFramework.framework/UnityFramework, …)
: Library not loaded: @rpath/AirBridge.framework/AirBridge
```
If you are using Airbridge Unity SDK version 1.14.1 or 1.16.2, Please update to version 1.16.3.
```html Text lines theme={"theme":{"light":"github-dark-dimmed","dark":"github-dark-dimmed"}}
[!] CocoaPods could not find compatible versions for pod "AirBridge":
In Podfile:
AirBridge (= {MISSING_VERSION})
```
If you can't find a compatible [AirBridge](https://cocoapods.org/pods/AirBridge) version on iOS, execute the command below to update the source repository.
```bash lines theme={"theme":{"light":"github-dark-dimmed","dark":"github-dark-dimmed"}}
pod repo update
pod install --repo-update
```
After updating your source repository, run the `pod search AirBrdige` command to verify that the correct AirBridge version exists in your repository, and then proceed with the iOS build.